I glanced briefly at the voltmeter on the instrument panel, but it was in the negative and did not respond to an increase in the speed of the engine, I thought: the belts had come off again (my crankshaft pulley beats in a figure of eight, this happens), so I thought that the pump was not spinning either. I made it home; there were only 150 meters left. I looked - the belts are in place, the generator is turning but there is no voltage. Lately it has been stuck to me not at 3 points, but at two, due to the loss of a fastening bolt in the lower far eye, as a result of which it wobbles quite badly at idle in relation to the engine. Well, apparently something shook in him. In 15 minutes I changed the relay regulator, which is located in the engine compartment on the wing. No changes. I went to dig the Internet and forum.
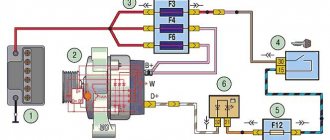
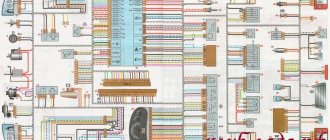
Below is a diagram of checking the charging system on the 402 engine.
Malfunctions of the charging system of group 1-2 GAZ-2410, 3102, -029, -10, 3302 with the ZMZ-402 engine
1. broken contact in the wire from the battery terminal to the power fuse block near the battery - the battery will not charge, but the voltage from the generator will remain for other consumers, the voltmeter will show the voltage of the on-board network
2. the fuse in the battery charging circuit has blown - the battery will not charge, but at the same time the voltage from the generator will remain for other consumers, the voltmeter will show the voltage of the on-board network
3. the contact in the wire from the generator to the power fuse block is broken - the battery will not charge and the voltage in the on-board network will be determined by the battery voltage, the voltmeter will show the battery voltage
4. the contact is broken in the wire that supplies “+” from the ignition switch to the relay-regulator and one of the generator brushes. There will be no charging, the voltmeter will show the battery voltage
5. The contact in the wire from the second brush of the generator to terminal “Ш” of the relay regulator is broken. Charging will not occur, the voltmeter will show battery voltage
6. The relay-regulator has failed - break. Charging will not occur, the voltmeter will show battery voltage
7. there is no electrical contact with the brushes in the brush assembly or brush holder. Charging will not occur, the voltmeter will show battery voltage
8. There is no contact between the brushes and the slip rings on the armature. Charging will not occur, the voltmeter will show battery voltage
9. break in the rotor winding. Charging will not occur, the voltmeter will show battery voltage
10. break in at least one of the phases of the stator winding. Charging will not occur, the voltmeter will show battery voltage
11. At least one of the rectifier unit diodes has failed. Charging will not occur, the voltmeter will show battery voltage
How to check (a control or a tester with a DC voltage measuring scale of at least 15 V can be used to check):
1, 2, 3. control: one end to the battery minus, the other to the wire terminal on the power fuse block - the control should be on, then to the terminal after the power fuse and, finally, to the terminal of the generator with the tester nut: negative terminal of the tester to negative battery, the positive terminal of the tester to the wire terminal on the power fuse block - the tester should show battery voltage, then to the terminal after the power fuse - the tester should show battery voltage and, finally, to the generator terminal with the nut - the tester should show battery voltage
4. disconnect the block from the generator brush holder and the block from the relay regulator, turn on the ignition. Control: one terminal to ground, the second to each of the blocks for each of the two wires. On one of them in each block the control light should light up. We insert the block on the generator into place and check for the presence of “+” on the second terminal in the relay-regulator block. The control should light up, but not at full intensity. This means that faults 5, 7, 8 and 9 are absent. After this, we disconnect the block from the generator again and connect the relay-regulator block. We switch the control with one terminal to “+”, and connect the second terminal to the second terminal of the generator block. The control should light up. This almost certainly means the absence of fault 6 and the complete absence of fault 5. Tester: the negative terminal of the tester is to ground, with the positive terminal of the tester we check for the presence of “+” on one of the wires in each block - the tester should show battery voltage. We insert the block on the generator into place and check for the presence of “+” on the second terminal in the relay-regulator block. The tester should show a voltage slightly lower than the battery voltage. This is explained by the voltage drop across the resistance of the rotor winding. This means that faults 7, 8 and 9 are absent. After this, we disconnect the block from the generator again and connect the relay-regulator block. We disconnect the negative terminal of the tester from ground, connect the positive terminal to the “+” of the battery, and connect the negative terminal of the tester to the second terminal of the generator block. The tester should show the battery voltage. This almost certainly means no fault 6 and no fault 5 at all.
5. The main check is only with a tester: remove the blocks from the relay-regulator and the generator and “ring” the terminals of the blocks among themselves. The test is carried out in resistance measurement mode, the measurement limit is units of ohms. On both wires of the blocks in the corresponding pairs of terminals, the tester should show zero or the resistance of its measuring probes.
Site about SUVs UAZ, GAZ, SUV, CUV, crossovers, all-terrain vehicles
The Gazelle and Sobol cars have two power sources - a battery and a generator. The battery is used to start the engine and to supply 12 V electric current to the starter and other consumers when the engine is not running. When the engine is running, the main source of current is the generator. It provides electric current to all consumers, including the ignition system, and charges the battery.
What to do if the Gazelle and Sable have lost charging, the battery does not recharge, reasons, check the belt, fuse and voltage regulator.
— On the multifunction display of the instrument cluster of Gazelle and Sobol cars produced since 2003 with ZMZ-40524 and UMZ-4218 engines, the voltage value is displayed in intermittent mode.
— The voltmeter needle in the instrument cluster of Gazelle and Sable cars produced before 2003 and Gazelle and Sable produced since 2003 with engines ZMZ-4063, ZMZ-40522, UMZ-4215 is in the left red zone of the scale.
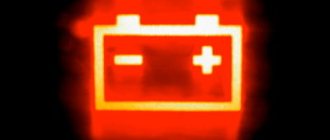
At the same time, the low battery warning light in the instrument cluster lights up. This means that the current does not flow from the generator to the on-board network and the energy reserve of the battery is consumed. This reserve is limited and depends on the battery capacity. If the battery is fully charged, you can drive to the garage without a generator, but it is better to try to fix the problem on the spot.
Check electrical equipment if charging has failed and the battery is not recharged from the generator.
Check to see if the accessory drive belt is broken. If the belt is intact, check its tension. Press the top of the belt with your thumb and see how much it bends. If the deflection is not normal, adjust the tension or replace the accessory drive belt.
If the belt is properly tensioned, check to see if the 90 A fuse link in the fuse block has burnt out. It is located in the engine compartment, where the battery is. This fuse link protects, among other circuits, the generator circuit. If the fuse link is burned out, replace it and start the engine. If the voltage reading on the display is no longer blinking (the voltmeter needle is in the green zone of the scale, the battery discharge indicator light has gone out), then the voltage is normal. You can continue moving.
Do not install fuses with a higher current rating. This may cause damage to electrical equipment and even cause a fire. If the voltage value with the engine running is again displayed intermittently (the voltmeter needle is in the left red zone of the scale, the battery discharge lamp has not gone out), check the wire going from the generator to the “positive” terminal of the battery and to the starter.
Wires may be broken or broken inside the insulation. Their contacts are oxidized or unreliable. Correct the problem and start the engine. If charging current appears, you can continue driving.
If, even after the measures taken, the voltage value with the engine running is again displayed in intermittent mode (the voltmeter needle is in the left red zone of the scale), then the possible cause of the malfunction lies in the generator itself. There may be several reasons, and it is better to eliminate them in a car service center or garage. You just have to hope that the energy reserve in the battery is enough to get to it.
In order to reduce current consumption when driving a car with a faulty generator, if possible, turn off the radio, unnecessary lights, heater fan and other equipment.
Check the voltage regulator if charging is lost and the battery is not recharged from the generator.
Experienced motorists can be advised to check the generator voltage regulator. The operation of the voltage regulator is to continuously automatically change the excitation current of the generator. In such a way that the generator voltage is maintained within specified limits when the generator speed and load changes.
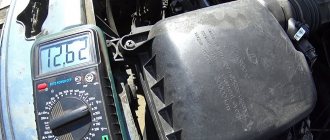
To check the regulator on a Gazelle and Sable car, you need a DC voltmeter with a measurement limit of 15-30 V. After 15 minutes of engine operation at medium speed with the headlights on, measure the voltage between the “B+” terminal of the ZMZ-406 and ZMZ-405 engine generators and ground . Or terminal “30” of the generator of the ZMZ-402 engine and the “ground” of the generator. The voltage should be between 13.6-14.6 V. Depending on the ambient temperature.
If there is a systematic undercharging or overcharging of the battery and the regulated voltage does not fall within the specified limits, the voltage regulator must be replaced.
Source
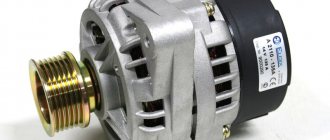
Generator connection diagram for VAZ 2107
Namely, to correctly adjust the operation of the ignition system elements. The voltage should be 13.6 - 14 Volts; when the headlights and heater are turned on, it should not drop below 13.4 Volts. If it starts normally, then the starter and wiring are normal.
On the other hand: I have repeatedly noticed, especially when starting is difficult, on a connected battery the voltage after start is about 15.1 V, which is clearly more than normal.
Replacing the pulley.
The battery becomes a consumer and charging begins, the excitation winding of the generator is powered through the same circuit, only now not from the battery, but from the generator output. If there is a breakdown or break, then the winding will have to be replaced; it’s easier to replace the generator. Check the rotor winding. The rotor shaft rotates in ball bearings installed in the covers. Calling an electrician he knew, he said two cherished words and everything fell into place - Put on the light bulb!
After this procedure, I had to straighten the impeller a little. This device was sufficient for breaking and tightening the nut. How to connect a generator to ZMZ 402
ZMZ 402 generator does not charge
The wire to the battery was ringing. There is voltage going to the generator!
Added after 55 seconds
and if it’s not there, then where to dig?
Added after 16 hours 24 minutes 25 seconds In short, lads, I found the following information about malfunctions:
Malfunctions of the charging system of group 1-2 GAZ-2410, 3102, -029, -10, 3302 with the ZMZ-402 engine
1. broken contact in the wire from the battery terminal to the power fuse block near the battery - the battery will not charge, but the voltage from the generator will remain for other consumers, the voltmeter will show the voltage of the on-board network
2. the fuse in the battery charging circuit has blown - the battery will not charge, but at the same time the voltage from the generator will remain for other consumers, the voltmeter will show the voltage of the on-board network
3. the contact in the wire from the generator to the power fuse block is broken - the battery will not charge and the voltage in the on-board network will be determined by the battery voltage, the voltmeter will show the battery voltage
4. the contact is broken in the wire that supplies “+” from the ignition switch to the relay-regulator and one of the generator brushes. There will be no charging, the voltmeter will show the battery voltage
5. The contact in the wire from the second brush of the generator to terminal “Ш” of the relay regulator is broken. Charging will not occur, the voltmeter will show battery voltage
6. The relay-regulator has failed - break. Charging will not occur, the voltmeter will show battery voltage
7. there is no electrical contact with the brushes in the brush assembly or brush holder. Charging will not occur, the voltmeter will show battery voltage
8. There is no contact between the brushes and the slip rings on the armature. Charging will not occur, the voltmeter will show battery voltage
9. break in the rotor winding. Charging will not occur, the voltmeter will show battery voltage
10. break in at least one of the phases of the stator winding. Charging will not occur, the voltmeter will show battery voltage
11. At least one of the rectifier unit diodes has failed. Charging will not occur, the voltmeter will show battery voltage
How to check (a control or a tester with a DC voltage measuring scale of at least 15 V can be used to check):
1, 2, 3. control: one end to the battery minus, the other to the wire terminal on the power fuse block - the control should be on, then to the terminal after the power fuse and, finally, to the terminal of the generator with the tester nut: negative terminal of the tester to negative battery, the positive terminal of the tester to the wire terminal on the power fuse block - the tester should show battery voltage, then to the terminal after the power fuse - the tester should show battery voltage and, finally, to the generator terminal with the nut - the tester should show battery voltage
4. disconnect the block from the generator brush holder and the block from the relay regulator, turn on the ignition. Control: one terminal to ground, the second to each of the blocks for each of the two wires. On one of them in each block the control light should light up. We insert the block on the generator into place and check for the presence of “+” on the second terminal in the relay-regulator block. The control should light up, but not at full intensity. This means that faults 5, 7, 8 and 9 are absent. After this, we disconnect the block from the generator again and connect the relay-regulator block. We switch the control with one terminal to “+”, and connect the second terminal to the second terminal of the generator block. The control should light up. This almost certainly means the absence of fault 6 and the complete absence of fault 5. Tester: the negative terminal of the tester is to ground, with the positive terminal of the tester we check for the presence of “+” on one of the wires in each block - the tester should show battery voltage. We insert the block on the generator into place and check for the presence of “+” on the second terminal in the relay-regulator block. The tester should show a voltage slightly lower than the battery voltage. This is explained by the voltage drop across the resistance of the rotor winding. This means that faults 7, 8 and 9 are absent. After this, we disconnect the block from the generator again and connect the relay-regulator block. We disconnect the negative terminal of the tester from ground, connect the positive terminal to the “+” of the battery, and connect the negative terminal of the tester to the second terminal of the generator block. The tester should show the battery voltage. This almost certainly means no fault 6 and no fault 5 at all.
To watch online, click on the video ⤵
What if the charging relay malfunctions and charges the battery incorrectly? Using the GAZ-2705 as an example Read more
No charger for your gazelle? there is a solution! More details
Charging gazelle. Car repair of a gypsy chaise. Linen-factory. Kaluga Read more
Everyday life of a sovkovod. No charging. Gas 2410 dvs 402 Read more
Charging, Volga 402 engine Read more
WEAK CHARGING? SOLUTION IN 5 MINUTES AND THE GENERATOR WILL BE LIKE NEW. More details
Low voltage on the gazelle generator Read more
Low battery charge | ZMZ 406 More details
How to increase the charging current on a gazelle is one way. More details
Replacing the Gazelle Volga voltage relay with a three-level voltage regulator relay Read more
How to increase the voltage in a GAZelle car Read more
How to check the generator on a car. Basic malfunctions. Simply about the complex Read more
Never do this and there will be no problems. And if it's already done, here's how you can detect it. More details
we increase the voltage of the generator VAZ 2110-2111-2112 Priora Kalina, etc. Read more
Reasons for the battery not charging. More details
Diagnostics and repair of Generator VAZ, Gazelle, Volga, Sable, Lada, Priora Read more
The generator does not charge. Bad charging. Generator repair. More details
Quick check of the generator outside the car Read more
How to increase generator voltage Read more
Weak charging gazelle 402 engine
I glanced briefly at the voltmeter on the instrument panel, but it was in the negative and did not respond to an increase in the speed of the engine, I thought: the belts had come off again (my crankshaft pulley beats in a figure of eight, this happens), so I thought that the pump was not spinning either. I made it home; there were only 150 meters left. I looked - the belts are in place, the generator is turning but there is no voltage. Lately it has been stuck to me not at 3 points, but at two, due to the loss of a fastening bolt in the lower far eye, as a result of which it wobbles quite badly at idle in relation to the engine. Well, apparently something shook in him. In 15 minutes I changed the relay regulator, which is located in the engine compartment on the wing. No changes. I went to dig the Internet and forum.
Below is a diagram of checking the charging system on the 402 engine.
Malfunctions of the charging system of group 1-2 GAZ-2410, 3102, -029, -10, 3302 with the ZMZ-402 engine
1. broken contact in the wire from the battery terminal to the power fuse block near the battery - the battery will not charge, but the voltage from the generator will remain for other consumers, the voltmeter will show the voltage of the on-board network
2. the fuse in the battery charging circuit has blown - the battery will not charge, but at the same time the voltage from the generator will remain for other consumers, the voltmeter will show the voltage of the on-board network
3. the contact in the wire from the generator to the power fuse block is broken - the battery will not charge and the voltage in the on-board network will be determined by the battery voltage, the voltmeter will show the battery voltage
4. the contact is broken in the wire that supplies “+” from the ignition switch to the relay-regulator and one of the generator brushes. There will be no charging, the voltmeter will show the battery voltage
5. The contact in the wire from the second brush of the generator to terminal “Ш” of the relay regulator is broken. Charging will not occur, the voltmeter will show battery voltage
6. The relay-regulator has failed - break. Charging will not occur, the voltmeter will show battery voltage
7. there is no electrical contact with the brushes in the brush assembly or brush holder. Charging will not occur, the voltmeter will show battery voltage
8. There is no contact between the brushes and the slip rings on the armature. Charging will not occur, the voltmeter will show battery voltage
9. break in the rotor winding. Charging will not occur, the voltmeter will show battery voltage
10. break in at least one of the phases of the stator winding. Charging will not occur, the voltmeter will show battery voltage
11. At least one of the rectifier unit diodes has failed. Charging will not occur, the voltmeter will show battery voltage
How to check (a control or a tester with a DC voltage measuring scale of at least 15 V can be used to check):
1, 2, 3. control: one end to the battery minus, the other to the wire terminal on the power fuse block - the control should be on, then to the terminal after the power fuse and, finally, to the terminal of the generator with the tester nut: negative terminal of the tester to negative battery, the positive terminal of the tester to the wire terminal on the power fuse block - the tester should show battery voltage, then to the terminal after the power fuse - the tester should show battery voltage and, finally, to the generator terminal with the nut - the tester should show battery voltage
4. disconnect the block from the generator brush holder and the block from the relay regulator, turn on the ignition. Control: one terminal to ground, the second to each of the blocks for each of the two wires. On one of them in each block the control light should light up. We insert the block on the generator into place and check for the presence of “+” on the second terminal in the relay-regulator block. The control should light up, but not at full intensity. This means that faults 5, 7, 8 and 9 are absent. After this, we disconnect the block from the generator again and connect the relay-regulator block. We switch the control with one terminal to “+”, and connect the second terminal to the second terminal of the generator block. The control should light up. This almost certainly means the absence of fault 6 and the complete absence of fault 5. Tester: the negative terminal of the tester is to ground, with the positive terminal of the tester we check for the presence of “+” on one of the wires in each block - the tester should show battery voltage. We insert the block on the generator into place and check for the presence of “+” on the second terminal in the relay-regulator block. The tester should show a voltage slightly lower than the battery voltage. This is explained by the voltage drop across the resistance of the rotor winding. This means that faults 7, 8 and 9 are absent. After this, we disconnect the block from the generator again and connect the relay-regulator block. We disconnect the negative terminal of the tester from ground, connect the positive terminal to the “+” of the battery, and connect the negative terminal of the tester to the second terminal of the generator block. The tester should show the battery voltage. This almost certainly means no fault 6 and no fault 5 at all.
Troubleshooting
Let's look at the most common reasons why the battery of GAZ cars with ZMZ 402, 405 and 406 engines cannot be charged, and we will also tell you what can be done in each specific case.
Checking belt tension
Over time, the drive belt can stretch and begin to slip. To check its tension, you need to apply a force equal to 40 N (4 kgf) to the middle of its upper section. In this case, the belt should bend by 8-10 mm.
To adjust the belt tension on a GAZ car with a 402 engine, you need to:
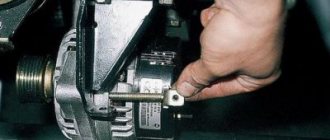
using a wrench, loosen the two bolts that secure the generator to the bracket;
loosen the bolt securing the adjusting bar;
Using a wrench, loosen the adjusting bolt;
- increase the belt tension by turning the generator in the direction opposite to where the engine cylinder block is located;
- tighten the adjusting bolt and check the tension; if it is within the normal range, tighten all the other bolts.
On machines with a ZMZ-406 engine under a load of 80 N (8 kgf), the deflection should be 15 mm. To achieve this you need:
using a wrench, loosen the tension roller bolt;
tension the belt by turning the adjusting bolt clockwise.
Wiring problems
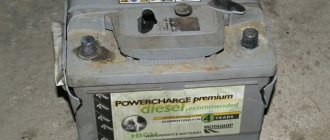
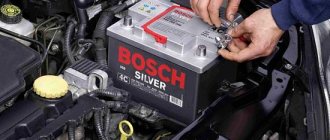
Sometimes the reason why charging fails can be a bad contact. The most common cause of contact failure is oxidation of the battery terminals. To clean them you need:
disconnect the wires from the battery;
wipe the battery;
- prepare a cleaning liquid (dilute 30 g of soda in 0.5 liters of water);
- soak a toothbrush in the prepared liquid and clean the terminals;
clean the contacts from the cleaning liquid and wipe them with a dry cloth;
connect the wires to the battery.
How to check the generator
Without removing the generator, you can check the rotor winding for an open circuit. To do this, remove the brush assembly, set the ohmmeter measurement limit to 10 Ohms and measure the electrical resistance of the rotor. It should be between 2.5 and 3 ohms.
To check the generator after removal, perform the following steps:
- connect the battery negative to the generator housing;
- we connect the positive terminal to the rotor brushes;
- We connect one output of the control light to the negative terminal of the battery, and the second to the power output of the generator.
Now when the generator pulley rotates, the light should light up.
Video of a quick check of the generator:
Diagnostics of the relay regulator
To check the relay regulator, you need to start the car engine and turn on the headlights. After 25 minutes, you need to measure the voltage between terminal “B+” (for motors ZMZ 405 and 406) or 30 (for ZMZ 402) of the generator and ground. The voltage should be in the range from 13.6 to 14.6 V. If it goes beyond these limits, then the regulator does not perform its functions.
You can see another way to check a relay regulator removed from a car in the video:
Currently reading:
Charging lost on Niva: main reasons and repair instructions for all models
Why the charger on the VAZ 2107 disappeared - we look for and fix problems
There is no charging on the VAZ 2114 - the main reasons and ways to eliminate them
How to repair a computer power supply with your own hands
Why won't my laptop turn on without a battery?
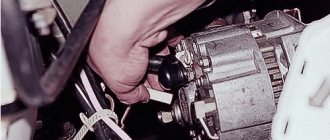
Repair GAZ 3110 (Volga): Checking and replacing generator brushes
You can check and replace the brushes without removing the generator from the car.
| EXECUTION ORDER | |
| 1. Disconnect the wire from the negative terminal of the battery. | |
| 2. Disconnect block 1 with wire from the brush holder terminal. Unscrew two screws 2 and remove brush holder 3 from the generator. | |
| 3. Check the ease of movement of the brushes in the brush holder. If the brushes are jammed, you need to remove the two mounting screws and remove the brush holder cover. Clean the brushes and clean the holes in the brush holder. If it is impossible to achieve the required result, replace the brush holder assembly or brushes. Brushes with chips, cracks or other defects must also be replaced. | |
| 4. Check the amount of protrusion of the brushes from the brush holder. If the value “a” of the protrusion of the brushes in a free state is less than 8 mm, replace the brush holder assembly or brushes. |
Consumables
The most important point for a GAZelle owner is that you need to train yourself to treat electrical components as consumables. The Russian mentality “it’s worth it - don’t touch it” is completely unjustified in this case.
Buy modern wires - their price is comparable to 10 liters of gasoline, and you will get much more benefits