02/28/2022 1,841 VAZ 2109
Author: Ivan Baranov
The gas distribution mechanism of car engines is often equipped with a low-noise belt drive, which is subject to wear and is a consumable item. You can replace the timing belt on a VAZ 2109 yourself, without going to a service station.
[Hide]
When does a timing belt need to be replaced?
The manufacturer has determined the frequency of replacing the camshaft drive belt on the VAZ 2109 every 75 thousand km. However, car owners prefer not to bring the mileage to the specified value, performing repairs after 50-60 thousand km. This is due to the operation of equipment under conditions of temperature changes, as well as due to the unstable quality of components.
To be on the safe side, it is recommended to regularly inspect the condition of the belt. The procedure is carried out annually or after 10-12 thousand kilometers. To carry out inspection, it is necessary to remove the plastic drive cover.
The belt must be replaced in the following cases:
- when abrasions are detected;
- in the presence of tears and delaminations;
- when oiling occurs (it is additionally required to detect and eliminate the source of the engine oil leak).
How to change the belt on a VAZ 2109?
To replace the camshaft belt on a VAZ 2109, an inspection hole and special tools are not required. The owner is able to complete the work independently within 2-3 hours. To carry out repairs, you need to purchase spare parts - a belt and a tension roller.
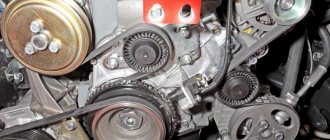
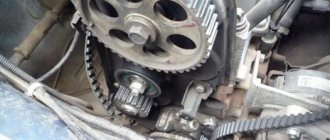
Timing diagram on a VAZ 2109 engine
The diagram shows the nodes:
- 1 - crankshaft gear;
- 2 — pump gear;
- 3 - tensioner;
- 4 — bracket with position mark;
- 5 - camshaft gear;
- 6 — belt;
- 7 - the letters A, B, C and D indicate marks on the gears and housing.
Tools and materials
Before changing parts, you will need to prepare:
- a set of wrenches or sockets (with sizes 8, 10, 17 and 19 mm);
- a screwdriver with a thick flat blade;
- a key for turning the tension roller (factory or homemade);
- spark plug key;
- marker for marking parts;
- rags for wiping the lid;
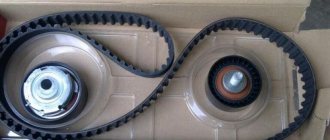
- camshaft drive belt;
- tension roller.
If a special wrench is not available, the roller can be installed using two suitable pins (for example, nails or bolts) and pliers. The pins are inserted into the guide holes and turned with pliers.
Belt selection
When purchasing a belt, you must pay attention to the manufacturer. According to reviews from service stations and owners, products from Gates and Contitech factories have the optimal price-quality ratio. It is recommended to install Gates tension rollers with a single row ball bearing and a working part consisting of two segments.
Gates video appearance
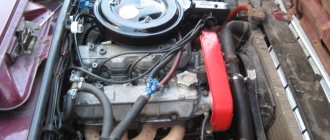
Instructions for replacing the belt on a car with a carburetor engine
To ensure smooth removal of the belt on a VAZ 2109 engine with a carburetor, you must:
- Place the machine in a convenient place (garage or open area). Shift into gear and apply the parking brake.
- Turn the steering wheel to the right until it stops, freeing access to the right mudguard.
- Remove the engine splash guard on the right side. The parts are fastened with 8 mm wrench bolts. A number of owners dismantle only the fastenings along the lower part of the arch and bend the shield to the side, providing access to the crankshaft pulley.
- Loosen the nut of the lower mounting of the generator to the engine (with a 19 mm wrench).
- Release the top mounting point of the generator (by 17 mm). Move the assembly to the side, reducing the tension on the rotor drive belt.
- Remove the belt from the pulleys. Some owners do not use this method of removing the part, dismantling it when removing the pulley from the crankshaft.
- Unscrew the three bolts securing the plastic protective casing to the engine. The operation is performed with a 10 mm wrench. The fastening design has spacer bushings placed under the bolts.
- Remove the casing by pulling it up. Wipe the inner surface from dirt with a rag.
- Remove the rubber cover from the inspection hatch of the gearbox housing. The plug is located above the engine flywheel.
- Insert a screwdriver into the resulting hole to secure the flywheel and crankshaft of the engine.
- Unscrew the crankshaft pulley mounting bolt (19 mm). Due to the large tightening torque, it is necessary to use an extension that fits onto the wrench or wrench. When unscrewing the nut, cases of the screwdriver falling out have been noted, so at this stage it is recommended to seek the help of a second person.
- Remove the pulley from the shaft. Check the condition of the sealing gland. If the slightest oil leakage is detected, the part must be replaced. If you leave the old oil seal, there is a risk of oil getting onto the surface of the belt, which leads to its destruction.
- Screw the bolt into place.
Removing the old belt
Sequence of removing the old part:
- Unscrew the spark plugs from the cylinders, which will make it easier to turn the crankshaft.
- Rotate the crankshaft by the pulley bolt and align the marks on the gears and the housing. It is recommended to perform several revolutions of the shaft to ensure correct valve timing. The accuracy of the alignment will further allow you to correctly set the phases.
- Mark with a marker the relative position of the belt on all gears. The mark is applied simultaneously to the belt itself and the gear.
- Unscrew the tension roller mounting nut with a 17 mm wrench (0.5-1.0 turn).
- Loosen the belt tension by turning the roller with a wrench or pins and pliers.
- Remove the old belt from the engine.
- Attach the old part to the new one and transfer the marks. Clamps or clips are used to secure the parts together.
- Remove the tension roller. It is recommended to change the unit together with the belt, regardless of the condition.
Installing a new belt
Installation of new parts consists of the following steps:
- Place the new tensioner in its original place.
- Place the belt on the gears, following the marks. If position adjustment is required, it is performed by turning the crankshaft clockwise at a small angle.
- Rotate the tension roller to ensure belt tension.
- Tighten the roller fastening to a torque of 40-42 N/m.
After installing the parts in place, some owners check the alignment of the gears. Due to distortions and beatings, premature destruction and breakage of the belt occurs, as well as its slipping. One of the reasons may be wear of the pump bearings, which is determined by the shaft rocking by the gear. If play is detected, the pump must be replaced, since in addition to belt destruction, there is a risk of coolant leakage.
A common cause of runout is deformation of the roller mounting stud, which occurs when the nut is tightened. The stud can be replaced with a new one, but self-made adjusting washers can be installed. The material for parts shaped like a semicircle is tin cans. Half rings are placed under the tensioner depending on the direction of bending of the stud.
Places for installing half rings
Another reason could be the low quality of the video. This is especially true for parts from unknown manufacturers. When purchasing, it is recommended to check the bearing runout and the evenness of the running surface. The bearing must be opened (remove the seal) and fill the cavity with additional lubricant (Litol-24). Such manipulation will extend the life of the unit and reduce operating noise.
Checking timing marks
Since the timing circuit is simple, the marks are checked as follows:
- Rotate the crankshaft two times by hand.
- Check the alignment of the marks and the belt tension. If a phase shift occurs, you will have to repeat the procedure for installing and tensioning the belt.
- If the marks match, it is necessary to reinstall the parts.
Replacement photo gallery
The photos show some of the steps to replace a timing belt.
Removing the cover mounting bolts Removing the cover from the engine Plug on the gearbox housing Unscrewing the crankshaft pulley bolt Removing the pulley Aligning the mark on the camshaft gear Loosening the belt tension Removing the belt from the gears Marking the crankshaft Tensioning the belt with a roller
Instructions for replacing the belt on a car with an injection engine
The injector was installed on only one type of “nine” engine - with a cylinder displacement of 1.5 liters. The use of a fuel injection system did not cause any adjustments to the camshaft drive pattern. The procedure for replacing the timing belt on a VAZ 2109 with an injection engine is practically no different from the list of work on a carburetor car.
The difference is the removal of the old belt, which will require:
- Remove the crankshaft position sensor located next to the pulley from the engine. To dismantle, you need to unfasten the wiring plug and then unscrew the sensor mounting bolt. After this, the sensor is removed from the guide hole.
- To loosen the tension of the auxiliary drive belt, you need to unscrew the M13 nut installed on the generator.
The intricacies of replacing the timing belt on an injection machine are shown in the video from the Alex ZW channel.
There are also several differences when reassembling:
- The crankshaft pulley needs to be installed accordingly. To do this, you need to set the top dead center in the first cylinder - according to the mark on the flywheel and on the crankcase. In this case, the mark of the camshaft gear will coincide with the notch on the plate. The installed pulley should be located opposite the sensor with the beginning of the 20th tooth, counted from the two missing ones.
- The gap between the sensor and the pulley should be 0.4-1.0 mm.
- After completing the assembly, start and check the operation of the engine.
Check points on the pulley
Checking the timing belt tension
With the correct belt tension, the long leg should rotate 90º using the thumb and index finger. The test should not require much physical effort to complete. When retightening, additional loads occur on the bearings of the pump and tension roller, which damage them. Excessive tension is also harmful to the belt itself, which can break while the engine is running.
Aligning marks
In order for the engine to work after replacement, it is necessary to set the timing marks. If the belt tensioner roller is noisy, it is better to replace it. Although it is better to do this in any case, so that no problems arise during the life of the belt. But if this is not possible, use a 17 wrench to loosen the nut holding it in order to loosen the tension for subsequent removal of the belt. We find a mark on the main camshaft sprocket and align it with the mark on the cover. To align the marks, unscrew the bolt holding the camshaft sprocket, align the timing belt marks, and then tighten it again.
After this, we align the marks on the crankshaft. To do this, we find a groove on the housing in the area of the oil pump and a point on the crankshaft gear. We put the pulley on the gear and turn it by hand until the marks match. This is easy to do; just hand strength is enough to turn the pulley.
Sometimes the marks on the crankshaft are not visible, then after aligning the marks on the camshaft, you need to make sure that the mark on the flywheel and the notch on the casing match. To do this, you first need to remove a special plug, after which these marks will be visible. If they do not match, after replacing the timing belt the engine will not start, and if it starts, it will run unstably and intermittently. Therefore, this stage is important for successful repair and subsequent operation of the car.
When replacement is required
The timing belt is responsible for the operation of the gas distribution mechanism.
Try in every possible way to avoid breaking the belt while driving, otherwise this may negatively affect the condition of the engine and the cost of its repair.
The most dangerous is the contact, the “meeting” between two main elements - the piston and the valve. In this case, the unit becomes deformed, requiring expensive restoration of the car.
There are several main criteria that indicate the need to replace the unit.
| Sign of wear | Peculiarities |
| Natural wear and tear | Each element has a certain resource, a margin of safety, above which it can “jump” only in rare exceptions. For timing belts on nines it is 50-60 thousand kilometers |
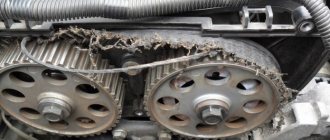
| Visual signs of wear | If you examine the condition of the strap, if there are any malfunctions, this will manifest itself in the form of defects, cracks, and peeling along the edges. All this suggests that you cannot continue to operate the car with such a strap; replacement is required. |
| Oil or coolant on the surface | Another sign that the strap is outdated and needs to be replaced. At the same time, do not forget to check for leaks in their cooling system and oil channels |
| Retighten the strap | When the service life has not yet come to an end, the strap may still become loose. To eliminate this, it is tensioned. But over time, the tension reaches its limit, the strap becomes overtightened and is no longer able to return to the desired position. For replacement and only |
| Tooth wear | If there are problems with the teeth, when moving, the belt simply begins to slip while the crankshaft rotates. Here you will have to change the gears and the belt itself |
Crack on the strap
Dismantling
To correctly replace the timing belt, you first need to dismantle the element. The process can take quite a lot of time, although the work itself is not very difficult.
- Remove the casing covering the belt, pulleys, dismantle the tension roller and other elements related to the gas distribution mechanism.
- The cover is held in place by three mounting bolts, so removal should not be a problem.
- Remove the alternator belt. This will give you access to the desired object - the timing belt. To do this, lower the retaining bolt down a little and move the generator towards the engine. This will loosen the belt, making it easy to remove.
- Align the gas distribution mechanism to the marks. First you need to install the crankshaft in the required position. This is done by turning it and looking through the hatch on the clutch housing.
- Stop rotating as soon as the mark on the crankshaft flywheel aligns with the marks on the housing. This indicates that the piston of the first cylinder is at TDC - top dead center.
- Make sure that the mark on the camshaft gear is aligned with the mark on the metal housing.
- Having set the marks, you can begin the procedure of dismantling the old worn timing belt.
- Release and move the tension roller to the side. This will release the tension on the strap. As a result, it can be removed from its position.
- Next you need to remove the belt from the crankshaft gear. To do this, the pulley is first removed.
- There should be no problems with dismantling the pulley, since it is removed this way. First remove the right wheel, turn the steering wheel to the right and you will gain access to the side shield. The shield is removed, and behind it is the crankshaft pulley. Relevant for carburetors and injectors.
- If your VAZ 2109 has an injection engine, you will need to fix the crankshaft to remove the pulley. It is not difficult to do such a procedure. Insert a long screwdriver into the special hatch where the flywheel mark is located. This will lock the crankshaft in the required position, so you can easily unscrew your pulley.
- On a carburetor VAZ 2109, fixation should be performed directly on the pulley.
- Before you begin removing the timing belt, examine the condition of the water pump and tension pulley. You should also check whether the axis of the tension roller and timing gear are in good condition.
- If there is damage, defective elements must be replaced.
- Check the current condition of the camshaft and crankshaft seals.
Crack on the strap
Experts agree that when replacing the timing belt, the rollers and pump should also be replaced. But this is a recommendation, not a requirement.
Preparatory work
Replacing the timing belt requires some prep work to get to it. To do this, lift the hood and remove the air filter pipe by unscrewing the fastenings of the retaining clamp with a wrench. Next, the belt protective cover is removed, for which you need to unscrew the three bolts that hold it in place. This is done with a regular open-end wrench. In the opened space, the timing belt will be visible, which needs to be replaced.
The front right wheel and the protection under it are first removed to get to the crankshaft pulley, which drives the gas distribution mechanism via a belt. In the cab, put the lever in the fourth gear position and ask the assistant to press the brake pedal. We install the head 19 on a long wrench so that it is convenient to get to the crankshaft pulley, which we unscrew, which will require some effort. After the bolt is broken, you can put the gear in neutral and not hold the brake pedal.
Important feature! To replace the timing belt on a VAZ 2109 8-valve injection engine or a similar VAZ 21099 model, when removing the crankshaft pulley, you need to hold the flywheel, which is best done with a screwdriver. Otherwise, it will rotate along with the pulley. In carburetor engines this problem does not exist; the pulley is held independently.
From the top of the open hood, the nut that holds the tension of the generator belt is loosened; this is best done using a special cardan on which to place the head of the key. The generator pulley is moved so that the belt can be removed without interference. After this, remove the crankshaft pulley so that the gear is visible.
Installation
Now directly about how to return a new timing belt to its place. There is nothing complicated here either, but we still recommend watching visual videos and studying the instructions.
- As soon as you have examined the condition of the unit and decided to change something, proceed to assembling the mechanism.
- It is easier to do the work so that all the inscriptions are turned in your direction, that is, towards the right wing of the car.
- Replace the pulley unless it needs to be replaced.
- Next, put on the belt. Moreover, it should be put on the lower gear first, and then on the upper one. Not the other way around.
- Make sure there is no sagging.
- Place the timing belt behind the water pump and tension pulley.
- Tighten the tension roller using a special wrench.
- If you do not have such a key, use a simple key and a screwdriver.
- Be sure to adjust your new strap properly. The adjustment is carried out until the moment when you can no longer turn it at an angle of more than 90 degrees. This is the best option for tightening the strap for the VAZ 2109.
- Turn the pulley several times. This will ensure that the marks on the timing gear and flywheel are in the correct position.
- If for some reason the tags do not match, we have bad news. You will have to remove the strap again and adjust the position again.
Crack on the strap
The main difficulty in replacing a timing belt lies not in the complexity of the processes performed, but in the time that needs to be spent on repairs.
A competent approach, attentiveness and the use of a high-quality new belt will allow you to easily restore the operation of the gas distribution mechanism and save hundreds of rubles on visiting a car service center.
Reassembly
Then everything is assembled in reverse order. First, install the crankshaft pulley. To tighten the bolt, set the fourth speed again and depress the brake pedal, after which the bolt is tightened with a head with great force using a collar. The generator belt is installed in place, the pulleys are moved apart using a pipe, a collar or a small pry bar. This is necessary for good tension of the generator belt, after which the nut is tightened using a wrench with a universal joint. The pulling procedure is repeated several times. This belt should be stretched very tightly and practically not bend under the force of your hand.