Car : Lada Priora. Asked by : anonymous The essence of the question : which is the best ignition coil to buy for a Priora? Car : Priora sedan standard 2010
The reels are tired. I have already replaced all 4, and again they were sentenced to service. I bought the reels as a set from a store that has certificates for an official dealership. Today I will try to return it under warranty, since all 4 coils are broken.
Therefore, what is better to buy, please tell me the verified article numbers of the coils for the Priora?
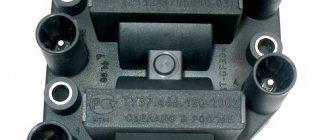
Crack on the coil of the first cylinder. This coil will "drizzle".
Story
The ignition system in Lada cars has changed over generations. Earlier cars with carburetor fuel injection used a distributor ignition system, which is quite unreliable and required manual adjustment and frequent maintenance.
The distributor was replaced with the advent of injection engines by a modular ignition system; a spark in such a system was produced by a module consisting of two coils. This system began to use a crankshaft position sensor, which helped the engine control unit determine the top dead center and compression stroke of the fuel-air mixture.
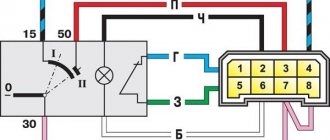
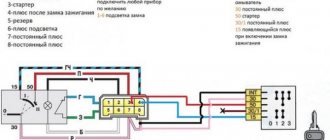
Instrument cluster block diagram
| № | Decoding |
| 1 | Electric power steering |
| 2 | Emergency gang control VAZ-2170 |
| 3 | Connection to oil pressure sensor |
| 4 | Parking brake indicator light |
| 5 | Electronic anti-theft device |
| 6 | Airbag control module |
| 7 | External lighting switch |
| 8 | Right turn signal indicator and doubler |
| 9 | Left turn signal indicator and backup |
| 10 | Engine control unit |
| 11 | Disabling the passenger's front airbag |
| 12 | Seat belt warning light |
| 13 | ABS brake system unit |
| 14 | Steering column switch button |
| 15 | Brake expansion tank indicator |
| 16 | ABS safety control module |
| 17 | Main beam headlight control unit |
| 18 | Shield backlight module |
| 19 | General disadvantage of the device |
| 20 | Constant positive battery terminals |
| 21 | Ignition switch contact |
| 22 | Fuel flow meter |
| 23, 24 | Steering wheel turn switches |
| 25,26 | Overboard temperature sensors |
| 27 | Fuel sensor VAZ-2170 |
| 28 | Speed sensor |
| 29 | Coolant temperature sensor |
| 30 | Tachometer signal |
| 31 | Shield diagnostics |
| 32 | Generator Regulator Relay Terminal |
Ignition system
Such a system is a collection of parts that are involved in the process of spark formation in the engine. A spark in an internal combustion engine is necessary to ignite the fuel mixture in the combustion chamber. If the engine loses spark, its operation stops completely.
The Priora ignition system includes the following elements:
These three parts are responsible for the formation of a spark in the Priora engine; failure of one of them entails the loss of spark in a particular cylinder.
Let's look at each part of the car's ignition system in more detail to understand their purpose in more detail.
Spark plug
Spark plugs are used in all gasoline-powered vehicles. It screws into the cylinder head and creates a spark in the combustion chamber, which is necessary to ignite the fuel mixture.
The spark plug is a part with a threaded part that is screwed into the cylinder head; an electrode is placed inside the threaded part that generates a spark. Since the spark plug operates under high voltage, a special insulator is used in the spark plug to prevent breakdown and leakage of voltage.
Ignition coil
As described above, the Priora already uses an individual ignition coil. Such a coil is installed on each cylinder and is responsible for supplying a spark to a specific cylinder. The transition to IKZ made it possible to increase engine power while saving fuel.
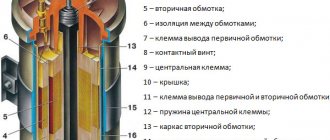
The ignition coil is a part in which there are two windings, primary and secondary. A voltage of 12V is supplied to the primary winding, and a voltage of almost 40,000 Volts is generated on the secondary winding. This voltage is necessary for reliable spark formation in the combustion chamber.
Crankshaft position sensor
This sensor is necessary to determine the top dead center of the internal combustion engine, that is, when the compression stroke occurs in the engine, it is necessary to supply a spark in the combustion chamber. This sensor understands when the piston is at the top and sends a signal to the ECU, which in turn sends a signal to the IKZ to form a spark in this cylinder. This is how the fuel-air mixture ignites in a specific cylinder.
This sensor is installed next to the crankshaft pulley and reads readings from it. There are marks on the crankshaft pulley that the DPKV reads and thereby determines TDC.
It should be noted that a breakdown of this sensor or a break in its power supply leads to a loss of spark in the internal combustion engine and the inability to start it.
Lada Priora Sedan city aspirated › Logbook › Refinement of IKZ power supply
Hello guests and subscribers of my logbook. Today we’ll talk about how you can improve the power supply system for the ignition coils used on my car and not only. The history of how they appeared on the car is somewhat unusual
In general, one person approached and asked for something interesting, he wanted to install coils from VAG turbo engines on his evil Opel, the calibrator and I twirled them in our hands and noticed them, they almost miraculously fit into the spark plug wells of a 16-valve engine! The matching board was, of course, invented and tested, the very first tests carried out on my car and on Pasha’s car, which constantly tunes me, lasted for a month, as a result, improvements were made and the board acquired its final form. There is a small video with these coils, it’s interesting to take a look. https://www.youtube.com/embed/nTDc5JOXZys
If you are interested in installing these coils, let me know and I will describe it in more detail.
In the process of developing the matching board, a good drawdown in the power supply to the IKZ was discovered at the moment of its operation, it was useful to look on the Internet what people were doing with this, the first thought was to install capacitors. Almost immediately I came across a good post www.drive2.ru/c/2171255/ which confirmed my thoughts. I don’t see the point in reprinting his post, check it out, everything is described very well! Taking into account the fact that I still made scarves for the matching board, I also made it for the capacitors.
The board was made even without the use of LUT, so it is not very beautiful, but there is space for a capacitor to power the injectors. Places for IKZ condensers and injectors signed
Capacitors were selected according to the principle: - what was available at that time - minimum voltage 25 volts, capacity not lower than 2200 uF
Among my stashes I found three pieces with a capacity of 3300 microfarads and a voltage of 25 volts, they were installed, all this was installed in the case and tucked under the hood of the car.
It is lined with a heat insulator at all ends; it is also used as a filler and prevents the board from moving around the case.
The collective farm under the hood looks like this
Obeying the trend that arose in me, described in this entry www.drive2.ru/l/456526025019360491/, you need to connect it humanly before the onset of cold weather.
Operating experience, especially taking into account the fact that the car has undergone significant modifications—idling has improved, it has become a little smoother—low-end traction has improved—work has improved slightly at rpm above 6000, I don’t know what’s causing it
There were no changes in terms of fuel consumption, but overall I recommend the improvement; indeed, the drawdowns in my case decreased by 15 percent, at the moment when I was climbing I didn’t think to take a screenshot. By the way, the DSO Nano DSO201 mobile oscilloscope, which was borrowed from my boss, is amazingly helpful in such things.
By the way, as you can see from the photo, the conductor that was intended to power the injectors was disconnected, this of course did not surprise me, but when it was connected, the composition of the mixture changed in a richer direction, I had no desire to roll back the mixture, I later forgot, although the car was rolled back online after of this “device”. Of course, the mixture became richer only at low engine speeds, where there are no problems with power supply and the mixture in its normal composition. A slight enrichment in itself will give us an even better start from where we are, by the way...
My recommendations: - it’s not necessary to install it - it’s up to you to connect the injectors or not, although I’ll definitely connect it before the next online setup. In fact, this modification has no downsides, but there aren’t many advantages either. Good luck to everyone on the roads and making competent and necessary modifications.
Misfires on Priora
There may be no spark at the Prior due to a breakdown of the sensor, coil, spark plug or ECU. Failures that lead to loss of spark are quite easy to solve, with the exception of a breakdown in the ECU.
If the spark on a Priora disappears on all 4 cylinders, this indicates a breakdown of the crankshaft sensor in 80% of cases, in the remaining 20% the ECU may fail.
If there is no spark on one of the cylinders, then there may be several reasons - a spark plug, a coil or a transistor in the ECU.
Consider each of the reasons in more detail.
Spark plug
Quite often, low-quality spark plugs can fail after several hundred kilometers or even immediately after installation. It is recommended to purchase only high-quality spark plugs.
Which spark plugs are best for Priora can be read in our article.
You can check the serviceability of the spark plug on a special stand or by trying to replace it with a new one or by installing a suspicious spark plug in the working cylinder.
Ignition coil
Problems with the coil appear practically the same as with spark plugs. One of the windings in it may break or break through the insulation, which causes the coil to malfunction. IKZ Prioras cannot be repaired and if they break down they are replaced with a new one.
You can check the serviceability of the coil by replacing it with a coil of another cylinder or using a special diagnostic device ELM 327.
You can read how to check the coil here.
Crankshaft position sensor
DPKV is installed in a place that is subject to both mechanical and temperature influences. Since the sensor works on the principle of a magnet, and its sensitive part tends to magnetize chips. The formation of chips on the sensor will negatively affect the reading from the crankshaft pulley, which can lead to the inability to determine TDC and, consequently, to loss of spark.
If carbon deposits appear
After 15 thousand kilometers, it is recommended to re-inspect the condition of the spark plugs. Sometimes brownish-yellow carbon deposits can be observed on the surface of the electrodes. This indicates the use of fuel with an octane rating that is not suitable for the vehicle. When the spark plug overheats, the carbon deposits will turn white. Erosion is also possible. The reason may be early ignition timing. Sometimes the candle is simply not screwed on tightly. Also, with early ignition, the electrode itself melts. This spark plug is for replacement only. Which spark plugs are better for Priora 16 cl., see above.
If the car is moving, you should check the part with a tester for functionality. Typically, a gun with a metal tip and cap is used for this. The tip is touched to the thread of the spark plug, and the cap is placed on the terminal for the armor wires. When you pull the trigger, a spark should occur between the electrodes. If it is not there, the element needs to be replaced.
Life hack: Priora car ignition coil for 16 valves, its price and design
To go, you need to start! The ignition coil of a Priora car is not expensive. Its price for VAZ 2170 is from 2000+ rubles. On some machines this is a sore part that constantly breaks down. On a Priora with a 16-valve engine, there are about 4-5 analogues of this part.
Read the article to the end and find out how to check its performance and which one is better. Starting the engine of a Lada Priora car is a difficult procedure, which involves several parts and assemblies at once. At the same time, the standby engine start is carried out very quickly. At this time, several small subprocesses take place, and one of them is the creation of the first spark to ignite the fuel-air mixture.
To create a spark, it is not possible to place an open fire under the hood. The injection engine has become more “advanced” compared to its carburetor predecessor - it uses ignition coils, one installed with each cylinder.
An incident may occur, causing the engine to start “unevenly”. You will have to immediately look for how to check the elements of the ignition system. If it turns out that the problem is in these small parts, do not rush to despair, because in stores there is a good standard ignition coil for Priora 16 valves, the price of which is comparable to analogues. The wires to the ignition coils are an equally important component, which if it doesn’t work, you won’t go anywhere.
Maintenance frequency of car generator bearings
When servicing the unit, you need to know which bearings are on the generator, and which race of each of them is pressed into place. To extend the time between overhauls, bearings are lubricated at the time of installation at the factory or when replaced by the user. It is believed that this amount is sufficient for the entire life of the rolling elements.
The frequency of bearing replacement is determined by ear:
- if the generator is noisy, it means the clip has worn out;
- Before jamming, the generator bearing hums for quite a long time, so the owner usually has enough time not to let this happen.
Design features of the generator are:
- one bearing is called the front bearing, since it is pressed into the corresponding (front) generator cover by the outer race;
- the second one is put on the shaft with tension on the reverse side, called the rear one, and is located near the commutator group;
- Before changing standard rolling consumables, you need to prepare a special tool;
- To get to the rolling parts, you will first have to remove the generator and then completely disassemble it.
For example, the front bearing can be knocked out, then a new rolling element can be installed in the mounting hole without a puller
It is important that the external dimensions match. It will not be possible to pull the rear bearing off the shaft in this way; a puller will be required.
But you can put on a new standard product by tapping a hammer on a sleeve of a suitable size or an old bearing.
Basic faults
A normal Priora part should last from 50 to 100 thousand kilometers, depending on how often you start the engine. If an element of the Priora ignition system malfunctions, the following symptoms will occur:
- When accelerating, the car will jerk (as if the box is kicking in a car with an automatic transmission), or when driving in first or second gear.
- The integrity of the winding is broken. It is worth paying attention to the tip of the ignition coil of the Priora car.
- The motor "troits". This manifests itself in vibration and excess noise that appears under the hood, while traction decreases.
What have manufacturers done to help car owners?
Initially, microprocessor ignition options went on sale, where a modified distributor was installed, configured to work together with a hall sensor and control a classic brand car.
And everything seemed to be going well, except that for the classics the work of the distributor still remained problematic. Among other things, at the very beginning it was clear that for the electronic system, the characteristics of the UOS for a heated or unheated motor are clearly different. Because when setting the UOS to cold and then warming up the engine, inevitable detonations occur.
Due to all the inconvenient moments, system manufacturers decided to make the following modification. They had to make the microprocessor ignition for classic cars almost identical to the injection version, leaving only the injection system control unchanged.
Design and principle of operation
So, starting the engine begins with turning the key in the ignition switch. At the same time, current must flow to the spark plugs, they give a spark to the fuel-air mixture, which is pumped up by the pump, the starter begins to rotate, causing the crankshaft to start moving. But the battery operates with low voltage electrical current.
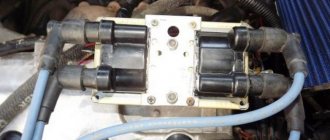
Each coil is a small transformer. Two levels of winding are hidden under the housing of the element of the VAZ-2170 Priora ignition system. Its wires are low-voltage and high-voltage. The first ones receive current from the battery, the second ones transmit it to the spark plugs. When the current is converted, it is transferred to the spark plugs. The ECU “manages” this process, correctly distributing the force between the spark plugs.
As for how many ignition coils are in the Priora, there are 4 of them - one for each cylinder. Their work does not mix or overlap in any way. Each of them has “its own scope of work.”
Benefits you shouldn't ignore
Lada 2105 Bright White 15 R Logbook Installation of steering column switches for Chevrolet Niva ignition switch for VAZ 2110
Along with optimizing his car, the owner, with a new ignition, additionally receives a number of special advantages.
Among them:
1. A real opportunity to customize your own engine for any attractive fuel for the car.
2. If you have a car with HBO, an increase in traction and overall power of the car.
3. Complete absence of detonations and knocking noises when picking up speed, even when less than ideal fuel is available.
4. In gasoline-powered cars, fuel burns out much faster, which reduces fuel consumption by an order of magnitude.
5. In cold weather, the car starts much faster and easier.
6. The electronic system does not require total control on the part of the owner, since control is assigned to the built-in display.
7. The machine can be converted and an additional toggle switch can be added to easily switch to one type of fuel or another.
8. With a new type of ignition, the owner receives new options; important parameters are kept at a specifically set level.
9. The starter turns off on its own after the engine starts.
10. You can control the ventilation of the cooling system.
Manufacturers and prices of analogues - which ignition coils are better for the Priora
No one, not even AvtoVAZ, promises that the analogue will work as long as the standard model. There are a sufficient number of options on the market. It will take quite a long time to determine which is better. The following components are suitable for Priora 16cl:
- SOATE (manufactured in Stary Oskol) (article 2112-3705010-12), price – 1,200 rubles.
- MZATE-2 (article 59.3705), price - 1,000 rubles.
- Baker Priora 2112-3705010-10 – 1100 rubles.
- Fenox IC16085 (STK) – 1,300 rubles.
Performance check: how to check ignition coils on a Priora
Before you start replacing the ignition coils, you definitely need to check them and inspect them. Cracks, chips, and other damage to its body are unacceptable. If you see that the plastic is damaged, it means the part has overheated and cannot be used further.
The answer to the question of how to check an element of the 16-valve Priora ignition system is not limited to inspection. First you need to swap them and see if there are interruptions in the other cylinder. If there are interruptions, the problem is in the coil. There are several ways to use devices. To work you need:
- Secure the car in place and turn off the engine.
- Remove the negative from the battery.
- Disconnect the part from the motor, and then connect a fully functional spark plug to it.
- Turn off the fuel pump.
- Use protective equipment against electric shock, this is a must!
- Turn on the ignition and crank the starter. The spark plug should spark during normal operation.
- Sometimes repair of the Priora ignition coil begins after receiving data from the ECU. The codes start with 0301 and end with 0304, indicating each cylinder accordingly. However, the problem is displayed in the coil-plug module, so the culprit will have to be found out separately.
McSystem › Blog › To the blog: Will a spark ignite a flame? Not always!
This modification will be useful in almost the entire line of VAZ injection engines, regardless of the type and composition of the ECM equipment and the ignition system in particular.
Immediately a warning - based on the results of comments and questions.! ! ! Intervening and making changes to the electrical circuit of a car requires at least basic skills in electrical engineering and awareness of the actions being performed! ! !If you feel that the electrical circuits and electrics of the car are not your profile, contact a more qualified person or an experienced auto electrician. This is in your best interests. And it will save you from unpredictable consequences.
Updates and additions are at the end of the article. A detailed detailed analysis of changes in the ignition system after modifications are described here:
Part two.
Expanded results In order. Engine VAZ 21124. 1.6 liters, 16 valves. Individual ignition coils (or dual module with high-voltage wires). Everything is beautiful. And at first glance, it seems that everything is thought out, so it should work clearly and reliably. It turns out that this is far from true. This is a VAZ!
Quite a lot has been written about ignition problems on this engine - about the choice of spark plugs, replacement and selection of individual ignition coils (hereinafter - IKZ).
So I came face to face with this problem. The main manifestations are the engine rotates unevenly at idle (speeds dance in the range of approximately 720-840 rpm), sluggish acceleration with twitching, increased consumption. In principle, most people understand - misfires, rare , but there is.
The ECU doesn't see them directly. Last year, one coil clearly started to fail - the ECU saw it. I replaced it and it started to loosen up a bit. But still the engine was missing something. What a good spark! Here's about this in detail. From the versions: - replacing the spark plugs (the current NGKs lasted only 7 tons km) with something more expensive from the "platinum, iridium" series, etc. - a costly option. - changing the IKZ, but for them a little more than 7 years (the original BOSH ones are there, the mileage is 75 tkm) - it’s a little expensive (the cost of one IKZ is around 540 UAH ($22), and there are four of them) and there is no confidence that the problem will go away. - Mass air flow sensor, which is also not fun... - look into ECU for serviceability of keys, current-limiting resistors, etc. Acting at random or based on assumptions is not my method or my approach.
Reading the ECU showed: 1.
Speed jumps2. Injection time jumps, slightly3. OZ jumps at XX (9-15 degrees) - a bit much4. Power supply, mass air flow sensor, air sensing sensor - everything is stable and beautiful.5. The ECU masses are all ideal (previous modifications and correct wiring were made) Verdict - unstable sparking.
The ICP parameters were measured - the resistance of the primary winding, inductance, the resistance of the secondary winding (taking into account the diode in the high-voltage circuit), checking for the absence of short-circuited turns - the norm.
The coils have a minimal (± 2%) spread and nothing alarming in the parameters. More on this later. On the hastily assembled “stand” there is a normal spark, a little weaker in appearance than on a classic with a contactless ignition system, but still clear throughout the entire range of rotational speeds (2 - 45 Hz), with an accumulation time of 2.0 ms. The coils are alive. The rubber caps in the explosive part of the coil have been replaced. To complete the picture, I decided to look at the diagrams on the coils with an oscilloscope on the engine, pulled out my C1-65A - a reliable, proven workhorse to the car and off we go. The ignition is on. The engine is running. On board the network (to the battery) 14.35V, which at XX, one hundred at 2000 rpm is stable. Amazing! Let's see. As usual, I start with power to the coils (+12V from the ignition switch) and I am HORROR! On the coils, as well as on the IKZ harness connector, the ripple is exactly 2.5V. I was not mistaken, I measured it in 2 modes (and the oscilloscope has been an everyday tool for many years and not the only working tool - there is no room for doubt). I apologize for the bad photos - the scan is slow and the shutter speed in the camera is short.
source
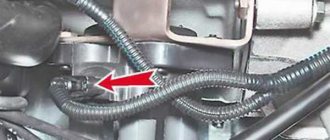
Removing and installing a coil on a Priora
To change the ignition system element in a 16 valve engine, follow these steps:
- Park the car level, securing it with the hand brake.
- Raise the hood and remove the negative from the battery.
- Undress the motor by removing its plastic protective casing.
- Find the spare part you need, and then the wire block connected to it.
- Squeeze the wire block clamp and turn off the power.
- Using the 10th key, unscrew the bolt that secures the part to the metal.
- Carefully remove the spool, trying to move it vertically. It would be a shame to damage the wiring at the very last moment.
- Remove the faulty part and replace it with a new one. Tighten the fastening bolt, connect the wire block and place the negative on the battery. Check functionality.
Source
Lada 2110 Blue Bird › Logbook › Capacitors in the ignition module
After reading Will a spark ignite a flame? Not always! I decided to try to do something similar in my car. In addition, several participants in the drive noted the improvement as useful. I purchased capacitors from a TV technician for 20 rubles. per piece because There is no radio parts store, and there was no particular desire to tinker with devices:
I wanted one like McSystem, but these were the only ones I could find. I thought these would work too, the main thing is to connect it correctly and assemble it according to this diagram:
Wrap it well with insulating tape and install it in the car. I’ll take a photo of how it looks in the car later. I haven’t figured out yet whether it was good for my car. I'll take a ride and report back.
I took it for a ride, but the traction is better, the dynamics have increased!
Life hack: Priora car ignition coil for 16 valves, its price and design
To go, you need to start! The ignition coil of a Priora car is not expensive. Its price for VAZ 2170 is from 2000+ rubles. On some machines this is a sore part that constantly breaks down. On a Priora with a 16-valve engine, there are about 4-5 analogues of this part.
Read the article to the end and find out how to check its performance and which one is better. Starting the engine of a Lada Priora car is a difficult procedure, which involves several parts and assemblies at once. At the same time, the standby engine start is carried out very quickly. At this time, several small subprocesses take place, and one of them is the creation of the first spark to ignite the fuel-air mixture.
To create a spark, it is not possible to place an open fire under the hood. The injection engine has become more “advanced” compared to its carburetor predecessor - it uses ignition coils, one installed with each cylinder.
An incident may occur, causing the engine to start “unevenly”. You will have to immediately look for how to check the elements of the ignition system. If it turns out that the problem is in these small parts, do not rush to despair, because in stores there is a good standard ignition coil for Priora 16 valves, the price of which is comparable to analogues. The wires to the ignition coils are an equally important component, which if it doesn’t work, you won’t go anywhere.
Lighting control unit diagram
| G, 56b | To the gear motor for adjusting headlights |
| 58b | Output to backlight sources |
| 31 | Mass (ground) |
| Xz | +12 volts (from terminal 15 of the ignition switch) |
| 56 | To the relay for switching high and low headlights |
| 1,3 | From rear and front fog lights |
| 2,4 | To the rear and front fog lamp relays |
| 58 | For lamps of Lada Priora dimensions |
| 30 | +12 V from terminal No. 30 of the ignition switch |
Basic faults
A normal Priora part should last from 50 to 100 thousand kilometers, depending on how often you start the engine. If an element of the Priora ignition system malfunctions, the following symptoms will occur:
- When accelerating, the car will jerk (as if the box is kicking in a car with an automatic transmission), or when driving in first or second gear.
- The integrity of the winding is broken. It is worth paying attention to the tip of the ignition coil of the Priora car.
- The motor "troits". This manifests itself in vibration and excess noise that appears under the hood, while traction decreases.
What can be put on the classics from the existing MPSZ
Among the most well-known microprocessor systems, Maya, Secu 3 or Mikas MPSZ are most often used. Assembling any of them is not difficult, if you have the skills to correctly see and read the instructions with the diagram, and follow the sequence of installation actions. When choosing a microprocessor system, you should not be intimidated by the fancy circuitry that product sellers like to show off, offering the services of a familiar electrician for “guaranteed high-quality installation for pennies.” All components can be installed on the classic with your own hands.
When choosing, pay attention to the quality of the block itself. It is considered good form if there is no warping of the plastic parts of the burrs or microcracks. The second indicator is the presence of a large scattering surface in the form of an aluminum base
The microprocessor remains the most capricious part and the choice of place under the hood or in the cabin must be taken very seriously
The second indicator is the presence of a large scattering surface in the form of an aluminum base. The microprocessor remains the most capricious part and the choice of place under the hood or in the cabin must be taken very seriously.
The ignition coils can be separated into a separate unit; alternatively, they can be mounted directly next to the spark plugs on the head cover.
Design and principle of operation
So, starting the engine begins with turning the key in the ignition switch. At the same time, current must flow to the spark plugs, they give a spark to the fuel-air mixture, which is pumped up by the pump, the starter begins to rotate, causing the crankshaft to start moving. But the battery operates with low voltage electrical current.
Each coil is a small transformer. Two levels of winding are hidden under the housing of the element of the VAZ-2170 Priora ignition system. Its wires are low-voltage and high-voltage. The first ones receive current from the battery, the second ones transmit it to the spark plugs. When the current is converted, it is transferred to the spark plugs. The ECU “manages” this process, correctly distributing the force between the spark plugs.
As for how many ignition coils are in the Priora, there are 4 of them - one for each cylinder. Their work does not mix or overlap in any way. Each of them has “its own scope of work.”
Signs of Engine Cylinder Failure
When driving, the engine begins to pull poorly. Work intermittently. However, at idle it seems to run smoothly. At speeds, if the neutral gear is engaged, there are no interruptions either. But as soon as you start moving, the engine shakes. Speed is gained pl
The electronic injection system is designed in this way. That it will compensate for the lack of operation of one cylinder. If you are supposed to maintain a certain number at idle. Even if the cylinder is not working, the electronic unit will give a command to increase the speed. And compensates for the loss of one cylinder. Also, as the speed increases, the injectors will begin to supply more fuel to the remaining cylinders than usual. The absence of one cylinder will not be noticeable. It's worth starting to move. The electronic control unit will also equalize engine speed by increasing the fuel supply to the working cylinders. But the loss of power will already be visible. Three cylinders are not four. The engine will choke. The sound of the engine will change. And there will be no pleasant acceleration like when 4 cylinders are running. Diagnostics involving a tester is expensive. Moreover, a faulty coil can be detected directly on the car.
Manufacturers and prices of analogues - which ignition coils are better for the Priora
No one, not even AvtoVAZ, promises that the analogue will work as long as the standard model. There are a sufficient number of options on the market. It will take quite a long time to determine which is better. The following components are suitable for Priora 16cl:
- SOATE (manufactured in Stary Oskol) (article 2112-3705010-12), price – 1,200 rubles.
- MZATE-2 (article 59.3705), price - 1,000 rubles.
- Baker Priora 2112-3705010-10 – 1100 rubles.
- Fenox IC16085 (STK) – 1,300 rubles.
Performance check: how to check ignition coils on a Priora
Before you start replacing the ignition coils, you definitely need to check them and inspect them. Cracks, chips, and other damage to its body are unacceptable. If you see that the plastic is damaged, it means the part has overheated and cannot be used further.
The answer to the question of how to check an element of the 16-valve Priora ignition system is not limited to inspection. First you need to swap them and see if there are interruptions in the other cylinder. If there are interruptions, the problem is in the coil. There are several ways to use devices. To work you need:
- Secure the car in place and turn off the engine.
- Remove the negative from the battery.
- Disconnect the part from the motor, and then connect a fully functional spark plug to it.
- Turn off the fuel pump.
- Use protective equipment against electric shock, this is a must!
- Turn on the ignition and crank the starter. The spark plug should spark during normal operation.
- Sometimes repair of the Priora ignition coil begins after receiving data from the ECU. The codes start with 0301 and end with 0304, indicating each cylinder accordingly. However, the problem is displayed in the coil-plug module, so the culprit will have to be found out separately.
Now we check the ignition system element on the Priora with a multimeter. For this and further work with components, models AZ-1 or MD-1 are suitable. For this:
- Remove the part to be examined from under the hood.
- Set the measurement switch to the “200 Ohm” position, connect the probes. The display should show “0” or values close to it.
- Using probes, the external winding is checked. Pinout – 1.3. The display should show exactly 0.08 Ohm. The error is the number that the display showed during calibration; it must be subtracted. If nothing is shown, check that the probes are accurately touching the winding. If there is contact, but there is no result, the winding is broken and needs to be replaced.
- Set the multimeter to 2 MΩ measurement limit to test the high voltage winding. Connect the black probe to the terminal of the second connector, and the red probe to the terminal of the coil. The indicator should be 342 kOhm - but only for a cold part. It should be cooled before testing. This also requires checking the exact contact with the probe.
Remember that the winding of this spare part does not change, but the tip can be easily changed. Most often, repairs are limited to routine replacement - in order to be completely sure of the tightness of the part.
Self-replacement
- Before changing the ignition switch on a Priora, you must take into account that this operation will be more labor-intensive than a similar process when working with classic VAZ car models.
- A motorist can complete this job in an hour. He also needs to stock up on tools:
- Phillips screwdriver or screwdriver with a similar bit;
- hammer 0.5 kg;
- a pointed chisel or punch with a blade width of 8–10 mm;
- hex head 10;
- ratchet equipment with middle extension.
Due to the fact that the repairs are supposed to be carried out in dark, cramped conditions, it is worth thinking about local comfortable lighting. Some find it convenient to work with a car lamp equipped with a hook or magnet for hanging in any conditions.
Some motorists are accustomed to using a bright headlamp with LEDs for such purposes.
Where to repair a VAZ engine
How to remove the ignition switch on a Priora
Before carrying out work, it is necessary to remove the terminals from the battery. Experts recommend using a proven algorithm:
At the initial stage, you will need to get rid of the casing that hides the ins and outs of the steering column. The operation is simple and requires only a screwdriver or screwdriver to unscrew threaded hardware. The second stage involves unscrewing the special bolts. They are manufactured with tear-off caps and are disposable materials. This design approach provides a certain degree of security, minimizing the possibility of unauthorized access to starting the car. A chisel is used to unscrew them.
It is important to remember that they have a right-hand thread. Having torn the hardware from its place, you can finally get rid of them using long-nose pliers (curved or straight)
Remove the clamp. Special bolts held the clamp installed on the steering column
The latter is installed to hold the lock. The dismantling work is completed by disconnecting the power plugs in order to have full access to working with the lock.
Next, we purchase a new lock with an immobilizer and relearn it if necessary. Usually you can do it the first time. In some situations, transponders in keys are changed so that the standard protection can recognize electronic signals and unlock in a timely manner.
New lock installation stage
For installation, you will need the bolts used in breakaway fasteners. When a certain force is created, the edges will break off, leaving a head that the classic key will not take. As a result, the clamps will be tightened sufficiently tightly and at the same time receive additional protection.
All four bolts are screwed in the same way with the edges breaking off. The estimated cost of the castle is about 1000 rubles. Most often, special bolts may be included in the kit so as not to purchase them separately.
It is important to know that it is not recommended to reuse old torn hardware to attach the clamp. A replacement service will cost another few hundred. In the end, by doing everything yourself, you can save money.
In the end, by doing everything yourself, you can save money.
A replacement service will cost another few hundred. As a result, by doing everything yourself, you can save money.
Do I need to put fender liners on the front?
Conclusion
The motorist can independently carry out all operations without outside help. The main thing is to have a lock and tools available.
Report on replacing the ignition switch on a Lada Priora
So, to get to the lock mount, we first need to remove the steering column cover. After this, this entire structure becomes available to us. Now, using a sharp chisel, you need to tear off all the bolts securing the lock, since the caps there are without edges.
- When all 4 bolts are broken, you can finally unscrew them by hand, or using long-nose pliers, as shown more clearly in the photo.
- When they are all unscrewed, you can remove the lock from the steering shaft, since there is nothing else holding it.
- And in order to completely release the ignition switch, you need to disconnect the two plugs with wires.
We install the new part in the reverse order, having previously purchased a new one. The price of a lock on a Priora is no more than 1,800 rubles complete with keys and door cylinders. But you can buy the same one at a disassembly for half the price, although it is no worse in quality.
To install, you need to buy new 4 bolts with tear-off caps. They twist until the caps break off.
The photo above shows an example of tens, but the meaning does not change. As a result, the caps come off like this, as shown in the photo.
Removing and installing a coil on a Priora
To change the ignition system element in a 16 valve engine, follow these steps:
- Park the car level, securing it with the hand brake.
- Raise the hood and remove the negative from the battery.
- Undress the motor by removing its plastic protective casing.
- Find the spare part you need, and then the wire block connected to it.
- Squeeze the wire block clamp and turn off the power.
- Using the 10th key, unscrew the bolt that secures the part to the metal.
- Carefully remove the spool, trying to move it vertically. It would be a shame to damage the wiring at the very last moment.
- Remove the faulty part and replace it with a new one. Tighten the fastening bolt, connect the wire block and place the negative on the battery. Check functionality.
Source