Perhaps one of the most common questions among car owners is the following: how to ensure reliable, fast and safe engine starting? The car starting system acts as a kind of start during the operation of any car. This system must be in good condition so that you do not have to resort to such unfavorable methods as pushing the car in an attempt to start it. And one of the most significant components of the ignition system is the distributor. This is a slang name popular among drivers, and the "official" name is ignition distributor. This mechanism is truly indispensable in the overall design of the car, so it is very important to understand this and know how to diagnose faults in the distributor cover.
Malfunction of the contact distributor.
Malfunction of the distributor during contact ignition is due to a change in the gap in the contacts or their contamination. The operation of a contact distributor, in contrast to a non-contact distributor, is greatly influenced by the condition of the contacts, which must be checked after 10,000 km. Distributor malfunctions include wear of the shaft cams and the stop of the contacts sliding along them, wear of the bushings in which the shaft rotates, destruction of the bearing of the movable contact plate, weakening of the contact spring, jamming of the contacts on the axis, burning, erosion or contamination of the contacts.
All these faults lead to a change in the gap or a violation of contact between the contacts. As a consequence, loss of engine power, engine idling stops, throttle response decreases, jerking is possible when the gas pedal is sharply pressed.
In case of significant wear or destruction of the bearing of the movable contact plate, critical wear of the bushings, breakage of the negative shunt, a violation of the contact of the contact pair lever and the contact itself leads to popping noises in the intake manifold and muffler. This is also possible if the radio interference resistor located in the distributor runner burns out.
When the engine does not start, this may be due to a lack of contact or gap in the contact pair, or a breakdown of the slider. The absence, contamination or burnout of contacts is determined visually if there is no spark discharge on the high-voltage wire coming from the ignition coil. If there is a spark on the central wire and no spark on the spark plug wires, this indicates a breakdown of the slider. Malfunctions also include malfunction of the centrifugal and vacuum regulators. If there is a weak spark on the central wire and large sparking between the contacts, the capacitor is most likely faulty. Do not install additional capacitors or capacitors of larger capacity. The capacitance of the capacitor should be in the range of 0.15 - 0.35 µF.
We find and fix the problem
It doesn't take much to get the ignition system in proper shape. Car manufacturers recommend periodically changing high-voltage wires, as well as ignition coils, not to mention spark plugs. If you have never done this before, then you may have all the signs of a faulty ignition coil. “Priora” or “Kalina” - nothing depends on the car, the symptoms are similar for all brands. Another thing is that on the same “Prior” the coil is of higher quality than on the “seven” or “kopek”, and breaks less often.
Malfunction of the contactless distributor.
When operating contactless distributors, the main malfunction is a malfunction of the hall sensor or inductive sensor. Minor wear and play in the bushings and bearing of the movable contact plate do not affect the operation of the distributor until the sensor rotor touches the stator.
Such malfunctions as breakdown of the slider, burning of its resistance. It can also break through the distributor cap between the cylinders. This malfunction is typical for non-contact distributors, since the secondary voltage in these systems is twice as high as in a contact one.
Capacitor
It is customary to always talk about two methods for checking a distributor capacitor. The first method is to measure the capacitance of the capacitor, since when it drops, the ignition system begins to malfunction, up to the complete stop of the internal combustion engine. You can easily diagnose the capacitance of a capacitor using a multimeter with the appropriate capacitance testing function.
It is not necessary to remove the capacitor to check. It will be possible to unscrew only its central contact.
Check algorithm:
- The device is set to mode up to 20 microforat.
- The multimeter probes are connected to the capacitor body and its main terminal.
0.20-0.25 uF is a normal value for VAZ car models. 0.17-0.25 μF – Gas, Moskvich, Zaporozhets and other OA models. If the device readings do not match the factory data, then the capacitor is faulty.
Note. A capacitor, if purchased or removed and checked in this form, may show incorrect values not at all due to a malfunction. Simply, it may not be suitable for a certain brand of car, but it will be fully functional.
The second way to check the capacitor is to use a homemade device with a tested and working capacitor.
Here's what's done:
- The capacitor being tested on the machine is disconnected from the main contact and taken to the side.
- One of the probes and clamps of the homemade device is connected to the released contact. Another probe goes to ground (any convenient place in the distributor body).
- The internal combustion engine starts.
- If its operation is stabilized, it functions normally at all speeds, there are no dips, etc., then doubts about the malfunction of the capacitor that was there are 100% justified.
In addition, with a working capacitor, the spark between the contacts of the distributor strikes noticeably, it is clearly visible if the distributor needs to be disassembled (remove the top). And most importantly, the discharge of the coil is felt and characteristic clicks sound. Conversely, if the capacitor is faulty, the coil will not discharge.
Distributor purpose
The distributor is a unique mechanism designed to determine the moment when high-voltage pulses begin to form in the ignition system. This device is used to distribute electric ignition among the cylinders of two types of gasoline internal combustion engines - injection and carburetor.
The distributor, by its nature, differs from other components in that its structure has a fairly large number of parts that wear out quickly. But the condition of this mechanism has a direct impact on the efficiency of the engine, as well as its starting characteristics. In addition, how efficiently the distributor works also affects the overall dynamics of the car and the toxicity of the exhaust.
As for the functions of this mechanism, there are two main ones:
- Interruption of the primary ignition circuit - in this way, the distributor provides current fluctuations in the primary winding of the coil, as a result of which a high level voltage appears in the primary part.
- Distribution of energy between the cylinder spark plugs in the required quantity and sequence.
The described mechanism is also indispensable because in its structure it has a number of mechanisms whose task is to change the ignition timing, which depends on the operating mode of the engine.
It should be noted that some cars, namely those with glow, diesel and compression engines, do not need a distributor for the simple reason that they have a different principle of ignition of the fuel-air mixture.
Why did the engine start to stall? – The most complete analysis of the reasons
What does the term “Engine Troit” mean?
I ask this question at the beginning of the article in order to cut off the “couch experts”, and only real car enthusiasts who love and appreciate their car remain here.
Just one of the commentators began to assert:
“Engine tripping is when there is no one cycle in the operation of an internal combustion engine. That is, out of four cycles of engine operation, one cycle was thrown away.”
I explained to him that he was wrong, but he didn’t get it. To prevent such armchair army specialists from wasting their time and “cracking” in the comments, I want to cut them off right away.
Now let's continue the conversation with real car lovers.
Today we will look at the main reasons why the motor may trip. They may seem banal, but read my work to the end carefully, I am sure you will learn something new for yourself.
Symptoms of a problem
Before you begin repairing the mechanism being analyzed or the distributor cover, naturally, you should carefully check it. This will help you find out the specific cause of the problem and how to deal with it.
There are certain signs that indicate a malfunction in the distributor.
Their list included the following:
- While driving, the car jerks unusually and abnormally.
- The engine will not start.
- As the engine accelerates, the piston pins begin to knock.
- The car picks up speed very slowly.
- Fuel consumption increases significantly.
Naturally, the presence of any of the above symptoms does not yet give the right to say that the problem lies specifically in the ignition distributor. But if any of them is identified, you should begin to “sound the alarm” and, preferably, prepare to repair the distributor.
The list of the most common distributor malfunctions includes:
- A runner who went broke.
- Burnt contacts that are located in the distributor cover.
- Hall sensor failure.
- The Hall sensor bearing is stuck or loose.
- The appearance of cracks in the lid.
- The Hall sensor plug has poor contact.
- Oil gets into the distributor despite the presence of a protective cap.
It should be noted here that all types of the above problems with the distributor imply the replacement of faulty parts, in addition to the last two points.
Finding the reasons why it triples in wet weather
After inspecting the engine compartment and making sure that there are no obviously damp places or visible damage, we try to start it. It turns out only after 5-10 attempts, while it catches 4-6 times, and even then, these attempts are not always enough to get it started. Further, after a successful first start, the car shows no signs of breakdowns, but as soon as it sits and cools down, everything repeats itself. Only 5-10 km after the start, the car starts without problems.
There is also another popular method of checking what’s what, which will help you find the real problem. Try leaving your car overnight in a place not illuminated by street lights. Then, at night, open the hood and ask someone to do the key-to-start. You yourself need to stand and watch what is happening around the “high voltage”, explosive coils, distributor. There will be “Northern Lights”. You can read on a moonless night with such a glow.
Condensation in the distributor cap
After checking the spark plugs, injectors and fuel pump, and replacing the filter to calm things down, no defects were found. Apart from these factors, you seem to have nothing else to sin about. Although in fact there is no need to dig very deep, because most likely it is condensation in the distributor cap . The cover must be carefully inspected from the inside. As an experiment, try drying it, although the distributors are different on different engines, the vulnerability in them is the same. You need to wash the inside of the distributor cover first with gasoline (to degrease), then with 96% alcohol (to remove moisture).
Many people advise buying a new distributor right away, but don’t rush to buy and change everything ahead of time. According to the never-missing law of meanness, the last of the component parts will be guilty. Only at the extreme end the distributor cap needs to be changed, and with it the slider at the same time.
Repair
So, the car owner has identified certain malfunctions in the operation of the distributor and is ready to begin repairing this unit on his own. The first thing you need to know in this case is how to properly remove and install the distributor back. I recommend following these instructions:
- To begin with: check if sparks are visible when the engine is running. This can usually be done in the dark. If sparks are visible, this gives rise to an insulation violation. Also, the lid must be dry and clean, and it is prone to burning. In addition, I advise you to check the wire connections, that is, the integrity of the contacts. Therefore, the terminals in the cover should not be removed, at least without much effort.
- After completing the basic checks, remove the negative cable from the battery terminal.
- Disconnect the high-voltage wires and vacuum hose from the distributor.
- Remove the cable from the throttle valve drive.
- Together with the wires and studs, remove the bracket that holds the wires. To do this, unscrew the nut and under no circumstances lose it.
- Apply special marks to the housing, distributor cover and auxiliary device drives, which will help maintain the starting ignition timing during further installation of the described mechanism in place. Otherwise, it will need to be adjusted.
- Using a screwdriver, press the connector lock to which the drive harness is connected and pull out the drives.
- Pull out the rubber plug located in the clutch housing.
- Rotate the crankshaft until the piston of the first cylinder is at the top dead point. In this case, the flywheel mark should coincide with the middle division on the housing scale.
- Unscrew the nuts and remove this device together with the distributor cover.
- Installation is carried out in reverse order. Here we should remind you of the mandatory check of the alignment of the marks and the ignition timing.
The car owner should know that each wire on the distributor cover is installed in a certain sequence, which depends on the operation of the cylinders. So, of all of them, only the first one is indicated, and the rest must be installed by the driver himself, and this must be done counterclockwise. Another mandatory factor when carrying out this procedure is that the car enthusiast’s view should be from the side of the antifreeze tank, made of plastic.
An equally important point: if there is a need to replace the cover or slider, then dismantling the distributor itself is no longer required.
So, repair of the ignition distributor-distributor takes place in the following stages:
- Disconnecting high-voltage wires and removing the distributor from the vehicle.
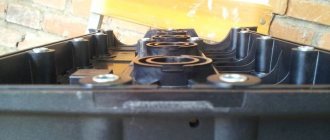
- Removing the cover and carefully inspecting it. The fact is that it can be pierced (this is manifested by the presence of a thin dark strip), and this can only be eliminated by replacing it with a new one. Also, the central contact in it may fall out (it is also called a coal), which can be corrected in the same simple way - by replacing it with a new one.
- Checking the slider, which will also need to be replaced if there is a blown fuse and dark stripes, rust, or traces of burning.
- Remove the dust shield: remove the low voltage terminal by unscrewing the screw that secures it, then use a screwdriver to open the claws of the holder and remove the wires from it. Next, unscrew the two screws that secure the Hall sensor support plate and remove the latter. After this, pull out the retaining ring from the plate pin, which may require considerable force. Unscrew the screws that secure the vacuum corrector, then use a screwdriver to pull out its rod - now it can be completely removed from the distributor. The final step is to pull out the support plate and check the condition of its bushing. Ideally, there should not be any tears on it, and there should be no noticeable wear on it. Otherwise, there will be a need to completely replace this element.
- Remove the snap ring, the pressure pin that secures the coupling. If the sealing ring is torn, has lost its former elasticity or is completely worn out, urgently replace it. Drive the pin out of the coupling, remove it and the adjusting washers. This element needs to be replaced if its spikes are “licked off”.
- Remove the centrifugal regulator and roller. If backlash, wear, potholes, burrs, non-free rotation of loads, etc. are detected. – replace the entire distributor body.
Repair of the distributor, despite the fact that it is considered a complex part and no less capricious, can be carried out on your own. Therefore, I advise you not to be afraid and try to complete this process, while being sure to follow the given instructions.
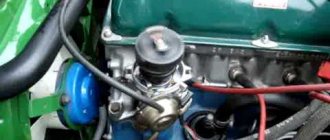
Description of SZ on UAZ
How is the ignition circuit installed, configured and adjusted on the AUZ 417 or any other? We will talk about this below. But first, let's understand the principle of operation of the node, as well as the types of SZ.
Operating principle of SZ
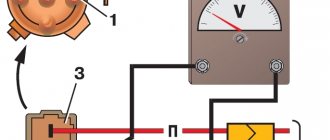
As already said, the ignition on an UAZ performs one of the main functions when starting the power unit. Thanks to this system, the procedure for igniting the air-fuel mixture in the cylinders of the power unit is carried out by supplying a spark. The spark is directly supplied to the spark plugs; one spark plug is installed on each cylinder. All of these safety devices operate in sequence mode, igniting the combustible mixture in the required period of time. It is also necessary to take into account that the ignition system on cars not only provides a spark, but also determines its strength.
The vehicle battery is not able to produce the voltage and current required to ignite the mixture, since this device only produces a certain amount of current. The help comes from the ignition system, the purpose of which is to increase the power of the car’s battery. As a result of using the SZ battery, it is possible to transmit sufficient voltage to the spark plugs to ignite the mixture.
Types of ignition systems
Today there are three main types of ignition systems that can be installed on cars:
- Contact SZ. It is considered obsolete, but continues to be successfully used on domestically produced vehicles. The principle of operation is that the system produces the necessary impulse, which appears due to the operation of the distribution component. The contact-type device itself is simple, and this is a plus, because in the event of a breakdown, the driver can always diagnose and repair it himself. The cost of replacement components is not high. The main components of a contact type system are a battery, a short circuit, a drive, spark plugs, a capacitor, and a breaker with a distributor.
- A non-contact ignition system called transistor. Many vehicles are equipped with this type. When compared with the type described above, the system is characterized by a number of advantages. Firstly, the generated spark has greater power, which is due to the increased voltage level in the secondary winding of the ignition coil. Secondly, the contactless system is equipped with an electromagnetic device that allows for stable operation, as well as energy transfer to all nodes. As a result, with proper tuning of the internal combustion engine, this allows not only to increase operating power, but also to save fuel. Thirdly, it is convenient in terms of node maintenance. To ensure long-term performance, after setting up and installing the distributor drive, this element must be lubricated from time to time. To ensure normal operation, the element is lubricated every ten thousand kilometers. As for the disadvantages, it is the difficulty of repair. It is impossible to repair the device yourself; this requires special diagnostic equipment, which is only available at service stations.
- Another option for SZ is electronic, which is the most technologically advanced and expensive today, which is why new vehicles are equipped with it. Unlike the two systems described above, the electronic ignition system is characterized by a complex device that ensures the functionality of not only the torque, but also other parameters. Currently, all modern cars are equipped with electronic systems. The key advantage is a more simplified procedure for setting the advance angle, as well as the absence of the need to periodically check the contacts for oxidation. In practice, the air-fuel mixture in engines with electronic combustion almost always burns completely. This type also has its disadvantages, in particular in the matter of repairs. It is impossible to produce it with your own hands, since this requires equipment. Detailed instructions for adjusting the ignition using a light bulb are presented in the video below.
System diagnostics
How to diagnose and replace high voltages, covers, and the runner of the distribution unit:
- First, all wires should be cleaned; to do this, they need to be treated with a damp cloth. It is necessary to carefully inspect each cable; if there is damage, the wire must be replaced.
- Before disconnecting the cables with a puller, check and remember their location. When disconnecting cables, you should carefully inspect the rubberized connecting wires; this is important.
- If you notice traces of corrosion on the contact sockets of the distributor cover, as well as the coil, these components need to be cleaned. To prevent corrosion, the cable ends can be treated with Vaseline (but with lubricant).
- You also need to dismantle the distributor cover along with the slider - carefully inspect the slider and the inner surface of the cover itself. If there are signs of burning or corrosion or wear, either the cover or the rotor is replaced. You should also carefully inspect the distribution assembly for sparking or cracking.
- When further installing high-voltage units, you should make sure that these elements are installed correctly, as this will affect the operation of the cylinders. Make sure that all connections are reliable and safe (video author - ICE Theory).
You can also diagnose the capacitor in a garage environment; to do this, follow these steps:
- First you need to dismantle the switchgear cover, the slider, and the boot, then you need to turn the motor until the contacts close. After this, the ignition should be turned off and the contacts themselves should be separated. If this step is accompanied by sparking, then this indicates a malfunction of the capacitor element.
- Then you need to diagnose the short circuit; to do this, remove the capacitor and connect a test light to it. The second wire from the control is connected to ground. If the light starts to light up, this indicates a malfunction of the element being diagnosed.
- If you have a new capacitor, try installing it instead of the old one. This is the most proven and effective diagnostic method. To dismantle the device, you need to unscrew the mounting bolt and then disconnect the wires. The installation procedure is carried out in reverse order.
Have you ever had to replace or repair an ignition coil?
- Yes, I repaired it
- Yes, I did
- Haven't encountered it
Hall sensor replacement
Replacing the Hall sensor will not be particularly difficult. Even a novice car enthusiast can handle this work with his own hands.
The video below shows in some detail the process of replacing the sensor in the distributor of a UAZ car.
Typically, replacing a Hall sensor consists of several steps:
- First of all, the distributor is removed from the car.
- Next, remove the distributor cover and align the timing mechanism mark with the crankshaft mark.
- Having remembered the position of the distributor, you need to unscrew the fasteners with a wrench.
- If there are latches and stoppers, they should also be removed.
- The shaft is pulled out of the distributor.
- All that remains is to disconnect the terminals of the Hall sensor and unscrew it.
- By pulling back the regulator, the faulty part is carefully removed through the gap formed.
- The new Hall sensor is installed in the reverse order.
Checking the functionality of the Hall sensor not only allows you to accurately determine the cause of engine failure. Thanks to simple techniques, the motorist will save his time on repairs and also eliminate unnecessary waste of money.
When is there an option to repair?
If during testing both secondary windings show integrity and serviceability, the reason for the inoperability of the coils may be a break in the soldering of the switch wires. Such damage is detected when the rear cover of the module is removed. If you have a soldering iron and know how to use it, you can restore the integrity of damaged contacts, while at the same time strengthening the rest. This, unfortunately, is the only failure of the ignition module that can be repaired.
Testing the ignition module can be done using simple do-it-yourself instruments. Based on our advice, you will be able to fully check both the module itself and other elements of the mechanism that may be the cause of the breakdown. We wish you success in this matter!
Final tips
If the ignition system suddenly fails on the road, the internal combustion engine will stall instantly and the spark will disappear. There may also be several reasons for this.
- Most likely, the “woman”, i.e., the coil, has broken through. This problem can be solved simply - install a new coil, according to the markings indicated on the body.
- The central core of the VSKV wire that comes from the coil may burn out. The solution is to install a new armored wire.
- This situation may indicate burnout of additional resistance or failure of the slider. If the slider is broken, then you need to install a new one. If there are problems with additional resistance, it is pulled out of the slider and wrapped in cigarette foil.
Note. To determine the exact breakdown of the slider, you need to remove the distributor cover and the main armored wire. Then the latter must be held above the slider (distance 2 mm from the surface). We turn on the ignition - if a spark jumps between the slider and the wire, a breakdown of the slider is proven.
- It is quite possible that the protrusion of the moving part of the contacts may break or wear out. It is plastic and breaks easily. Its task is to ensure the opening of the contacts and the hammer spring. It is considered the most difficult malfunction to determine, since the usual spark test does not work here.
- Burning of contacts is complete. In other words, this is severe wear of the contact group.
- The lid is broken. In addition to microcracks, a large and wide crack can form on it. The only solution is to replace it with a new one.
Note. If a broken roof catches a motorist on the road, a clove of garlic will help. They should wipe the current crack to at least get to the nearest service station or store. Garlic juice has the ability to temporarily restore the functionality of the lid - this has been proven in practice.
- Contact group 3Z is faulty. A new one is installed, this is the only way to solve the problem. It is not difficult to provide access to the contact group; it will be enough to connect the wiring responsible for the ignition to each other and insulate them well.
As you can see, there are several reasons. They are considered the most common. It is their fault that the spark disappears and the dynamics of the car are lost.
As you know, one of the main components in any vehicle is the ignition system (IS), which, in turn, consists of many elements that perform different functions. If at least one of the SZ components fails, this will negatively affect the functionality of the engine as a whole. How to check the Golf 3 ignition coil and other system elements, what malfunctions are typical for SZ - find out from this material.
- 1 Ignition features
- 1.1 Typical system malfunctions and methods for eliminating them
1.2 Photo gallery “Schematic design of breakers for different Golfs”