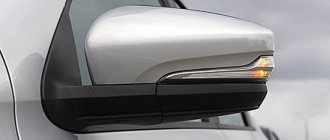
Side rear view mirrors are an integral element of the design of any vehicle. They allow better control of the road situation, promote traffic safety, and optimize the aerodynamics of the body.
Some mirrors are additionally equipped with direction indicators (read the instructions for how to replace them), this statement also applies to the popular domestic car Lada Granta. The need to remove mirrors may be due to the following factors:
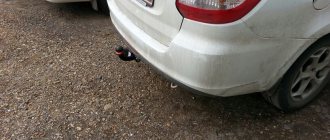
- Mechanical impact that caused the destruction of the housing.
- A crack or other defect on the mirror element. (Instructions for replacing the mirror element)
- Burnt spiral of heated mirrors or other damage to the electrical part.
In general, the operation of removing a mirror does not present any particular difficulties; it can be done on your own with minimal waste of time, so there is no need to turn to professionals.
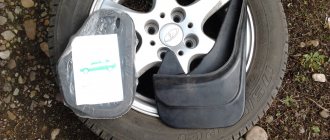
Disassembling the mirror
Disassembly example
Repair of side mirrors Lada Kalina
How to remove and disassemble a side mirror
by car Lada
Kalina
.
Replacing the mirror element on the exterior rear view mirror of Kalinas, Grants and Prioras
Video review on how to independently replace the mirror element on the outside rear view mirror of such cars…
There are several ways to disassemble a car mirror.
First way
Using a curved object or a screwdriver, unclip the mirror by gently pressing it from the inside. Trying to pry the mirror off from the edge may damage it. Some car enthusiasts use a wide variety of objects to remove the mirror element. It could even be all kinds of kitchen spatulas. Some wrap the edge of the spatula with electrical tape so as not to damage, or rather, scratch the mirror surface. Others use one hard spatula to fix the gap, and a second softer one to thread it into the resulting gap.
Second way
In order to remove the mirror element, you should sharply hit the body with a soft object - it can be anything. In order to disconnect the mirror housing itself from the triangular mount, you need to remove the spring, unscrew the adjusting rod and remove the pin. Assembly and installation of the mirror is usually carried out in the reverse order.
Flexible heating element for side rear view mirrors for VAZ 1118-1119 (Kalina) and Granta.
- Add to favorites
- Description
- Delivery terms
- Reviews
Attention! The price is for 1 set!
With the arrival of autumn and then winter, more and more motorists are beginning to think about heated rear-view mirrors.
In the rain, it is difficult to make out drops on the mirror what is happening in the next row. In winter, mirrors fog up and become covered in ice.
Unfortunately, car manufacturers will not soon begin to equip every car with such a useful function as heated side mirrors.
But the cleanliness of mirrors directly affects traffic safety.
The offered heaters have several advantages over heating elements from other manufacturers: 1) 6.3 mm male terminals This allows for simplified connection while maintaining build quality. If you need to change the mirror element, the wires are simply disconnected and installed in place, without the need for soldering, twisting or other similar connections. 2) already applied adhesive layer. Special thermal tape has already been applied to the elements at the factory. You don’t need to search and select it in the store, everything is already ready for installation 3) strict quality control control All mirrors undergo mandatory control after manufacturing. This ensures the high quality of the product.
Replacing the mirror element on Grant
Many drivers, out of ignorance, change the entire mirror assembly, although in most cases only the mirror element is damaged. And it would be quite ridiculous to pay about 1000 rubles for a complete mirror if you can get by with 300 rubles per element.
The design of the rear view mirrors on Grant, meaning external ones, is the same as on Kalina. Of course, if possible, it is better to immediately install a carbaza.ru rear view camera when replacing it in order to protect yourself as much as possible from unwanted damage. That is why the entire process of this repair will be identical. Let's look at the main reasons why this part may be damaged:
- side impact in an accident
- hitting the mirrors when driving on a too narrow section of the road
- other damage not related to the operation of the car
What happens if you make the wrong choice?
If you install unsuitable or low-quality spark plugs in your car, the following troubles may arise:
- deterioration of engine ignition. When starting the engine, the owner will have to crank the starter for a long time, and this can reduce the functionality of the battery. In some situations it will be impossible to start the vehicle;
- excess fuel consumption;
- Once started, the engine will be much noisier and the sounds will subsequently increase in volume. This is especially noticeable during the process of warming up the car;
- the production of harmful substances in exhaust gases will increase. The analysis can be carried out using special equipment;
- the power and dynamics of the motor will decrease. This will be noticeably felt as you climb the hill.
In order to avoid such problems with your car, we recommend buying only high-quality spark plugs from trusted manufacturers.
In this article we discussed how to change spark plugs and the principles of choosing the right part for the full functioning of the power unit
It is necessary to pay due attention to the choice of spark plugs, since they play a major role in the vehicle operating system
Important nuances
Let's start with him. They serve to provide the motorist with a panoramic view while in the driver's seat. Moreover, this is true for cars with left and right-hand drive. Only the recommendations should be applied slightly differently.
If you have a left-hand drive, follow these instructions very carefully. If the car is right-hand drive, then the advice on the left side mirror is applied based on the right mirror. And vice versa. I think you've got this point figured out. But in general, right-hand drive cars are a separate topic for discussion, since they are not adapted to our traffic regulations. Too many problems arise. Especially when trying to overtake another car. But let's leave these conversations for another thematic material.
First, keep in mind that cars can be equipped with 2 types of mirrors. Moreover, they can use an electric drive or a mechanical type of drive, where a special lever or joystick is responsible for the settings. Here you need to work manually. I think each of you will understand, using your own car as an example, what to press and where.
Electric ones are more convenient, but are not found on all cars. But everywhere there is the possibility of adjusting the position.
When operating a car, consider what type of mirror is located on the sides of the car.
- With a spherical surface. Their characteristic feature is the ability to distance objects. That is, they create the impression that the car is further away from you than it actually is. It creates a deceptive effect, distorting the reality of what is happening. Not the best option. And if you have similar mirrors on your Polo or other car, many advise replacing them;
- With flat glass surface. Such designs are the most optimal for learning to look and adjust mirrors without distorting reality. They are considered the most suitable for car use, since they can cover the entire road.
Having decided on these questions, you can proceed directly to the settings.
Installing mirror covers
As for installation, anyone can handle it. However, in case of even minimal doubts, it is better to contact the nearest car service center. This way you can avoid the risk of damaging the paintwork of the body or trim. Usually the linings are equipped with everything necessary for convenient mounting on a car. Using an example, we will describe the installation of an overlay using hermetic glue or silicone.
First you need to thoroughly clean the outside of the mirror from dust and dirt, then wipe it dry. The inside of the lining must be coated with sealant. Its layer should be small, but as even as possible. Then you need to place the pad on the cleaned surface of the mirror and press it firmly for several minutes. Next, you need to wipe off the excess glue and then leave the parts to dry.
In most cases, glue can be replaced without any problems with construction double-sided tape. If you use tape, then you need to stick it in several strips, as close as possible to the outside of the cover or directly to the mirror. There is no need to put tape on the edge. The gluing technology is the same as when using sealant.
If your trim comes with mounting hardware, then it's even easier. Just install it and snap it in the right places. It will hold tight.
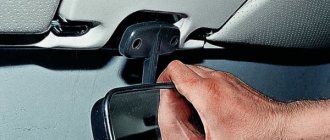
Removing the door trim
To gain access to the elements that fix the mirror, you first need to remove the door trim.
The sequence of actions is as follows:
- Removing the key blocking the lock.
- Removing the plugs.
- Sequentially unscrew the screws and screws holding the upholstery.
- To remove the upholstery, you need to insert a flat-head screwdriver wrapped in electrical tape into the groove between the upholstery and the door panel ( but it’s better to use a special device ). The clamps provide some resistance, but significant force during dismantling is unacceptable.
- The rods of the locking mechanism are removed, the upholstery is moved back to a distance limited by the length of the wires supplying the lifts.
- The wiring is carefully removed, after which the door trim is also dismantled.
Detailed and universal method
Universal method
In the car interior, you need to unclip the plastic cover that covers the mirror mounting screws. After removing the cover, unscrew the three screws that hold the mirror in place and remove it. After this, you need to carefully remove the rubber gaskets -
If the rubber gaskets are damaged, it will be very difficult to buy new ones; they are rarely sold separately.
Now you need to unscrew the two screws securing the mirror adjustment joystick. Disassembling the joysticks themselves is a simple procedure; you just need to carefully remember the position of the cables and the color, since different colors are responsible for their adjustment. Next, you need to remove the three screws that are located on the lower plastic corner - it is most susceptible to damage during vehicle operation. After that you need to remove it too. How to remove the mirror element has already been described above. After removing the mirror element, you need to unscrew the four screws and remove everything else.
Place on silicone glue
The easiest way, of course, is to ask a mechanic you know or send the car to a car service center if you need to replace the mirror or paint it. But most owners are accustomed to repairing their car themselves - after all, this is a significant saving of money.