The question of how to remove the fuel pump on Lada Kalina cars can often be found on the World Wide Web. But the thing is that the quality of our gasoline and the ability for stable operation of this part cannot “get along” in a peaceful environment. Therefore, the need for a complete replacement or repair of this device for owners of Lada Kalina occurs with enviable frequency.
In the video, replacing the fuel pump on a Lada Kalina:
Advantages and disadvantages of a fuel pump
Despite its apparent simplicity, understanding the purpose of the fuel pump requires some explanation. The fact is that in most cases, this also applies to cars of the Lada Kalina family, the gas tank is located on the opposite side of the car from the engine. Therefore, efficient operation of the fuel pump is required to ensure that the fuel travels a significant distance at the required pressure.
The design of the Lada Kalina uses an electric fuel pump as a more modern and efficient device.
Among the main advantages of a fuel pump are several:
- ensuring the supply of the required amount of fuel taking into account the needs of the engine;
- high reliability and simplicity of design;
- high level of safety, since the pump stops working immediately after the engine stops.
At the same time, the electric fuel pump has a number of disadvantages that can affect its operation:
- noise during operation;
- need for cooling;
- demands on fuel quality.
It is the use of low-quality gasoline and untimely replacement of fuel filters that lead to a decrease in performance or failure of the gasoline pump.
Changing the mesh with your own hands
So, the mesh located in the fuel pump is forced to constantly come into contact with dust and dirt, because the pump itself is located between the seats, and dust constantly settles on its body.
That is why experienced motorists are not lazy to wipe the pump body with a damp cloth from time to time to avoid untimely clogging of the system.
Motorists advise carrying out such work every 45,000 - 50,000 km. mileage, this is exactly the time during which the Kalina mesh wears out. Of course, this work is classified as dusty, but, in principle, it is not as difficult as it seems, it can be done alone, in half an hour - an hour.
https://xn--80aal0a.xn--80asehdb/do-my-self/repair/repair-lada-granta/2699-kak-snyat-benzonasos-na-lada-granta-kalina-priora-svoimi-rukami. htmlhttps://ladaprofi.ru/lada-kalina/kak-bystro-snyat-benzonasos-na-lade-kaline.htmlhttps://vaz-russia.com/remont-vaz-1117-kalina-universal/zamena-benzonasosa- na-kaline.htmlhttps://carfrance.ru/kak-zamenit-benzonasos-na-lada-kalina-svoimi-rukami/https://mylada.net/remont/zamena-setochki-benzonasosa-na-kaline.html
Fuel purification
Electric fuel pump without protective cover
To prevent fuel pump failure, you must not only avoid refueling with low-quality gasoline (use only proven refueling), but also promptly replace the fuel filter.
Keep in mind that preventing contaminants from reaching fuel system parts occurs not only in the fuel filter.
Impurities can be filtered out in the following places:
- mesh at the inlet to the fuel pump;
- fine filter in the fuel line after the fuel pump;
- mesh in front of the fuel pressure regulator;
- mesh in front of the fuel injector entrance.
It is the first two positions that directly affect the proper operation of the pump. The frequency of replacing the fuel filter is determined at 30 thousand km, but owners do this more often, taking into account the low quality of the gasoline being poured.
The frequency of replacement of the Kalina coarse fuel pump mesh is not determined by the factory, and for this reason it is forgotten until a situation arises when the fuel pump begins to malfunction.
At the same time, it is recommended to clean the mesh, and if necessary, for example, if it is damaged, the fuel pump mesh is replaced. It is recommended to carry out such a replacement every 50-60 thousand km.
Cleaning the dirt-collecting mesh of the fuel pump
The module has been removed, what next?
Having disengaged the four latches, the module cover is disconnected from the “glass”. Then, the “glass” can be cleaned, the pump screen can be replaced, and so on. Details are illustrated in the photo:
The mesh will be fixed in front of the intake hole
The module is assembled in the reverse order. And when installing it in place, you need to make sure that the plastic protrusion coincides with the slot on the tank:
Fuel pump module assembly
Here are a couple more tips:
- Do not turn on the pump motor “in the air” (the windings overheat);
- The module is replaced together with the sealing ring, which must be included in the kit.
In a Lada Kalina car, as in any other, you can observe the following effect: symptoms indicate that the fuel pump is not working, but its engine is humming. Then you need to clean or replace the mesh (discussed above).
There are various folk tips for repair and tuning. One sounds like this: the pump is cleaned without dismantling it, but simply by turning on the electric motor in reverse polarity. It is this advice that is not recommended to be followed.
Procedure for servicing the fuel pump, possible malfunctions
You should not always resort to immediate replacement of the Kalina fuel pump, because first you can repair it. But for this you need to select the right tool in advance.
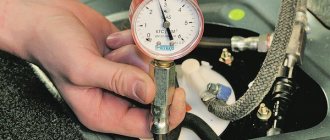
For this device, two parameters are usually monitored: operating pressure and operating performance. After removing the device, you can check the current consumption at rated and full load. But for such measurements you will need a specialized stand.
The initial point of control will be the voltage of the connector that supplies the fuel pump from the vehicle’s on-board power system. Not only should it be equal to 12 V or even slightly exceed this value, but also when the machine is operating, the noise of the operating device should be clearly audible.
The disadvantage of this control method is the inability to detect unreliable contact in the electrical circuit on the way to the connector. Any loose connection in the fuse box, fuel pump relay, will result in the 12 V received at the terminals upstream of the pump showing the same 12 V. But a working pump will receive only a few volts and will not be able to work normally.
Also, a malfunction in such a situation may be a breakdown of the fuel pump relay. This malfunction is easy to diagnose, since special symbols are displayed on the instrument panel, which allows the driver to see an error in the operation of this part.
All control relays are located inside the car and, when malfunctioning, distinguish themselves with characteristic clicks. Replacing the fuel pump relay yourself is not difficult; it is enough to recognize the location of its installation by the special printed symbols.
Fuel pump parts disassembled
Checking the pressure created consists of monitoring this parameter in the pump pumping mode, when it turns on after turning the key for 1.5-2 seconds to add fuel to the pipeline system. For Lada Kalina this figure is 0.8-1.2 kgf/cm2. If the pressure turns out to be underestimated, then you should look for the cause of this phenomenon, checking each link in turn: filter, mesh, fuel pump. Ultimately, the part that prevents the pressure from quickly building up to normal will be replaced.
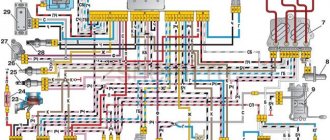
General diagram of electrical equipment of VAZ 1118
1 — block headlight; 2 — windshield wiper gear motor; 3 - generator; 4 - battery; 5 - starter; 6 — sound signal; 7 — hood open sensor; 8 — power window switch for the right front door; 9 — motor-reducer for window lifter of the right front door; 10 — electric pump for windshield washer; 11 — connecting blocks of wires for connecting the right (front) speaker of the audio system; 12 — electric drive for locking the lock of the right front door with an open door sensor; 13 — ambient air temperature sensor; 14 — connecting block of the wiring harness for connection to the engine control system harness; 15 — electric drive for locking the left front door lock (with an open door sensor and a central locking switch); 16 — sensor of insufficient brake fluid level; 17 — connecting blocks of wires for connecting the left (front) speaker of the audio system; 18 — right front door power window switch (installed on the driver’s door); 19 — left front door power window switch; 20 — central locking switch; 21 — motor-reducer for window lifter of the right front door; 22 — remote control unit; 23 — immobilizer control unit (APS-6); 24 — mounting block; 25 — instrument panel; 26 — right side turn signal; 27 — glove box lighting lamp; 28 — switch for the glove compartment lighting lamp; 29 — brake signal switch; 30 — ignition switch (lock); 31 — lighting control unit; 32 — steering column switches; 33 — left side direction indicator; 34 — connecting blocks of wires for connecting the left (rear) speaker of the audio system; 35 — electric drive for locking the left (rear) door with an open door sensor; 36 — electric heater fan; 37 — additional heater resistor; 38 — heater switch; 39 — alarm switch; 40 — reverse lock solenoid switch; 41 — rear window heating switch; 42 — connecting blocks of wires for connecting the right (rear) speaker of the audio system; 43 — electric drive for locking the right rear door lock (with a door open sensor); 44 — fuel module of the engine control system; 45 — reverse light switch; 46 — parking brake warning lamp switch; 47 — cigarette lighter; 48 — reverse lock solenoid; 49 — connecting blocks of wires for connecting the head unit of the audio system; 50 — backlight lamps on the trim of the center console of the instrument panel; 51 — electric power steering control unit; 52 — interior lamp; 53 — rear light; 54 — block for connecting the electric drive for locking the trunk lid lock*; 55 — luggage compartment lid open sensor; 56 — license plate lights; 57 — additional brake light; 58 — rear window heating element; 59 — luggage compartment lighting lamp.
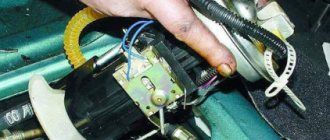
Removing and installing the fuel pump Lada Kalina:
- Next, when all the screws are unscrewed, you can safely remove it with a slight movement of your hand:
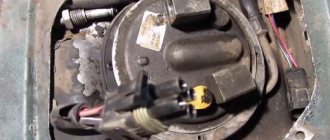
- After which the following picture opens, where we see the upper part of the Kalina fuel pump and all the fittings that are connected to it:
- Now you can begin to remove the wires and hoses and the fuel pump. First, disconnect the power plug, which is located on the left side. Push the plastic lock up a little and pull the plug to the side.
- Disconnect the fittings one by one. The lower one is removed as follows: with one hand we press on the metal locking clamp, and with the other hand or pliers we pull the fitting to the side:
- The top one is removed in the same way, only there is a slightly different latch - green. You need to press on it with one hand and pull the tip to the side with the other.
- It is advisable to clean everything around the fuel pump thoroughly so that when dismantling, no dust, dirt or other debris gets inside the tank.
- Next, you can begin to remove the large metal ring that secures the pump. The factory uses a special puller for these purposes, but you can do without unnecessary devices. Simply place a flat-head screwdriver on the end of the ring and slowly tap it in a counterclockwise direction with a hammer until the ring comes out of the mounting grooves.
- The Jonnesway screwdriver coped well with this test, its body remained intact and undamaged after numerous hammer blows! After the clip has popped out, it can be removed:
Lada 2108 Charoit › Logbook › Popular about the fuel pressure regulator
Probably, many people know that injection cars use a fuel system with excess pressure released, i.e. returning excess fuel back to the tank. The pump pumps fuel constantly, it enters the ramp under pressure, and a fuel pressure regulator is installed at the outlet of it. The detail is inconspicuous and generally not annoying during the work process.
The regulator didn’t bother me either, but one day while inspecting the hoses in the engine compartment, I noticed that the vacuum hose going to the regulator (hereinafter referred to as the RTD) had a crack. An experiment was immediately carried out: what if the crack in the hose is slightly opened? Nothing in the engine's performance has changed. I removed the hose altogether - and again no reaction. Naturally, the first question arose: is the RDT even working?! And then the second: how does this crap work? No, well, I knew it in general, but I wanted to understand it exactly. So, here’s the drawing:
The RTD has an inlet hole (in the drawing below), it is not visible, it looks into the ramp. Fuel comes here from the ramp under pressure. There is an outlet through which the fuel returns to the tank. And there is a pipe (3) connecting the vacuum cavity (B) through a hose to the inlet manifold, in which there is a vacuum when the engine is running. Pressure regulation occurs in two ways: a spring-loaded valve (5), set to a constant certain pressure, and through a diaphragm (4 ) a vacuum that changes depending on the load on the engine. The valve always maintains constant pressure, its operation does not depend in any way on the engine. But with a vacuum it is more interesting. You can find many different descriptions and diagrams of regulators, and they only confuse. Let's try to figure it out to make it clear.
We are essentially interested in 2 modes: XX and load.
At idle, the throttle valve is closed and maximum vacuum is maintained in the intake manifold. This vacuum reduces the RTD spring force, retracting the valve, and the valve opens earlier, at lower fuel pressure, thus lowering fuel pressure at idle.
Under load, the throttle valve opens, exposing the intake manifold to the atmosphere, and the vacuum decreases (i.e., air pressure increases, becoming closer to atmospheric pressure). In this case, the spring force increases, and as a result the valve opens later, and the fuel pressure increases.
In this case, the maximum pressure will be if you remove the vacuum hose from the RTD. That is. the valve does not increase pressure during load, but decreases it during idle, which may not be immediately obvious.
So now it’s clear why, in my case, removing the hose had no effect on the operation of the engine - the pressure increased, reached a maximum, and did not fall.
Source
REASONS FOR REPLACEMENT
Characteristic signs of a fuel pump malfunction:
- power drop;
- failures when sharply pressing the gas pedal;
- difficulty starting the engine;
- when you sharply press the gas pedal to the floor at low speeds, the engine begins to “choke”;
- increased noise level when the motor is turned on;
- “dips” are observed, a loss of power some time after the start of movement, and if the engine is allowed to cool, interruptions in operation disappear for a short period.
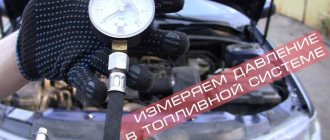
Before you begin replacing the fuel pump, it is important to make sure that engine interruptions are related to the fuel supply and not to the ignition system, ECU, or power supply to the pump motor. It is necessary to measure the pressure in the fuel rail. If the value obtained at the time of interruptions in engine operation differs from the standard values, you can begin diagnosing the power system.
The symptoms described above can be caused not only by a faulty fuel pump, but also by a clogged mesh or fine fuel filter. Also, do not forget that the cause of interruptions in the fuel supply may be poor contact in the motor power supply circuit (torn wires, oxidation, etc.). For personal diagnostics, it is important to know the structure and operating principle of the fuel pump.
Pinout BN VAZ 2108, 2109, 21099
The fuel pump activation relay (2) is shown by an arrow.
1 — nozzles; 2 — spark plugs; 3 — ignition module; 4 — diagnostic block; 5 - controller; 6 — block connected to the instrument panel harness; 7 - main relay; 8 - main relay fuse; 9 — electric fan relay; 10 — controller power supply fuse; 11- electric fuel pump relay; 12 — fuel pump power circuit fuse; 13 — mass air flow sensor; 14 — throttle position sensor; 15 — coolant temperature sensor; 16 — idle speed regulator; 17 — knock sensor; 18 — crankshaft position sensor; 19- oxygen sensor; 20- APS control unit; 21 — APS status indicator; 22 — speed sensor; 23 — electric fuel pump with fuel level sensor; 24 — solenoid valve for purge of the adsorber; 25 — block connected to the ignition system harness; 26 — instrument cluster; 27 — ignition relay; 28 — ignition switch; 29 — mounting block; 30 — electric fan of the cooling system;
REPLACEMENT GUIDE
Let's look at how to change the fuel pump yourself using the Hyundai Solaris as an example.
- Unscrew the mounting bolts and remove the rear seat cushion.
- Cut off the sealant with a utility knife.
- Remove the power plug.
- Using pliers, loosen the self-tightening clamp and remove the gasoline vapor removal hose to the adsorber.
- Remove the fuel supply hose.
- Release the ventilation hose going to the gasoline vapor adsorber from the bracket.
- Unscrew the fastening screws and remove the pressure plate.
- Pull out the fuel module.
- Remove the rubber seal.
- Disconnect the power plugs.
- We recommend removing the FLS to avoid damaging it during module disassembly.
- Remove the fuel pipe tip stopper.
- Remove the tube and O-ring.
- Press the latches of the metal guides, and then separate the parts of the housing.
Lada Kalina dashboard diagram
1,2,3,4 — blocks of the instrument panel wiring harness to the blocks of the rear wiring harness;
5,6 — blocks of the instrument panel wiring harness to the blocks of the front wiring harness; 7 — block of the instrument panel wiring harness to the block of the wiring harness 8 — block of the instrument panel wiring harness to the block of the front wiring harness; 9 — lighting control module; 10 — ignition switch; 11 — on-board computer mode switch; 12 — windshield wiper switch; 13 — sound signal switch; 14 — light signaling switch; 15 — instrument cluster; 16 — evaporator temperature sensor; 17 — interior air temperature sensor; 18 — air conditioner switch; 19 — controller of the automatic climate control system; 20 — heater damper gearmotor; 21 — rear window heating switch; 22 — alarm switch; 23 — brake signal switch; 24 — cigarette lighter; 25 — electric amplifier control unit; 26,27 — blocks of the instrument panel wiring harness to the radio; 28 — backlight lamp for the heater control panel; 29 — illuminator; 30 — mounting block: 31 — heater electric motor switch; 32 — heater electric motor; 33 — additional resistance of the heater electric motor; 34 — lampshade lighting of the glove box; 35 — glove box lighting switch; 36 — control unit of the APS-6 automobile anti-theft system; 37 — driver airbag module; 38 — passenger airbag module; 39.40 — blocks of the instrument panel wiring harness to the blocks of the ignition system wiring harness. KZ - additional starter relay; K4 - additional relay; K5 - relay-interrupter for direction indicators and hazard warning lights; K6 - windshield wiper relay; K7 - headlight high beam relay; K8 - sound signal relay; K9 - relay for turning on fog lights; K10 — relay for turning on the heated rear window; K11 — electric seat heating relay; K12 - air conditioning compressor clutch activation relay;
Instrument panel wiring harness - 11186-3724030-20.
Fuel pump device
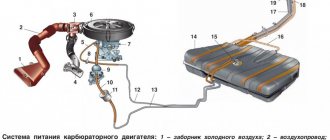
Modern cars use two types of fuel pumps - mechanical or electric. The former are used in carburetor engines, the latter in injection engines.
The mechanical pump is usually installed on the body of the gas tank, while the electric pump is installed inside the tank. Some automakers use both types of pumps at once.
Mechanical pump
The mechanical fuel pump is quite large. Its main elements are:
“>
Diagnosis procedure
After you are convinced that the fuel pump has failed, you can proceed to the next stage. In particular, it is necessary to understand what exactly the problem is. There can be many options here. The easiest way is to check the integrity of the fuses. Let us remind you that the fuel pump itself in the “fourteenth” is located in the fuel tank. After the ignition is turned on, voltage is supplied to its terminals through fuse F3 and relay R2 - the latter are located in the cabin under the panel on the passenger side.
If the fuel pump fails, the first thing to do is remove the cover located under the panel on the right side of the console. This is not difficult to do - it is secured with two self-tapping screws. Under the cover you will see 3 fuses and 3 relays. The integrity of the above-mentioned F3 should be checked. Also, do not forget to inspect the contacts into which this fuse is inserted. If no problems are found here, move on to checking the fuel pump relay. The easiest way to do this is to borrow something that is known to work from someone you know and try how the car works with it.
If the fuse and relay are good, we move on. The next stage of diagnosis will be to inspect the terminals of the fuel pump itself. To get to them, you must first lift the rear seat cushion. Once you have access to the cover located on the bottom, unscrew the screws holding it. A hatch will open in front of you, in which there are 3 terminals
Please note that black and gray wires lead to the two positive ones. The third terminal is negative
Through them, power is supplied to the fuel pump itself. You will need to check whether there is voltage at the positive terminal, for example, using a test lamp. It should light up for 3-5 seconds after you turn on the ignition.
The light is on, but the fuel pump does not show any signs of life - which means we arm ourselves with a tester and check the voltage level. There should be at least 10 volts here. This is the minimum required value to start the fuel pump. Note that the reason why the voltage has decreased is quite often the oxidized contacts of the positive and negative wires. Accordingly, to fix the problem, you just need to wipe them. By the way, there is another verification option. Take long wires and apply voltage to the fuel pump terminals directly from the battery. In this case, everything will become immediately clear.
Don't forget to also check the ground of the fuel pump - it is attached near the parking brake lever, under the dashboard. This reason is quite common, this point also needs to be checked. With constant use of the handbrake, the mass may well be shifted slightly to the side. Just in case, remove the plastic casing covering the lever, disconnect the mass, clean the contacts and return it to its place.
These are all “external” reasons. If no problems are found here, then you will need to remove the fuel pump and look for the “internal” ones. One of the most common problems is worn or stuck brushes. Another fairly common cause is the motor. You can check it using the same test lamp, having first supplied power to the fuel pump.
How to replace a faulty valve?
To do this, you will need to remove the entire module from the tank.
- First, we release the pressure using the previously described technology.
- We remove the back seat.
- The hatch is covered with a soundproofing mat, which must be moved to the side.
- We unscrew the screws and remove the indicated hatch.
- Disconnect the electrical power connectors for the pump and sensor.
- Unscrew the clamping ring. We rotate to the left. You can tear it out of place with a punch and a hammer, making light taps.
- We take out the module and float.
- On the old regulator, remove the wire and pull out the spring clip. You will need a screwdriver.
- We install a new valve. Lubricate its rubber ring with oil (motor oil).
- During reassembly of the unit, we monitor the condition of the gaskets and, if necessary, replace them with new analogues.
- The installation of the module must be carried out taking into account its correct orientation in space. The arrow on the lid points towards the luggage compartment.
FakeHeader
Comments 17
Congratulations! You bought an excellent original UTES module (an old model, it says “UTES” in big letters, I had exactly the same one in my car from the factory, only 21101-1139009, manufactured in 2008), with an ORIGINAL Bosch pump 0 580 454 035 ( Now there are a lot of fakes)! Today I had a hard time finding and buying the original “UTES” module 21101-1139009 in Kharkov
There is the same one for Kalina:
I looked for it all over Ukraine, in Kyiv I went around the entire car market, called all the companies, then I started calling different offices in Kharkov, Dnepr and Zaporozhye - there is no original UTOS anywhere at the moment. Complete fakes under the guise of UTYOS or Chinese bullshit. The best thing that can be found now under the guise of UTOS is ATK (Avtotekhprom), but I was looking for the original UTOS in original packaging.
I accidentally came across the Losk104 website and there I bought exactly what I was persistently looking for!
Regarding DUT, Kalina is equipped with DUT-K, DUT-17 and DUT-10.
I can’t tell you which one for which tank. Like DUT-K of the “universal” type. I have a VAZ 21093 (2009) with a 1.6 Kalino engine, my module 21101-1139009 has a DUT-K2 sensor, it is completely interchangeable with DUT-11, there is no difference.
Dnepr auto dealers are still the same. They are purchased from Ukravtovaz (they recently opened their online store) shop.ladaukraine.com/ Now the fuel pump modules come from the DCK assembly line (the same was in my car)
Yes, in DneprAuto the prices are great, I just gave their links as an example, it’s easy to search on their website, it’s easy to look at the photo.
PS In UkrAvtoVAZ I see that the prices are also crap... A module like ours, only with a metal cover (for 1.5 engines) costs 2050 hryvnia shop.ladaukraine.com/prod...enzonasos/21101113900900/
You can buy it in Kharkov. where I bought mine for 1235 hryvnia
PS In DSK the inserts seem to be not Bosch ones, but Czech “Aisans” 3J, they seem to be worse than Bosch ones
You need to find out the price there, it differs. For example, Kalinovsky steering tips are indicated on the website for 430 UAH, but I paid 413 in fact
Yes, in DneprAuto the prices are great, I just gave their links as an example, it’s easy to search on their website, it’s easy to look at the photo.
PS In UkrAvtoVAZ I see that the prices are also crap... A module like ours, only with a metal cover (for 1.5 engines) costs 2050 hryvnia shop.ladaukraine.com/prod...enzonasos/21101113900900/
You can buy it in Kharkov. where I bought mine for 1235 hryvnia
PS In DSK the inserts seem to be not Bosch ones, but Czech “Aisans” 3J, they seem to be worse than Bosch ones
In my factory there was a 1 in 1 Bosch, the same as in Utes, but after so many years they could have changed the supplier.
Well, from the factory, our cars should be equipped with such Utes, with Bosch inserts and precisely with the number 0 580 454 035, or SEPO modules (they also come inside with the same Bosch ones and some other inserts from another manufacturer, like Aisan) or same DSK. Having deeply delved into this topic, studying forums and topics for a long time, I realized that there is nothing better than the UTOS module inside with the original Bosch.
Important points
Where is the gazelle fuel pump fuse located?
The procedure outlined above seems quite simple, but, nevertheless, there are a couple of nuances that should be mentioned.
Firstly, gasoline. When the gas lines are unscrewed, it begins to flow directly onto the cap (this happens especially often if the car owner forgot to relieve the pressure in the gas line using the breather, as mentioned above). Yes, a little gasoline leaks out, but the smell of gasoline in the cabin is not what a car owner needs, right? Therefore, before removing the fuel lines, you should put a cloth on the pump cover and carefully insert it with a screwdriver into all the cracks. The rag will absorb the leaked gasoline, then you can throw it away, which will help get rid of the smell in the cabin.
Secondly, the fuel pump retaining plate. As practice shows, this is a fragile thing, and breaking it by carelessly prying it with a screwdriver is not just easy, but very easy. But it’s difficult to find this part on sale; it is only sold complete with a complete fuel pump, and this is a waste of money. The matter is further complicated by the fact that it is not always possible to move this plate out of place with just a flat screwdriver (especially if the car owner is trying to disassemble the pump for the first time), so sometimes you have to resort to using a hammer and chisel, and this, in turn, increases the risk many times over plate breakage.
As you can see, there are no difficulties with independently replacing the pump grid on the Lada Kalina, and if you strictly follow the above instructions, even those who are doing it for the first time will not have any problems. The main thing is to be patient and follow safety precautions. It is imperative to remove the terminal from the battery! Otherwise, a banal mesh replacement can turn into a fire.