The design of the VAZ 2110 fuel system
The fuel supply systems on cars with carburetor and injection engines are somewhat different. The design of the fuel system of VAZ 2110, 2111, 2112 does not differ depending on the model.
In the period from 1996 to 2000, carburetor engines were installed on these series. Fuel is pumped from the tank through a filter by a mechanical fuel pump driven by a camshaft eccentric and supplied to the carburetor. This element is designed to prepare a fuel-air mixture that enters the intake manifold and is ignited using spark plugs.
Diagram of the fuel system of a VAZ 2110 carburetor engine.
Unlike carburetor cars, in injection cars the gas pump is installed in the gas tank, and the fuel enters the ramp, which is equipped with a mechanical valve that regulates the pressure in the system. At the command of the electronic control unit, the injectors open and gasoline is injected into the intake manifold, where it mixes with air and, entering the combustion chamber, is ignited by the spark plugs.
The fuel supply system on eight- and sixteen-valve injection engines is not much different.
Diagram of the fuel system of the “tens” injection engine.
What is a fuel pump and how does it work?
The fuel pump is an integral part of every internal combustion engine vehicle and must be kept in good condition. Gasoline pumps usually fail in two situations: when the strainer becomes clogged (we’ll tell you how to replace it below) and when the owner drives on an empty tank.
In both cases, the fuel pump operates at full capacity and with large losses.
Note. Car owners should make it a habit to drive with an empty tank to help the fuel pump work longer.
However, in older cars, the fuel pump is not used at all, so the problem of its failure does not arise, but, of course, other problems may arise. However, in modern cars, the fuel tank and the engine are in different parts of the car, and the fuel pump pumps fuel from one part to the other.
Types of fuel pumps in modern cars.
There are two types of engines: carburetor and injection, which use different fuel pumps. Carbureted engines use a mechanical fuel pump and typically deliver the fuel at low pressure.
A fuel injection engine, on the other hand, delivers fuel quickly at high pressure and uses an electric type fuel pump (see VAZ 2110 Electric Pumps and all related content). The VAZ 2110 uses both carburetor and injection engines, depending on the vehicle’s configuration.
These fuel pumps have different connections, mechanical ones are attached to the fuel tank, and electric fuel pumps are located directly in the fuel tank. There is also a version of the VAZ 2110 with two pumps - the first is connected to the fuel tank and operates at low power, and the second is located directly in the engine and operates at very high power.
Electric fuel pumps work as follows: they pump fuel into the engine, the rate of fuel pumping depends on which engine is installed in the car. If the engine is powerful, the pushing speed will be high, but if the engine is quite weak, the pushing speed will be low.
Note. The speed of the electric fuel pump is controlled by the vehicle's electronic system.
On the other hand, older cars do not have an electric fuel pump, and the fuel flow rate is not regulated in any way. Older pumps delivered fuel at a constant rate, which prevented the engine from stalling.
Electric fuel pumps are very, very noisy, so they are installed directly into the fuel tank. They heat up very quickly, but the fuel in the tank cools the fuel pump and muffles any additional noise.
Where is the VAZ 2110 fuel pump located?
It is located in the direct fuel tank of a domestic car. Let's discuss the details of the VAZ 2110 injector fuel pump.
Fuel pump circuit (electric)
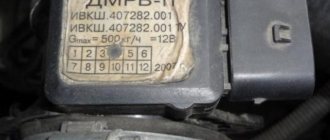
The design of the electric fuel pump 2110 itself is very simple - the unit is an electric motor that is powered by a voltage of 12 volts. The engine is installed in a housing, at the inlet of which there is a sieve - a coarse filter. The filter element prevents dirt particles from penetrating into the pump housing, thereby protecting the unit from clogging and possible failure.
The electrical circuit of the VAZ fuel pump includes the following.
- Ignition.
- Fusion.
- Wiring.
- Wiring.
- The engine control unit.
When you turn the ignition key, power is supplied to the CV terminal through the relay, and the pump begins to pump gasoline. As soon as the fuel inlet pipe is filled with gasoline, the ECU (control unit) sends a command through a relay to turn off the voltage - the fuel system is ready to start the engine, and all that remains is to start the engine using the starter.
Fuel pump relay VAZ 2110
Relays in any circuit are designed to open and close a circuit, and their primary function is to protect circuit components from high inrush currents. The current required to start an internal combustion engine reaches 80-300 amps on a crank starter, and any component in the circuit can be damaged if a relay is not installed.
The VAZ 2110 fuel pump relay is a standard type; inside the plastic case there is a solenoid coil with an iron core, which closes the contacts when voltage is applied due to an electromagnetic field. Relay 2110 - four contacts, rated for 30 amperes.
Design features of fuel pumps for carburetor and injection fuel injection systems
The mechanical fuel pump installed on the first modifications of the VAZ 2110/2112 has a simple design. It is based on a set of membranes made of special rubber fabric that resists the chemical effects of gasoline. The pump body has two valves: inlet and outlet. The membrane is driven by a piston rod (pusher). It is moved by a cam mechanism with a rotating camshaft.
Such a mechanical fuel pump can be used for decades until the drive rod wears out or the diaphragm ruptures. And if this happens, these components can be replaced within half an hour.
The first modifications of the VAZ 2110 with a carburetor injection system were equipped with a mechanical fuel pump
With an electric fuel pump everything is much more complicated. It is based on a small electric motor. It is no different from a conventional pump, but operates completely immersed in gasoline. The pressure in the system is not pumped up using a membrane (although such a pump exists), but using a specially shaped impeller mounted on the engine shaft.
The service life of the electric fuel pump is 150-200,000 km. But he may fail even sooner. Additives added to gasoline, as well as various types of mechanical impurities, are the main reasons for the failure of unused resources. The first can damage the brushes and commutators, the second can clog the valve mechanism.
The fuel pump of VAZ 2110/2112 engines with fuel injection has an electrical design and is part of a submersible fuel module.
Types of fuel pumps
Some older models do not have such a device as a fuel pump at all. This is an old and ineffective solution, and we hope you never have to deal with this problem.
Today, two types of fuel pumps are installed on the VAZ 2110 - mechanical and electronic.
- The mechanical one is considered a classic solution and is located outside the fuel tank. It works on a simple principle - the gas pump takes fuel from the fuel tank, i.e. sucks it in. Due to the short distance between the pump and the carburetor, it can work quite well at low pressure.
- An electronic pump is a more modern type of pump installed in a tank. This is due to a higher noise level during operation compared to analogues. Its operation depends entirely on the electronic system, which takes into account several factors simultaneously. Current throttle position.
- Exhaust air content.
- Air/fuel ratio, etc.
Many people want to know where the fuel pump fuse is located on a VAZ 2110.
Answer: It is located at the bottom of the console when viewed from the passenger side. The one on the far right is what you're looking for. Although they are usually assembled in a random order, so the arrangement may vary.
Fuel pump fuse VAZ 2110
The electric pump used to supply fuel operates under pressure, which causes some noise. Because of this, the fuel pump is installed deep in the vehicle's fuel tank. As a result, the fuel is cooled and the pump is turned off.
The pump is driven by an electric motor. When the ignition is turned on, the on-board system sends a signal to the pump and it begins to supply fuel.
In some cases, the pump is charged with electricity. This causes the engine to run for several minutes, which establishes pressure in the fuel system.
Please note that if the computer does not send a start signal to the pump after 3 seconds, it will automatically shut down. This is why we hear the engine pump for the first few seconds.
If there is no pressure in the fuel rail of a VAZ 2110, it is recommended to replace the fuel pump with a new one. Practice has shown that it makes no sense to repair it. This is a long and labor-intensive process that is extremely unreliable from a financial point of view.
Principle of operation.
Fuel from the fuel pump enters the fuel rail through the fuel line, having previously passed through a fine filter. A fuel wiper is connected to the injector. The latter injects fuel into the engine manifold at the command of the ECU.
The pressure regulator is part of the ramp and helps maintain the required pressure. It returns excess pressure back to the fuel tank through the fuel line.
Frequent breakdowns
A fuel pump malfunction can be caused by: poor quality fuel, clogged fuel filter, simple emptying of the gas tank, or how intensively the vehicle is used. Mechanical damage to internal components due to wear or poor quality of workmanship and materials cannot be ruled out.
Helping the fuel pump last longer is within the capabilities of any car enthusiast who follows a number of rules:
- refuel with high-quality fuel at proven gas stations;
- change the fuel filter in a timely manner;
- periodically clean the gas tank from accumulated impurities;
- Make sure that the fuel level in the tank is sufficient for the system to operate.
The last point is due to the fact that running the pump idle will lead to overheating and failure.
Principle of operation
The operation of the element is practically no different from the principle of operation of a mechanical pump. So, the element operates thanks to a core that is pulled into the solenoid valve. This action occurs until the system turns off the contacts for supplying voltage to the network. The element starts when the ignition is turned on (turning the key to the appropriate position). So, the VAZ-2112 fuel pump with 16 valves is supplied with 12V power. The mechanism creates in a couple of seconds the required pressure necessary to inject fuel into the injectors.
At the outlet, this indicator (pressure) reaches 0.4 MPa. The design of the element itself is modular. In addition to the pump, the unit contains an anti-drip glass, wires and tubes protected by a solid spring.
The pump itself has a diaphragm that moves up and down. As a result, a vacuum is created in the system. This helps open the pump suction valve. As the diaphragm moves upward, the inlet valve closes under pressure. This opens the injection element. It pushes fuel under pressure further to the injectors. The system also provides a return line. It serves to bleed unnecessary fuel back into the tank. Separate lines are provided for the return line.
Signs of fuel pump wear
A faulty fuel pump either works intermittently, that is, incorrectly, or does not function at all. Problems may occur due to severe wear or failure of other system elements.
Signs of a fuel pump malfunction that require checking its functionality are:
- engine failure to start;
- uneven operation of the power unit, it stalls and loses power;
- extraneous noises in the operation of the fuel pump or their complete absence.
Without diagnostics, it will not be possible to determine the nature of the malfunction, and during the test you must always move from the simplest to the most complex.
Where is?
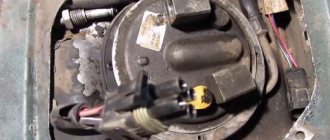
On the first “ten” models, this pump was mechanical and located in the engine compartment. But the “two-piece” appeared a little later, in ’98, and was already equipped with a fully fuel-injected engine with distributed injection. Therefore, the design uses a submersible electric fuel pump. On the VAZ-2112 the injector (16 and 8 valves) is located in the tank. To be more precise, the element is located under the back row pillow, on the right side. For its convenient maintenance, a special hatch is provided.
Diagnostics
If it is impossible to start the car, when the starter turns the flywheel perfectly and there is a spark, you should check the fuel supply. If the pump works and gasoline enters the ramp, then the cause should be looked for further. To initially check the operation of the pump, just open the tank lid and, turning on the ignition, listen, the characteristic pumping noise should sound.
You should not immediately change the unit; first you need to check the fuse responsible for the operation of the electric motor of the fuel pump. Even if it is working properly, you need to check the power supply with a multimeter or probe and examine the relay. If power is supplied, then replacing the pump cannot be avoided.
It is more difficult when the pump is running, that is, it buzzes when turned on. First you need to check the condition of the filter, clean it if it is clogged with foreign impurities. Interruptions in operation can also be caused by faulty spark plugs, injectors, sensors, or a decrease in pressure in the fuel line. The pressure in the ramp, in turn, depends on the tightness of the main pipeline connections and the serviceability of the bypass valve.
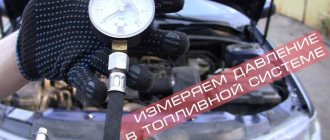
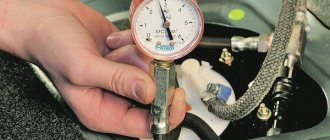
It would be a good idea to measure the pressure using a pressure gauge with the fuel pump on but the engine stopped. Absence or significant deviation from the norm will indicate a malfunction.
The vehicle makes noises you have never heard before
It is unlikely that you will be able to solve this problem yourself without disassembling and examining this element of the car in detail. Noises may occur due to the fact that the pump is nearing the end of its life and will soon have to be replaced. The second option, in which vibrations as well as extraneous sounds may appear, is that the filter mesh is dirty or a non-original filter is used in the system. In any case, extraneous sound will be one of the first reasons for the need to seek help from a professional auto repair shop. Contacting professional experts is recommended even if you have not noticed any other signs.
Replacing the fuel pump on a VAZ 2110 injector
Before replacing the fuel pump on a VAZ 2110 with an injector injection system, you should prepare a new spare part and the tools necessary for the job. With the right approach, the procedure itself will not take much time, 20–30 minutes, a maximum of an hour if things don’t go quite smoothly.
Tools
The set of tools for replacing a fuel pump is small, but should be on hand so that during the repair process you don’t have to run around and look for a suitable wrench or screwdriver.
When dismantling and installing a new fuel pump you will need:
- a wrench for loosening the terminals on the battery, the size depends on the installed fasteners;
- flathead and Phillips screwdrivers;
- key to 17;
- tubular wrench or deep socket 7 with ratchet or wrench.
Having prepared the tool and a new part, you can begin metalwork.
How to choose a new part
The standard fuel pump installed on injection engines has catalog number 2112-1139009. If desired, you can replace it with a similar part from other manufacturers. In some cases, such a choice will be dictated by the greater reliability of analogues, in others - by relatively affordable cost.
The following are offered for replacement:
- Bosch 0 560 454 035, which has higher quality and wear resistance;
- Fenox EFM33006O7 with low cost;
- Ween 192-0262, inexpensive like Fenox;
- Pekar 2112-1139009 - will be slightly more expensive than the previous ones, but cheaper than the original;
- ATS 53453 has a higher cost, but car owners do not complain about the quality.
Which one is better, the car owner will have to choose on his own, based on his own preferences, requests, and availability of funds.
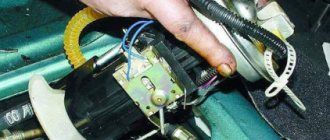
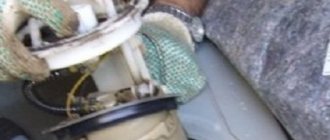
Removing the old fuel pump
The procedure for dismantling the VAZ ten electric fuel pump is standard for the entire family of the series.
Step by step steps to eliminate the faulty part:
- The terminal on the battery is disconnected.
- The pressure in the fuel system is checked and, if necessary, released through a special valve on the ramp, covered with a protective cap.
- The rear seat cushion is removed and the trimmed part of the carpet is moved away.
- The hatch cover is retracted to the side. To do this, unscrew two mounting screws.
- The power supply is disconnected by separating the wire block from the connector.
- The fuel line clamp is loosened or removed.
- Use a key to unscrew the two lines from the fuel pump.
- The gaskets at the ends of the fuel lines must be replaced.
- The 8 fastening bolts are unscrewed.
- The pressure ring is removed and the fuel pump housing is carefully pulled out.
- The seal is removed and inspected. If necessary, it is replaced.
Particular attention should be paid to compliance with safety regulations, including fire safety.
Installing a new
Installation of a new electric fuel pump is carried out in the reverse order.
The following actions are performed sequentially:
- The seal is installed.
- The new pump is carefully inserted.
- The pressure ring is installed and 8 fastening bolts are tightened.
- The fuel lines are screwed on.
- The power supply is connected to the connector.
- The hatch cover is installed and closed with the folded carpet flap.
- The rear seat cushion is installed.
- The battery terminals are connected.
When installing, remember that the arrow stamped on the housing must be directed backwards.
Fuel pump VAZ 2106
A car fuel pump is considered the most important element of the entire gasoline supply system. Actually, the pump is necessary in order to pump fuel from the gas tank to the carburetor. After all, it is in the carburetor unit that the air-fuel mixture is formed, which is then supplied to the engine.
The fuel pump supplies fuel from the tank to the engine through special hoses.
Principle of operation
The main task of the fuel pump is to generate excess pressure in the fuel system under any engine operating mode. It is necessary to ensure that there is always a sufficient amount of gasoline in the carburetor float chamber.
Video: design and operation diagram of a gasoline pump
Which fuel pump is better for the “six”
The standard equipment of the “six” is a gasoline pump produced by DAAZ (Dimitrovgrad Automobile Unit Plant). In terms of its structure, it is a mechanical unit, which is equipped with a diaphragm drive. Three diaphragms are built into the design of the DAAZ fuel pump to ensure uninterrupted operation of the device.
Find out what to do if the salon smells of gasoline: https://bumper.guru/klassicheskie-modeli-vaz/poleznoe/zapah-benzina-v-salone.html
The performance of a fuel pump of this brand is 60 liters per hour (on free drain). This volume is quite enough for optimal operation of the entire fuel distribution system on the VAZ 2106.
Initially, the “six” was equipped with DAAZ brand fuel pumps
A modern analogue of DAAZ is considered to be a petrol pump of the Pekar brand produced by the fuel equipment plant in Saratov. This pump has the same performance (60 l/h), but is considered more reliable due to its high tightness and resistance of the membrane elements to oil.
“Pekar” can be installed on a VAZ 2106 of any year of manufacture, but it became standard after 1990.
The Pekar fuel pump has the same performance as the DAAZ, but it is more modern and reliable
Thus, DAAZ and Pekar are the optimal equipment for the VAZ 2106 system, which allows the car to function without interruptions and breakdowns.
The gasoline pump on the VAZ 2106 is located under the hood. The device is fixed on the left side to the engine cylinder block. Fastening is carried out with studs with the obligatory use of a thermal spacer and an adjusting shim. This arrangement is very convenient, since if necessary, you can quickly find, remove and repair or replace the faulty part.
The fuel pump is located on the cylinder block on the left side
Replacing the fuel pump filter
To replace the VAZ 2110 fuel pump filter, you will have to carry out the procedure of completely removing the unit from the gas tank. Removal and replacement should be carried out after detecting interruptions in engine operation and jerking in first gear.
Some experienced motorists recommend changing the fuel pump screen at the next oil change, and establishing such a rule. This approach will allow the fuel pump itself to last longer and the engine will perform better.
To change the filter on a removed fuel pump:
- The plastic cup is removed, depending on the model, either simply from the body, or along the guides with preliminary disconnection of the two wire blocks.
- There is a filter inside, which can be removed by prying it off with a screwdriver.
- A new one is placed in its place and securely fixed in the seat.
- Reassemble and install the pump in the reverse order.
All places for mounting the mass of the VAZ of the tenth family
Location of masses in the car interior
1 – fuse block. 2 – near the driver’s right leg there is a shield that is attached with a couple of screws; after removing it, you will see that everything is there as in the picture. 3 – in principle, the situation is similar to the point described above, except that the shield is located next to the navigator’s left leg.
The stud in the dashboard behind the mounting block, in order to find it, you need to bend in a certain way. The headlight hydraulic corrector is shown there for reference; the ground pin is located above and to the left of it. Through this mass, the windshield wipers, heater fan (21124) and door lock activators are powered.
The console is on the right side, from here it is more convenient to check the very important ground pin, through which the bracket under the ECU is connected to the car body, and accordingly the reliability of the ground of the ECM and the cooling fan depends - this nut also holds the corner that supports the far part of the left panel of the console.
Weight of the Electric Fuel Pump (EFP) module and fuel level indicator. A black and white wire is attached to the left rear handbrake lever mounting bolt under the floor tunnel. The fuel pump is powered through this mass, and the accuracy of the fuel level reading also depends on it.
The ground is on the stud of the fuel pump flange; this wire most likely connects the pump housing to the fuel filter bracket and this was done for safety reasons to equalize the potentials of these two devices.
It is easy to find the ground of the electric fuel pump module without removing the tunnel; just fold back the mat, slightly bend or carefully trim the carpet of the floor behind the driver's seat below the ashtray of the rear passengers, without damaging the ground wire itself. Then the carpet easily falls into place and the cut is almost invisible.
Location of masses under the hood of a car
The battery terminal is large and thick with a large cross-section wire (approximately 16 sq. mm). Its thick part, about the thickness of a little finger, connects the negative battery and the engine. If the contact of this wire is unreliable, there may be a deterioration in the battery charge, a decrease in the starter rotation speed when starting, as well as problems in the ECM system, because the minus comes from the engine, from the studs on which the ignition distributor hung on carburetor cars.
The thin wire connecting the battery negative and the car body is the main connection for all electricity consumers in the car, and in carburetor modifications also for the engine. Through this connection, all the car's lighting equipment, radio and other devices are powered, depending on the year of manufacture of the car.
The connection point for the negative terminal of the battery to the engine block is connected to the upper stud of the thermostat, if you look behind the air filter. The cross-section of the wire was chosen based on the large current consumption of the starter; this wire can easily be traced by hand if it is led from the battery. The starter current flows through this wire, charging the battery, some sensors screwed into the engine block are connected through it
Nearby there is another ground connection point to the engine block, it is slightly higher and to the left. The 2112 engine has two brown wires connected to this place - this is the mass of the ECM, that is, the mass of the sensors, ignition module, ECU and cooling fan. The arrow below shows the engine (starter) ground wire from the battery.
The mass point under the adsorber is the mass of the right headlight and the mass of the right fog lamp.
Choosing motor oil for manual transmission
Transmission oil is designed to lubricate mechanical parts. High-quality oils with high performance during the operation of the gearbox pass through all parts, creating a special film on them. Thanks to this, the wear resistance of spare parts increases and they become stronger. In view of this, oil for a manual transmission is considered a significant consumable.
According to the manufacturers' recommendations, it is possible to pour motor lubricant into a manual transmission if the car has front-wheel drive. Engine and gearbox oils differ in viscosity index. Engine lubricant is thinner. You can verify this by shaking bottles of engine and transmission oil.
When choosing which oil to pour into the unit, be sure to take into account the viscosity index and operating indicators. Transmission oils are divided into the following categories:
- GL-1 – mineral water without additives;
- GL-2 – contains fatty foods;
- GL-3 – resists scuffing well;
- GL-4 – is resistant to scuffing and wear;
- GL-5 – resistant to corrosion, wear, and scuffing.
Oils included in the first three categories are used in the mechanics of machines produced a long time ago. Lubricants of the 4th and 5th categories are used in transmissions of passenger cars of various models. GL-4 is only available in cars with front-wheel drive. GL-5 is suitable for gearboxes of rear-wheel drive vehicles and drive axles.
Today, the most common are universal petroleum products, that is, those that can be used at any time of the year. Seasonal replacement of consumables is not very profitable for the motorist; it takes money and time.
https://youtube.com/watch?v=jpzO7iyGtpk%3F
Symptoms that clearly indicate a faulty pump and rod
The main sign of a faulty fuel pump is that the engine begins to stall at high temperatures, and after stopping it does not start. It sits for a while, cools down, and only then is it possible to start the engine. Of course, another breakdown has a similar symptom - a violation of valve adjustment. Only in this case does it feel as if the engine is trying with all its might to pull the car, but cannot, it is beyond its capabilities. And when the fuel pump starts to malfunction, the engine simply stalls.
The reason for this is excessive heating. As we said, the VAZ 2101 fuel pump consists of two valves. Well, one or both became warped due to heating and stopped opening. Cool them slightly and you can continue moving. Remember how often you saw a wet rag thrown over a gas pump? Now you know what purpose this is for.
But there is also a VAZ 2101 fuel pump rod, a truly wonderful contraption. It is made of steel. And if in the Soviet years it was hardened, now no one needs it. The price of the stock is at least 25 rubles. Well, who will spend kilowatts of energy on a part whose final cost is 25 rubles? Nobody! What happens then? But an unpleasant picture emerges - the fuel pump lever simply erases the rod, reducing its length.
And if you have gaskets under the fuel pump housing, then you are just lucky! When you pull one out, the rod will protrude from the insert more. And that’s it, the pump will continue to pump gasoline normally. But what if there are no gaskets? Who knows what could happen, for example, they forgot to put them on? And that’s why the rod was worn out. What to do then? Try taking it out and inserting it the other way. You know, this action helped several times.
A sign that the fuel pump rod has worn out is that the car accelerates to a certain speed. I had such a thing that I drove around the city normally, but as soon as I got on the highway, my maximum speed was 90 km/h, and that’s all. You step on the gas, but the engine stalls, it doesn’t have enough gasoline. I released the pedal a little - it drives calmly and shows no signs of breakdown. Moreover, a pump rod malfunction cannot always be detected when driving around the city or at idle speed. A short-term increase in engine speed will not give the same effect as long-term driving at high speed.
Mechanical fuel pump repair
The functionality of a mechanical fuel pump can be restored by replacing its faulty elements. You can buy them at any automobile store. But it is better to buy not individual spare parts, but a repair kit. It includes all the elements that can fail:
- intake and exhaust valves;
- diaphragms with spacers, “plates”, rod;
- pusher;
- thermal spacer;
- gaskets
Replacing valves
To replace the pump valves you will need a slotted impact driver and a small hammer. The valves are held in their seats by punching at three points. These areas must be carefully knocked off with a screwdriver. After this, the valves can be removed. Having installed the new parts, we secure them with cores. To do this, place the tip of the screwdriver on the edge of the housing along the circumference of the socket and strike it lightly with a hammer. We fix each valve in three places.
Replacing valves
How to change apertures
To replace the diaphragms, you need to unscrew the nut by 10 in the upper part of the rod. Next, we remove the damaged elements, and in their place we install parts from the repair kit.
The kit includes three diaphragms: two working and one safety. The latter serves to prevent unauthorized fuel from entering the carburetor if the first two are damaged. It is installed at the very bottom of the rod immediately after the lower “plate”. We place spacers on top of it on the rod: first a small one, then a large one. We place the working membranes and the upper “plate” on them. We secure the resulting structure with a nut.
The mechanical fuel pump has 3 diaphragms
Replacing the pusher, thermal spacer and gaskets
The thermal spacer does not need to be replaced unless it is damaged. Inspect its mating surfaces, especially the outer one, to which the lower part of the pump housing is attached. It should be perfectly smooth. Otherwise, oil leakage may occur at the junction of parts during engine operation.
Replacing the pusher is carried out by removing the old one and installing a new rod in its place. There is no difference in which end where it will be installed.
Now about the gaskets. There are only three of them in the repair kit, and they have different thicknesses:
- “A” – 02.27–03 mm;
- “B” – 0.7–0.8 mm;
- “C” – 1.1–1.3 mm.
The first is intended for installation between the thermal spacer and the auxiliary drive housing, and the gaskets “B” and “C” are used to adjust the protrusion of the pusher above its mating surface.
The adjustment is made as follows:
- We install the thermal spacer with the first gasket and a new rod into the auxiliary drive housing.
- Place gasket “B” on the mating plane of the spacer. Next, you need to rotate the engine crankshaft to the position of the pusher until it is recessed as much as possible. This can be done using a large slotted screwdriver. We insert its end into the clutch housing window and slowly push the flywheel clockwise.
- We periodically check the position of the pusher and measure its protrusion. When it enters the auxiliary drive housing to its maximum length, we measure how much it protrudes above the mating plane of the spacer with the gasket already installed on it. This value should be 0.8–1.3 mm. If it is larger, replace gasket “B” with gasket “C”. If the protrusion length is less than specified, swap gaskets “A” and “B”.
After the adjustment is completed, the fuel pump is installed in place and secured with nuts.