Lada K alina 2 . REPLACING TRANSMISSION CONTROL CABLES
You will need: pliers, a 13mm socket.
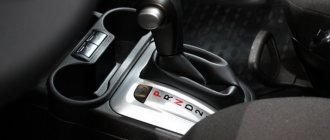
The designs of control drives for automatic or manual transmissions are fundamentally the same. The difference is in the number of cables (a manual transmission has two, and an automatic transmission has one) and in the way the cables are attached to the automatic transmission's multifunction switch levers and the manual transmission's shift mechanism. The operation is shown using the example of a car with an automatic transmission. The differences in methods for replacing manual transmission control drive cables are specifically discussed.
1. Perform steps 1-9 of removing the automatic transmission selector lever
the selector lever for controlling an automatic transmission and the control lever for a manual transmission,” p. 158). 2. Remove the tip of the gearbox control cable from the rocker lever pin, overcoming the elastic resistance of its clamp.
On a car with a manual transmission, similarly disconnect cable 2 (see Fig. 6.4) and gear shift cable 3 from the rocker levers.
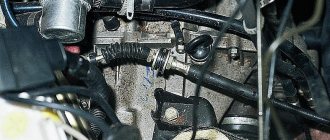
3. Press the lock of the end of the transmission control cable sheath.
eleven. . and remove the tip from the bracket on the gearbox. On a car with a manual transmission, the ends of the cable sheaths are not equipped with special clamps. They are rubberized and held in the slots of bracket 1 (see Fig. 6.4) on the gearbox only by tension. 12. Remove the cables from holders 5 (see Fig. 6.4) on a car with a manual transmission or 4 (see Fig. 6.10) on a car with an automatic transmission.
13. Remove the seal of 4 (see Fig. 6.4) cables from the hole in the front panel on a car with a manual transmission or 2 (see Fig. 6.10) on a car with an automatic transmission and remove the cables
14. Install the parts in the reverse order of removal.
15. Adjust the gearbox control drive (see “Adjusting the drive
Tools:
- Driver for socket attachment
- Extension for the end attachment on the wrench
- 8mm wrench attachment
- 10mm wrench attachment
- Ratchet wrench
- 13 mm head
- Open-end wrench 13 mm
- 13 mm straight box spanner
- Small flat screwdriver
- Large flat screwdriver
- Circlip Pliers
- Pliers
- Calipers
Parts and consumables:
- Chalk
- Aerosol lubricant type WD-40
- Lubricant LSC-15
- Tie rod end bushings and damper (if required)
- Plastic shifter shaft washers (if necessary)
- Shift lever ball joint (if required)
Notes:
Remove and disassemble the transmission control mechanism to replace the plastic washers on the gear shift shaft and ball joint. Carry out the work on an inspection ditch or overpass.
1. Remove the middle mudguard as described in this article.
2. Inside the car, overcoming the resistance of the latches, use the yoke to remove the frame for fastening the gear lever cover from the hole in the floor tunnel.
Removing the gear shift cover frame:
1 – gear shift lever cover with frame;
2 – floor tunnel lining.
3. Slide the cover along with the frame along the gear shift lever.
4. Turning the cover inside out, unwind the insulating tape covering the lever cover (during subsequent assembly, the insulating tape can be replaced with a plastic clamp).
Common questions about replacing the Lada Granta cable box
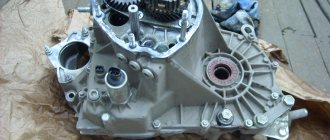
The hollow secondary shaft houses the removable main gear drive gear, driven gears and forward speed synchronizers. The shafts (primary, secondary) are mounted on bearings: in front - on roller bearings, in back - on ball bearings.
The second most important unit in a car after the engine is the gearbox (gearbox) - it serves to change the magnitude and direction of the transmitted torque, as well as to disconnect the engine and transmission.
More than a century has passed since the invention of the first box. Problems of a century ago with pulleys and belt drives have quietly replaced questions a la removing the cables of a Lada Granta gearbox or repairing a Toyota Camry automatic transmission. Progress.
Finding the reason
One of the owners of a Lada Kalina (VAZ 11194) decided to check where there was such noise from the transmission in the cabin. With the help of spot wiretapping, he was able to find out that some of the vibrations from the gearbox are transmitted to the cabin through the clutch cable. This was confirmed by a simple experiment:
- raised the front wheels
- turned on first speed
- raised the speed to 4500-5000 rpm
- Reduced the speed to 1500 rpm using the brake pedal without releasing the gas pedal
Then, the same thing was done with the clutch cable disconnected from the gearbox fork. The familiar sound of “hrrrrr.” "disappeared. The sounds were recorded in an mp3 file (before the pause - with a cable, after - without it). Site users can download the file:
To download files you need to log in to the site.
Conclusion : the clutch cable is a transmitter of vibrations from the gearbox fork.
A similar situation may occur on Lada Grant and Priora cars.
LADA Granta manual transmission device
A mechanical five-speed gearbox was combined with a planetary gear and final drive. They are one. In joy and in sorrow.
The input shaft - the gear block - is in constant mesh with the forward gears.
The hollow secondary shaft houses the removable main gear drive gear, driven gears and forward speed synchronizers. The shafts (primary, secondary) are mounted on bearings: in front - on roller bearings, in back - on ball bearings.
Manual transmission device "Lada Granta"
The oil sump is located under the output shaft front bearing and directs the oil flow into the output shaft and under the driven gears.
A symmetrical differential consists of a pair of gears and a pair of pinions in the shape of a cone. The final drive driven gear is held on the differential housing flange.
The variable speed drive consists of a shift lever, a ball joint, a rod, and a rod.
The gear shift mechanism is securely mounted on the clutch housing.
This is how I remember the VAZ-2180 manual transmission on Grants produced before 2013.
Recommendations
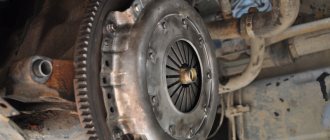
- As a rule, the clutch “disappears” when the clutch fork breaks or the cable breaks.
In such a situation, you can drive your car to the service center without using the clutch pedal. To do this, turn off the engine, engage first gear, then start with the gear engaged. To upshift, you need to re-gear, and to downshift, you need to wait until the engine speed drops to suitable values. We also recommend reading a separate article on how to drive without a clutch. In this article you will learn how to get to the repair site with a broken clutch. - Usually the cable threads break at the base of the pinch.
Some car enthusiasts attach the clutch cable lead to bearings to avoid bending it. The result is increased reliability and increased service life of the cable. When replacing the cable, the plastic insert is removed from the old cable and placed on the new cable. If this is not done, the plastic on the new cable will quickly break. - If the Grant clutch is being replaced, the gearbox or engine is being removed, experienced car enthusiasts recommend replacing the clutch cable if the cable has traveled more than 30-40 thousand km. Also on the Granta, clutch adjustment and inspection are necessary if even minor problems appear with the clutch pedal or difficulties with gear shifting.
New - well forgotten old
The modernized gearbox received the index 2181 and the same gearbox. The volume of oil poured has decreased by almost a third. “Mineral water” was exchanged for semi-synthetics, which retains its properties in cold temperatures down to -42 0 C, and does not require replacement for almost 200 thousand km. Suddenly.
Multi-cone synchronizers appeared on first and second speeds for good reason: their mission is to extend the life of the constantly loaded second gear and reduce the effort when changing gears.
The gear change mechanism has become a separate module. To dismantle it, it is not necessary to remove the Lada Granta box. A special lock prevents erroneous start of the reverse mode when turning off fifth gear. Innovation – selector grid: sets the lever stroke when selecting gears, repeating the shift pattern.
The main character in selecting the characteristics of the mechanism turned out to be... a simulation stand. The test driver engages the gears, and the robot simulates shifts. Taking into account the optimal settings, we created a mathematical model for the manufacture of another innovation - a 3D central plate, proposed instead of return locks and springs.
The rocker drive for gear changes was replaced by a cable.
As a result, we got a clear shift pattern, eliminated the interaction of the gearshift lever and seat cushions, and got rid of blocking when selecting reverse gear.
Differences between cable-shift and rocker-shift gearboxes
In gearboxes with rocker shifting, the desired speed is selected using a multi-lever assembly mechanism that connects the handle and the rod that fits the box. An example of such a gearbox is AvtoVAZ 2180.
With cable switching, the variable speed drive with rods gave way to cables.
Cable shift gearbox
By replacing rigid rods with flexible cables, vibrations of the body and gear lever decreased, backlash decreased, and shifts became clearer.
When to remove cables
The Lada Granta has a cable gear change mechanism that is more capricious than the rocker “brother”. During operation, carefully monitor the condition of the unit. Be sure to adhere to the “culture” of gear shifting. Jerks are detrimental to synchronizers and gears. The cables will also get it.
For some, removing the Grants gearbox cables will seem like an easy procedure, for others it will seem like a labor-intensive process, a la removing the gearbox on a Lada Granta. Such work is often carried out at a technical service station (STS). The cables are replaced in pairs.
About the uniqueness of the cable unit for Granta
Replacing the rods and rockers with a cable system in the Lada Granta was intended to reduce the impact of vibration. At first, the developers were inclined to build a hydraulic circuit for the switching unit, similar to many foreign cars. Such a decision would have caused an additional increase in cost, affecting the price of the car, so the manufacturer chose a path that would take into account the financial capabilities of a wide range of buyers. The final increase in the cost of the car due to the use of a progressive cable unit reaches 5 thousand rubles. This is quite acceptable, since the price increase is insignificant, and the transmission unit is reliable.
Which is better Lada Granta liftback or Kalina 2 station wagon
Speed Lada Granta luxury speed
Note that the cable gearbox has acquired more durable forks enclosed in the shift mechanism. Previously, the manufacturer used steel parts coated with bronze. Over time, abrasion of the protective layer was observed, leading to the penetration of dust into the unit with a subsequent harmful effect on the properties of the oil.
New analog forks are endowed with increased strength and have reduced weight. Aluminum is used as the material for their manufacture. An additional measure was the use of plastic linings to protect the forks from premature wear.
Also, the manufacturer of the Lada Granta mercilessly replaced the outdated lockers and springs present in the design of the switching unit. Now the main component here is the plate, which allows you to quickly “sort out” the steps. A latch moves along the surface of this element, which conveys the “intentions” of the owner to the unit (activation of the desired gear).
The cable gearbox allowed the LADA Granta gearbox to become an attribute of comfortable control of the vehicle's driving modes. Discomfort will be guaranteed to be absent due to the leveling of vibrations.
Perhaps the future promises LADA Granta the installation of a hydraulic shift mechanism, but in the present, such a solution as a cable gearbox allows you to get maximum comfort at minimal cost. The functionality of the updated box has made it possible to sufficiently get rid of annoying problems that bring frustration and discomfort to LADA Granta owners. The differential has undergone virtually no changes (with the exception of synchronizers, as already noted). This made it possible to minimize the increase in the cost of a car with such a transmission.
The cable gearbox is very simple not only to operate, but also if repairs are necessary. This is confirmed by a separately removable switching unit, a reduced volume of lubricant and its less frequent need for replacement (after 200 thousand km or a five-year interval).
Dismantling gearbox cables on Grant
The “Kulibins” have not disappeared from Rus'. They happily spend the night in garages, replace the cables themselves, but they don’t guard the cooperative along with the dogs...
Those who are accustomed to “picking” a swallow on their own are probably familiar with the methodology for carrying out such work. They don’t just have to change the cables, they need to remove the Grants checkpoint every day. Less prepared motorists, having familiarized themselves with the equipment, will broaden their horizons and show off new knowledge. “Under the arm” of the service station master.
Tools and equipment
A good surgeon needs a sharp scalpel, a good mechanic needs a key to “13”. A small list of must-have items that will make removing the gearbox cables on the Grant as simple as possible.
- set of keys, heads;
- pliers;
- slotted screwdriver;
- socket head at “13”;
- gloves;
- additional lighting;
- lubricant, for example, WD-40;
- rags.
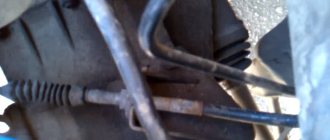
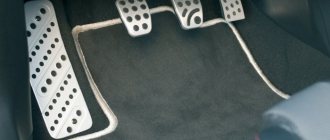
Grant gearbox cables close up before removal
A simple set of equipment for the tricky work of a handyman. Removing the Lada Granta gearbox requires a much more impressive amount of tools.
Safety precautions
Removal of the Grants gearbox cables is carried out without lifting the car: access from the cab and engine compartment is sufficient.
Compliance with safety regulations (which will at least keep your fingers intact) means:
- Availability of a first aid kit in case of injuries.
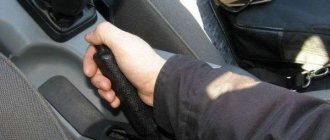
- The car is placed on a flat surface and the hand brake is applied. Wheel chocks are installed under the wheels.
- The work is performed with proper tools.
- Use the correct grip: hold the pliers so that the hand is positioned up to the safety stops of the handles.
- Do not use pliers as an impact tool or lever.
Procedure
Removing the gearbox cable on the Lada Grant is accompanied by a whole list. This, of course, is not replacing the clutch fork without removing the gearbox on a Grant, but still. Let the car gurus not be offended. This list is not for them, but for those who are already “on fire” to show off their knowledge:
- Preparing the car: turn off the ignition, disconnect the negative terminal of the battery;
- dismantling the tunnel lining;
- dismantling the bracket (by the bent edge) securing the cable sheath using pliers;
- disconnection of the cable tip and the rocker lever pin;
- removing the tip (by the spring cotter pin) from the hole in the rocker lever using pliers;
- dismantling the battery shelf;
- disconnecting the cable tip and the manual transmission lever (preliminarily compress the tip clamps with pliers);
- removing the end of the cable sheath;
- disconnecting the tip from the gearshift lever;
- removing the thermal shield of the additional muffler;
- removing the cable holder from the hole in the base of the body;
- Removing the gearbox cables on the Grant.
How to set up the gear selector
Those who like to customize it “for themselves” will be very upset: on the Lada Granta, adjustment of the cable drive is excluded. This fact is confirmed by the technical documentation of the manufacturer.
But the inquisitive mind of a motorist knows no barriers. No, no, and new adjustment methods are appearing with recommendations on how to tighten sagging cables or move their attachment points. Such measures are not always effective and are carried out at your own peril and risk.
Source
What tools will you need?
If the Grant clutch pedal is too tight or, conversely, has completely failed, and the Grant clutch does not work properly, you will need to change the cable. By the way, a breakdown of the clutch fork will lead to exactly the same symptoms.
To replace the clutch cable you will need:
- open-end wrench at “8”, as well as at “10”;
- a knob (for the end cap) and a knob attachment “10”;
- a pair of Phillips screwdrivers (wide and medium), a flat screwdriver;
- ruler and caliper or ruler
It is also necessary to purchase a new clutch release cable for the Lada Granta and prepare a Litol type lubricant. You may also need a bushing for the clutch cable adjustment mechanism if this element is severely worn or damaged.
Operations for removing the gearbox from a Lada Granta car
The gearbox is heavy and its shape does not have the correct contours, which is why it is best to carry out the work with at least two people.
1. Disconnect the wire from the negative terminal of the battery.
2. For ease of operation, remove the air filter.
4. Raise the car on a lift or hang its front part and place it on reliable supports (if you are working on an inspection ditch). For ease of operation, you can remove the front wheels.
6. If the gearbox is removed for repairs, drain the oil from it
Work principles
Old box with modernization
The new design is the old gearbox with significant upgrades. The previous design is known to us for its shortcomings: large lever strokes, difficult activation and low vibration comfort.
The cable driven gearbox is not a new type. The device can be safely called an updated version of the previous design, which has been made more convenient by improving it. It follows from this that the driver, accustomed to the previous version of the box, will not need to relearn. For cable gearboxes, the diameter of the clutch has been changed, increased from 200 to 215 mm. The starter was moved, installing it along the engine.
Removing and disassembling the Lada Granta gearbox control mechanism
Tools:
- Driver for socket attachment
- Extension for the end attachment on the wrench
- 8mm wrench attachment
- 10mm wrench attachment
- Ratchet wrench
- 13 mm head
- Open-end wrench 13 mm
- 13 mm straight box spanner
- Small flat screwdriver
- Large flat screwdriver
- Circlip Pliers
- Pliers
- Calipers
Parts and consumables:
- Chalk
- Aerosol lubricant type WD-40
- Lubricant LSC-15
- Tie rod end bushings and damper (if required)
- Plastic shifter shaft washers (if necessary)
- Shift lever ball joint (if required)
Remove and disassemble the transmission control mechanism to replace the plastic washers on the gear shift shaft and ball joint. Carry out the work on an inspection ditch or overpass.
1. Remove the middle mudguard as described in this article.
2. Inside the car, overcoming the resistance of the latches, use the yoke to remove the frame for fastening the gear lever cover from the hole in the floor tunnel.
Removing the gear shift cover frame:
1 – gear shift lever cover with frame;
2 – floor tunnel lining.
3. Slide the cover along with the frame along the gear shift lever.
4. Turning the cover inside out, unwind the insulating tape covering the lever cover (during subsequent assembly, the insulating tape can be replaced with a plastic clamp).
5. Pull the cover together with the frame from the gear shift lever and from the lever handle.
6. From the bottom of the car, use chalk to mark the positions of the gear selector rod hinge shank relative to the control rod (this will help with subsequent assembly of the parts).
7. Using a 13 mm spanner, loosen the nut of the clamp bolt securing the control rod to the transmission shank to remove the rod away from the gearbox.
8. Use a flat screwdriver to open the clamp and slide it along the rod.
9. Remove the control rod from the shaft of the gear shift rod joint.
10. To remove the reaction rod, use two 13 mm wrenches to loosen the nut of the coupling bolt of the clamp securing the reaction rod to the tip and remove the rod from the tip.
11. Using a 13 mm socket, unscrew the four nuts securing the base of the gear shift lever.
Removing the gearbox control mechanism (items 11-12) can be done after removing the lever from the holder (after steps 19-21).
12. Remove the gearbox control mechanism downwards.
13. Using a 13 mm socket, unscrew the nut securing the gear shift lever axis (which is also the stop for locking the reverse gear) and remove it.
14. Pull the gear shift lever out of the control rod.
15. Remove the two inner plastic and two outer metal washers, as well as the metal spacer.
16. Each of the plastic washers has one protrusion that fits into the corresponding grooves in the lever.
17. Use pliers to remove the retaining ring of the plastic shift lever insert.
18. Remove the gear shift lever together with the bushing from the ball joint cage, as well as the spring under the bushing.
19. Using a 13 mm socket, unscrew the two nuts of the gear lever ball joint bracket and remove it (shown on the installed gearbox control mechanism).
20. Separate the base of the gearbox control mechanism from the cover and lever cage.
21. Using a 13 mm socket, remove the two bolts securing the torque rod to the base of the ball joint, holding the nuts from turning with a spanner of the same size (shown on the installed transmission control mechanism).
22. Remove the jet rod.
23. With your hand on the control rod fork, pull it through the shift lever base boot and remove it.
24. Remove the cover from the gear shift lever cage.
25. If you need to replace the plastic bushings and the torque tip damper, use a 13 mm spanner to unscrew the nut securing the torque tip to the gearbox bracket and remove the tip.
26. Remove the two plastic bushings and the rubber damper from the torque rod end.
27. Assemble and install the gearbox control drive in reverse order.
Before assembly, put LSC-15 lubricant into the gear shift lever bushing.
28. Install the control rod onto the shank of the gear selector rod hinge according to the previously marked marks. Check that the drive is installed correctly - nothing should interfere with the movement of the lever, the gears should engage easily without jamming.
29. Otherwise, the drive needs to be adjusted. An assistant will be required to adjust the drive. After loosening the clamp, remove the rod from the shank of the gear shift rod hinge.
30. Make sure the switch rod in the box is in the neutral position. Set the switch rod to the reverse gear position. To do this, use pliers to turn the switch rod counterclockwise by the hinge shank (looking in the direction of the car) until it stops, overcoming the spring force, and move the rod inside the gearbox until it locks.
Checking the control mechanism adjustment:
1 – lever axis stop;
2 – lining of the reverse gear lock bracket.
31. Place the transmission control rod on the joint shank (do not tighten the clamp) and set the gear shift lever to the reverse position. In this case, the stop of the lever axis should be in the extreme forward position of the groove of the reverse gear lock bracket lining. After this, tighten the clamp on the control rod.
When is it necessary to change the clutch cable?
As a rule, replacing the cable is necessary when it breaks or is stretched too much (adjusting the cable does not allow normal operation of the clutch).
In this case:
- the clutch pedal becomes tight;
- the pedal stroke changes;
- squeezing the clutch is also difficult;
- the clutch pedal falls to the floor;
As a result, gears are difficult to engage, and a crunching noise may appear in the gearbox when shifting. Please note that ignoring the problem, as well as active attempts to “stick” the gear with a crunch while driving and other efforts that the driver makes when trying to change gears with a faulty clutch, can cause severe wear of the synchronizers and other elements of the gearbox. This means that there is no need to delay replacing the cable.
Moreover, this procedure is not complicated and can be done with your own hands in a regular garage. The only caveat is that you have to work in the area of the pedal assembly, which is not entirely convenient (the fuse box and power steering are in the way).
Procedure for removing/installing an automatic transmission on a Lada Grant
Required materials and tools:
- a set of car keys;
- heads, ratchet;
- rags;
- extension cord, additional lighting;
- screwdrivers with different tips;
- pliers, side cutters;
- hydraulic stop / telescopic stand;
- metal brush;
- new gear oil;
- hydraulic jack / any other lifting mechanism;
- graphite-based lubricant;
- rubber / silicone hose for draining waste;
- wooden stops;
- gloves.
Removal and installation of Lada Vesta gearbox shift cables
We prepare the car for the job. Turn off the ignition, open the hood and disconnect the negative terminal of the battery.
We disconnect the resonator pipes 1, Figure 1, inlet from the air intake and the air filter housing, use a 10mm head to unscrew the two fastening bolts and remove the resonator.
We recess the buttons 2, Figure 2, of the cable end clamps and disconnect the ends of the shift cable 4 and gear selection cable 5 from the levers of the gear shift mechanism 6.
Move the clamps 1 for fastening the cable sheaths in the direction indicated by the arrow and remove the cable sheaths from the fastening bracket 3.
Remove the front floor tunnel lining and the instrument panel module.
We recess the buttons 4, Figure 3, of the cable end clamps and disconnect the ends 5 of the shift cable and the gear selection cable from the drive levers 3 for controlling the gear shift mechanism.
We move the clamps 1 for fastening the cable sheaths in the direction indicated by the arrow, remove the cable sheaths from the grooves of the drive housing 3 for controlling the gear shift mechanism.
We lift the edge of the soundproofing of the floor tunnel.
We unscrew two nuts 1, Figure 4, remove the sealing plate 2 from the mounting studs and carefully remove the gearshift cables 3 inside the car.
Installing shift cables
Check that the installed cables comply with the vehicle equipment.
Install the cables from inside the car.
Carefully pull cables 3, Figure 4, through the hole in the floor tunnel into the engine compartment.
We install the sealing plate 2 on the fastening studs and tighten the nuts 1 with a head of 10. The tightening torque of the nuts is 5 - 7 Nm (0.5 - 0.7 kgf.m).
We install gearshift cables 4 and 5 into the grooves of bracket 3, Figure 2, on the gearbox.
We apply AZMOL LSC-15 lubricant to the spherical pins of the levers of gear shift mechanism 6 and connect the cable ends to the levers.
We install the gear shift cables into the grooves of the control drive housing.
Adjusting the length of the gearshift cables
We install mechanism 6, Figure 2, gear shift to the “neutral” position.
We install device 2 on lever 1, Figure 5, of the control drive to fix the lever in the “neutral” position.
We attach the ends 1 of the cables to the ball pins of the control drive lever and fix the length of the cables by pressing buttons 2, Figure 6, in the direction indicated by the arrow.
Remove the device for fixing the control drive lever.
We check the smooth engagement of all gears and, if necessary, re-adjust the length of the cables.
We install the instrument panel module and the floor tunnel lining.
We attach the intake resonator 1, Figure 1, to the air filter housing and the air intake and secure it to the body with two bolts.
We connect the earth wire terminal to the battery.
Catalog numbers and a list of all necessary parts
Catalog numbers of bearings, their cost
| Name | vendor code |
| F-846067-01 (dimensions 56 x 86 x 25) | From 1290.00 |
| F846067-00 | —/— |
| F846067-02 | —/— |
| NA4912NBS | 1706.88 |
| 61912ISB | 1272.96 |
*prices are current as of November 26, 2018.
Before replacing an automatic transmission, always confirm the catalog numbers with service station specialists.
Procedure for removing a manual transmission
Required materials and tools:
- set of car keys, sockets, ratchet;
- rags;
- additional lighting;
- jack;
- graphite lubricant;
- plastic container for draining waste;
- transmission oil.
Step-by-step instructions for replacing a manual transmission
- We install the machine within the perimeter of the repair area: on an inspection hole, on a road overpass.
- We remove the terminals from the battery, preventing a short circuit in the circuit.
- We dismantle the air filter and the plastic air filter housing.
- We unscrew the fastening nuts, remove the power terminals, and dismantle the starter.
- We unscrew the mudguards and the oil pan protection (if any).
- Remove the block with wires from the reverse activation sensor.
- Disconnect the contacts from the speed sensor.
- We twist the drain plug and drain the waste from the manual transmission.
- Disconnect the clutch cable, lever fork, and bracket from the gearbox housing.
10.2.1. Replacing gear shift cables
| Before replacing the two shift cables, read all instructions regarding this work. Many of the operations are quite complex and difficult to perform for an inexperienced person. |
| Rice. 248. Parts of the gear shift cable drive: 1 - tip of the gear shift cable; 2 — tip of the gear selection cable; 3 — gear selection cable; 4 — gear shift cable; 5 — nut, 3 Nm; 6 — bolt, 20 Nm; 7 - holder; 8 — nut, 20 Nm; 9 — rotary lever; 10 — gear selector lever |
Replacing shift cables is a labor-intensive job. The disassembled view of the gear shift cable drive is shown in (Fig. 248). The gearshift cables cannot be replaced individually, as they belong to the same unit. Replace the gearshift cables in the following order: - disconnect the terminals and remove the battery (do not forget to have the security code of the radio with you);
| Rice. 234. Places for fastening the air duct and the AB partition (parts are shown at the fastening points with arrows): 1 - air duct; 2 — battery compartment partition |
— remove air duct 1 (see Fig. 234) and partition 2 of the battery compartment;
| Rice. 235. Places for attaching the battery casing and the holder of the additional relay unit |
— if installed, remove the additional relay block located on the left in the engine compartment (see Fig. 235, arrows 1 and 2); — Unscrew the fastening bolts (see Fig. 235, arrow 3) and remove the battery casing with the expansion tank of the cooling system. Set the tank aside;
| Rice. 239. Attaching cables to the gearbox levers: 1 - gear selection lever; 2 - gear lever |
— Using a screwdriver, carefully press one cable from gear selection lever 1 (see Fig. 239) and the second cable from gear selection lever 2;
| Rice. 240. Fastening gear shift cables to the gearbox. To remove the cables, squeeze the clamps in the direction of the arrows. |
— squeeze the clamps (see Fig. 240, arrows) and remove both gear shift cables from the holder on the gearbox; — unscrew the bolts securing the front thermal protection shield of the exhaust system and slide it into the gap between the exhaust system and the rear thermal protection shield so that both gearshift cables become visible. If there are difficulties, then disconnect the exhaust pipe and the middle part of the exhaust system so that the front heat shield can be moved; — remove both front seats together with the seat adjustment devices; - Unscrew the gear shift lever handle and remove it together with the compression spring (the spring will weaken after unscrewing the handle);
| Rice. 249. Removing the reverse gear blocking mechanism 1 and the protective corrugated cover 2 |
— unfasten the corrugated cover 2 (Fig. 249) of the gear shift lever from the center console; — pull the corrugated cover up and remove it together with mechanism 1 (see Fig. 249) for blocking the reverse gear; — remove the center console cover from the clamps and unscrew the center console mounting bolts; — open the ashtray and pull it out upward;
Operational and design features
Among the main innovations of such a development as a cable-driven gearbox is a reduction in the volume of oil used in the box. Previously, the manufacturer assumed the use of mineral fluid in a volume of 3 liters, but now the unit requires semi-synthetic fluid with the amount reduced to 2.2 liters.
Many Lada Granta owners are concerned about the question that has arisen: what type of oil should they choose when replacing a progressive gearbox to ensure its normal functionality? The manufacturer continually recommends using fluids with a viscosity parameter of “75W-85” in accordance with the “GL-4” specification.
A distinctive feature of the new cable-driven gearbox from its ancestor (VAZ-2108) is the modernized switching circuit. This confirms the fact that the fifth speed is not located to the left of the first stage, but opposite the 5th gear. This design has managed to acquire serious popularity among Grant owners. It also allows you to eliminate the moment of accidental engagement of reverse gear when moving forward.
Also among the advantages of the new transmission of the Lada Grant are the following points:
- the ability to operate in severe frost (down to minus 42 degrees) while ensuring free manipulation of the lever;
- availability of the procedure for removing the switching unit without completely dismantling the transmission unit;
- quick gear changes with a minimum of effort;
- increased reliability and protection of 1st and 2nd gears due to the use of cone synchronizers;
- the fact that the intermediate segments of the synchronizers were coated with a special composition, which made it possible to improve the quality performance of the unit.
Catalog numbers, bearing names
Replacing an automatic transmission with a manual transmission and vice versa: how justified is it?
The question is ambiguous, since each owner must start from his goals. When it comes to aggressive driving style, drifting, etc., you can’t find a better mechanic.
If you are a supporter of a smooth ride, medium speeds, and fuel economy, then an automatic is the best choice. Although, if you have the skills, you can drive it on the automatic type.
The final choice is up to the owner of the technical device.
Reviews
| № | Positive |
| 1. | Vladimir: after two years of active operation, there are no complaints about the operation of the manual transmission. I carry out technical inspections in a timely manner, fill in semi-synthetic oil, medium speed limits, non-aggressive driving style. |
| 2. | Sergey: after driving a car for a year and a half, I will say the following: there were no major breakdowns, nor any unscheduled repairs. However, twice I independently tightened the drive cable on the lever. |
| 3. | Kirill: I took a Granta with an automatic rifle from the showroom, the car is playful, good acceleration dynamics, average fuel consumption. The build quality is satisfactory, spare parts are always available in the market and stores. |
| 4. | Dmitry: I recently underwent scheduled maintenance, the master assured me that the transmission was in good working order. Replaced consumables, filter, oil. I have been actively using the car for two years now. The manufacturer indicates a resource of 180 - 200 thousand km before major repairs. Let's see how much mine comes out. |
| 5. | Vasily: at 65,000 km I replaced the rubber boot once, since the previous one was defective. There were no other breakdowns, consumables were replaced as usual. |
| 6. | Ivan: my positive review of the Lada Granta car. This is my second year of driving actively, and in a month I hit two months’ worth. I'm pleased with the build quality of the transmission, no complaints. |
| 7. | Vitaly: the manufacturer recommends changing the transmission oil every 60,000 km, in practice my interval is 50,000 km. I believe that the fresher the oil, the more useful substances are retained in it to protect and lubricate the gearbox gears. |
| Negative | |
| 1. | Ivan: I do not agree with the manufacturer’s statements about the service life of 180,000 km. Already at 80,000 km the cable drive was replaced. In the process, other minor breakdowns were eliminated. The model is crude, there are many shortcomings and defects that are not eliminated from year to year. |
| 2. | Vasily: after 75,000 km, my automatic transmission began to change gears with a certain delay (pause). After visiting a service station, the technician diagnosed a defect in the control unit and solenoid. |
| 3. | Gennady: in general, the transmission is good, but there are a number of shortcomings and defects that need to be eliminated. In order not to be fooled in the future, I plan to buy a Renault Logan. The model is proven, the weaknesses are known, there are not so many of them. |
Conclusion The design of a standard transmission is quite complex, regardless of whether it is manual or automatic. In case of repairs and preventive maintenance, prepare thoroughly and study the methodological recommendations.
When it comes to major transmission repairs, use the services of service station professionals. At a special diagnostic stand, technicians conduct tests and calibrate the operation of the box. Upon completion, they provide a quality guarantee for the block of work performed.
Symptoms of malfunction, diagnostics, solutions
| Sign | Cause and remedy |
| Incomplete engagement of the clutch (slips) | Replacing discs, cleaning clutches |
| Incomplete shutdown (leading) | Prevention of the clutch mechanism |
| Periodic jerks | Clutch cable wear, clutch replacement |
| Vibration, beating when shifting to higher gears | The flywheel is bent, the gripper teeth are worn out. Replacing the flywheel and related consumables |
| Noise, creaking, grinding noise when activated | Damper spring wear, replacement with a new one, drive lubrication |
| Pedal free play is increased, exceeding 2 -3 mm | Tensioning the cable, replacing with a new one |
| You can hear the smell of burnt friction linings | Dismantling the clutch block, replacing worn elements |
| Increased fuel consumption | Flywheel worn, teeth damaged |
| Reduced acceleration dynamics | Replacing clutches |