Self-diagnosis of the clutch disc
- Clutch not disengaging.
- Clutch slipping.
- The occurrence of vibration and extraneous sounds when the clutch is disengaged.
- The clutch pedal fails (does not return).
If the pedal does not return (falls through), the VAZ-2107 clutch cylinder may need to be replaced.
Replacing the clutch can be done in several ways. The first requires dismantling the power unit, the second requires removing the gearbox, which requires an inspection hole, a lift or an overpass. In the first case, it is necessary to use special equipment in the form of a lift. To remove the engine, you will also need to completely drain the coolant, disconnect the pipes from the radiator, and in the end you will spend a lot of time disassembling the parts. Therefore, it is advisable to use the second method, during which you can avoid all unnecessary operations. Let's look at how to replace a VAZ-2107 clutch step by step.
Removing the gearbox
After this, the starter is removed; as a rule, it is secured with three bolts. Before performing this task, you must disconnect the terminals from the battery. Finally, we dismantle the lever in the cabin, the cable on the speedometer and the brackets securing the exhaust pipe. After completing these operations, to dismantle the box itself, you need to unscrew the 4 bolts on the power unit casing.
Removing the disk
Installing the disc
We insert the new clutch disc in place of the old one. When installed correctly, the large protrusion should press against the release bearing. After making sure that the part is installed correctly, perform all the above operations in reverse order. You can use the gearbox input shaft as a guide. If you don’t have one, you can make one; it won’t take much of your time. The main rule is that the manufactured shaft can be easily pulled out by hand after installing the part. Finally, we screw the clutch basket, focusing on the previously made marks.
https://youtube.com/watch?v=rrO-5EmSUUo
Sources
- https://luxvaz.ru/vaz-2110/58-zamena-trosika-scepleniya.html
- https://remontavtovaz.ru/vaz-2110/zamena-i-regulirovka-trosa-scepleniya-vaz-2110.html
- https://vipwash.ru/stseplenie/zamena-stsepleniya-i-diska-na-vaz-2107
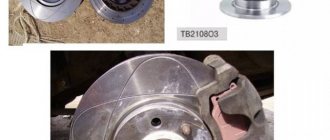
Replacing brake discs yourself
Front brake discs VAZ 2110
The first step is to dismantle the worn-out brake discs. To do this you should do:
- The car wheel should be removed.
- Remove worn brake pads.
- Disassemble the brake frame.
- Clean the surface of the hub.
- Check the operation of the hub.
- Remove excess coating from new discs.
- Check the brake disc runout.
- Install the brake pads.
To carry out this work, the following equipment, mechanisms, and tools should be used:
- Jack.
- Any device for unscrewing nuts with the number “7”.
- Wrenches with numbers "13" and "17".
- Hammer.
- A screwdriver designed for unscrewing flat fasteners.
Removing the wheel
Removing the front wheel of a VAZ 2110
In order to remove a car wheel, you must do the following:
- A jack is installed under the car.
- The car is raised to such a level that it does not tip over, but the removal of the wheel was carried out without interference.
- Unscrew the wheel mounts with a wrench.
- Remove the hubcaps and the wheel itself.
This work is no different from replacing a tire when the tires go flat due to a puncture.
Removing the brake pads
Front brake pads VAZ 2110
To remove used brake pads:
- The piston must be moved as far as possible from the standard mechanism.
Note: The distance should not exceed that which will be convenient for removing old brake pads.
- The seized brake pads are disposed of.
To make the work easier, you should disassemble the brake frame:
- Unscrew the two bolts that secure the VAZ 2110 pads.
- Disconnect the device completely.
Note: after unscrewing the bolts, the wheel cylinder brake hose remains untouched.
Cleaning the hub and checking for runout
Front hub VAZ 2110
The next step is cleaning the hub. It should be thoroughly cleaned, as additional debris can negatively affect the performance of the new equipment. For this purpose it is used:
- Wire brush.
- Alcohol solvent.
This method cleans the mechanism from rust, dirt and possible surface damage. Sometimes, when the hub surface is not cleaned, the brake system may make a sound that sounds like a beating sound. This condition is unacceptable.
Note: remaining dirt on the hub, its deviations in operation due to poor cleaning, are not a defect in the brake discs.
Before finally fixing the devices in place, a test run should be carried out. This will help you find out the hub runout. This test uses a special device. The normal runout should not exceed 0.1 millimeters. When the hub runout indicator is exceeded, the hub mechanism should be repaired and only then further installation of the brake discs should be carried out. Hub repairs are carried out quite carefully. It is necessary to replace the bearing if the runout of the mechanism is too great. To replace a bearing, do the following:
- Lightly unscrew the nut that secures the stand. There is no need to unscrew it completely.
- We completely unscrew the nut that holds the CV joint (see VAZ 2110: replacing the CV joint - do it right). The stand is removed.
- The spring must be compressed. To do this, it is necessary to use a tightening mechanism. It is installed on a spring and gradually clamped on both sides.
- At the moment of maximum compression of the spring (it should not be compressed completely), the old bearing is removed.
- The old bearing is removed and a new, ready-to-use working bearing takes its place.
After installing the new bearing, we assemble the hub mechanism in the reverse order. After each element is installed in its place, you should check the hub runout again. Don't forget about the maximum value.
Note. The check must be carried out carefully, since the safety of the driver and his passengers may depend on its operation.
Preparing new drives for installation
VAZ 2110 front and rear wheels
An integral part of replacing VAZ 2110 brake discs is removing the coating on the new part. New brake discs have a special coating called conservative. Any solvent can be used for this purpose. After removing the coating, new brake discs should be installed in place of the old worn ones.
Checking the runout of the disc itself
VAZ 2110 front brake disc is heating up
Once again, it is necessary to do a small check of the performance indicators. This time you should pay attention to the runout of the brake disc itself. The maximum permissible value should not exceed 0.15 millimeters. When repairs are carried out carefully and according to the rules, this indicator should not exceed the permissible value.
Note. When the indicator is exceeded, and the repairman does not deign to do the calibration, the sensitivity of the brake pedal can increase significantly. In addition, vibration will increase during braking.
Installation
VAZ 2110 front disc brakes kit
The last step when replacing the brake disc of a VAZ 2110 car is to install the brake pads in their original place. The steps to perform this operation are carried out in the opposite order as at the time of disassembly.
How to bleed and break in brakes
After replacing parts, bleed the system, even when the calipers were not removed. The easiest way to do the job is with two people; prepare everything you need in advance: fresh brake fluid, a cut-off plastic bottle and a piece of hose that should fit tightly onto the bleeder fitting. Sequencing:
- Open the cap on the expansion tank and pour liquid to the very top. Start with the wheel furthest from the master cylinder.
- Pour some brake fluid into the container, put one end of the hose on the fitting, and lower the other into the bottle.
- The assistant must press the pedal vigorously several times and hold it in the lower position. Carefully unscrew the fitting by half a turn or a little more, watch how the liquid comes out into the container, and close it after a few seconds. Carry out the work until there are no air bubbles in the extruded composition.
- Also bleed the remaining wheels. Monitor the level in the tank, top up if it falls below the mark.
After finishing the work, put on the rubber plugs and put the wheels in place. Make sure that the system is working properly by accelerating and pressing the pedal sharply. If the car pulls to the side, it means the pumping was done incorrectly, you need to repeat it again.
After replacing the pads and discs, the system must be run in. At first, do not press the pedal too sharply, do it smoothly and intermittently. After a run of 300 kilometers, accelerate on the highway and brake sharply several times, finally grinding in the parts. After that, drive as usual.
Replacing discs and pads with your own hands is not difficult if you follow the instructions for carrying out the work. Select quality replacement parts to ensure your brakes work properly and are safe. After replacement, be sure to bleed the brake system and run it for at least 300 kilometers.
Replacement steps
The entire replacement process can be divided into several stages:
- Removing wheels;
- Removing the old brake pad;
- Frame disassembly;
- Cleaning the hub and checking it;
- Removing coating from new disks;
- Runout check;
- Installation of new brake system elements.
Now let's talk about this in more detail.
Removing the wheel
In fact, dismantling the wheel for subsequent replacement of the brake elements is not difficult.
But a certain sequence of actions will have to be followed.
- Place a jack under the car.
- Lift it up so that it doesn't tip over, but still allows you to easily remove the wheels.
- Unscrew the wheel fasteners.
- Remove the hubcaps and the wheels themselves.
As you can see, the procedure is really simple, but it requires attention and accuracy.
Removing the pads
- Try to move the piston as far as possible from the brake mechanism. But do not exceed the distance beyond that which will allow you to comfortably remove the brake pads.
- Take out the block.
- To make the job easier, you can disassemble the brake frame. To do this, unscrew the two bolts securing the block and disconnect the device.
Substitutes
| vendor code | Price, rub.) | vendor code | Price, rub.) |
| Delphi 65140 | 850 | Finwhale 23593 | 800 |
| LS1219/S | 850 | VR311 | 800 |
| Bosch 17888 | 950 | TRW 26401 | 800 |
| 986487217 | 850 | GS8164 | 850 |
| HZTS 79927 | 800 | 2101-3502090 | 800 |
| Start 63275 | 800 | 21010-3502092 | 850 |
| MASTER SPORT 2103-3502093 | 850 | 030137-02332 | 800 |
The lists are presented for informational purposes. Before purchasing, be sure to consult with a specialist from a service center or auto store to determine the compatibility of the catalog article with the make/model of your car.
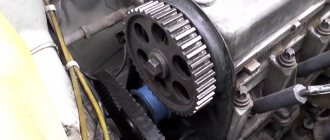
Purpose of the timing belt
An internal combustion engine is a complex system that consists of hundreds of parts and several more or less independent mechanisms. And the engine will only function normally if its mechanisms, assemblies and systems work in harmony. This quality - consistency of operation - is of decisive importance for the engine. For example, a certain position of the pistons corresponds to a strictly defined position of the valves, and if this condition is not met, the engine simply will not work.
Therefore, in internal combustion engines there is an urgent task of synchronizing and coordinating the operation of several systems. In modern engines, this problem is solved using several drives - a gas distribution mechanism drive, a generator, a water pump, an ignition distributor, a fuel pump, etc. But the most important thing is the timing drive, which is necessarily present in all types of engines.
- 1,050 rub.
- 350 rub.
- RUB 3,785
- RUB 1,190
- 415 rub.
- 300 rub.
- RUB 2,070
- RUB 3,350
- RUB 1,135
The engines of VAZ passenger cars initially used a timing drive, implemented using a metal chain that connected the crankshaft gear to the timing shaft gear and some other units. However, later VAZ designers abandoned the use of a chain, preferring a simpler, more reliable and modern solution - a rubber timing belt.
The timing belt in VAZ engines solves several problems at once:
- Transmission of torque from the engine crankshaft to the shaft (or shafts, if there are two) of the gas distribution mechanism;
- Transmission of torque to auxiliary units, primarily to the water pump of the engine cooling system;
- Ensuring synchronous operation of the crankshaft and timing gear;
- Preventing mismatch between the operation of the crankshaft and timing gear in all engine operating modes.
It should be noted that in VAZ cars the timing belt serves to drive the camshafts and water pump. This belt could, in principle, rotate the generator and other mechanisms, but VAZ designers abandoned this idea. Why? Because in this case, a broken belt or jamming of any of the units would immediately disable the entire engine, so it is more reliable and safer to make a separate drive for some units. And a breakdown of the water pump will not stop the engine immediately, so combining the drive of this unit with the timing drive does not pose a potential danger.
VAZ cars use several types of timing belts, which differ in characteristics and design.
Brake pedal
The main control element of the VAZ 2101 braking system is the brake pedal, located in the cabin under the steering column between the clutch and accelerator pedals. The pedal transmits the muscular force from the driver's legs to the GTZ. If the brake pedal is adjusted correctly, the free play will be 4–6 cm. When you press it and travel the specified distance, the vehicle begins to smoothly slow down.
Free play of the brake pedal: 1 — master cylinder; 2 - pusher; 3 — brake pedal; 4 — brake light switch buffer; 5 — switch nut; 6 — brake light switch; 7 — pedal release spring
What is a brake disc and why is it needed?
The brake disc is an element of the front wheel braking mechanism. It is made of steel and has the shape of a plate, the rim of which serves as a working surface. The protruding part (bottom) of the disk is attached to the hub.
The pads are located in close proximity to the working surface of the part. When we press on the brake pedal, they press against the disc, causing it to slow down. This is how the front wheels of the “fourteenth” brake.
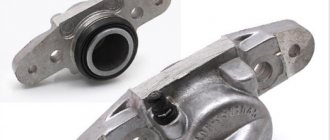
Car pump device
In case of many defects, the pump is replaced on a VAZ sixth model, a video about which can always be watched on the Internet. The “six” prefers to change the entire water pump, because Many car enthusiasts do not repair this component of the car cooling system due to its low price when purchased at a spare parts store. The price of a “six” water pump in various retail outlets is quite reasonable, varying from 600 to 700 rubles.
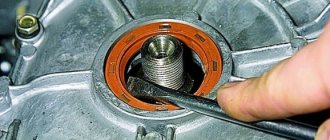
The liquid base (antifreeze) acts as a cooler for the power plant, which heats up during operation. But the cooler is moved using the so-called. “pump” (water pump), which with its impeller blades forces liquid to flow into the supplied pipes. When the “six” water pump is not working, the temperature of the engine begins to steadily increase, which can lead to its overheating, deformation of individual elements and subsequent breakdown. Therefore, it is necessary to replace the pump or repair it. What the water pump consists of can be seen when replacing the oil seal of the VAZ 2106 pump: it is a pump of a centrifugal operating principle, to which the rotational torque is transmitted from the crankshaft pulley of the vehicle’s engine unit. The part is located on the right side of the “engine” and is mounted with a paronite gasket. The product is cast from light aluminum alloys, the shaft of which is equipped with a double-row non-separable bearing without a cage. At one end of the shaft there is a blade impeller, at the other end there is a pulley hub.
An O-ring with the help of an oil seal forces the impeller to be in a state of readiness for operation. Under the action of the rotating impeller, the required pressure is created, with the help of which antifreeze is pumped into the cooling system and supplied to cool the power plant and other components of the vehicle.
All components of the water pump can be seen when replacing the pump seal, which is carried out during plumbing repairs. To find out whether the coolant is circulating in the heating system and whether the “six” pump is functioning, we perform the following simple steps: start and heat the engine to an operating temperature of 90 degrees Celsius and squeeze the upper pipe directed to the radiator with both hands. If the water pump is functioning, you will feel the circulation of antifreeze in the system.
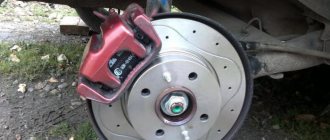
How to replace brake discs on a VAZ 2110-VAZ 2112?
Note! We recommend replacing brake discs in pairs, because when installing two new discs on both wheels, firstly, the car brakes normally and does not pull to the side, and secondly, they wear out evenly, thereby the effectiveness of the braking system is greatly reduced by replacing the disc only on the one hand, it will give practically no result if, on the other hand, the brake disc is worn out, but on the contrary, it will aggravate the situation, because during braking, the new disc will stop the wheel much faster than the old one, because of this the car will be pulled to the side constantly!
Removal: 1) To remove the brake disc, you will first need to remove the brake caliper (Indicated by the red arrow, how to remove it, read the article: “Replacing the brake caliper on a VAZ 2109”) and place it either on the lever as shown in the photo below, or hang it by a wire or a rope to a spring (This is much better, because the caliper can fall from the lever and the brake hose will break because of this), after which you just have to monitor the condition of the brake hose (Indicated by a blue arrow), it should not be too tight, and because of this it can also tear, due to which you will also have to change the hose and bleed the brake system, and this is already extra work and a waste of money (in this case you will need to buy brake fluid) and time.
2) When the caliper is removed, proceed to cleaning the old brake disc, it is cleaned with a metal brush and pay special attention to the place where the disc with the hub is attached (This place is indicated by a blue arrow), this place, in addition to cleaning, also contains penetrating lubricant Treat with WD-40, but don’t forget to remove the plastic cap with a screwdriver (It’s clearly visible in the photo, if you look at the blue arrow, you’d think it’s directed at it too) and when all operations are completed, unscrew the two guides studs (indicated by red arrows) securing the brake disc (while holding the disc turning) and then remove the worn disc from the car, pulling it towards you with your hands to do this
Drum brake disc VAZ 2115
We install the rear drum discs in the same way as the front ones. Fixing the disk on two slots clamped with screws. Before removing the drum, gently tap the body. This is necessary in case rust or layers have formed inside the “cap”.
Tips for servicing VAZ 2115
We comply with the technical inspection (TO) deadlines. We carry out maintenance every 15,000 km, as indicated in the instructions.
After long trips on muddy or snowy roads, rinse the calipers with running water. This will remove chemicals from the surface and reduce the likelihood of deformation and corrosion. If you have a covered area, leave the car in a non-ventilated box.
Avoid overheating of the wheel bearing and caliper, as this reduces braking efficiency.
Which type of disk is better?
- Stock;
- Ventilated;
- With notches.
The first type is the simplest with minimal efficiency, frequent deformation against the background of increasing operating temperature. At high speeds, the operating temperature rises, which has nowhere to go, which leads to disk jamming. Since 2000, most automakers have increasingly installed ventilated discs in production models.
The second type is the most in demand in terms of price-quality ratio. The main advantage of the ventilated type is the presence of multiple through holes on the plane of the disk. This facilitates the rapid removal of excess heat, preventing overheating.
A disc with notches is the most effective, but at the same time expensive product. Notches can be combined with or without holes. In the first case, cooling, removal of moisture and condensate will be several times faster, which will increase the overall service life of the equipment.
Master brake cylinder
The GTZ of the VAZ “kopek” is a hydraulic type mechanism, consisting of two sections and designed to operate a system with two circuits.
The master cylinder creates fluid pressure throughout the entire brake system.
If problems arise with one of the circuits, the second, although not as effective, will ensure that the car stops. The GTZ is mounted to the pedal assembly bracket.
Design of the GTZ VAZ 2101: 1 - plug; 2 — cylinder body; 3 — rear brake drive piston; 4 — washer; 5 — front brake drive piston; 6 - sealing ring; 7 — locking screws; 8 — piston return springs; 9 — spring plate; 10 — pressure spring of the sealing ring; 11 — spacer ring; 12 — inlet; A - compensation hole (gaps between sealing ring 6, spacer ring 11 and piston 5)
Pistons 3 and 5 are responsible for the performance of different circuits. The initial position of the piston elements is ensured by springs 8, by means of which the pistons are pressed into screws 7. The hydraulic cylinder is sealed with the corresponding cuffs 6. In the front part of the housing is plugged with a plug 1.
The main problems with the GTZ are wear of the lip seals, the piston or the cylinder itself. If rubber products can be replaced with new ones from the repair kit, then if the cylinder or piston is damaged, the device will have to be completely replaced. Since the product is located under the hood near the clutch master cylinder, replacing it does not cause any difficulties.
Which disks to choose
If replacing brake discs on a VAZ 2114 is inevitable, you should take care to select them correctly. Remember, your safety depends on their quality. And be prepared for the fact that you will have to buy not one disc, but a set of two pieces. Under no circumstances should you change them one by one! Due to uneven wear of parts, the braking efficiency of each wheel will be different. This may cause you to lose control of the vehicle.
The standard front brake disc for the VAZ 2114 (R-13) goes on sale under catalog number 2108-3501070. The price of the set, depending on the manufacturer and modification, can vary from 1100 to 4000 rubles.
How to carry out the work
When replacing disc brakes, the sequence of work must be followed. This must be done on a level surface, preferably in a garage, and prepare a set of tools for fastening in advance; different models use different options - from ordinary bolts to screws with an internal hexagon or star. Step-by-step instruction:
- Place chocks under those wheels that will not be removed to prevent the car from rolling.
- Remove the mounting bolts or nuts on the wheel rim. Raise the car with a jack and remove the wheel. It is dangerous to put a stop and leave the car on a jack.
- Unscrew the cap on the brake fluid reservoir. This will make it easier to press in the brake cylinder.
- When there are fixing brackets, carefully remove them with a screwdriver. Then unscrew the caliper mount. Take a flat-head screwdriver and carefully press in the piston on the brake cylinder.
- If you need to change the pads, the old ones are removed, the installation site is cleaned of dirt, and then new parts can be installed. Reassemble in reverse order.
- When removing the disc, move the caliper to the side and hang it so as not to damage the hose. The bolts must be removed carefully; to do this, first block the hub in a stationary position.
- Clean the installation site from debris and deposits. Replacing the brake disc is carried out in the reverse order. If there is a protective lubricant on it, remove it with a degreaser.
For your information! Carry out work no earlier than half an hour after the trip. All parts of the brake system must cool down.
When installing discs or replacing pads, inspect all elements and, if necessary, replace worn ones
Pay attention to the fasteners and brake hoses; if they are cracked, buy new ones. You can check the system in advance from the pit to stock up on everything you need in advance
Is it financially profitable?
When the owner of the car imagines how much work he has to do, willy-nilly he begins to calculate whether it makes sense to change the brake discs himself, or whether it is easier to take the car to a service station.
Depending on the manufacturer and the place where you purchase new brake discs, their price can range from 1 to 2 thousand rubles. Add to this minor expenses on consumables. Surely you have tools, a jack, and the same WD40 in your garage. That is, additional costs, in addition to the purchase of brake discs themselves, are minimal.
Now we invite you to familiarize yourself with the cost of services of professional service centers for the repair and replacement of various components of the brake system.
Source
Malfunctions
Any driver experiences an unpleasant feeling when the clutch pedal sinks to the floor. This can happen if the clutch cable breaks; it is also possible that the release fork breaks (this case is discussed in another article). The cable breaks more often on older cars that are used in extreme conditions or all year round.
The cable may become frayed, which affects the smoothness of the pedal and the operation of the clutch. This cable also requires replacement.
If the clutch cable is broken, you can drive your car to the repair site. You need to start the car in first gear and shift while driving. The following situation is possible: the cable broke while the gear was engaged, and the car stalled.
There is a possibility that it will be difficult to engage the neutral position. Then your car won’t even be able to roll off the roadway. The transmission is disengaged by rocking the car forward and backward and disengaging the transmission at the same time. You can jack up one of the wheels and spin it by hand, this will also help.
Even if the cable is not replaced, gear shifting is possible. It is possible to get to the service station, but such driving has a negative impact on the service life of the gearbox.
The cost of the spare part is low, about 300 rubles. The cost of replacing a cable in a car service is 400 rubles.
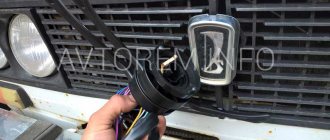
Important points when replacing the cable
Unscrewing the fastener
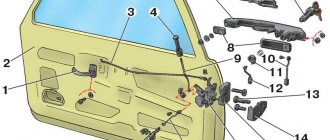
- As practice shows, the procedure for replacing a cable on a “ten” begins in the engine compartment. You are required to hold the fork and at the same time pull the cable that is removed from the fork.
- Then the cable fastener is removed from the bracket, which is located on the gearbox. Having completed this procedure, we go into the interior and dismantle the damaged element, that is, the cable.
- The result of the repair is influenced not only by the quality of the new cable, but also by the correctness of the entire replacement procedure.
- If you are dealing with a “ten” from an experimental industrial batch, then the bracket will be presented as a bolt with a Phillips-head screwdriver. To dismantle such a fastening element, you cannot use a regular screwdriver. A special shortened tool will be required.
- If the cable breaks while driving, you can unscrew the bracket with a handy tool, but through the safety block.
- It is strongly recommended to replace the non-standard bolt with a regular one, which can be unscrewed with a simple wrench.
- Be sure to keep a set of tools in your car, since it is extremely rare for a cable to break at the right moment. There is hardly a right moment for any kind of machine breakdown.
Go to a service station or change it yourself
Replacing the front brake discs of a VAZ 2114 at a service station will cost you at least 2,500 rubles. From a financial point of view, this is not cheap. If you have experience with hand tools, you can do the replacement yourself. This procedure will take 4-5 hours, but the money will stay at home.
Replacing VAZ 2114 brake discs with your own hands involves using the following tools and means:
- jack;
- wheel wrench;
- key to 17;
- key for 12;
- mallet or hammer and wooden block;
- liquid VD-40;
- a piece of wire (30-50 cm).
Cable replacement technology
To eliminate this category of breakdowns, there is a certain technique. The clutch is released using a cable. And its regulation is carried out mechanically in the engine compartment on a support in the upper part of the gearbox housing. When disengaging the clutch, problems may appear, which can be identified by checking the serviceability of the pedal mechanism, as well as pressing it five times all the way. Adjusting the operation of the unit determines the free movement of the lever by 1 cm in the opposite direction to the usual movement.
If this is not possible, then the cable needs to be replaced. When removing it, you should make a sharp movement to separate it from the attachment point, then, by squeezing the outer shell, achieve compression of the cable adjustment mechanism at the point of the rubber cuff. To fix the cable mechanism on the gearbox, it must be unfastened from the mounting unit.
Removing the glove box is quite a labor-intensive operation. It is necessary to remove the relay panel (without detaching the wires from the terminals), the clutch pedal housing, only then unfasten the cable and pull it out of the car
Next, carefully pull it through the rubber bushing. Installation is performed in reverse order
Installation of the roller at the end of the cable is carried out by securing the outer parts of the cable to the gearbox, followed by rigid fixation
Installation is performed in reverse order. Installation of the roller at the end of the cable is carried out by securing the outer parts of the cable to the gearbox, followed by rigid fixation
It is important to stretch the cable sheath in the direction of travel and place a rubber damper in the clutch lever. If, during the process of replacing the clutch cable of a VAZ 2110, it is not possible to pull the sheath through in the recommended way, then it must be pushed through until it is possible to compress the plug at the point where the rubber cuff is located
If the sheaths are misaligned, the cable adjustment mechanics should be started again. Then place the casing and relay panel on the mounting conductor and recheck the mounting terminals in detail.
Depressing the clutch pedal and then checking the cable adjustment mechanism completes the installation. After all the preliminary manipulations, you can reconnect the battery.
There are times when the VAZ 2110 clutch cable has been replaced, but the vehicle is still impossible to operate. Probably the reason lies in a poor-quality cable mechanism. If it is in good working order, ensuring further operation consists of repeated repair operations. Duplicating previous actions will eliminate the possibility of an error and will also allow you to check the complex operation of the entire mechanism. If the attempt fails again, the cable must be replaced completely.
When replacing the VAZ 2110 clutch cable, it is important to know this key point: if the vehicle was produced in a pilot production batch, then the bracket can be fixed in the form of a bolted connection using a Phillips screwdriver. In this case, a traditional screwdriver will not cope with the problem of unscrewing, and a shortened version of the tool will be required. However, in the event of a sudden breakdown on the route, the fasteners can be released using a long screwdriver through the safety block
After completing the repair, for subsequent ease of maintenance, it is recommended to replace the old bolt with a standardized version with a wrench head
However, in the event of a sudden breakdown on the route, the fasteners can be released using a long screwdriver through the safety block. After completing the repair, for subsequent ease of maintenance, it is recommended to replace the old bolt with a standardized version with a wrench head.
Replacing and installing a cable requires mandatory adjustment of the pedal travel from top to floor in the range from 12.5...13.0 cm. That is, the pedal must be placed at the same height as the others. Adjustment is carried out by loosening the nuts on the fastening holder located on the gearbox.
By changing the location of the tip using the nuts, you can control the amount of stroke. When a satisfactory result is obtained, tighten the nuts. At this stage, installation and adjustment of the clutch cable is complete.
Replacing brake pads is a consequence of changing discs
Since when replacing a brake disc, the brake pads must be replaced, the process of this work should also be described. It is not recommended to use old brake pads with new brake discs. This can worsen the braking process, and in some cases lead to immediate failure of the brake discs. To replace brake pads on a VAZ 2110, you should be able to do the following work:
- Since the car is in the air, you should start removing the pads the moment the wheel is disconnected from the car.
- Having a flat-head screwdriver, you should bend the lock washers. They are the locking mechanism for the caliper bracket bolts.
- After bending, unscrew the bracket nut (top). Using a key with the number “17”, we clamp the bolt on one side and unscrew the nut on the other.
Replacing the front brake pads of a VAZ
- After unscrewing the bolt, all that remains is to remove the brake pads. This applies to both internal and external.
- After dismantling the old equipment, it should be replaced with new one.
Note: New brake pads must be lubricated before installation. It would be preferable and more effective to use copper grease.
After the lubricated brake pads are in place, it is necessary to completely reassemble all parts of the brake system and wheel in reverse order. If it is necessary to replace all brake discs, this procedure is performed separately for each wheel.
Note. Before driving with a new brake system, the first few hundred kilometers should be braked smoothly. This is necessary for the safety of the driver and the integrity of parts of the vehicle's braking system.
If you have doubts about self-repair, the work should be entrusted to professionals. They will not only carry out high-quality repairs, but will also make a selection of spare parts. With their selection, brake system spare parts will be of high quality. This will allow the VAZ 2110 driver not to have to search for spare parts. In addition, it is recommended to watch the video tutorial downloaded from the Internet. It is also recommended to use photographic materials as a visual aid if the work is still done with your own hands. During the replacement process, you need to follow the advice given in the instructions. Thus, you can save a lot of money, because the price of professional services is not cheap.
Replacement process
Schematic diagram of a car clutch Most car enthusiasts and owners of the VAZ-2114 are accustomed to doing most of the repair and restoration operations on their car with their own hands. Replacing the clutch cable is no exception. Of course, not everyone is able to do this on their own, because they do not know where to start and carry out the process.
Algorithm of actions on the VAZ-2114
In principle, when everything is put together, you can proceed directly to the repair process:
- We remove the negative terminal from the battery to disconnect the power to the car.
- We find the cable and begin the dismantling process.
- Using a 17mm wrench, unscrew the fastening nuts.
Cable mounting bolts under the hood
Using 17mm wrenches, unscrew the clutch cable fixing nuts
We remove the cable from the bracket and clutch fork.
We remove the clutch cable from the seat from the fork
- All other actions will be performed from the salon. To do this, you need to free access to the clutch pedal. We remove the carpet from the driver's side, and then carefully move the carpet away.
- Disconnect the cable eye from the hook on the pedal. There is a locking bracket installed there. You'll have to tinker with it.
Clutch pedal bracket under the hood
Disconnect the eyelet securing the cable to the pedal
The cable is pulled out from the engine compartment, so it needs to be pushed through from the passenger compartment. You can, of course, pull under the hood and pull it out, but this is dangerous because you can hit wiring or other elements.
We completely dismantle the cable
- Now you need to disassemble the cable housing and remove it from there.
- We install the new cable into the old housing and mount it in place.
- The remaining parts must be assembled in reverse order.
- After installing the product, it is necessary to adjust the cable tension.
Clutch cable adjustment process
Checking disc wear
Experienced technicians can determine by eye that the front brake disc on a VAZ 2114 needs to be replaced, but there are several points by which you can diagnose the problem yourself:
- The thickness of one of the disks is less than 10.8 mm;
- The part is deformed due to mechanical damage;
- Chips and grooves are visible on the working surface.
According to the manufacturer, the service life of the discs is 100,000 kilometers, but car enthusiasts say that they can rarely go more than 70,000 kilometers. Moreover, for such a service life, you have to change the brake pads on time and carry out independent diagnostics at least once every 3 months.
If you do not take precautions when operating a car, then due to poor performance of the brake mechanism, you can create an emergency situation on the road.
Bleeding the brake system of VAZ 2106
Bleeding the brakes is done to remove air trapped in the brake system. It is easy to determine the presence of air: the brake pedal is initially pressed too softly, and after several presses it suddenly acquires an unusual “hardness”. These are signs of an air lock.
Sequencing
First of all, it should be said that it is best to bleed the brakes with an assistant. But with some skill, this can be done alone.
- First, check the brake fluid level.
The tank must be filled to the upper marks. The reservoir must be filled with liquid to the level of the upper edge of the mounting plate - The fitting on the rear brake drum is unscrewed, a rubber hose is inserted in its place, and the other end of the hose is lowered into a plastic bottle.
The fitting is slightly unscrewed and a hose is inserted into it, with the other end lowered into the bottle - After this, the assistant sitting in the cab should press the brakes two or three times and then hold the pedal down for one minute.
- At this moment, the fitting is unscrewed so that brake fluid flows out of it through the hose. Air bubbles will be visible in it.
- After some time, the brake pedal will finally fall to the floor, which will be reported by the assistant. As soon as this happens, tighten the fitting and repeat all the above steps. This must be done until liquid with bubbles stops flowing from the hose.
- When the leaking brake fluid becomes normal, the bleeding procedure should be done with other wheels.