One of the most common types of body work that owners of the “Seven” have to deal with is replacing the front wing of a VAZ 2107.
The reasons for wing failure are simple:
- The appearance of traces of corrosion, even through holes. Despite the fairly high-quality metal and anti-corrosion treatment used in the manufacture of the car, dirt, moisture and, in particular, chemicals that are sprinkled on roads in winter cause the destruction of the paintwork and steel of the wing.
- Damage to a part due to an accident. It is worth replacing the wing only if the degree of its damage does not allow it to be straightened. Otherwise, it is better to restore and paint the old wing than to waste time and effort replacing the part.
Purchasing a new VAZ 2107 wing in a store is not a problem, but you should pay attention to the geometric parameters of the part. Sometimes there are body parts on the market that do not meet factory standards. It is quite difficult to perfectly install such wings in place. It is better to choose a high-quality part that does not require additional straightening or bending in accordance with the seat. You can do the work of replacing the wings yourself. You just need to have a few plumbing tools, a drill, a grinder and a semi-automatic welding machine adapted for welding in a carbon dioxide environment.
How to replace the front wing of a VAZ-2107
The reason for this is traces of corrosion or even through holes that have appeared over time, despite the fact that fairly high-quality metal was used during the production of the machine.
And those who purchased a VAZ-2107 car much later, and it was produced until 2012 at the Volzhsky Automobile Plant, could encounter such a problem as an accident. It is worth understanding that it is possible to resolve the issue of replacing the front fenders for such a car without even contacting expensive special service services. To do this, you need to be aware of at least the basic concepts of the work of a straightening welder. Even though this is a rather complicated procedure, you can still do it yourself.
Buying a front wing for a car today is quite simple. It’s a good idea to go to a specialized auto store or try to find one at auto dismantling yards, where they sell spare parts for domestic cars. Please note that if the damage allows the spare part to be straightened, then it is better to carry out such measures, because the wings that are produced as new spare parts do not always meet factory standards. This may lead to difficulties during their further installation.
How to change the wing on a VAZ 2107
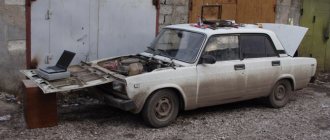
The VAZ 2107 brand car is known not only in Russia, but also in neighboring countries. Its production began in the 80s, and production was closed in 2012. A lot of time has passed, but the car continues to be popular. Over time, it is possible that you will get into an accident or cause corrosion to appear. Usually the front fenders are the first to suffer. If any of these troubles happen, then repairing or replacing the damaged front wing on a VAZ 2107 will help maintain its appearance.
Preparing the car to replace the front wing
To carry out all the necessary procedures you will need the following tools:
- drill or so-called hole punch;
- Grinder;
- spanners;
- impact screwdriver, etc.
To remove a damaged car part, namely the fender, you must first remove several other parts. The first thing you need to do is remove the front door.
This can be done using an impact screwdriver, as it is screwed on with Phillips screws.
Next, the hood, wheel, headlight, and front bumper are dismantled, regardless of whether the right or left fender is being replaced. It is advisable to seal the doorway to prevent dust from entering the interior. This way you will avoid unnecessary expenses on dry cleaning services. When operating the grinding machine, it is necessary to cover the windshield from abrasive particles.
After all the dismantling and preparation of the site for installation of the new wing has been carried out, you can begin to directly replace the part.
Rear fender replacement
To begin with, remove the trim in the luggage compartment, and the rear seats in the passenger compartment. For safety reasons, it is recommended to remove the gas tank (even if you are replacing the left fender). Take a grinder and cut off the wing, departing about 1 cm from the factory seam. Using powerful pliers, twist the remaining metal into a strip and remove it. Inspect the inner arch and, if necessary, repair it (boil it), then prime it. Next, attach the fender, secure it with clamps and align it so that there are equal gaps between it and the trunk lid and rear door. If everything is fine, then you can weld it (preferably spot welding).
Description of self-replacement of the front wing of a VAZ-2107
A drill or hole punch is used to make holes in a new car part so that it can later be welded to the body. Considering that the work is performed by a non-professional in a garage, and it is not possible to use resistance welding, it is better to use a semi-automatic machine. In this brand of car, the front fenders are welded, not screwed, so welding cannot be done without.
Using a grinding machine equipped with a special wheel, you need to clean the places where the welding took place. After this, you should install the door and hood, and return the headlight unit to its place. In order to align the replaced wing, it is necessary to adjust the gaps. Such events are carried out using a clamp. This will help secure the unwelded part and ensure that it is aligned correctly.
Then, using a semi-automatic machine, it is necessary to weld a new wing of the VAZ-2107 car. After all the holes are fixed, they need to be sanded with a grinding wheel.
At the very last stage, painting work is carried out. First you need to prepare the surface. The new wing is available in black and is coated with a preservative, which must be removed before painting. It is better to perform these works manually, without using grinding machines, as the surface can be damaged, which will subsequently entail additional processing, the purchase of materials and painting work.
Replacing the wing of a VAZ 2101
Most car owners carefully monitor the appearance of their “horse” and literally blow away specks of dust from it. Regular washing and polishing at least once a month is a mandatory procedure for which no expense is spared. But active use sooner or later is reflected in the appearance - abrasions, chips, cracks, traces of corrosion and even dents appear. In this case, the car's wings (both front and rear) suffer the most. But don't worry. Replacing a fender is possible if you have love for your car, hands, the necessary equipment and a desire to save money.
When to change?
There are car enthusiasts who, when the first scratch appears, rush to the service station and ask for a new wing to be installed. Take your time:
— firstly, such a service (when ordered on the service) can hardly be called cheap. If you need to change several wings, this can cost a pretty penny. Please note that you will have to pay a considerable amount not only for the work, but also for the new wing;
- secondly, if replacing the wing is necessary and straightening will not help, then do the work yourself. If you follow simple instructions, this is a matter of a few hours. In addition to everything, you have a chance to study the body part of your car, which will definitely come in handy in the future.
When does a wing require replacement:
- If you are in an accident and the damage is minor, then straightening and putty can help out. If the impact was very strong and the wing is severely deformed or even torn, it is better to replace it.
- Corrosion is the main enemy of a metal body. She mercilessly destroys metal and starts with the fenders of the car. It is better not to “treat” serious (through) damage to the body, but to replace it immediately.
If you are in doubt about what is the best thing to do - straighten or change the wing, it is better to consult with several specialists and then make a decision.
Front fender
So you've decided that fender replacement is the best option. Great. Stock up on a new part, the necessary tools and get down to business. By the way, the specifics of replacement are different for each car (for obvious reasons). In this article we will pay attention to the real “father of the classics” - the VAZ-2101:
- Remove everything that may interfere with further work - the hood, bumper, front door. Immediately remove the turn signal on the fender, the sidelights and the headlight itself. Only after this can you work on the wing.
- Use a grinder or a sharp chisel to cut off the wing joints:
The practice of replacing the rear wing of a VAZ 2105 - 2107
Actually, I started the process of replacing the rear wing with a detailed inspection; the panel was replaced earlier. By the way, if you are changing the panels, then replace the panels first, and only then the fenders or sills.
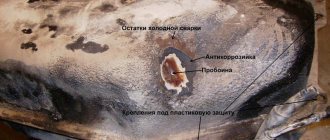
The gap between the wing and the door, the arch is rotten, masked with anti-gravel
Holes in the bottom of the wing
Next, we drill out the rear wing from the rear pillar; in order to find all the welding points, you may need to grind the surface with a grinder.
Welding points that need to be drilled
Drilled out these points
It is also necessary to drill out all other points - on the arch in the door opening, on the arch from the wheel side, cut off the points from the inside of the trunk where the rear panel meets the wing.
If the tire tank cover also changes, then we tear off this cover too, you will get something like this:
Photo of VAZ 2107 without rear wing
Small holes on the rear fender arch
Thanks for subscribing!
Here you can see that in some places it was necessary to weld the patches; the arches were not completely changed. We fasten the wing with self-tapping screws - this will allow you to adjust the wing panel in any direction and securely fix the wing before welding.
We fix the wing with self-tapping screws
By the way, I didn’t show the preparation for welding a new part, but everything is standard:
- Drilling holes for welding
- Cleaning and priming the wing from the inside
- I highly recommend putting sealant at the junction of the fender and the drain (where the trunk rubber is)
We place the wing on the screws immediately, then it will not be possible to tighten it, we also check during the welding process whether the wing has moved.
Check the gap, cook
We cook the wing to the rear pillar
Thus we weld the wing, the welding points are the same as on the old wing.
One of the most common types of body work that owners of the “Seven” have to deal with is replacing the front wing of a VAZ 2107.
The reasons for wing failure are simple:
- The appearance of traces of corrosion, even through holes. Despite the fairly high-quality metal and anti-corrosion treatment used in the manufacture of the car, dirt, moisture and, in particular, chemicals that are sprinkled on roads in winter cause the destruction of the paintwork and steel of the wing.
- Damage to a part due to an accident. It is worth replacing the wing only if the degree of its damage does not allow it to be straightened. Otherwise, it is better to restore and paint the old wing than to waste time and effort replacing the part.
Purchasing a new VAZ 2107 wing in a store is not a problem, but you should pay attention to the geometric parameters of the part. Sometimes there are body parts on the market that do not meet factory standards. It is quite difficult to perfectly install such wings in place. It is better to choose a high-quality part that does not require additional straightening or bending in accordance with the seat. You can do the work of replacing the wings yourself. You just need to have a few plumbing tools, a drill, a grinder and a semi-automatic welding machine adapted for welding in a carbon dioxide environment.
Features of replacing the front or rear wing in a VAZ 2107
Production of the VAZ 2107 ended in 2012, but even today this brand remains one of the most used in the VAZ line, along with 2106 and 2109. Drivers consider a durable, hard-to-kill body to be a feature of the 2107 configuration, the elements of which, although not coated with zinc, show high performance characteristics.
Replacing a VAZ 2107 wing is a type of repair that every Zhiguli owner has to deal with sooner or later. The market offers a complete catalog of body parts for the entire VAZ line, so choosing an original part from official manufacturers is not difficult.
In what cases are body parts replaced?
Few drivers know that rolled, black, galvanized steel loses 1% of its thickness every year. This is a natural process that builders and metallurgists know well. For body parts, natural wear and tear as thickness decreases is more than 2% per year of the original figure.
Therefore, the first reason for repairing and replacing a car body is natural processes, which for all metal parts end the same way: complete rotting or corrosion of the parts. Corrosion processes cannot be stopped, but can be delayed for 2-3 years by constant inspection of the body and anti-corrosion treatment of the metal. Reasons when an element needs to be changed:
- Corrosion has covered more than 50% of the surface, and there are through-holes.
- Accident, careless parking. Replacement is carried out if there is a break in the part, a deep dent that cannot be pulled out and straightened.
- The material used to make the part is plastic.
If there are small scratches on the paintwork, shallow dents with non-sharp edges, it is not advisable to replace the entire wing; it is recommended to straighten and draw out the metal.
Before changing the wing on a VAZ 2107, you need to inspect the element to check how the part is attached to the body. Factory assembly involves only welding; the wing is welded to the base at certain points. If the car is used, there is a chance that the model already has removable fenders mounted on bolts. In this case, replacing the part does not require the use of a welding machine.
Please pay attention!
When replacing, it is also important to pay attention to the fact that “remake” body parts today are not produced of very high quality. Both the thickness and density of the metal fail (it easily succumbs to rust and dents). Therefore, if it is possible to restore the “original” wing, feel free to do such repairs - it will cost less.
Necessary tool
- Grinder, self-tapping screws, screwdriver;
- Drill for drilling holes for spot welding;
- The welding itself (it’s better to use a non-bulky semi-automatic machine. See the article “Which semi-automatic welding machine to choose for car repair”);
- Every little thing for fitting parts, puttying, sanding.
- We also recommend that before removing the old part, measure (at least visually) the gaps between all parts. This is done so that the new wing, subsequently, clearly “falls into place”;
- Before changing the rear wing on a classic, it is necessary to do some preparatory work to make the work process as convenient as possible. First, remove the trunk trim. Inside the car, remove the rear seats. For safety, we also recommend removing the gas tank, even if the left one is being changed! You can also remove the door, but some people simply open it wide open. The trunk lid, especially if you are afraid of scratches and damage, must also be removed.
Preparation of VAZ 2107
Replacing the front wing of a VAZ 2107 begins with preparing the car and selecting the necessary tools and materials. For repair you will need:
- drill with a set of drills 0.8 mm;
- angle grinder (grinder);
- impact screwdriver;
- set of wrenches;
- hammer;
- chisel;
- clamps or other metal fasteners;
- welding machine.
If it is necessary to replace a removable part, then clamps and a welding machine are not required. Regardless of the structure, removable or non-removable, before work it is necessary to dismantle some of the mounted body elements. Step by step preparation process:
- Remove the front door.
- Remove the hood cover and the wheel under the wing that needs to be replaced.
- Remove the bumper and headlight unit.
The screws that hold the hinged panels are unscrewed with an impact screwdriver. Experienced drivers recommend spraying WD-40 on the threads to remove metal oxidation, making the job easier.
Removing the old wing on a VAZ
Dismantling, depending on the method of its installation, will be different. How to change the front wing on a VAZ 2107 if the original part is installed on the body by welding? The process of dismantling the old element step by step:
- Determine spot welding locations. At the service station, to dismantle the wing, they do not use cutting out the part with a chisel, but welding it with a welding machine.
- Drill out the welding points of the gutter on the body, cut off the gutter with a chisel.
- Cut off the connection between the fender and the front panel from the headlight downwards.
- Cut the connecting seam in the area of the side post, 5 mm away from the bend line.
- Use a grinder to cut out the remaining parts of the wing.
- Clean the cut areas and straighten the deformed edges.
- Inspect the body cavity, if there is rust or corrosion plaques, carry out repairs and treat the surface with anti-corrosive or zinc-chromate primer class GF-073. Experienced drivers recommend using Movil for any body work. This will protect the new wing from corrosion.
To dismantle a removable element that is installed on the body with bolts, you must use a power screwdriver. With this replacement, there is no need to remove the hood and door covers, and also protect the windshield from welding. Dismantling process step by step:
- Raise the hood and install the support stand.
- If the model is equipped with special protection, remove it.
When replacing the right fender, the steering wheel is turned all the way to the right; when replacing the left fender, it is turned to the left.
- Under the hood, in the side drain, unscrew the four upper mounting bolts.
- Unscrew the lower mounting bolts.
- Unscrew the two bolts located under the car fender, which secure the part and the front pillar. Parts are difficult to find, they are often covered with a layer of dust and dirt; before reinstallation, it is recommended to wash the car with a Karcher.
- Remove from seat.
The part is attached to the VAZ 2107 using 8 bolts. The process of replacing removable, often plastic elements is a fairly simple procedure even for an inexperienced technician. Repairs take up to 2 hours and are carried out in the garage.
VAZ 2109,2108,2107,2106,2105,2104,2103,2102,2101, 2170, Tavria, Chevrolet Niva
Repair after accidents » Body repair technology » Front fender replacement
In case of significant deformation, ruptures, as well as in cases of through pitting corrosion, the front fenders must be replaced. In case of minor damage (small dents, scratches, etc.), the damaged areas are corrected directly on the car with mandatory subsequent priming and painting.
Front fender replacement operations must be performed in the following order.
1. Remove the front bumper, hood, antenna, front door and lighting fixtures.
2. Cut off (Fig. 1) the connections of the wing with the front panel (III) and the headlight casing (II) with a sharpened chisel or with any mechanized tool (vibrating shears, grinding machine, etc.), stepping back from the connection line by 2— 3 mm; connecting the wing to the front pillar of the side of the body frame (II), retreating 2-3 mm from the bend line of the vertical amplifier;
3. Drill out the metal at the resistance welding points connecting the gutter to the mudguard (I) and detach the wing together with the gutter from the mudguard panel and the wind window frame. By bending the wing, as shown in pos. III, cut it down horizontally at the junction with the lower part of the front side panel.
4. Remove the remaining strips of metal using end cutters and a thin, sharp chisel. Straighten the deformed edges of the front panels, mudguard and front pillar along the seats and clean them with a grinding machine.
Installation of a new VAZ 2107 wing
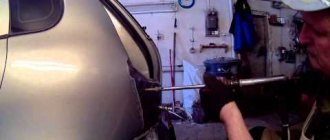
Replacing a front fender requires the ability to operate a welding machine. It is recommended to use gas welding with a brass rod L-62 or L-58. After checking the part on the seat, contact welding is carried out in increments of 40-50 mm. If electric welding is used in a carbon dioxide environment, it is recommended to use wire Sv 08 G1S or G2S, with a diameter of 0.8 mm. Welding should be done with a 10 mm seam in increments of 30-40 mm, the optimal current strength is 50-90 A.
Before installing a new element, it is necessary to mount all the removed parts on the body: door, hood cover, bumper and try on the new element on the seat.
Replacement using welding step by step:
- Insert the wing into the seat, observing the gap.
- Secure with clamps or other fasteners.
- Remove the bumper, hood, door.
- Grab the part in the area of the front pillar and check the geometry.
- Remove the clamps.
- Weld.
- Clean weld areas.
- Prime the joints, treat them with anti-corrosion agent, and paint over them after drying.
The price of an original part for a VAZ 2107 is from 1800 rubles. The new element is covered with conservation transport primer; the primer is removed before installation. It is recommended to remove the preservative by hand without using a sander. The cost of welding work when replacing one element is from 14,000 rubles.
Installation of plastic wings on a VAZ 2107
Plastic fenders with bolts on the VAZ 2107 are an alternative to a metal element, which has its own advantages and disadvantages. The advantages of the plastic element are obvious: the wing is not subject to corrosion, the aerodynamic performance of the car is improved, and the total weight on the body is reduced. In addition, plastic elements are simply removed and installed; the price of spare parts starts from 300 rubles.
Among the shortcomings, the minimum resistance of the part to impacts is noted. At the slightest collision, the plastic breaks or bends. The part can no longer be repaired; a full replacement and complete painting of the car is necessary; it is almost impossible to choose the color of the spare part to match the paintwork. The process of installing plastic elements instead of the standard metal one:
- Using a chisel, the old element is disconnected along the weld seams and pulled out.
- The deformed edges are cleaned, the remains of the old element are cut off.
- A layer of auto putty or auto glue is applied to the joints between the body and the plastic fender.
- The part is applied to the seat using glue and secured with bolts.
- 36 hours after the glue has hardened, the bolts are removed and the excess putty that has come out over the edge at the places where the glue is glued is removed.
- A layer of graviton and laminate is applied to the gluing areas.
- The structure is puttied and painted at the final stage.
The cost of replacing the original element with a plastic analogue at a service station starts from 7,000 rubles. Replacing the wing on a VAZ 2107 in 70% of cases is carried out independently. Repairs only require some skill when working with welding.
In what cases are body parts replaced?
There are two common reasons for the failure of any body part:
- Over time, traces of corrosion appear, which develop into through holes. The automaker tries to use only high-quality metal. Additionally, the body undergoes anti-corrosion treatment. However, constant exposure to moisture, dirt, and chemicals takes its toll. The paintwork and steel gradually deteriorate.
- Unfortunately, sometimes people get into accidents. Even a minor accident inevitably leads to damage to body parts. The front fenders on VAZs are especially at risk. Sometimes they can be straightened. But in some cases it is much cheaper and easier to supply a new part.
To carry out the replacement in your own garage, you need to have a drill, a welding machine for a carbon dioxide environment and a grinder.
Removing the old wing on a VAZ
First you need to make sure that you have all the necessary tools:
Before dismantling, you need to temporarily remove parts that may interfere with operation:
- front door;
- hood;
- wheel under the wing;
- bumper;
- block headlight.
Generally, the mounting screws are fairly tight, so it will be easier to remove them with an impact driver. First you need to spray the threads with WD-40 and let it sit for a few minutes.
Guide to replacing the front wing on a VAZ 2107
Owners of all old sevens sooner or later are faced with the need to replace the front wing on a VAZ 2107. Buying a new wing in an auto shop for any VAZ models will not be difficult. It is better to buy body parts from a reliable manufacturer. After all, if the dimensions are slightly off, then it won’t be possible to fit the new part perfectly into place. Let's discuss how to replace the wing on a VAZ in a garage.
- In what cases are body parts replaced?
- Removing the old wing on a VAZ
- How to install a new wing on a VAZ
In what cases are body parts replaced?
There are two common reasons for the failure of any body part:
- Over time, traces of corrosion appear, which develop into through holes. The automaker tries to use only high-quality metal. Additionally, the body undergoes anti-corrosion treatment. However, constant exposure to moisture, dirt, and chemicals takes its toll. The paintwork and steel gradually deteriorate.
- Unfortunately, sometimes people get into accidents. Even a minor accident inevitably leads to damage to body parts. The front fenders on VAZs are especially at risk. Sometimes they can be straightened. But in some cases it is much cheaper and easier to supply a new part.
To carry out the replacement in your own garage, you need to have a drill, a welding machine for a carbon dioxide environment and a grinder.
Removing the old wing on a VAZ
First you need to make sure that you have all the necessary tools:
- spanners;
- impact screwdriver;
- Bulgarian;
- drill;
- hammer;
- chisel.
Before dismantling, you need to temporarily remove parts that may interfere with operation:
- front door;
- hood;
- wheel under the wing;
- bumper;
- block headlight.
Generally, the mounting screws are fairly tight, so it will be easier to remove them with an impact driver. First you need to spray the threads with WD-40 and let it sit for a few minutes.
The remaining elements unscrew more easily.
The wings themselves are attached to the body by welding. To remove them you will have to use a sander.
Before you begin the cutting process, we recommend sealing the door opening with polyethylene or tape. This will protect the interior from large amounts of metal dust and sawdust getting into it. It's also a good idea to cover your windshield to protect it from hot sparks and abrasives.
Dismantling is carried out in four stages:
- Cut or chop off any weld points that secure the fender to the drain channel.
- Back off two to three millimeters and cut off the connection near the headlamp.
- About five millimeters from the bend line, cut off the connection to the side post.
- Using a grinder, remove the remaining parts of the wing and clean the landing areas.
After dismantling, you need to make sure that the body cavities are thoroughly cleaned and washed. If there are pockets of corrosion, prime and clean them. Treat them with zinc chromate primer and also apply Movil. This will protect the new wing from the appearance of new foci of corrosion.
How to install a new wing on a VAZ
To install the wing, you need to know how to work with a welding machine. Gas or semi-automatic welding is suitable. It is better, of course, to use the second option. This will prevent the use of explosive gas containers.
Before installing the new wing, replace all other previously removed body elements: bumper, headlight, door and hood. This is done temporarily to fit the new wing and set the gaps.
Now you can get started:
- align the part, observing the gaps with other body parts;
- secure it with clamps;
- dismantle the previously installed body elements again;
- temporarily weld the wing in several places so that it does not move with the clamps removed;
- make sure that the part is installed correctly;
- finally secure it in place using spot welding.
After the work has been completed, finally install the removed body elements, clean the welded areas, prime them and paint them.
1200 rub. for the photo report
We pay for photo reports on car repairs. Earnings from 10,000 rubles/month.
Write:
If you are concerned about the question “how to change the front wing on a VAZ 2107,” then this video, if not an instruction, is a fairly detailed answer. In addition, here you can learn how to straighten an apron on a “seven”.
So, replacing the front wing of a VAZ 2106 or VAZ 2107 begins with cutting off the damaged body part. If the damage is significant, then you may have to start with cleaning, that is, dismantling, in the engine compartment. Then you can begin to prepare the apron for straightening.
You can learn more about how to do such a body repair as replacing the front wing of a VAZ 2107 and straightening the apron by watching this video.
Hello! Today’s post will be dedicated to replacing the rear wing on VAZ 2105 - 2107 cars, I will also give a couple of tips on how to replace the wing and what to pay attention to.
Replacing the rear wing on a VAZ 2105 - 2107
First, let's talk about the theory of replacement, as well as the devices and tools that we will need in the replacement process. It is necessary to replace the wing in case of large deformations due to impacts and accidents, if the part is severely damaged by corrosion.
Important! New body parts are now not of very high quality, this applies both to the quality of workmanship (risks, minor deformations during stamping) and to the thickness and quality of the metal itself - the metal is thin and rusts very actively.
Thus, in every repair I try to preserve the original factory part as much as possible, changing only part of the part, making patches, etc. On a car assembled from new parts it is quite difficult, if not impossible (the bends do not match.
But despite my persuasion, the owner of the car shown here firmly decided to change the entire wing, and there was a lot of work to do with it.
Tool for replacing the rear wing on a VAZ 2107:
- Semi-automatic for welding the wing and patching holes under the wing. Read about my semi-automatic
- Drill for drilling spot welds and drilling holes for welding in a new part.
- Grinder, screws, screwdriver
Often, when replacing a rear fender, it becomes necessary to replace the spare wheel or tank, depending on the side. Also, if the car is rotten, then it is not a bad idea to purchase the outer part of the inner rear wheel arch or patch it.
I highly recommend that before cutting the old fender off the car, you look at the gaps between the door and the fender, the fender and the trunk. This is necessary in order to know where it is necessary to trim, tighten (if possible) to obtain the required gap. To cut off the wing, you need to start by drilling out all the spot welds, try not to drill through (as I did when replacing the front wing of the Tavria), I first drill and then carefully tear off the wing with a screwdriver. Take your time to minimize deformation of adjacent parts.
How to change the wing on a VAZ 2107
One of the most common types of body work that owners of the “Seven” have to deal with is replacing the front wing of a VAZ 2107.
The reasons for wing failure are simple:
- The appearance of traces of corrosion, even through holes. Despite the fairly high-quality metal and anti-corrosion treatment used in the manufacture of the car, dirt, moisture and, in particular, chemicals that are sprinkled on roads in winter cause the destruction of the paintwork and steel of the wing.
- Damage to a part due to an accident. It is worth replacing the wing only if the degree of its damage does not allow it to be straightened. Otherwise, it is better to restore and paint the old wing than to waste time and effort replacing the part.
Purchasing a new VAZ 2107 wing in a store is not a problem, but you should pay attention to the geometric parameters of the part. Sometimes there are body parts on the market that do not meet factory standards. It is quite difficult to perfectly install such wings in place. It is better to choose a high-quality part that does not require additional straightening or bending in accordance with the seat.
You can do the work of replacing the wings yourself. You just need to have a few plumbing tools, a drill, a grinder and a semi-automatic welding machine adapted for welding in a carbon dioxide environment.
Preparing a VAZ 2107 for wing replacement
For preparatory work you will need:
- impact screwdriver;
- angle grinder (“grinder”) with disc;
- drill with drill bit;
- chisel;
- hammer;
- set of wrenches.
Before dismantling the old front wing of the VAZ 2107, it is necessary to remove some adjacent parts from the car:
- front door;
- hood;
- bumper;
- block headlight;
- wheel.
The screws securing the front door of the VAZ 2107 are tightened very tightly, so it will not be possible to unscrew them without an impact screwdriver. You can make it easier to unscrew them by treating the threads with WD-40.
The fastening of other parts is easier to unscrew.
The front fenders are attached to the body by a welded joint. Therefore, to dismantle them you will have to use a grinder.
Before cutting off the old wings, you need to seal the doorway (where the dismantled door was) with plastic film and tape. Otherwise, dust and metal filings may contaminate the interior of the car. You should also cover the windshield from hot particles and abrasives. The old wing is dismantled in four stages:
- Cut off or cut away the flash weld points securing the fender to the gutter.
- After retreating 2-3 mm, cut off the connection between the wing and the front panel (near the headlight).
- Stepping back 5 mm from the bend line, cut off the connection between the wing and the sidewall pillar.
- Remove the remains of the wing from the body and clean the seats with a grinder.
When the old wing is removed, it is necessary to check the condition of the body cavities that it covered. They should be thoroughly cleaned of dirt and washed. If there are pockets of corrosion, they must be cleaned and primed. Before installing a new wing, all cavities must be treated with zinc-chromate primer and additional protection with Movil applied to the surface. This will allow you not to worry about the emergence of new corrosion centers after the wing is installed.
Installation of a new VAZ 2107 wing
To install the wing, semi-automatic welding or gas welding is required. The first option is safer and does not require the use of explosive gas cylinders.
To properly install a new VAZ 2107 wing, you need to replace the door, headlight, hood and bumper of the car. After this, the wing needs:
- align the wing, maintaining the gaps between it and other parts of the body;
- secure the wing with clamps.
Next, you will have to dismantle the doors, headlight, bumper and hood again. Before this, you can additionally “grab” the wing by welding in several places so that it does not move. Care should be taken not to damage the paintwork of other parts.
Welding is carried out in three stages:
- the wing is welded temporarily, with several short seams, so that it cannot move even without clamps;
- the correct position of the wing on the car is checked;
- The final welding of the wing is carried out.
This completes the replacement of the VAZ 2107 wing. All that remains is to thoroughly clean the welding areas and prime, and then paint, the wing and welding areas.
If you find an error, please select a piece of text and press Ctrl+Enter.