It's time to replace the rear beam. I replaced it because it was eating rubber on the inside. When the camber was done, the specialist said that on the left side it was 12 mm, on the right side it was 6.8 mm. He said that it was very crooked.
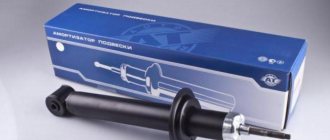
I thought for a long time about which beam to buy, I took 2170 i.e. Priorovskaya assembled (Silent blocks, handbrake cable, metal hoses). I thought that something would fly off and break when I was filming.
beam 2170
How to shoot in much the same way as on video
When I was filming, there were some swear words that even the neighbors in the garage heard.
Well, how can you install such bolts that you then unscrew the hell out of, and even 6 edges break off. As I write, my nerves take over when I remember. The grinder was covered, I was waiting for a ride, I took a hammer and a chisel and hoped that it would move. So I had to cut off almost all the bolts.
I almost removed the beam, the problem of unscrewing the brake hoses was very hemorrhoidal, they became stuck and rusted. The vodka helped.
The bolts from the rack and the silent blocks are fresh, and there was no difficulty in unscrewing them.
I bought brake fluid, the rear brake cylinders leaked, two pieces at once, two Karl! Also 8 bolts
New. Not a slave cylinder!
I assembled everything much faster and easier. I forgot to change the sorcerer, I don’t want to pump the brakes anymore.
After all these replacements, the problem with the brake pedal beating returned. Again costs in purchasing rear brake drums...
So:
- Beam 2170 - 5000 rub.
- Rear brake cylinders: 3 pcs - 960 rub.
- Brake fluid - 150 rub.
- Bolts with hub washer - 180 rub.
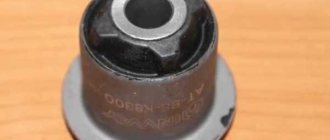
How to replace rear silent blocks on a VAZ 2114
Preparatory stage. Initially, the repair site and vehicle are prepared. It is necessary to drive the car onto an overpass or use an inspection hole. It's good to fix it in place and let the car cool down. It is recommended to move away all cables, pipes, and wires passing nearby so as not to damage them during routine repairs of the machine.
It is also important to thoroughly rinse the area where the hinge is located, clean everything from dirt and open access to the fastening system so that nothing interferes and it is possible to replace the rear silent blocks of the VAZ 2114. Fixing stage. The car is installed well, raised on a jack, a place is prepared for repairing the vehicle, wooden blocks are also used to fix some parts of the car
If you are afraid of damaging parts of the brake system and engine, you can dismantle them for a while. Direct replacement of rear silent blocks on a VAZ 2114. Gradually unscrew all the nuts. If necessary, the fasteners that have frozen forever are cut off with a grinder. The metal parts of the hinge are lowered to allow access to the rubber or polyurethane layer. Then, using a chisel and a hammer, the damaged part of the hinge is removed from the niche. A new part is installed in the freed space, which can be clamped in a vice at the time of installation. This is how the replacement of the rear silent blocks of the VAZ 2114 is completed.
It is recommended to carry out a wheel alignment diagnosis at the end of the repair work; this will be more reliable. We observe the behavior of the machine for several days; if the alarming signs disappear, it means that you have discovered the correct location of the problem and fixed it in time. The “stuffing” of a car is complex and consists of small parts, but never discount them. Clearly understand: if it is vital to replace the rear silent blocks on a VAZ 2114, then act, look for opportunities to put the vehicle in order. Transform the powerful “steel horse” into a source of supreme pride! Don't lose sight of a single detail, not a single little thing!
Wheel alignment
Replacement methods
We will tell you about two main ways to replace silent blocks on the rear beam of the “tens” , which can easily be used in a garage.
Which method to choose is up to you to decide. But before that, familiarize yourself with them in more detail.
First way
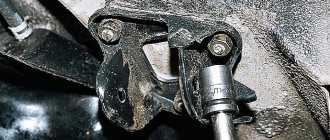
The method is not particularly difficult if you strictly follow the instructions. To begin with, we note that the silent block is located at the bottom of the car. Therefore, you will need a jack or inspection hole.
Defects
- Raise the car with a jack or drive it into a viewing hole. The second option is more convenient, since this way the view of the bottom will be better. And it’s much more convenient to work standing up than lying under a car.
- It is not necessary to completely remove the rear beam. When dismantling it, you will need to remove additional brake hoses, which takes a lot of time.
- It is better to disconnect the sorcerer so as not to damage it during the repair process. But shoot carefully.
- Now remove the nut with a 19mm wrench. You will have to make a serious effort, which is why some car owners call their comrades for help. If there are no assistants, pre-treat the thread with the almighty WD40 or plain water. This will allow the fastener to oxidize. Then clean it with a wire brush, which will make it easier to remove the element.
- Using a crowbar, lower the beam down a little, but do not remove it completely.
- There is an elastic band on the beam that should be cut off, otherwise it will interfere with the work process. Just keep in mind that if the rubber band is old, feel free to remove it. It is better to dismantle a good product by drilling a small hole.
- Now the silent block is removed.
- The new part is generously lubricated and pressed into its rightful place. Just do not use grease for lubrication, as this substance corrodes the part. The best lubrication option is regular soap or any available detergent.
- Return the sorcerer to its place and tighten the beam.
Second way
The second option for replacing the silent block is even simpler. But he also has his tricks.
Easy way
- Raise the car on a jack or drive it into a viewing hole.
- Using the same 19 mm wrench, remove the fastening nuts on the rear beam. This will allow you to detach the beam from the bracket.
- Remove the unscrewed bolt and move the rear beam eye down slightly.
- To make work easier, insert a wooden beam between the beam and the body, approximately the same size as a regular building brick.
- Remove the silent block by hitting it with a hammer.
- Lubricate the new block with something slippery, which will allow the element to do its job better.
- Press the silent block into its place.
- Remove the inserted beam and return the beam to its original position, securing it with fasteners.
At this point, the procedure for replacing the silent block of the rear beam of your domestic “ten” produced by AvtoVAZ can be considered complete.
Both methods allow you to independently, without unnecessary problems, resolve the issue of a failed silent block. Just in case, don’t forget to call a friend in the garage who will help you at the most difficult stages.
All modern cars have a large number of silent blocks in their suspension design. Their main purpose is to dampen the rigidity of connecting various parts to each other, protecting them from direct contact and destruction. All VAZ-2110 rubber silent blocks operate on the principles of torsion. They reduce vibration that is transmitted through the hinge during suspension operation.
How to disassemble the rear suspension?
This work is also best done on a viewing hole or overpass. Sequencing:
- Remove the trim that is located in the trunk.
- Loosen the nuts that hold the posts in place.
- After this, you need to loosen the wheel bolts.
- Be sure to remove the handbrake cable, drums, tubes and hoses. Otherwise, you will damage them when removing the rear beam.
- To remove the struts, you need to install a puller on the spring.
- After this, you need to unscrew the lower bolt securing the shock absorber strut to the rear beam.
- The top of the stand is secured with one nut.
After removing both struts, you can begin disassembling the rear beam mounting elements. To do this, you need to dismantle the brackets that secure it to the body. There is nothing complicated in the design of the rear suspension. All work on dismantling and replacing worn elements is carried out independently without any problems. Assembly of the unit must be carried out in reverse order. Try to carry out repairs and maintenance of the rear suspension of the VAZ-2114 in a timely manner.
Necessary tools and spare parts
Before starting self-repair, you should prepare a set of tools for the job. The procedure for replacing worn silent blocks of a beam is impossible without the following set of tools:
- New silent blocks;
- Fastening bolts for new parts (old fasteners often become unusable, since the suspension on the rear axle is rarely repaired);
- Jack and bars for fixing the car in a stationary state;
- Puller for pressing a new silent block into the seat;
- A set of open-end and socket wrenches for unscrewing fastening nuts;
- Hammer and lubricant for processing soured fasteners.
Let us immediately note that the presence of pullers and devices for pressing new parts will greatly simplify the work. Soured fastening nuts should be treated several hours before starting work. If you have the specified list of tools, replacing the silent blocks of the rear beam of the VAZ 2114 with your own hands becomes easy.
Useful : Replacing rear struts on a VAZ 2114
Rear suspension
Sometimes it is also necessary to replace the silent blocks on the rear suspension of a VAZ 2114 car. They are not as susceptible to wear as in the case of the front control arms, but the fact remains.
The sequence of your work in this situation will be as follows:
If there is no lift, slightly loosen the bolts on the wheels, install a jack, raise the car and completely remove the wheel. It is advisable to place some supports under the beam. Both simple bricks and a second jack will do. It all depends on what you have at your disposal. Now you need to remove the bolts that are attached to the shock absorber and the car body. Proceed carefully to avoid damaging the threads. The bolts are knocked out, the beam moves down or slightly back. This will allow you to get to the desired silent blocks. They are dismantled with a puller. New suspension elements are installed in a similar way to the front control arm silent blocks.
To help them sit in their nests better, use a soapy solution. Reassemble the entire disassembled structure in reverse order. During the disassembly and assembly process, pay attention to the remaining components to which you gain full or partial access. As practice shows, performing certain repairs allows you to study the condition of related components, assemblies and parts of the car, identify emerging problems in a timely manner and eliminate these breakdowns or what may lead to this.
Should you try it if you have no experience at all? Most likely not. But this experience must come from somewhere, right?!
Suspension faults
It should be noted that car suspension repairs can be easily done on your own. The most vulnerable component is the shock absorber struts. They bear the maximum load, since the car is constantly experiencing dynamic forces that are transmitted from the wheels, especially when driving on uneven roads. Moreover, steering rods create lateral loads during turns. Shock absorber struts are the most expensive suspension components. But their reliability is quite high, so most often rubber seals and silent blocks fail, as well as tie rod ends, ball joints, and bearings. All those components that are included in the suspension device of the VAZ-2114.
If repairs have recently been carried out, it is possible that the threaded connections have become loose.
Please note that car suspensions use nuts with plastic inserts on the threads. They are used to secure it to the bolt.
When repairing the front and rear suspension, you must have not only a standard set of keys, but also the following tools:
- For tightening springs.
- Tie rod end remover.
- Puller for ball joints.
- When replacing a wheel bearing, an appropriate puller must be used.
Checking the rear suspension of VAZ 2114, VAZ 2115, VAZ 2113
rear suspension, design and maintenance
Before checking, wash all parts thoroughly. When washing, protect rubber parts from solvents. Suspension arms. Check the condition of the VAZ 2114 suspension arms, connector and suspension beam reinforcements. If cracks or deformations are found in these beam elements, replace the suspension arms assemblies. Welding and straightening work is not permitted, as this may lead to a violation of the wheel alignment angles. Use tool 67.7824.9519 to check whether the suspension arms are deformed. Make sure that the threaded holes in the arm flanges are not damaged and are in good condition. Otherwise, straighten the threads, and if impossible, replace the suspension arms.
Types of spare parts
By manufacturer you can get a spare part for a VAZ 2114:
- Original (AvtoVAZ plant).
- Non-original (from another manufacturer).
Depending on the condition, the spare part may be:
- Used.
- New.
The part can be purchased:
- According to an advertisement from a private individual, the owner of a VAZ 2114.
- At the car dismantling point.
- In the online store.
- At the car market.
- In a specialty store.
According to the configuration, the beam can be:
- Naked.
- Assembled (complete with torsion bars, levers, hubs and drums).
By payment method you can buy a spare part:
- On credit.
- In installments.
- For personal savings.
You can take a car part from the following manufacturer for the VAZ 2114:
- JP GROUP.
- AvtoVAZ.
Rear suspension device for VAZ 2114, VAZ 2115, VAZ 2113
rear suspension, design and maintenance
Rear suspension parts: 1 – rubber-metal hinge; 2 – suspension arm mounting bracket; 3 – shock absorber casing; 4 – compression stroke buffer; 5 – casing cover; 6 – support washer; 7 – shock absorber cushion; 8 – spacer sleeve; 9 – shock absorber; 10 – insulating gasket; 11 – rear suspension spring; 12 – lever connector; 13 – lever of the rear suspension beam; 14 – shock absorber mounting bracket; 15 – flange; 16 – lever bushing
The rear suspension beam of the Lada Samara 2 consists of two trailing arms 13 and a connector 12, which are welded together through amplifiers.
Suspension of the right rear wheel: 1 – suspension arm; 2 – rubber-metal hinge; 3 – suspension arm mounting bracket; 4 – lever connector; 5 – shock absorber
In the rear part, brackets 14 with eyes are welded to the suspension arms for attaching shock absorbers of VAZ 2113, VAZ 2114, VAZ 2115, as well as flanges 15, to which the rear wheel axles are bolted together with the wheel brake shields. At the front, the suspension arms have welded bushings 16 into which rubber-metal hinges 1 are pressed. Bolts pass through the hinges connecting the suspension arms to stamped-welded brackets 3, which are attached to the body side members with welded bolts.
Rear suspension parts: 1 – rubber-metal hinge; 2 – suspension arm mounting bracket; 3 – shock absorber casing; 4 – compression stroke buffer; 5 – casing cover; 6 – support washer; 7 – shock absorber cushion; 8 – spacer sleeve; 9 – shock absorber; 10 – insulating gasket; 11 – rear suspension spring; 12 – lever connector; 13 – lever of the rear suspension beam; 14 – shock absorber mounting bracket; 15 – flange; 16 – lever bushing
How to disassemble the rear suspension?
This work is also best done on a viewing hole or overpass. Sequencing:
- Remove the trim that is located in the trunk.
- Loosen the nuts that hold the posts in place.
- After this, you need to loosen the wheel bolts.
- Be sure to remove the handbrake cable, drums, tubes and hoses. Otherwise, you will damage them when removing the rear beam.
- To remove the struts, you need to install a puller on the spring.
- After this, you need to unscrew the lower bolt securing the shock absorber strut to the rear beam.
- The top of the stand is secured with one nut.
After removing both struts, you can begin disassembling the rear beam mounting elements. To do this, you need to dismantle the brackets that secure it to the body. There is nothing complicated in the design of the rear suspension. All work on dismantling and replacing worn elements is carried out independently without any problems. Assembly of the unit must be carried out in reverse order. Try to carry out repairs and maintenance of the rear suspension of the VAZ-2114 in a timely manner.
Rear beam for VAZ 2112, VAZ 2111, VAZ 2110 from Priora
Today, the production of the domestic car VAZ-2110 has already been completed, and this model has been perfectly replaced by the modern LadaPriora car model. It is worth noting that as a result of this, for many owners of old “ten” cars, the spare parts of the new car are ideal for each other. Now we will try to figure out how to replace the rear beam. In addition, do not forget that along with replacing the beam, you can begin work on painting the entire body of your car. First, you need to understand what are the main distinguishing features of one rear beam from another. The beam of the Priora car is distinguished by the fact that it has a torsion bar, thanks to which it receives additional reinforcement during its movement.
But as for the replacement process, you need to prepare all the tools that may be needed to simplify the whole job. First, this is a wrench set.
Secondly, these are ring wrenches, it is also better if it is a whole set of them. Thirdly, wrenches for unscrewing brake pipes are very useful. In addition, you will need a spare part of a piece of pipe, but only for attaching keys to it.
To make it more convenient to unscrew the rear beam mount itself, you need to use a 19mm wrench, then unscrew the nuts and brake pipes. Do not forget that you need to remove the rod, at the end of which you can easily find a trim nut, which serves as a clamp.
Start disassembling the front suspension
All work must be done on an overpass or pit. When replacing the VAZ-2114 suspension, try to use special tools - this will make the work much easier. The sequence is something like this:
- You definitely need to press the handbrake.
- Secure the rear wheels using wheel chocks.
- If decorative caps are installed on the rims, they must be removed.
- If the wheel bearing is being replaced, you will need to unlock and slightly unscrew the nut in advance.
- The wheel bolts also need to be loosened.
- Having lifted my side of the car that is being repaired, it is necessary to completely unscrew the wheel mounting bolts and completely remove it.
You will need to remove the braces from the stabilizer link. After this, using a puller, the ball joint is disconnected from the steering knuckle. It is screwed from below with two bolts; they must be removed using a “17” key. Without this, it will not be possible to dismantle the VAZ-2114 suspension arm.
Description of the spare part
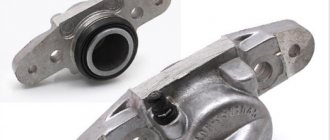
The rear beam on the VAZ 2114 is a steel element of the torsion bar suspension that provides connection between the rear part of the car body and the wheels. Gives the car lateral stability. Has a U-shaped section. It has high bending rigidity and low torsional rigidity. The design of the rear beam is simple.
The part consists of two longitudinal-type arms connected by welding. At the stern there are special holders with holes used for mounting shock absorber elements. There are also flanges with holes for fastening the axle of the rear pair of wheels. A malfunction of the rear beam is manifested by the knocking of wheels and abrasions on the body from tires.
What affects the price of a part?
The rear beam for a VAZ 2114 car is sold in different places and the cost of such a part varies widely. The price level is influenced by the following factors:
- Quality.
- Originality.
- Sales region.
- Equipment (levers, torsion bars, etc.).
- Popularity of the manufacturer.
- The need for delivery and its cost.
- Place of purchase.
- Availability of guarantee.
- Seller rating and pricing policy.
- Condition of the part, degree of wear.
Chassis of VAZ 2114: description, repair
Fundamentally, the chassis designs of front-wheel drive VAZ cars of various models are similar to each other, however, there are differences. It will be useful for car enthusiasts to understand the question of what the VAZ 2114 suspension consists of, to know the causes and types of malfunctions, and to be able to eliminate them.
Front suspension device
Suspension type: independent, telescopic. Let's take a closer look at the main components and elements that make up the front suspension of the VAZ 2114.
- The basis is the main rotating support element - the front pillar. Assembled into a single unit with a cylindrical spring, a swivel bearing, and upper and lower support cups. The strut is attached to the steering knuckle of the hub with the lower bracket, secured to the body with three bolts at the top and rests against the glass with the upper cup. Has a steering knuckle for attaching a tie rod pin.
- Front hub assembly with ball joint, double row bearing, brake disc and caliper. The ball joint is fixedly screwed to the lower suspension arm, the support pin is inserted into the seat at the bottom of the hub and screwed with a nut.
- The lower suspension arm is attached to a brace, which is attached at both ends to the body side member using two brackets. On one side of the brace there is an attachment point for the anti-roll bar, in which one end is fixed. The second end of the stabilizer is fixed to the suspension extension of the second front wheel, thus connecting them together.
Front suspension diagram for VAZ 2114
The wheel is turned by a steering rod, which pulls the eye on the stand and turns the entire assembly, while at the top it turns on a support bearing, and at the bottom on a ball joint. The anti-roll bar ties the suspension on both sides together and makes it work in sync.
Rear element design
Suspension type: dependent, on a rigid transverse continuous beam. The structural elements of the rear suspension and the methods of their connection in the VAZ 2114 are as follows.
- The base is a cross beam. The structure is welded, in the shape of the letter “H”, only with a long cross member. The two front ends of the beam are secured to brackets bolted to the rear side members of the vehicle. The method of connection to the brackets is hinged, on rubber-metal bushings. The rear ends of the beam have mounting flanges for wheel hubs. The hubs are bolted to the flange; a protective casing, brake cylinder and pads are mounted on them. Inside the hub there is a double row radial bearing. The brake drum is mounted on top of the pads and secured to the hub with guide pins.
- The lower end of the strut with a cylindrical spring is attached to the rear ends of the beam on the other side of the hubs. The upper end of the shock absorber rests against a glass welded to the body through a rubber spacer.
Rear suspension diagram for VAZ 2114
The rear suspension diagram is shown in Fig. 2. The rear chassis of the VAZ 2114 car operates as follows: the transverse beam works like a swinging pendulum, the attachments to the side members do not allow it to move along the axis of the car. Racks with springs attached to the opposite end of the pendulum limit its up-and-down movement and serve as a shock-absorbing and partially supporting element for the wheels.
Brief description of faults
In most cases, chassis repairs can be done yourself. The main malfunctions, as a rule, are associated with the failure of the shock-absorbing front and rear struts, since they are the most loaded structural element. The racks absorb dynamic loads from the car body, from the wheels when overcoming uneven road surfaces and lateral loads from the influence of steering rods, which increases at low speeds.
Two tools are required to remove and install the stands. The remaining tools are in every car enthusiast's garage:
- spring ties;
- a puller for pushing the steering rod pin out of the lever; it can also be used to press out the ball joint if necessary.
Smaller suspension malfunctions occur due to wear of the rubber seals and rubber-metal bushings (silent blocks). They are much easier to replace than a stand, although sometimes a device is also needed to press out silent blocks.
Rear beam replacement procedure
- While the car is on the ground, you need to loosen the nuts on the wheels, after which you can raise the car.
- Remove the shock absorbers on both sides of the rear suspension.
- Disconnect the parking brake cables and remove the cable jackets from the bracket located on the body.
- Bend the brackets securing the cable to the body, then pull both cables out of the brackets. This is done to provide convenient access to the beam mounting bolt.
- From the bracket, which is located on the rear axle beam, you need to disconnect the earring through which the elastic lever of the pressure regulator drive passes, which is connected to the lever bracket.
- Disconnect the brake hoses from the tubes on both sides of the beam. To prevent brake fluid leakage, you must immediately close the holes with something.
- On each side, unscrew one nut from the bolts securing the beams to the brackets.
- Knock out the bolts (they can “sit” quite tightly, so you can hit them quite hard). After this, the beam can be removed, for which it can simply be rolled out on wheels.
Tags: rear beam came off, repair of mounting for VAZ 2108, 2109, 21099, 2113, 2114, 2115
Comments 34
It didn't hurt too bad
normal. everyone is alive and well. basin HFCH
The most important thing is that everything is fine)))
electrode MP-3 or some other?
No, esab’s ones are exclusive. MP3s blow God knows where. But these ones are just a fairy tale. The troika cooks almost the entire bodywork in my hands. Occasionally I cook one and a half www.esab.ru/ru/ru/
It's clear. I'll have to promote myself there additionally
our EVERYTHING was pushing!
I don’t know how the chisels work, but on my 12th coupe, no matter how you lift it, the doors close perfectly
into the jack or into the threshold? into the threshold through a meter board? specify...
I always put it in the threshold, I don’t put anything in it. Only a diamond jack with a recess for the threshold
I think that the thresholds have already been changed, and a thick amplifier has been welded in. You shouldn’t exaggerate the capabilities of the Lada
I’m the only owner, only if someone cooked it at night while I was sleeping))) I can, of course, not be lazy and shoot a video tomorrow or the day after tomorrow
come on, jack the end of the door into the threshold, and hang out the whole side.
well, a jack at the end of the door is not a problem, but hanging the side with such a jack simply won’t work
come on, jack the end of the door into the threshold, and hang out the whole side.
counter question, why didn’t they show the whole side on the video?
Then I’ll try to hang the whole side with a normal jack, I’m even curious)))
from 2 approaches to the front jack - the entire side is hung
Well done, I wasn’t afraid, of course I almost got to this point, the new spar was torn, I also opened it from the interior, reinforced it with plates, since one pin attaching the beam to the spar was torn off (thanks to the stampers for their contact welding of these pins), it was drilled right through hole, and pulled off the pin with engravers, and drove for six months with a torn spar =) the beam also danced and the car was constantly chattering, there is also a blog entry if you’re interested
I've already done everything. Just for fun, I'll take a look at it in my spare time.
meh. . . there is hard work. )) And what did you use to weld the damaged areas, I see that it was electric welding? )
The rear beam of the VAZ 2109 is an unreliable thing, and the owners of this car may have a large number of reasons to remove it. For example, the owner of a vehicle may hear unusual noises: grinding metal, quiet impacts, etc. These “special effects” will be heard in the rear of the VAZ 2109. The sound can be either constant or occur occasionally, for example, when there are bumps on the road.
1 — rubber-metal hinge; 2 — rear suspension arm mounting bracket; 3 — shock absorber casing; 4 — compression stroke buffer; 5 — casing cover; 6 — support washer; 7 — shock absorber cushions; 8 — spacer sleeve; 9 — shock absorber; 10 - insulating gasket; 11 — rear suspension spring; 12 — lever connector; 13 — rear suspension beam arm; 14 — shock absorber mounting bracket; 15 - flange; 16 — lever bushing
Read more: Cadet ru Gorno-Altaisk
It is very difficult for a person who does not have the necessary experience to determine on their own what caused new noises in a car. This is due not only to a lack of practice, but also to the large number of variants of the problem. So, for example, a knocking stabilizer can “move” the silent block to the side, the noise can often be caused by bearings on the axle shafts - in general, there are many options. Therefore, to find out the exact problem, it is recommended to go to a service center and carry out the repair yourself.
Withdrawal procedure
- Raise and secure the rear of the car.
- Remove the left wheel.
- Disconnect the elastic pressure lever from the earring.
- Remove the left parking brake cable from the 2 brackets on the left rear suspension arm.
- Using 19mm wrenches, unscrew the nut of the bolt securing the lever to the body bracket.
- We take out the bolt. Pull the lever down so that the brake hose is not stretched. We install the cup of a special puller on the outside, and a special washer on the inside.
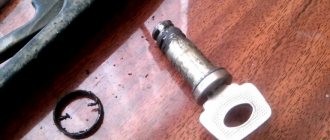
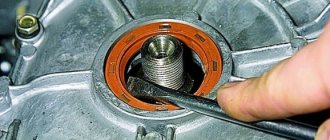
- Rotating the nut of the puller bolt, press the silent block into the cup. You need to press the silent block towards the threshold.