Payment for goods and downloading of the book in electronic form (PDF format) is made on the website.
To do this, you need to find the book you are interested in and click on the “Buy” button. The price of the book is indicated on the button.
For convenience, the price on the website for residents of Russia, Belarus and Kazakhstan is presented in rubles.
For residents of Ukraine in hryvnias, and for all other countries - dollars.
After clicking on the “BUY” button, a payment window will open where you can select a payment system with which you can pay for the selected book using any bank card (Visa, MasterCard, MIR, etc.)
When you click on the “Pay by bank card” button, the Portmone payment system will open, which is the easiest way to make a payment.
In addition, the website offers four payment systems for payment:
- Yandex (payment from any bank cards, Yandex Money account, QIWI Wallet, terminals, etc.);
- Portmone (payment from any bank cards, Portmone account);
- PayPal (payment from any bank cards, PayPal account);
- WebMoney (payment from any bank cards, payment from WebMoney wallets).
Payment via Yandex Cashier
After selecting payment via Yandex, the Yandex Cashier payment system will launch, where you need to select a convenient payment method (bank card, QIWI, Yandex Money account, etc.)
After specifying payment details and confirming payment, payment for the goods will occur.
If you have a bank card in a currency other than the ruble, then the money will be debited from the card at the rate of the Central Bank of Russia at the time of the purchase.
This payment method is optimal for residents of Russia, Kazakhstan and Belarus.
Official website of the Yandex Kassa payment system https://kassa.yandex.ru
Removal from gearbox
Follow the instructions clearly, be sure to watch the video tutorials. Plus, don't forget to check the condition of all engine mounts, since you'll probably be reassembling it again. All damaged elements will have to be replaced without fail.
- First, disconnect the battery to completely cut off the power to the car.
- Drain the oil from the engine crankcase. Here it is better for the engine to be warm. This will allow the oil to drain out faster.
- Drain the coolant from the cooling system. A cold motor is already required here. Be careful.
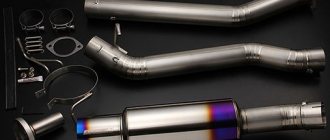
- To disconnect the exhaust systems, you will have to completely remove the engine crankcase protection and dismantle the exhaust pipe.
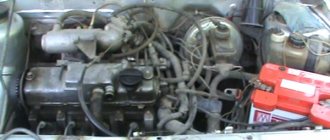
- Remove the air filter housing, and then disconnect all hoses from the engine, power wiring, sensors, damper rods, and brake system vacuum hoses.
- Unscrew the fastening nut of the ground wire, put on the stud and located on the clutch housing.
- Disconnect the cooling system pipes and turn off the thermostat.
- Disconnect the central high voltage from the ignition distributor. After this, you can release the clamp of the block with the supply wiring and remove the entire block.
- Disconnect the fuel supply hoses from the fuel pump. To do this, just loosen the fastening clamp.
- Unscrew the adjusting nuts to remove the drive cable from the clutch lever.
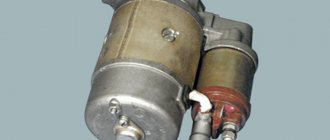
- Disconnect the power supply wires from the starter - one wire from the battery going to the solenoid relay and the wiring block.
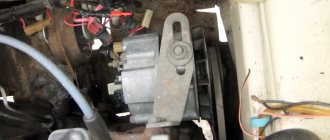
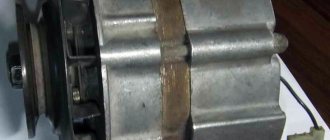
- Switch off the generator in the same way.
- Deprive power by disconnecting the corresponding wires from the coolant temperature sensor and oil pressure sensor.
- Disconnect a pair of pipes from the radiator for the car interior. Loosen the clamps, which will allow you to remove the elements.
- We go directly under the car. Here it is better to have a pit or overpass available, otherwise it is inconvenient and unsafe to remove the engine while lying down.
- Unscrew the fastening nuts of the drive rod from the tip of the gearbox shift joint. The speedometer drive rod and the reverse sensor are also disconnected here. You need to disconnect the power wires.
- Disconnect both guy wires, right and left. Before this, you need to loosen the clamp of the tensioner fastening nut to the suspension arm on both sides. Next, unscrew the three bolts of the bracket to the car body. It is not necessary to remove them completely, but just move them to the side. This way they will not interfere with further processes.
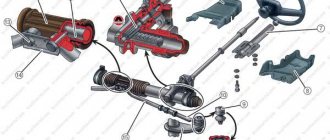
- The next step is to disconnect the tie rods. To achieve the desired result, remove the cotter pin and unscrew the nut. Next, armed with a special puller, press the pin out of the swing arm.
- We perform the same actions with the ball joint, which will need to be similarly disconnected from the lever.
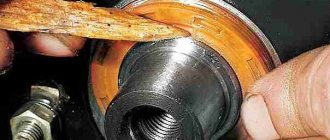
- Using a pry bar, pull out the upper tail of the front wheel drive and move it slightly to the side. Don't forget to insert a technological plug in place of this tail. A plug from an old grenade will suit you just fine, if you have one available.
- Now comes the stage of directly dismantling the power unit itself.
- Securely secure the motor by tying it by the eyelets using a strong rope or metal wire. Rym translated from Dutch “ring” means ring. That is, instead of a head, the eye bolt and eye nut end in a ring. And the eye bolt and eye nut are intended for gripping and moving machines, parts, as well as during installation, disassembly, loading, etc.
- The fastening rope is properly attached to the support or winch. It is best to remove the motor from the top, but a lifting mechanism will come in handy here.
- You can also remove the engine through the bottom. To do this, the engine is lowered to the floor, after which the front of the car is raised with jacks. Here, act at your own discretion and do not forget that the motor weighs quite a lot. We strongly do not recommend trying to get it out manually.
- Once you have secured the engine with ropes and a winch, unscrew the motor mounting nuts holding it to the supports.
- That's it, nothing now prevents you from removing the engine from its seat.
- Act as carefully as possible so that the engine elements are not damaged during removal, it does not touch or damage the body, and also does not fall off the mounts at the most inopportune moment.
Accuracy is the main requirement when independently dismantling the power unit from a VAZ 2109 or any other car. Be sure to enlist the support of a partner, since it is quite difficult to complete all stages with two hands.
Take your time, don't try to get the job done in a few hours. It may take several days to remove the motor.
The main thing here is not speed, but the quality and care of each manipulation.
Payment via Portmone
After selecting payment through Portmone, the payment system will launch, where you need to select the payment method: bank card or Portmone account.
The price in the Portmone payment system is converted into dollars at the exchange rate of the Central Bank of the country where you are located.
If you have a bank card in a currency other than the dollar, then the money will be debited from the card at the rate of the Central Bank of your country at the time of the purchase.
After specifying payment details and confirming payment, payment for the goods will occur.
Official website of the Portmone payment system https://www.portmone.com
What are piston rings and their purpose
Piston rings are elastic, open elements that are installed in special grooves on the piston body. They are made of high-strength steel or cast iron, and covered with an alloying material on top. The alloy coating further increases strength and also reduces wear rates.
Typically, 3 rings are inserted into the piston: 2 compression rings (occupying the 2 upper grooves) and 1 oil scraper ring (the lower groove). The purpose of the compression rings is to prevent hot gases from breaking through along the piston into the engine crankcase. Oil scraper - removes excess oil from the cylinder mirror, preventing it from entering the combustion chamber. In addition, the rings reduce the temperature of the piston, transferring almost half of the heat from its surface to the cylinder walls.
When the piston rings no longer cope with the tasks assigned to them due to their wear, the car engine signals this by displaying the corresponding symptoms.
Signs of piston ring wear
Blue or black smoke from the exhaust pipe indicates that wear has reached a critical stage. This indicates that excess oil entered the combustion chamber past the oil scraper ring and burned there along with the fuel. Black smoke coming out of the crankcase ventilation tube indicates that the compression rings, due to wear, allow gases to escape from the combustion chamber into its cavity.
Critical wear is accompanied by a decrease in compression (the ability to maintain pressure) in the engine cylinders. This means that some of the gases formed during the combustion of the fuel mixture, which was supposed to push the piston, broke into the crankcase without performing useful work. This is what will lead to a drop in pressure in the cylinder, therefore, the engine will lose some power. Increased oil consumption is observed.
Compression is checked with a special device - a compression meter. When the nominal pressure values are unknown (there are no operating instructions), it is first measured in a dry cylinder, then a little engine oil is poured through the spark plug hole, and the measurement is made again. If the compression increases, then the rings need to be replaced. Similar signs can be observed in the case of their “occurrence”.
This problem, if the case is not very advanced, can be corrected with the help of special fuel additives. For an engine with a carburetor system, you can try cleaning it with a carbon remover spray that is injected directly into the carburetor. If removing carbon deposits from the combustion chamber has no effect, then there is only one way out - replacing the piston rings and cleaning the grooves.
Payment via PayPal
After selecting payment via PayPal, the PayPal payment system will launch, where you need to select the payment method: bank card or PayPal account.
If you already have a PayPal account, then you need to log into it and make a payment.
If you do not have a PayPal account and you want to pay using a bank card via PayPal, you need to click on the “Create an Account” button - shown with an arrow in the picture.
PayPal will then prompt you to select your country and provide your credit card information.
After specifying the information required to make the payment, you must click on the “Pay Now” button.
Official website of the PayPal payment system https://www.paypal.com
Payment via WebMoney
After selecting payment via WebMoney, the payment system will launch, where you need to select the payment method: bank card or WebMoney wallet.
If you already have a WebMoney wallet, then you need to log into it and make a payment.
If you do not have a WebMoney wallet and you want to pay in another way, you need to select any of the methods that WebMoney offers and make the payment
After specifying payment details and confirming payment, payment for the goods will occur.
Official website of the WebMoney payment system https://www.webmoney.ru/
Signs of piston wear
On average, a piston replacement on a VAZ 2109 is required every 150,000 km
The car owner should pay attention to warning signs that indicate the need to change the rings
- The car began to require more fuel.
- Compression measurements showed a value of less than 10 atmospheres.
- There is less engine oil.
- Replacing oil seals does not help eliminate oil leaks.
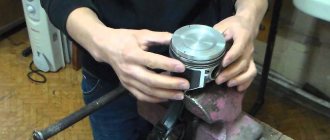
The VAZ 2109 piston group is a set consisting of a piston, piston rings mounted on it, a piston pin and its fasteners. There are three grooves on the surface of the piston for rings.
The oil scraper is responsible for removing excess oil from the cylinder walls, thereby reducing fuel consumption. Only a film a few microns thick is left inside the cylinder liner to lower the piston. Well, the pin, which is inserted transversely inside the piston cavity, attaches the connecting rod to the piston.
Downloading a book
After successfully completing the payment (by any method) and returning to the KrutilVertel store from the payment system website, you will be taken to the successful payment page:
On this page you need to indicate your e-mail, where access to download the book will be sent.
If you are already registered on our website, then simply follow the link to your personal account.
The book you purchased will be in your personal account, from where you can always download it.
Please note that after making the payment, you need to return back from the payment system website to the KrutilVertel website.
If for some reason you did not return back to the site and closed the payment system tab with a message about the successful completion of the payment, please let us know - we will send you a letter indicating access to download the book.
Boring cylinder blocks
If a number of previous operations could be performed with one’s own hands, then to bore cylinder blocks it is necessary to hire a master who has the skills to work on special equipment. The owners of the car take out the cylinder block and give it to the craftsmen for boring, and after restoration they put the cylinder blocks in their original place.
The cylinder head has a sufficient margin of safety and a solid resource to operate it for quite a long time, and rarely breaks ahead of schedule. Cylinders are mostly repaired on a scheduled basis, but sometimes are subject to immediate repairs. For example, when you need to weld a hole in the block, which is formed by a break in the connecting rod mechanism.
Sometimes a car owner wants to bore cylinder blocks, not for routine repairs, but in order to increase engine power. Under the influence of such a process, which is called boosting, the combustion chamber increases in working volume, which leads to a significant increase in power. Before performing such an operation, all risks are carefully calculated, because forcing can bore both the block and the head so much that the walls of the head can become deformed and become unusable.
When boring cylinder blocks, expansion of the seat slots is provided - liners are used that have already been increased in size. To know exactly their parameters, you should consult with a specialist who will perform this operation. Determination of new sizes is carried out using a bore gauge.
The boring operation is carried out on a special machine at low speed, showing certain skills in this area. When boring, it is necessary to simultaneously adhere to the dimensions of the future cylinder, not to disturb its shape and adhere to the principles of high-quality processing
It is also very important to adhere to strict positions - the cylinders must be placed strictly parallel and perpendicular to the camshaft bed. And it is important that during boring there is an allowance left so that the axis does not move during honing - the final operation during boring to correct possible defects during the previous operation
This completes the overhaul of the VAZ 2109 engine and it is necessary to assemble and install the power plant in its original position. After the final stages of assembly and filling with antifreeze, technical oil and water for further operation, manipulation of the valves is certainly carried out. This operation will be the final one as part of a major overhaul of the power plant.
Engine overhaul is carried out after a certain mileage of the car. The engine can be replaced completely, or its individual parts are changed - to determine which parts have already worn out and need to be repaired, a thorough diagnosis is carried out. The fact that the engine needs a major overhaul is recognized by high oil consumption, compression checks and comparison with control ones in the cylinder. With characteristic engine sounds and a drop in power of the power plant.
When the owner took good care of his car and regularly carried out maintenance, changed the oil and air filters, then the timing of major repairs comes later. If the car owner neglected the needs of his vehicle, the need for major repairs would approach faster.
When carrying out a major overhaul of a power plant, the engine is removed using lifting mechanisms, installed on a pallet and moved. When the power plant is severely depleted, the entire engine is changed. If it is in good condition, only individual parts are changed. The engine is disassembled and its parts are marked in order to install them strictly in their places. Those parts that have not yet exhausted their capital life are removed, cleaned, lubricated with technical oil and await their turn for installation. The sequence of engine assembly after a major overhaul is strictly defined and must be followed.
The cylinder head is removed by the car owner, but it is bored by specialists using special equipment. The owner of the car installs the bored cylinders himself. Properly performed major repairs provide the vehicle with long mileage and high-quality further operation. If the overhaul repair was carried out correctly, all parts of the car engine were torn, and the worn ones were replaced with new ones, then such a repair will eliminate all problems and return the car to ease of movement.
https://youtube.com/watch?v=JGLX-tL4mWg
Problems when paying with bank cards
Sometimes difficulties may arise when paying with Visa/MasterCard bank cards. The most common of them:
- There is a restriction on the card for paying for online purchases
- A plastic card is not intended for making payments online.
- The plastic card is not activated for making payments online.
- There are not enough funds on the plastic card.
In order to solve these problems, you need to call or write to the technical support of the bank where you are served. Bank specialists will help you resolve them and make payments.
That's basically it. The entire process of paying for a book in PDF format on car repair on our website takes 1-2 minutes.
If you still have any questions, you can ask them using the feedback form, or write us an email at [email protected]
Installing a crankshaft on a VAZ
Crankshaft repair
Overhaul of a VAZ 21083 engine usually consists of disassembling the unit, troubleshooting parts, boring the crankshaft and cylinders, and assembling the engine. Disassembling the engine is a simple matter, troubleshooting and boring are also simple procedures. But you need to assemble the motor extremely carefully, carefully following the instructions.
Let's start by installing the crankshaft into the cylinder block. Remember: cylinder and main bearing numbers are counted from right to left as the vehicle moves. That is, 1 cylinder is located near the pump and timing drive, and 4 is located near the clutch and gearbox.
- Turn the block upside down.
- We place the main bearing shells with the locking protrusions into the grooves of the beds. In the 3rd bed (middle) we put the liner without a groove, and in the remaining 4 - with grooves.
- Lubricate the liners with engine oil.
- Lubricate the crankshaft journals with oil and place it in bed, with the flywheel flange facing the 4th cylinder.
- We insert thrust half rings into the grooves of the middle main bearing. Each half-ring has 2 notches on one side. Using these sides we install the half rings to the crankshaft cheeks. We place the white half-ring in front (on the pulley side), and the yellow half-ring in the back (on the flywheel side).
- We rotate the half rings so that their tips are flush with the ends of the bed.
- We place liners without grooves in the main bearing caps, with locking protrusions in the grooves, and lubricate them.
- We place the main bearing caps on their corresponding beds with notches in the direction of mounting the generator. 1 cover is marked with one notch, 2 - two notches and 2 holes, 3 - three, 4 - four, 5 - two.
- We secure the covers with bolts.
- Tighten the cover bolts in the following sequence - first cover bolts 3, then 2 and 4, and finally cover bolts 1 and 5.
- After this, we rotate the shaft; if it jams, we look for the cause and eliminate it. If it doesn’t jam, check the axial clearance of the crankshaft; if it is more than 0.26 mm, replace the half rings with thicker ones. If the gap is normal, we proceed to install the oil seals and oil pump.