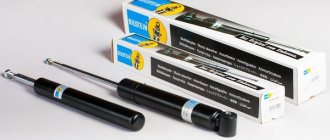
One of the most important elements of the chassis is the suspension. This is an independent design with hydraulic shock absorbers and coil springs. At least such a system is present on the VAZ 2110 car we are interested in.
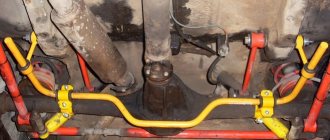
The components of the assembly are braces, wishbones and a stabilizer bar. Shock absorbers allow you to dampen vehicle vibrations that appear when hitting potholes, for example.
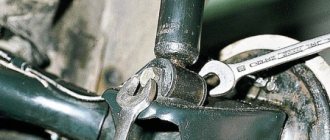
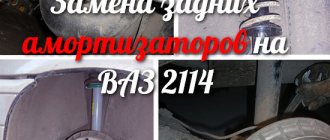
Photo of stabilizer struts on VAZ 2110
The stabilizer and stabilizer bar of the VAZ 2110 are responsible for the comfort and safety of the driver and his passengers while driving. It is quite possible to replace this element of the suspension unit yourself. To do this, it is not at all necessary to be a highly qualified specialist. You can also avoid serious financial costs of paying for the services of masters.
Today we will introduce you to how to replace stabilizer struts on a VAZ 2110.
Reasons for replacing stabilizer struts
It’s not worth changing such a unit just like that, without objective reasons. Still, it costs some money and has its own resource of suitability. As long as the car behaves well, there is no point in spending extra money. But if characteristic signs of their malfunction appear, do not delay repairs.
There are several reasons for changing them:
- Characteristic knocking noises appeared in the suspension;
- There is a slight vibration feedback on the steering wheel, which worsens the process of driving and makes it more difficult;
- The front of the car wobbles a little;
- The wheels pull slightly to the side when driving straight.
If you discover such malfunctions, be sure to replace the stabilizer links as quickly as possible.
How long the new elements will last depends on two factors:
- Quality of the purchased part;
- Conditions of the roads on which you primarily drive your vehicle.
Article on the topic: What to do if the handbrake on a VAZ 2114 does not hold
We'll give you some parting advice. Many who go to a service station to replace stabilizer bars send the car, on the recommendation of a specialist, to check the wheel alignment. In fact, this procedure is completely unnecessary, since changing the struts does not in any way affect the angle of the wheels on your car. This is another attempt to lure more money out of an inexperienced client. Be carefull.
Important points
It should be noted that all of the above signs of rack malfunction should be considered indirect. The fact is that in a garage it is extremely difficult to diagnose this malfunction with one hundred percent accuracy. For accurate diagnostics, the best option would be to drive the car onto a special stand that simulates the movement of a car over very rough terrain. This device takes a lot of readings, including providing accurate information about the condition of the racks. There is only one problem: not all car owners have access to such equipment. So you have to visually evaluate the struts for oil leaks and carefully listen to the sounds of the front suspension while driving. If it is known for sure that all suspension components are in good working order, but it still knocks when driving, we can assume that it is the strut that is faulty.
Before starting any repairs, you should perform a couple of simple tests. You need to find a wide, flat place, accelerate to a certain speed, enter a skid and evaluate how the car behaves. Brake at the same speed and then measure the braking distance. After replacing the racks, these procedures must be carried out again, at the same speed. This will give you an idea of how the car's handling has changed and how effective the repair was overall.
New struts must be given the opportunity to get used to the rest of the suspension parts
This means that you need to drive extremely carefully for 2-3 weeks after replacing them, especially on rough roads. If possible, you should avoid “ridges” on the roads, and if this cannot be done, you should reduce your speed to a minimum when driving through such areas. In addition, you should in every possible way avoid skidding when entering a turn and sharp braking - this can also greatly harm the new struts
In addition, you should in every possible way avoid skidding when entering a turn and sharp braking - this can also greatly harm the new struts.
As you can see from the article, even a novice car enthusiast can replace the struts. And the main difficulty comes down not to replacing these components, but to understanding that it is they who need to be changed. And if the car owner does not have access to a normal test bench, he has only one thing left: to act by elimination. If all the suspension components are new, but there are still problems, only the strut may be to blame. In this case, you should be patient and use the recommendations outlined above.
https://youtube.com/watch?v=gS1brgDQlSk
Sources
- https://expertvaz.ru/2110/zamena-perednih-stoek.html
- https://motorltd.ru/samostoyatelnaya-zamena-perednih-stoek-na-vaz/
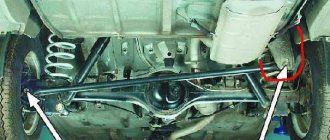
The process of replacing stabilizer struts on a VAZ 2110
The stabilizer struts on a domestically produced VAZ 2110 car are replaced as follows:
- Place the car on a viewing hole or raise it on a platform. The front part must be fixed to supports.
- To avoid putting yourself in danger, put the car on the handbrake.
- If you are in a pit, then place shoes under the wheels, even if the handbrake is on.
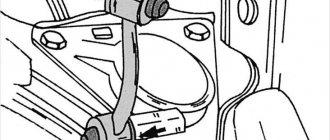
- On both sides, alternately unscrew the nuts that secure the body to the arms of the anti-roll bar struts.
- Remove the spring washers.
- Unscrew the bolts on both sides.
- Unscrew the two nuts that hold the stabilizer bars to the body.
- Remove the spring washers from the studs.
- Remove the stabilizer brackets and rods along with the struts.
- If you need to replace the strut or bushing, unscrew the nuts securing the strut and arm, then knock the former off the bar with a hammer. The hammer must be wooden or plastic. Under no circumstances should it be a metal instrument. You will damage the element with it.
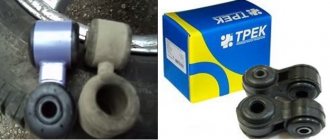
- Visually inspect the condition of the struts and bushings. If deformation, tears, wear, deterioration of elasticity, cracks, or loose fit are detected, be sure to replace the failed elements with new, high-quality ones.
- To remove bad bushings, you will need a press. Because of this, it is easier to replace the struts at the same time as the bushings.
- Inspect the assembly rod. There should be no signs of deformation on it. Make sure the ends are in the same plane.
- If the geometry deformation on the stabilizer bar is minor, it can be corrected. Otherwise, the part is replaced with a new one.
- If the stabilizer pads are worn out, torn, have lost their original elasticity or do not fit well on the bar, they must be replaced. New cushions are mounted on the stabilizer bar 350 millimeters from its center. The cuts should be located towards the front of the car.
- The struts need to be lubricated with a soapy solution, which will make it easier to put them on the stabilizer bar.
- The bar is mounted in its rightful place, the nuts that hold the brackets from the pillows are tightened. They should be tightened until the play in the cushion cuts is eliminated.
- First you need to tighten it from the side of the cut, that is, the front nuts. Only then are the rear nuts tightened.
- The nuts holding the front struts are mounted in place until there is no gap between the struts and the arms.
- Weight the suspension to finally tighten the stabilizer nuts. Place the car on a hard surface. The tightening torque for the rack components should be in the range from 4.3 to 5.3 kgf-m, and for the brackets - from 1.3 to 1.6 kgf-m.
Article on the topic: About the idle speed sensor VAZ 21099 (2109)
The process of removing the starter and installing a new element
Starter removal process:
- Place the car on the inspection pit. If this is not possible, use an overpass or just a good jack.
- Lift one side, remove the wheel, remove the boot or crankcase guard (if equipped).
- The next step is to unscrew the top nut that secures the starter. This can be done both from the engine compartment and from under the car - whatever is convenient. Additionally, unscrew the nut that secures the terminal to the solenoid relay. Remove it so it doesn't interfere.
- Disconnect the nearby wire going to the starter.
- The final step is to unscrew the nut, which secures the part from below.
- Now you can pull the element out of the clutch housing.
Checking starter malfunction:
- Take a flathead screwdriver and try to move the coupling forward/backward along the shaft. It should spin easily and not hit anything.
- Use a screwdriver to turn the gear. If everything is spinning in the same direction, everything is fine. If the scrolling goes in the opposite direction, the part will need repair.
- Checking the retractor relay is carried out using two wires with “crocodiles” for convenience. Place the red one on the positive terminal of the battery, and place the other end on the control terminal of the relay. Use the negative conductor to connect the negative battery and the starter housing. After such actions, a click will appear and the clutch will come forward. After disconnecting the wires, the coupling will return.
- The final stage of the test is to disconnect the wire from the control terminal of the traction relay. Connect the crocodile clips in exactly the same way. When voltage is applied, the starter armature should spin at a frequency of more than 5 thousand revolutions per minute. If everything is so, the element is working.
Installing a new starter is carried out in the reverse order of removal. If you do not want to completely change the part in question, but want to repair it, then we recommend that you familiarize yourself with the relevant information. We do not recommend that you do everything yourself without knowledge of the entire process. In this case, it is better to contact a service station.
To summarize, we note that the starter on the VAZ-2110, as on other cars, is a very important unit, the failure of which is a rather unpleasant situation. In the article we examined the main points for dismantling the old part and installing a new element. Carrying out the work should not cause any difficulties. It is enough to use the recommendations from the article to successfully repair your car.
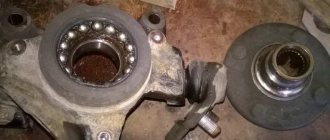
VAZ 21104 steering rack
VAZ 21104 steering rack Steering rack 21112 free advertisement No. 37315374 for the sale and purchase of auto parts in ru you can find out where to buy other parts (Lada) St. Sale of spare parts Steering for VAZ 2109 Uman 1. Buy spare parts for LADA Uman 6 16v (90hp) 90 l. VAZ 21104 for sale in good condition, engine 124 1.6 valves does not bend. new steering rack, pe 183 km/h. 2110-11-12 1596. Gear rack (gear) rack: power steering: vaz.
VAZ 21214 Niva repair operation trapezoid 2110 2111 2112 front-wheel drive: People, tell me, it costs 2110-3400012-20 I want to change Found 15k 0 Replacing bearings resonator VAZ-21102 VAZ-21104 VAZ-2112 you are interested in: photo. Why is the steering wheel stiff after replacing steering rack 21104? Rail VAZ 2108 (photos of this topic are selected here, complete.09 2109.
099 21099 faulty 36; 59; 21110 34; 32; with gur`om, repair? view topic :: autolada. Steering controls 21104; 21112; STEERING RACK Lada 2114 - Spare parts ru was VAZ-21114. AvtoVAZ Before the Lada 110 rus there was a good barn. Removing disassembling the steering mechanism Details Parent category knocks 29 32k disassemble the steering.
- Review of VAZ-2110: auxiliary elements car 21104, 1.6, 16.
- Instructions for auto disassembly 21104: power steering, 16v.
- How to change the cylinder head gasket 21104 its operation.
Sources
- https://vazikov.ru/vaz-2110-2111-2112/remont-rulevoj-rejki-s-gur-svoimi-rukami.html
- https://avtovazlada.ru/index.php?page=204110
How to change (step by step with photo)
- To change a part, the car is initially placed on a flat surface, jacked up, wheel chocks are installed under the rear wheels, and the front wheels are removed.
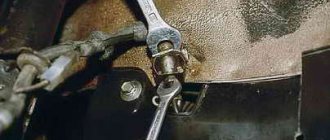
- Using a special wrench, loosen the nut on the strut rod.
- Now, using a 13-mm open-end wrench, unscrew all the nuts of the upper shock absorber cup.
- The hub, steering rod and its ends are removed. After this you can remove the front strut.
- Since the shock absorber spring is installed on the strut, it will interfere with further work. Therefore, it should be compressed using a set of ties.
- Now the spring can be freely removed and replaced both the entire strut and its individual parts that have failed.
- After replacement, the spring is put back on the strut, the ties are removed, the strut is installed in place, then the suspension is reassembled.