The reason for writing a new addition was the replacement of the standard speakers, which are installed by the factory in the “Lux” configuration. Previously, I wrote that due to poor sound insulation and the whine of the gearbox, I decided not to bother with the music, did not change anything, selected sound settings on the installed standard multimedia system (hereinafter referred to as MMS), which made the sound more or less normal, and used it without much discomfort . But recently I noticed that the rear left speaker began to grunt, introducing annoying notes into my favorite music. An autopsy showed that the diffuser in the installed speaker had come unstuck and, when trying to reproduce low-frequency sounds, produced the same grunting sounds. In general, I decided to change the speakers. And all at once, although the sound in the front doors was normal. I started studying sites with car audio. The factory installed DELTA speakers with a diameter of 13 cm both front and rear. On the forums, many car enthusiasts write about installing 16 cm speakers. At first I wanted to do this myself, but abandoned this idea for the following reasons:
Features of the preparatory process before installing speakers
Gearbox Lada Granta
Before installing speakers in your car in the front doors, you should ask yourself about ensuring a sufficient dispersion effect of sound waves. This suggests the need to stick an additional layer of Bitoplast 10 over the existing Vizomat MP-2. This action is not mandatory, but will significantly reduce the degree of reflection of sound waves from the door surface.
Why Bitoplast 10 and not traditional foam rubber? Let us note the peculiarity of the properties of these materials, which consists in the ability to absorb moisture to varying degrees. Foam rubber is capable of absorbing water like a sponge, which will subsequently lead to the appearance of pockets of corrosion inside the LADA Granta door card, which cannot be said about the recommended material.
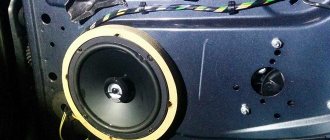
Spacers can serve as additional means. You can purchase them at any specialized retail outlet. Is it possible to independently manufacture the indicated spacers (rings)? Such an event is quite possible and requires the presence of an electric jigsaw, the ability to use it and a sheet of high-quality plywood or wood. The thickness of the material affects the placement of the device inside the door panel.
If you neglect to install the ring and use only plastic spacers, this will not allow the side door window of the LADA Granta to fully lower in the future. To ensure correct placement of the speaker inside the door panel and full functioning of the window regulator, you will also need to install plastic spacers under the previously designated ring. It is necessary to place smaller elements under the upper points of the accessory, and, on the contrary, larger ones under the lower points (i.e., remove the gap).
We fix the ring made in this way in the standard hole of the door card. At the same time, we place the indicated spacers.
Preparatory work
First, it is determined what diameter of the speakers will be installed on the Lada Granta liftback or other type of hatchback. Then a set of equipment and fasteners is prepared. Installation will require the following tools:
- screwdrivers;
- jigsaw;
- sharp knife;
- rags;
- metal files;
- wooden spacer;
- chalk to mark the diameter of the stand.
Speaker size 13 is the norm. The internal design of the door allows you to install such a column without additional manipulations. In this case, installation and cutting of the metal base is not required.
Reviews
| № | Positive |
| 1. | Kirill , 33 years old: the standard front speakers are quite enough for me. To add volume to the sound, I installed a couple on the rear shelf. |
| 2. | Vasily , 44 years old: The standard radio on the Lada Granta Liftback is not bad, the sound is good. There are not enough speakers in the back row. I didn’t bother, I set the speakers to “13”. |
| 3. | Vitaly , 33 years old: after purchasing the Lada Granta Liftback, I supplemented the standard audio system with only two rear speakers, that’s enough for me. |
| 4. | Gennady , 41 years old: to increase the volume of sound, he added two speakers to the rear side doors and the rear parcel shelf. The standard radio works, no problems. |
| 5. | Mikhail , 35 years old: I heard a lot of complaints about the standard system, my feedback is positive. Yes, it is not super powerful, but it is enough for the average driver. |
| 6. | Gennady , 29 years old: the standard 2-DIMM radio on the Lada Granta Liftback is quite enough for good sound. Anyone who wants a concert hall should buy it separately. |
| 7. | Vyacheslav , 38 years old: I heard that they install rear speakers on the Grant at “16”, but did not bother. I bought it on “13”, I’m happy, there are no complaints about the sound, it’s not ideal, but it’s enough for me. |
| Negative | |
| 1. | Vasily , 28 years old: I didn’t believe the negative reviews until I bought the Lada Granta Liftback. Weak and terrible. Change the speakers and radio. |
| 2. | Kirill , 33 years old: I took the car with me, it had a standard radio, I replaced it with a new one from Pioneer. It's a completely different matter. |
| 3. | Georgy , 41 years old: when buying Grants, I knew in advance about problems with acoustics. I bought coaxial speakers and a good radio. |
Conclusion In general, the sound quality of the standard speakers on the Lada Granta liftback is good. Lovers of high quality and cleanliness do not like this, so they strive to replace it with expensive models.
It is necessary to start from the fact that the car is in the budget segment, which means there is no point in demanding the best. If desired, install 16 speakers on the rear side doors to enhance the sound quality.
Speaker installation
Many sedans are purchased in a classic configuration, without a radio and sound system. To install these fragments, it is important to follow the step-by-step instructions:
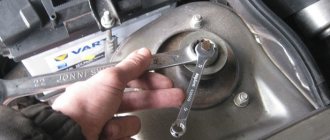
- The casing is removed. To do this, unscrew the handle, which is held on by two bolts, disconnect the latches and pull out the panel covered with fabric. Sound insulation is removed.
- The electrical wiring is disconnected, the old speaker is removed (if equipped).
- A hole is created in the cladding for musical equipment. An iron niche has already been created for size 13 acoustics. This is where the back of the speakers is inserted. Sometimes a little filing with a jigsaw is required.
- The equipment is fastened with self-tapping screws. The wiring is being connected.
- The facing card is returned to its place and secured with clips. They often break during removal, so it is worth purchasing an additional set of clamps. At the end the handle is screwed on.
There are more wires in the front door than in the back door. In addition to the electric lifts and the locking mechanism, the electrical wiring of the car's side mirror is connected there.
How to install 16 cm speakers with spacers
You can install 16-cm speakers without enlarging the hole, but then, due to the spacer, the speaker will stick out from the door. It is more advisable to carry out a standard cutting. Instructions:
- After the handle and facing panel are removed, the wires are disconnected. Sound insulation is removed. Use a jigsaw to enlarge the standard hole in the door.
- A pre-created podium is attached to the back and securely fixed with self-tapping screws.
- The cable is removed, the electronics are connected, and the structure is assembled in the reverse order.
Before putting the door back together, it is important to check the sound of the speakers. Incorrect operation may be due to incorrect wiring connections. If you hear wheezing or knocking, it means the speaker is not securely fixed.
Acoustics for the front doors of Lada Granta
Installing speakers in Granta doors allows you to be independent of the body type - speakers in the doors do not require an acoustic shelf. This means that you can install speakers in a sedan and a hatchback according to the same principle.
Here we are talking only about acoustics.
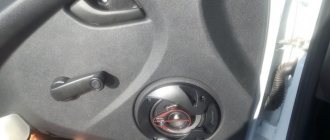
In non-luxury trim levels, the door cards do not even have holes for speakers - only perforations in the plastic.
Preparatory work
Before we begin the installation itself, let's figure out how to prepare the car. For this:
- We disassemble the door : dismantle the handle (pry up and remove the trim, unscrew 2 screws), the tip of the limit switch, two screws from the bottom of the door, overcoming the resistance of the retaining pins, pull the door card toward you and remove it from the door;
- We soundproof the door: in the warm season or in a heated garage, we cover all accessible parts of the door with vibroplast. Vibroplast StP M2 is suitable; when applying it to the door, be sure to heat it with a construction hairdryer and roll it with a pressure roller;
- If you have Spleen thermal insulation material, we cover the inside of the door card with it. This will further hide noise from the door when assembled;
- We are preparing spacers , if any are required for installing 16 cm speakers - more about them later in the text;
- We replace the factory terminals on the speaker wire in the door with normal ones (usually good terminals are included with the speakers) - to do this, we simply cut off the unnecessary connectors and attach the terminals we need to the wiring. A high-quality twist with heat shrink is enough;
- If the door panels do not have holes for speakers , we prepare them. It would be optimal to supply factory acoustic grids, which are installed on luxury versions of Granta and Datsun OnDo.
Review of prices of audio products manufacturers
| Name / characteristics / article number | Price, rub.) |
| Comprehensive budget solution | |
| Radio tape recorder PIONEER MVH-150UBG | from 1500 – 1700 |
| Speakers Pioneer TS-1339 (13cm) | from 2000 |
| Speaker trim | from 450 – 500 |
| Additional noise/vibration insulation of doors | from 1200 |
| Consumables, bolts, screws for vinyl (wood) spacers | from 100 – 150 |
| Car radios | |
| Pioneer SPX-HUD01 | from 10000 |
| Pioneer DVH-345UB | from 12000 |
| Sony XAV-65 | From 15000 |
| Pioneer SPH-DA230DAB | —/— |
| Pioneer SPH-DA120 | from 12000 |
| Pioneer MVH-X585BT | —/— |
| Pioneer MVH-X580BT | —/— |
| Pioneer MVH-S300BT | —/— |
| Auto acoustics coaxial | |
| Two-way coaxial acoustics URAL AK-M | from 7000 |
| URAL AK-74 | —/— |
| Coaxial acoustics URAL AS-C6947 | from 5200 |
| URAL AS-C1647 | —/— |
| URAL AS-C1347 | —/— |
| Four-way acoustics German Maestro AC6511 | from 7500 |
| Focal Performance PC 130 | —/— |
| Dragster DCB 5 | —/—7 |
| Dragster DCA 943 | from 6800 |
| Dragster DC 572.2 | —/— |
| Dragster DC 502.2 | —/— |
| Auto acoustics component | |
| 2-component acoustics Dragster DSB 5 | from 4000 |
| URAL AS-C1627K | —/— |
| URAL AS-C1327k | —/— |
| URAL AK-74.C | —/— |
| URAL AK-47.C | —/— |
| Avatar CBR-6.21L | from 5000 |
| German Maestro MB 4.2 FR | —/— |
| German Maestro 2S 6512 | —/— |
| Dragster DSC 592.2 | —/— |
| Dragster DSA 582 | —/— |
| Dragster DS 532.3 | —/— |
| Alphard Machete MC-6.2A | —/— |
| Amplifiers single / multi-channel | |
| Machete MFC-650.1D | from 10000 |
| Taramps DSP 3000 | —/— |
| Taramps TS2000x4 | —/— |
| Taramps TL500 | —/— |
| Taramps TL1800 | —/— |
| Taramps TL1500 | —/— |
| Taramps DS800x4 | —/— |
| Taramps DS800x2 | —/— |
| Taramps DS440x4 | —/— |
*prices are as of September 20, 2018.
Installing speakers in Granta rear doors
The procedure for working with the rear doors is identical to the front ones. Important difference : homemade spacers are not required here. The plant produces a set of special mounts for installing 13 cm speakers in the rear doors.
Articles for ordering online:
| Speaker Mount - Rear Left | 21907901033 |
| Speaker Mount - Rear Right | 21907901032 |
| Rear left column trim | 21906202095 |
| Rear right column trim | 21906202094 |
| Trim for front left door | 21906102097 |
| Trim for front right door | 21906102096 |
Purchasing factory mounts eliminates the need to look for homemade spacers for speakers.
Installation sequence:
- Disassemble the door;
- Cut a hole in the door card for the lining;
- Install the speaker mount on the door;
- Replace the standard audio terminals with normal ones;
- Connect the wires to the column, secure it;
- Install the trim and assemble the door.
You can replace the fastening with improvised materials, but factory production takes into account all bends.
General information about music in Grant
In this section, we will consider general non-professional points about music in the Lada Granta.
Installing music
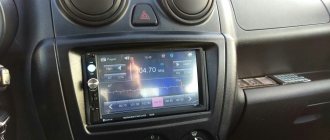
If you have a VAZ 2190 in the basic configuration (or Norma) with audio preparation, then installing music will entail the following steps:
- Removing the radio cover - on the back side there are ISO connectors for power and speaker wires. You will have to run the wires to the rear speakers yourself if you plan to install an acoustic shelf, since from the factory the wires are routed only to the doors;
- Installation of a 1- DIN radio (for 2-DIN you will have to farm, cutting out a jumper in the panel and looking for a suitable frame);
- Finding and connecting the plug of the pre-installed antenna - often the antenna wire on the roof is lost under the ceiling trim and it turns out to be easier to install the antenna separately than to find the factory cable;
- Pulling wires into the trunk to connect an amplifier, subwoofer and speakers installed in an acoustic shelf.
- To install the amplifier, you will also need a separate power cable from the engine compartment directly from the battery terminal through a fuse.
Installing front speakers
Acoustics for Lada Granta
Before moving on to the actual algorithm for installing the front speakers (see How to choose speakers for a car radio on your own), let us remind you that this car has already been equipped with standard seats and there is no need to do anything new. But a serious problem arises when installing two-component acoustics. And yet, modernization will have to be carried out, since the diameter of the standard seats is quite limited, however, as on other car models.
Note. If, for example, we want to install high-quality 16 cm acoustics on a Lada Granta, then another intractable problem will arise. The front windows may not open all the way and will hit the speaker. You will have to make special spacers from plywood or chipboard.
Making podiums
So:
- The first thing to do is to make podiums.
DIY acoustic podium
- Cut out a paper stencil to fit the diameter of the speaker. Don't forget to cut out the inner circle too.
Note. For 16 cm acoustics, you should get a ring with the same diameter and a 15 cm circle cut inside it.
- We glue together 2 pieces of plywood, cut according to a stencil. We use PVA glue and self-tapping screws.
- We should get rings 11 mm thick. This is quite enough for most speakers, although the thickness can be increased, if necessary, later by adding additional rings.
- Now we need to install these same acoustic podiums in the door of the Lada Grant. Without removing the trim, we make markings by attaching a homemade ring to the door.
- We remove the casing.
- We take a drill and start drilling holes in the metal of the door.
- We put up podiums and fasten them well.
Note. During this work, it is recommended to at the same time make high-quality sound insulation of the door. It will make the sound from the speakers much fuller, and music lovers will be satisfied.
- We lay wiring in the door.
- We put the trim back in place.
- We install the decorative speaker grille. You can attach it in various ways.
Level three. Upgrade without replacing the standard head unit
If all these “flowers” with speakers seem frivolous to you, it’s time to move on to the “berries” - touching on the amplification part of the system. The main problem that has to be solved in this case is where to get the original uncorrected linear signal from which to start building a new audio system.
In fact, you won't find it anywhere just like that. And there is simply no single recipe for all cars; in any case, you will have to turn to professionals who specialize in “voicing” cars. By and large, it all comes down to four options.
The first option is to “pull out” the linear signal from the electronic bowels of the head unit. For many models, this process, by the way, is well established, and for a relatively small amount your standard head unit will acquire a tail with RCA connectors on the rear side.
In many head units it is not difficult to get a line signal. Sometimes, however, its level is low, and in order not to pick up interference on the way to the amplifier, you have to add a small output buffer. But for an experienced master this does not cause any particular difficulties.
The second option has to be used when it is not possible to display “linear lines”. In this case, we leave the standard amplifier in the system, decisively disconnect the standard speakers from it and connect its outputs to the inputs of the new amplifier. The only requirement for the latter is the presence of so-called high-level inputs.
High-level inputs are a feature exclusively of car audio equipment; at home, it would hardly occur to anyone to connect one amplifier after another. In a car this is a necessary measure, and although technically it is not very elegant, it still makes sense. After all, it is no longer low-impedance speakers that will be connected to the standard amplifier. Its output stages will operate in a completely different mode, with lower currents, so the signal quality will be somewhat different. In any case, you will get better sound than in the state.
But this option is also not always applicable. A little higher, I already said that many systems introduce intentional signal correction. In this case, there is no point in simply passing the “crooked” signal from the standard amplifier to a new one. And if the standard system has channel-by-channel amplification, then you won’t even find a curved signal - only frequency “cuts”.
For such cases, there is a third option, using a digital processor like Audison bit One, Audison bit Ten, Helix DSP, etc. The trick of these devices is that they can combine the original audio signal from these separate frequency pieces, remove the correction (or rather , adjust the signal “in the opposite direction”) and send such a restored signal to a new amplifier. In the right hands, by the way, it’s quite an effective thing.
Typically, automotive processors are configured from a laptop or tablet
Well, the fourth option is applicable in cars in which the standard system is built using the MOST bus (Media Oriented Systems Transport). By the way, there are quite a few of them these days. The peculiarity of the MOST structure is that all devices (source, amplifiers, monitors, changers, etc.) are united by a single digital bus through which data circulates around the ring. It is impossible to take and remove anything from such a system; the data transfer is interrupted and everything simply stops working.
Despite the apparent complexity at first glance, this option is actually one of the most convenient for installing a new system. All you need is a MOST adapter. It is included in the MOST ring as another device, pulls the digital audio signal out of the bus and gives it to us “on a silver platter” - in the form of the usual SPDIF.
If the standard audio system uses a MOST bus, then using an adapter allows you to get SPDIF without surgical intervention in the head unit or wiring
And then we can do whatever our heart desires with it - from an economical “processor + amplifier in one package” solution (MD.Lab AM-60.6DSP, Audison Prima AP8.9 bit, Helix P SIX DSP, etc.) and to extravagant systems with an external DAC and other audiophile tricks.
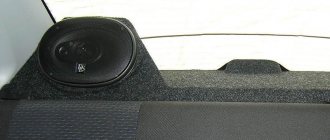
Professional rear acoustics in Lada Granta
Acoustic shelf in Lada Granta
If the owner of a Lada Granta is a true connoisseur of sound, then the above methods for installing an audio system will not be enough for him. Therefore, we will present another method that involves installing professional acoustics in this car. To begin, prepare the necessary materials and equipment:
- Coaxial acoustics, preferably 6x9 from Pioneer. As for the rated power, 120 W will be enough.
- An acoustic shelf that you can make yourself, or you can buy ready-made.
- Kit for connecting a 4-channel amplifier, preferably from Supra.
- One roll of Splen.
As an amplifier, it is advisable to choose, again from Pioneer, a 2-channel option. As for the 4-channel option, this will be superfluous. The 2-channel amplifier exactly matches the selected acoustics.
Note. The kit for connecting a 2-channel amplifier can be used as for a 4-channel amplifier. The wires in this case are of higher quality and better.
The actual installation process itself:
- We dismantle the old shelf. We press out holes in the new one using hydraulics and cover it with two sheets of vibrating mat, and on top with a roll of Splen.
- We make podiums for the shelf to match the size of the speakers.
- We install everything in place.
This concludes the process of installing acoustics in the Lada Granta. The instructions will help you do everything correctly and will prevent you from making mistakes if you also use photo and video materials in the process. The price in this case will be very low if you do everything yourself.
Level two. Replacing standard speakers
This is where you need to be very careful. This is a field with a rake; you can’t run with your eyes closed. This upgrade option is not always applicable. If you replace only the speakers and leave everything else, then it is far from a fact that the system will “sing.” Moreover, in some cases the result may be completely negative. Although the standard audio system itself is not of a high class, everything in it is matched to each other and balanced.
It is clear that the audio system is far from a priority element when designing a car, but sometimes the methods for installing standard speakers are simply surprising. The photo shows a standard BMW speaker, which was simply attached to the inside of the upholstery and covered with a light casing
One of the tricks that automakers resort to is reduced acoustic impedance. In general, the most common acoustics in car audio are 4-ohm ones, but in “standard” speakers they often use 2-ohm ones. All in order to boost the dead standard amplifier and slightly increase the volume headroom. Replace these speakers with more conventional 4-ohm ones and you get a quiet system, and any attempts to increase the volume will be accompanied by an increase in distortion.
But that’s okay, there are plenty of aftermarket acoustics with 2-ohm ones. Don't step on another rake - a corrected signal. This, by the way, is one of the “tricks” of many branded standard systems - it’s not the components that are better, but correction that compensates for the features of cheap speakers and the shortcomings of their acoustic design. Replace the dynamics in such a system, and such a correction will no longer be appropriate.
But there is no need to be scared and completely discard this option. Today you can find many acoustic kits that are tailored specifically for certain brands and models of cars. Mainly for European ones, in this part of the world such an upgrade is most in demand.
The video demonstrates the ease of upgrading a standard audio system by simply replacing the OEM speakers with a set specially designed for a specific car brand:
How to machine a cylindrical hole
16 cm speakers will require enlarging the hole in the metal structure. This diameter is preferable because it creates more sonorous acoustics. For cutting you will need a metal jigsaw and steel files. Chalk outlines the place of the cut, which is measured in advance. When the niche is ready, it should be cleaned with sandpaper, and also make sure that the speaker fits tightly into the hole. If it dangles, it will create extraneous noise in the cabin.
A wooden podium is additionally prepared from wood, which is attached to the inside of the speakers.
The main differences between coaxial and component acoustics
- Coaxial: a single design of speakers, where low-frequency and high-frequency are mounted on the same axis. Depending on the type of preinstalled crossover, one, two, or three-way crossovers are distinguished.
- Component: consists of a number of individual different-frequency speakers that are installed throughout the vehicle interior.
It is better to install coaxial ones on the back row of seats, component ones - in the front. The cost of coaxial speakers is a third cheaper than component ones.
Sealing is a guarantee of high-quality sound
In order to achieve a tight fit of all components when installing speakers in a domestic Lada Granta car, it is necessary to carry out intermediate sealing measures. Once the ring is attached, gaps may be found between it and the door panel caused by the installation of spacers. To eliminate this negative point, you will need to glue the outer side of the ring with a special product - “Vizomat 10”. Now the outer side is free of cracks, and the space between the ring and the door can be filled with polyurethane foam. Without allowing the foam to completely harden, we remove all protrusions that could cause interference when installing the speaker.
Crib
Instead of a conclusion, let's summarize:
- You can plug in budget sound into the Grant for an amount of 20,000 rubles or more.
- Podiums in the front doors = impossible to open the glove compartment.
- 16 cm speakers in the front doors - cut the metal of the door or prepare spacers with the factory facing of the speakers.
- The acoustic shelf covers the ISOFIX mounts.
- Audio preparation pulls wires only in the doors.
- Article numbers for ordering speaker covers and mounts are in the “Installing speakers in rear doors” section.
Did you like the article? Write a comment or see what we have about the selection of budget cars for 200 thousand.
Speaker installation process
Installing the rear speaker, oddly enough, is even easier than the front speaker. We take the spacer and screw it to the back door, after which all that remains is to secure the speaker and connect it. With the front door, everything looks more complicated - there you need to glue threaded washers under the holes for the bolts. And normally these washers are held in place by brackets, which are not included in the “standard” configuration.
Rear and front door without trim
Each speaker is screwed onto 4 threaded screws, but it is better to connect the connectors first. One pair of speaker wires goes into each door, and they come from the main connector intended for the radio. Before making the connection, it is better to test the wires for breaks.
We have discussed in full how to install speakers in Kalina 2. We will not consider the method of installing and connecting the radio, but note that it is not at all necessary to dismantle the center console for this.
Let's sum it up
Now the installation of 16 cm speakers in the door panels of the Lada Granta can be considered complete. After this, only the final assembly of all door components will be required. The installation procedure considered will allow the owner to be guaranteed to enjoy excellent sound. As you can see, installing speakers in a car in the front doors is not a complicated procedure.
Sources
- https://Vaz-Lada-Granta.com/elektrika-tormoza/ustanovka-kolonok.html
- https://InfoKuzov.ru/remont/perednij-zvuk-na-grantu
- https://car-fact.ru/marki-i-modeli/otechestvennye/lada-granta/dinamiki-v-grantu.html
- https://avtozvuk-info.ru/shemy-podklyucheniya-akusticheskoj-sistemy/podklyuchenie-kolonok/ustanovka-akustiki-v-lada-granta-386
[collapse]