You have to start replacing the lambda probe when checking it shows that it is not working and therefore requires replacement.
It is worth noting that it is advisable to purchase a similar lambda probe for replacement, so as not to resort to resoldering the connectors or a model with the same number of connectors.
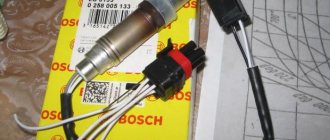
For example, oxygen sensors from the company BOSCH, which produces lambda probes for both foreign cars, in particular Ford cars, and domestic cars, VAZ, Moskvich, etc., are very popular. And most of them are interchangeable.
Where is the oxygen sensor located?
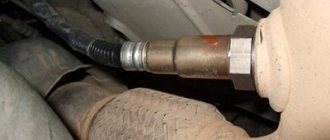
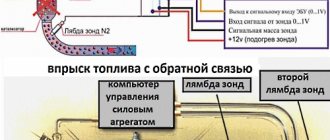
The front oxygen sensor DK1 is installed in the exhaust manifold or in the front exhaust pipe in front of the catalytic converter. As you know, the catalytic converter is a major part of the vehicle's emissions control system.
The rear oxygen sensor DK2 is installed in the exhaust after the catalytic converter.
On 4-cylinder engines, at least two lambda probes are installed. V6 and V8 engines have at least four O2 sensors.
The ECU uses the signal from the front oxygen sensor to adjust the air/fuel mixture by adding or decreasing fuel.
The rear oxygen sensor signal is used to monitor the performance of the catalytic converter. Modern cars use an air-fuel ratio sensor instead of a front oxygen sensor. It works similarly, but more accurately.
Replacement
The lambda probe can only be changed when the engine is cool and the ignition is off. The new device must have the same markings as the old one. The process is divided into several stages:
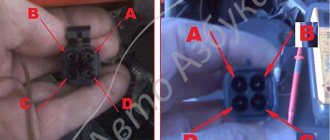
- Disconnect the wiring from the device;
- Unscrew the faulty component using a wrench;
- A new one is screwed in. A new one is screwed in in its place. Be careful when working to avoid damaging the threads.
- The wires are connected and the correct functionality of the device is diagnosed.
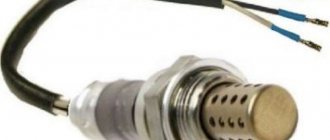
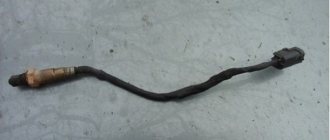
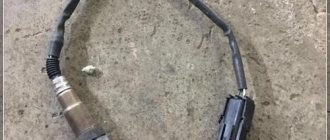
Unfortunately, not all car owners know what a lambda probe is and why it is needed. A lambda probe is an oxygen sensor that allows the electronic system to monitor and balance the correct ratio of air and gasoline in the combustion chambers. It is able to promptly correct the structure of the fuel mixture and prevent destabilization of the engine operating process.
This rather fragile device is located in a very aggressive environment, so its operation must be constantly monitored, since if it breaks down, further use of the car is impossible. Periodic checking of the lambda probe will guarantee stable operation of the vehicle.
How does an oxygen sensor work?
There are several types of lambda sensors, but for the sake of simplicity, we will only look at conventional voltage-generating oxygen sensors in this article.
As the name suggests, a voltage-generating oxygen sensor generates a small voltage proportional to the difference in the amount of oxygen inside and outside the exhaust gas.
For proper operation, the lambda probe must be heated to a certain temperature. A typical modern sensor has an internal electrical heating element that is powered by the engine ECU.
When the air-fuel mixture (FA) entering the engine is lean (not enough fuel and a lot of air), more oxygen remains in the exhaust and the oxygen sensor produces a very small voltage (0.1 - 0.2 V).
If the fuel assembly becomes rich (lots of fuel and not enough air), there is less oxygen left in the exhaust, so the sensor will generate a higher voltage (about 0.9 V).
Video, what is a lambda probe
Additional requirements for proper operation of the lambda
Lambda sensors only work correctly after reaching a sufficiently high operating temperature. The shorter the warm-up time, the faster they become active in performing their functions. Previously, the engine control unit ignores its signals, which always leads to an increase in fuel consumption and a deterioration in the composition of exhaust gases. The probe must respond as quickly as possible to changes in the composition of the emitted flue gas, since any delay in response means an unfavorable delay in the correction of the air-fuel ratio by the engine control module.
Adjusting the air-fuel ratio
The front O2 sensor is responsible for maintaining the optimal air/fuel ratio entering the engine, which is approximately 14.7:1 or 14.7 parts air to 1 part fuel.
The control unit adjusts the air-fuel mixture based on feedback from the front oxygen sensor. When the front lambda probe detects high oxygen levels, the ECU assumes that the engine is running lean (not enough fuel) and therefore adds fuel.
When the oxygen level in the exhaust becomes low, the ECU assumes that the engine is running rich (too much fuel) and reduces the fuel supply.
This process is continuous. The engine computer constantly switches between lean and rich states to maintain the optimal air/fuel ratio. This process is called closed loop operation.
If you look at the front oxygen sensor voltage signal, it will cycle somewhere between 0.2 volts (lean) and 0.9 volts (rich).
When the car starts cold, the front oxygen sensor is not fully warmed up, and the ECU does not use the DC1 signal to adjust the fuel. This mode is called open loop. Only when the sensor has fully warmed up does the fuel injection system enter closed-loop mode.
In modern cars, instead of a conventional oxygen sensor, a wideband air-fuel ratio sensor is installed. The air/fuel ratio sensor works differently but serves the same purpose - to determine whether the air/fuel mixture entering the engine is rich or lean.
The air fuel ratio sensor is more accurate and can measure a wider range.
Instructions for repairing and replacing the sensor
You can replace or restore the controller yourself.
How to remove the sensor
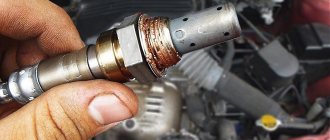
Removing the device, regardless of the machine model, is done as follows:
- Warm up the surface of the part to approximately 60 degrees. To do this, you can use a regular lighter or torch. Warming up will make it easier to remove the device from the seat.
- Disconnect the wires connected to the part.
- Carefully unscrew the oxygen sensor. It is not recommended to use special tools for dismantling.
- Remove the protective cap.
Diman Stepanenko spoke about dismantling the lambda probe on his own.
Cleaning and Soaking
There are two options for restoring the oxygen sensor:
- the first - using orthophosphoric acid;
- the second - with phosphoric acid and a burner.
It must be taken into account that phosphoric acid or another similar product belongs to the category of hazardous substances. When working with a substance, it is important to remember safety rules. Acid should not be allowed to enter the mucous membranes or inside the body.
First way
This method cannot be called accelerated, since the consumer needs to gain full or at least partial access to the ceramic surface of the device. This component is hidden behind a protective cap made of metal; it is not easy to dismantle. Do not use a hacksaw for removal as it will damage the work surface. Dismantling is carried out using a lathe - at the base of the oxygen sensor, you need to cut off the protective cap using a cutter. The cutting is done close to the thread.
If it is not possible to use the machine, you can use a file. It is not possible to completely remove the cap with this tool, but you can make small windows about 5 mm in size on it. Approximately 100 ml of orthophosphoric acid is used for cleaning. If it is not available, you can use a rust converter.
Device recovery:
- Pour the liquid into a glass container. You can use jars, glasses, etc.
- Place the oxygen sensor core into the container. The controller cannot be completely immersed in liquid. Wait about twenty minutes.
- Remove the sensor from the container and rinse its base with tap water. Wait until the device is completely dry.
- If you are unable to remove the dark deposits on the core the first time, repeat the procedure. It is necessary to ensure that the element again becomes a metallic color.
- If, after several attempts, high-quality cleaning fails, you can use a brush to enhance the effect of the product. The base of the device is wetted and treated with it. As a result, the plaque should be removed. If the protective cap has been removed, then the brush will not be needed. It is better to use a toothbrush instead.
- After cleaning has been completely completed, the sensor is washed. If the cap has been removed, then after restoration it must be put back in place. For this, argon welding is used.
When using this method, please note:
- If the device is heavily soiled, then twenty minutes will not be enough to restore it. For critical blockages, the soaking procedure can be extended to three hours. In some situations, cleaning may take a full night, at least eight hours.
- After cleaning, you need to check how effectively the procedure was performed. Diagnostics will require some time for the car owner to understand how the car behaves and how much fuel it “eats.” If the malfunction indicator on the device remains lit, then the controller could not be repaired.
- If the machine is equipped with a sensor whose protective cap is equipped with a double shell, then it will not be possible to make a hole in it with a file. To solve the problem, you need to soak the device in acid or another product with the cap itself.
The process of cleaning the oxygen controller is shown by Alexander Sabegatulin.
Second way
To restore the controller you will need the same acid, as well as a gas burner or stove. When using a household stove, give preference to a small burner.
Cleaning procedure:
- The lid is removed from the burner. Then it is turned over and installed back, with a slight offset to the side. It is necessary to install the lid so that it covers the pipe itself from liquid getting inside.
- The fire on the burner is lit.
- The lambda probe core must be dipped in a container of acid, then taken with pliers and heated over a fire. This will cause the acid to boil and the substance will begin to splash. A greenish tint of salt will appear on the working surface of the device.
- Wait until the substance has completely boiled away. Rinse the controller with clean water and then repeat the cleaning procedure. These steps must be continued until the controller is completely shiny. This may take ten minutes or more. Before further installation, the thread of the lambda probe must be treated with graphite lubricant, which will prevent the oxygen sensor from sticking to the threaded hole.
Installing a lambda probe
Installation of the device is carried out in the reverse order:
- A protective cap is installed on the sensor.
- Wires are connected to the device.
- The controller is installed in the seat and screwed in.
Rear oxygen sensor
The rear or downstream oxygen sensor is located in the exhaust after the catalytic converter. It measures the amount of oxygen in the exhaust gases leaving the catalyst. The signal from the rear lambda probe is used to monitor the effectiveness of the converter.
The controller constantly compares signals from the front and rear O2 sensors. Based on two signals, the ECU knows how well the catalytic converter is working. If the catalytic converter fails, the ECU turns on the Check Engine light to let you know.
The rear oxygen sensor can be checked using a diagnostic scanner, an ELM327 adapter with Torque software, or an oscilloscope.
Causes of lambda probe malfunction
Lambda sensors, manufactured to OE standards, generally do not deteriorate over the life of the vehicle without external causes. These include: mechanical stress causing physical damage, such as cracking of the ceramic core or interruption of cable connections; contamination of the sensor due to particulate vapors deposited on it, which causes the probe's response to slow down to changes in the composition of the exhaust gases and, consequently, disruption of the electronic engine control module; Wetness and corrosion of electrical connectors, which alter the values of the signals emitted by the probe.
Oxygen Sensor Identification
The front lambda probe in front of the catalytic converter is usually called the "upstream" sensor or sensor 1.
The rear sensor installed after the catalytic converter is called the downstream sensor or sensor 2.
A typical inline 4-cylinder engine has only one block (bank 1/bank 1). Therefore, in an inline 4-cylinder engine, the term "Bank 1, Sensor 1" simply refers to the front oxygen sensor. "Bank 1, Sensor 2" is the rear oxygen sensor.
Read more: What is Bank 1, Bank 2, Sensor 1, Sensor 2?
A V6 or V8 engine has two blocks (or two parts of that "V"). Typically the cylinder block containing cylinder #1 is called "Bank 1".
Different car manufacturers define Bank 1 and Bank 2 differently. To find out where bank 1 and bank 2 are in your car, you can look in the repair manual or Google, specifying the year, make, model and engine size.
Lambda probe selection
- Faulty lambda probes are not subject to any repairs, so in the event of malfunctions there is a need to replace them.
- Experience shows that it is better to choose a spare part from a proven brand that meets quality requirements rather than a cheap replacement.
- Proper and reliable operation of the sensor depends on the quality of the materials used to manufacture it, well-designed construction, precision machining, and precise assembly (laser welding) of the components. Very strict requirements apply here, since the entire sensor is exposed to the very unfavorable conditions existing inside the exhaust system, and therefore to significant temperature differences, strong vibrations, humidity and chemicals.
- Using cheaper parts can only provide obvious savings as it usually speeds up the replacement period. Additionally, cheap replacements are often offered as "universal", meaning without the original connectors on the ends of the wires.
- Manual fabrication increases the risk of connections that are poorly conductive or even completely incorrect, which can lead to serious and costly failures of other electronic engine control system components.