The Opel Astra H timing belt is one of the most important elements of a car engine. We reveal the features of its operation, the reasons for the drive breakage, its consequences and the method of replacement.
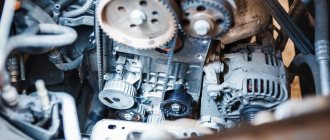
The Astra H timing gear drive is a toothed ring made of rubber, the main part of the gas distribution mechanism. In addition to its main function, the belt drives the oil pump and, on some Astras, also the pump. It is important to replace the belt in a timely manner, because the consequences of a break are dire for Astra.
According to Opel regulations, the timing drive on the Opel Astra H must be replaced every 90,000 km, or 6 years of operation. However, it is recommended not to wait until the deadline, and certainly not to re-roll, but to replace it at intervals of 75,000 - 80,000 km, or 5 years.
Replacement Regulations
That is why it is so important to diagnose the condition of the belt drive in a timely manner. This should be done at least after 25,000 km. The manufacturer recommends replacing the belt drive after 150,000 km. But for some reasons the belt will have to be changed a little earlier. Here are the factors that will affect the reduction in belt drive service:
- a low-quality consumable was initially installed;
- aggressive driving;
- the belt will wear out faster if the car is operated under constant loads;
- Incorrect installation of the belt drive can also affect its early wear.
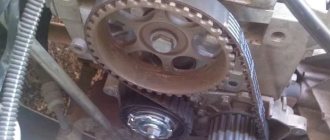
When inspecting the belt, you should pay attention to the following defects:
- the surface looks clearly worn out - there are cracks, dents and bulges on it;
- chips are visible on the teeth;
- traces of oil are visible on the belt;
- individual threads appeared at the ends;
- the material began to delaminate.
Separately, it is worth mentioning the oil marks on the surface of the belt. This can only mean one thing - as a result of a seal failure, oil began to leak and gets onto the belt. Oil destroys rubber, and such a belt will definitely not last long. If oil leakage is detected, the oil seals must also be replaced along with the belt. And that's not all - you may also have to replace the gaskets and tension roller.
If you decide to change the belt yourself, prepare the necessary tools and consumables. There is no need to skimp on consumables, as they will wear out much earlier than expected. By the way, if you are replacing the pump along with the belt, buy antifreeze, since the old one will have to be drained.
Belt life and preparation for replacement
Yes, this procedure cannot be called simple, but you can still do it yourself. Opel Astra manufacturers recommend changing the drive after 150,000 kilometers. This regulation should be adhered to, but one should not forget about periodic diagnostics. The wear of the drive may be premature, and the following factors may contribute to this:
- drive quality parameters;
- driver's driving style;
- increased loads during operation;
- Incorrect drive installation.
This is why it is so important to periodically inspect the condition of the belt. But what external defects indicate that the belt has worn out and it’s time to change it to a new one:
- the outer surface is covered with cracks or bulges;
- the teeth are ground down or chipped;
- surface with oil stains;
- the ends are frayed;
- the material began to delaminate.
By the way, if you find oil stains on the belt, this indicates that you need to change the oil seals, thereby eliminating the leaks. Otherwise, oil will get onto the new belt, and since the oil corrodes the rubber, this will definitely not help extend its service life. Be prepared for the fact that you will also need to change the tension rollers. If there is play, we also change the water pump.
Expert advice on replacing the Z18Xer timing belt
The brand's gasoline power unit is one of the most common internal combustion engines used to equip Opel cars. This engine is also installed on such popular models as Astra H and J, Opel Zafira B and C, Opel Insignia, Opel Vectra C. The engine has been produced from 2005 to the present day.
It is characterized by high reliability and has a significant service life. Timely and qualified maintenance is of great importance for the efficient and reliable operation of the motor, as well as for ensuring its high durability. Maintenance of the power unit includes a wide range of routine operations.
Important
One of the main ones is replacing the Z18Xer timing belt. The effective operation of the internal combustion engine depends on the timeliness of its execution. Moreover, compliance with the timing of this operation is of great importance for the longevity of the engine. In addition to meeting deadlines, it is also important to trust qualified technicians to replace the timing belt.
Only if these conditions are met can reliable operation of the power unit be ensured and protected from serious damage.
Important requirements for replacing the Z18Xer timing belt
The Z18Xer engine's timing belt is one of the most important components to ensure engine performance and efficient operation. This is a key link in the belt drive, which provides timing drive from the engine crankshaft. It is also responsible for the synchronized rotation of the shafts.
Its condition is key for the normal operation of the motor. The belt is made of rubber, so as it wears, its strength characteristics gradually deteriorate. It must be taken into account that during operation it experiences significant loads. This can lead to its breakage, which is an extremely undesirable phenomenon for the motor.
Therefore, timely replacement of the z18xer timing belt is of great importance.
The most harmless consequence of a broken belt is the stoppage of the engine, which can only be started after installing a new element. However, often the consequences are much more serious. The fact is that when the timing belt breaks, the valve timing is disrupted.
As a result of uncoordinated operation of the mechanisms, a meeting of pistons and valves in the cylinders may occur, which is accompanied by a strong mutual impact. This causes damage to the pistons and bending of the valve guides. In addition, connecting rods can be damaged, and shafts are often deformed. These damages are very serious and require major repairs.
Its implementation will require significant costs and considerable time. Often these defects can cause complete engine failure. In order to avoid such serious consequences, it is extremely important that the z18xer timing belt replacement is carried out in a timely manner; moreover, it does not need to be done so often.
In accordance with the service regulations, it is necessary to change the drive element of the gas distribution mechanism every 150 thousand kilometers of the vehicle.
However, it must be taken into account that the Z18Xer engine belt, like the z16xer timing belt, can wear out prematurely. In such cases, it is important to change it as soon as possible.
Advice
This need is evidenced by visible signs of wear that appear on the toothed surface, including cracks, signs of rubber peeling, and undercuts. It is also necessary to pay attention to the outer and end surfaces, where cracks, folds and other deformations of the rubber may appear.
It may become frayed and peel off. Another alarming sign is the discovery of stains and oil leaks on the rubber. Its impact leads to rapid destruction of rubber, so experts recommend urgent replacement in such situations. The cause of oil ingress must first be eliminated.
Most often this is a leak in the crankshaft or camshaft oil seal. It is important that the z16xer or Z18xer timing belt be inspected at each scheduled maintenance for the presence of the listed symptoms. This will allow you to replace it in a timely manner if necessary and prevent serious engine damage.
Experts recommend using only original elements for replacement. Z18xer engines use a high quality reinforced belt made from highly durable and flexible rubber. The Z16xer timing belt is also identical.
The use of lower quality components allows you to save only at the replacement stage. Subsequently, a cheap element of unknown origin quickly fails and has to be replaced very soon. It can also break with all the ensuing consequences.
Replacing the timing belt
The gas distribution mechanism of the engines is driven by a rubber reinforced toothed belt. Replacing the timing belt is a routine maintenance job.
According to the manufacturer's recommendation, the timing belt must be replaced after 150 thousand kilometers. The timing belt is also replaced if during inspection you find:
- traces of oil on any surface of the belt;
- traces of wear on the toothed surface, cracks, undercuts, folds and peeling of fabric from rubber;
- cracks, folds, depressions or bulges on the outer surface of the belt;
- fraying or delamination on the end surfaces of the belt.
WARNING
A belt with traces of engine oil on any of its surfaces must be replaced, as the oil quickly destroys the rubber. The cause of oil getting on the belt (usually a leak in the crankshaft seals and camshafts) must be eliminated immediately.
NOTE
Carry out the work on an inspection ditch, overpass or, if possible, on a lift.
You will need: TORX keys E14, E18, T50, hex key “6”, socket head “11”.
1. Remove the accessory drive belt (see Replacing the accessory drive belt).
2. For easier access, remove the air filter (see Removing and Installing the Air Filter, Air Duct and Intake Muffler).
3. Remove the right front wheel.
4. Remove the right engine mudguard (see Removing and installing mudguards and engine crankcase protection).
5. Set the piston of the 1st cylinder to the TDC position of the compression stroke (see Installing the piston of the 1st cylinder to the TDC position of the compression stroke).
6. Remove the two bolts securing the front timing cover...
7. ...and remove the cover.
8. If you are removing the belt not for replacement, use a felt-tip pen to mark the direction of movement of the belt when the engine is running, so as not to change this direction when reinstalling it.
NOTE
The teeth of the timing belt are run in to the toothed pulleys of the crankshaft and camshafts on one side. Changing the direction of the belt will cause it to wear out faster due to repeated running in.
9. Remove the crankshaft pulley mounting bolt...
10. ...and remove the pulley.
HELPFUL ADVICE
The crankshaft pulley mounting bolt is tightened to a very high torque. In order to prevent the crankshaft from turning, engage V gear and press the brake pedal (an assistant should do this).
11. Remove the bolt securing the tension roller of the auxiliary drive belt...
12. ...and remove the video.
13. Remove the four bolts securing the lower timing cover...
14. ...and remove the cover.
15. Loosen the intermediate roller mounting bolt, but do not remove it completely.
16. Loosen the tension of the timing belt by using key A to turn the roller clockwise until it stops, overcoming the resistance of the roller spring...
17. ...and then, holding the tension roller in this position, unscrew the bolt securing the intermediate roller and remove it.
18. Remove the belt from the crankshaft timing pulley...
19. ...and remove the timing belt.
HELPFUL ADVICE
Whenever you replace the timing belt, replace...
...its tension...
...and intermediate rollers, since their service life has already been reduced and when installing the old rollers after a relatively short period of time, repeated disassembly may be required to replace them. In addition, there is a high risk of destruction of rollers that have been operating for a long time, which will lead to emergency engine failure. Removing the intermediate roller is described above in this subsection (see paragraphs 15–17)…
...to remove the tension roller, unscrew the bolt securing it.
20. Install the rollers, if removed, in the reverse order of removal.
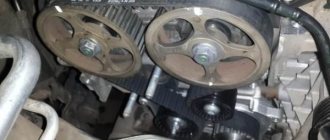
21. Check the alignment marks of the crankshaft and camshafts (see Installing the piston of the first cylinder to the TDC position of the compression stroke).
22. Place the belt on the crankshaft timing belt. Place the leading part of the belt behind the intermediate roller and, pulling it tight, put it on the camshaft pulleys. Place the rear part of the belt behind the tension roller, having first turned it clockwise until it stops (see paragraph 16).
NOTE
After the tension on the tension roller stops, under the action of the spring it will take the position necessary for normal belt tension.
23. Screw the pulley mounting bolt into the crankshaft shank and turn the crankshaft two turns so that the tension roller provides the nominal belt tension.
24. Check the alignment marks of the crankshaft and camshafts. If there is a discrepancy, reinstall the belt.
25. Install all previously removed parts in the reverse order of removal.
This Opel Astra is equipped with a 1.6 liter engine with the Z16XE index. The gas distribution mechanism (GRM) is driven by a toothed belt. The timing belt also drives the pump. Its replacement is recommended complete with a belt and rollers, but use is allowed for two service life of the belt. We do not recommend saving, and we recommend changing the pump along with the belt.
Replacing a belt can be regarded as a job of average complexity, but it is very responsible. If the belt breaks or is installed incorrectly, the valve bends.
Our report describes, step by step and in detail, the replacement of the Astra G 1.6 timing kit without a pump.
Tools and materials needed to replace belts
To replace it, it is advisable to have an assistant and the following tool:
- Wheel key.
- 8mm socket head.
- Torx sockets T8, T10, T14, T18.
- Torx bits T30, T50, T40.
- Open-end wrench 15mm, 13mm.
- Jack.
- Passatizhi.
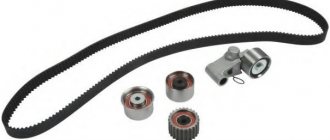
The timing belt kit has the number: K025499XS - Gates, analogues: dayco KTB361, BGA TB9500K.
Drive belt, original - GM 6340626, we installed from Continental, size 5PK1212.
You may also be interested in instructions for replacing the timing belt on an Opel Astra G with a Z18XE engine.
Engine and timing Opel Astra N
The Opel Astra N car was produced from 2004 to 2015, and since 2006 there was a restyle version. Over this fairly long period, the car was equipped with various power units:
- 1.4 l Z14XEP (90hp);
- 1.6 l Z16XER (115hp);
- 1.8 l Z18XER (140hp);
- 2.0 l Z20LER (200 hp);
- 2.0 l Z20LEH (240 hp).
The Z14XEP engine has a Twinport system and was installed exclusively on a 5-door hatchback. Z16XER and Z18XER have variable valve timing - this is the most common version of the power unit, which was installed on almost all cars (the exception was sports versions of the hatchback with 3 doors). The Z20LER and Z20LEH engines are equipped with turbocharging and are installed on a 3-door hatchback in the sport configuration.
Let's consider the process of replacing the engine timing belt on an Opel Astra 2008 (Z18XER). Read how to change the timing belt on an Astra N with a Z16XER engine here.
When is the timing belt replaced on the Opel Astra N Z16XER?
The machine is equipped with a rubber belt with reinforcement. According to the regulations, the belt on the specified Opel model must be changed every 150,000 kilometers, which significantly exceeds the average service life of a conventional belt. But you need to take into account that these terms are more relevant for European roads.
Under no circumstances should the situation lead to the Opel Astra Z16XER engine breaking the timing belt. A break will cause serious damage and in some cases require engine overhaul.
Operating the machine in difficult road conditions and harsh climates significantly reduces the service life of the spare part. Therefore, it is advisable to check the condition of the timing belt after passing 100,000 kilometers. If there are any defects, replace them immediately.
What signs will indicate that it is time to change the belt, read below.
Signs of timing belt damage:
- oil stains on the outer part of the belt;
- noticeable damage on the end part;
- defects on the gear or outer side (cracks, delamination, etc.).
Oil leaks are a serious defect - technical fluid negatively affects the rubber, damaging it. The appearance of oil stains can occur due to depressurization of shaft seals. Repairs should be made immediately.
Choosing a new belt
The auto giant Opel recommends installing original components that will last the stated period. But the car owner often finds himself in situations where there are no official Opel representatives nearby. In this case, you have to use high-quality analogues.
Name of companies based on price/quality ratio:
- Gates;
- Contitech;
- Bosch;
- Dayco.
These manufacturers are the main suppliers of automotive parts for many auto giants. This fact proves that they have a high reputation and quality products. After selecting a suitable belt for the Opel Astra, you can proceed to the replacement procedure.
The Opel Astra H timing belt is one of the most important elements of a car engine. We reveal the features of its operation, the reasons for the drive breakage, its consequences and the method of replacement.
The Astra H timing gear drive is a toothed ring made of rubber, the main part of the gas distribution mechanism. In addition to its main function, the belt drives the oil pump and, on some Astras, also the pump. It is important to replace the belt in a timely manner, because the consequences of a break are dire for Astra.
According to Opel regulations, the timing drive on the Opel Astra H must be replaced every 90,000 km, or 6 years of operation. However, it is recommended not to wait until the deadline, and certainly not to re-roll, but to replace it at intervals of 75,000 - 80,000 km, or 5 years.
Replacing the timing belt Opel Astra n z16xer
Replacing the timing belt Opel Astra H 1.6 Z16XER
Therefore, it is very important to periodically carry out diagnostic measures. In addition to wear and tear, the belt may become loose and sag slightly, which reduces the power of the machine.
And if you leave things to chance and do not monitor the condition of the belt, it may break. But this will be a real problem, as it will cause the pistons and valves to meet. This will certainly lead to bending of the valves and, accordingly, to wasting money on serious car repairs.
Pistons can also be damaged by this encounter, and cylinders are often scratched. To avoid this, you just need to change the timing belt in a timely manner. We insert the crankshaft pulley mounting bolt back, take out the flywheel fixing tool, and turn the crankshaft clockwise with a wrench until the two marks on the gears align (see below for camshaft and crankshaft GEARS).
The photo shows a homemade fixing element.
Replacing the Opel Astra G timing belt
It is needed to fix the camshaft gears. This is approximately how you need to install it. Remove the engine mount.
Remove the upper protective cover of the timing belt. Remove the middle part of the plastic protection.
Set the top dead center. We turn the crankshaft by the bolt, always clockwise, until the marks on the crankshaft pulley and the lower protection coincide. It's not very visible, but it won't be difficult to find them.
The marks on the top of the camshaft couplings should also match. Unscrew the crankshaft pulley bolt.
Signs of damage to the timing belt: Oil leaks are a serious defect - technical fluid negatively affects the rubber, causing damage. The appearance of oil stains can occur due to depressurization of shaft seals. Repairs should be made immediately.
Replacing the timing belt Opel Astra N Z16XER
Catalog numbers of suitable spare parts: Tools for work: Remove the front wheel and engine mudguard from the right side of the car. Remove the auxiliary drive belt - to do this, you need to turn the tensioner pulley counterclockwise using a wrench.
But the belt was GM. The letters and numbers are still visible on the belt, and the serial number is also pressed in. The old belt is in “I’ll walk another 30 without choking” condition, although there are slight signs of wear.
Probably not even signs of wear, but traces of use.
How to change the timing belt on an Opel Astra (Z18XER)
- Removing the belt will help. units.
- Remove the air filter from the system.
- Unfasten the wheel on the front passenger side and remove the engine splash guard from there.
- Place the piston of the 1st cylinder at TDC.
- Unscrew the 3 bolts and remove the front timing cover.
(No. 1 – cover, No. 2 – fastenings)
Provided that you do not plan to change the timing belt (for example, you are carrying out diagnostics), be sure to make marks with a marker that will show which direction it was moving - otherwise, during assembly, you can confuse the direction, which will negatively affect the service life of the part.
- Unfasten the belt tension roller. units by unscrewing the fastening.
- Remove the crankshaft pulley.
(No. 1 – lower timing cover, No. 2 – cover fasteners, No. 3 – pulley fasteners, No. 4 – pulley).
- Remove fasteners No. 2 of the bottom cover (No. 1), and then dismantle the part.
- Remove the phase sensor (No. 2) from the block head – 2 pcs. fasteners.
- Support the motor with a support.
- Remove the right support (in figure No. 1) of the suspension - it is held in place by 3 fasteners on the power unit side and 3 on the body side.
- Do not completely unscrew the tension roller fastener (indicated as No. 2), then turn the roller counterclockwise with a wrench so that the tension device pointer (No. 2) is in the extreme left position. After this, the timing belt tension will weaken, and the bolt will need to be tightened again.
(B – location of the indicator when tensioning the new belt; A – location when tensioning the old belt; No. 1 – mark that allows you to control the tension of the old belt; No. 2 – indicator of the adjusting unit; No. 3 – mark that allows you to control the tension of the new belt)
- Remove the belt from the crankshaft timing pulley and then remove the spare part.
Recommendation!
Together with the belt, change the rollers (tensioner and intermediate) and the pump every time - to replace these parts you will have to carry out all the previously described actions, and their service life, however, is not much longer than the service life of the belt. In addition, in cases where parts are not replaced, there is a high risk of damage to the entire system; the consequences for the internal combustion engine can be extremely serious.
Installing timing belt Opel Astra:
- Install the rollers and pump.
- The marks on the crankshaft and camshafts must match.
- Fix the belt on the crankshaft toothed pulley: the drive branch is wound behind the intermediate roller, after which it is tensioned and put on the camshaft pulleys. Next, fix the driven part on the toothed pulley of the pump, and then insert this part behind the tension roller.
- Unscrew, but not completely, the tension roller bolt (No. 2) and use a 3mm wrench to turn it clockwise until the pointer (No. 2) is opposite mark No. 1 (“USED” - used belt), or No. 3 (“NEW” - new belt). Re-tighten the bolt all the way.
- Screw the pulley bolt into the crankshaft shank and turn the shaft 2 turns so that the belt takes the optimal position relative to the pulleys.
- The alignment marks on the shafts must match. If this does not happen, you must repeat the procedure.
DETAILS: Replacing piston rings on a Zetec-E engine
Opel Astra - how to set timing marks?
If you are going to change the timing belt on an Opel Astra yourself, use the diagram below to set marks on the shafts.
Once you have ensured that the belt is installed correctly - the Opel Astra timing marks match - you can install all other elements in the reverse order.
Causes of timing belt breakage in Opel Astra H
If the Opel Astra N timing belt was replaced on time, it may break for the following reasons:
Be sure to check out:
- Quality of spare parts. You should not purchase cheap products of dubious manufacture. By saving on a belt, the car owner runs the risk of it breaking, which means costly repairs. The best option is original production parts.
- Quality of timing belt installation. It is important that it is installed not only in a timely manner, but also correctly. It is very important to observe all Opel Astra timing marks and install the rollers correctly.
- Operating conditions of the Astra, and driving style.
- Condition of the rollers. They may be poorly secured during the previous replacement, or have a manufacturing defect, and when play appears, the timing belt jumps on the rollers and eventually breaks.
- On XER series engines, typical for the Opel Astra H, the pump is installed on the drive belt and is changed every 150 thousand kilometers. On other models, it has the same maintenance schedule as a belt, but car owners often neglect to replace this part. And when the pump jams, a break also occurs.
- Oil getting into the drive. Oil may squirt through the valve cover gasket or camshaft seals. This can be prevented by regularly inspecting the valve cover of the Astra engine for oil leaks. If they are found, the gasket and seals will need to be replaced.
Timing kit for Opel Astra H L48 Hatchback 1.6 116 hp. id22682
Manufacturer:FLENNORGermany
Article:F904592V
Manufacturer: DAYCOGermany
Article:KTB562
Manufacturer: GATES Belgium
Article:K015603XS
- Manufacturer: FEBI BILSTEINGGermany
- Article:27825
- Width (mm):24
- Number of teeth:146
- Surface: coated
- Weight [kg]:1.030
- Quantity required:1
- Manufacturer:SNRFrance
- Article:KD453.26
- Number of teeth 1:146
- Number of straps:1
- Weight [g]:1140
- Manufacturer:HEPUGermany
- Article: PK03630
- Number of straps:1
- Included videos:2
- Width (mm):24
- Number of teeth:146
- Manufacturer: GRAF Italy
- Article:KP959-1
- Number of straps:1
- Width (mm):24
- Number of teeth:146
- Manufacturer: BOSCH Germany
- Article number:1 987 948 215
- Number of teeth:146
- Length [mm]:1168
- Width (mm):24
- Included videos:2
Manufacturer:LYNXautoJapan
Article:PK-1238
- Manufacturer: METELLI Italy
- Article: 30-0959-1
- Number of straps:1
- Width (mm):24
- Number of teeth:146
- Manufacturer: SKFSweden
- Article: VKMA 05260
- Number of teeth:146
- Width (mm):24
- Belt: rounded toothed profile
- Manufacturer: FAI AutoParts UK
- Article: TBK467
- For article no.:85146/t1162/t1161
Step-by-step instruction
First, disconnect the air filter with pipes from the throttle valve.
We remove the front right wheel, the side plastic protection and jack up the engine through a plank. We remove the generator belt, using a nineteen key, using a special protrusion, turn the tension roller, thereby loosening the belt. In the photo it has already been removed.
Remove the engine mount.
We dismantle the support.
Remove the upper protective cover of the timing belt.
Remove the middle part of the plastic protection.
Set the top dead center
We turn the crankshaft by the bolt, always clockwise, until the marks on the crankshaft pulley and the lower protection coincide.
It's not very visible, but it won't be difficult to find them.
The marks on the top of the camshaft couplings should also match.
Unscrew the crankshaft pulley bolt. If the transmission is manual, then this procedure will not pose any special problems. We place stops under the wheels, turn on the fifth wheel, insert a specially trained screwdriver into the brake disc under the caliper and, with a slight movement of the hand, unscrew the bolt. But if the robot is like in our case, then a wrench helps us, but if there is no current one, we make a crankshaft pulley clamp. In the corner we drill two holes by eight and insert two bolts there, tightening them with nuts; we eventually insert these bolts into the holes in the pulley. You will get the dimensions yourself by measuring the distance between the holes. In the photo, the lock is shown schematically with a red rectangle; any holes can be used.
Remove the pulley and lower timing belt protection. On the left we see a tension roller, on the right a bypass roller.
We check the camshaft marks and, if they are gone, we bring them down. The marks on the crankshaft sprockets, in turn, should also match.
We install our Russian clamp on the camshafts and mark the old belt, just in case.
You can purchase special clamps; you can find them on Ali or on Vseinstruments.ru.
It will turn out like this.
Using a hexagon, we turn the timing belt tension roller counterclockwise, thereby loosening the belt and removing the belt and rollers.
What are the consequences of late service?
A timing belt is a ring with teeth on the inside and a metal base on the inside. The belt engages with the gears of the shafts with its teeth. A double load is placed on the belt, since it also acts as a drive for the pump and oil pump. This causes the belt to wear out quite quickly, and then it needs to be replaced. Therefore, it is very important to periodically carry out diagnostic measures. In addition to wear and tear, the belt may become loose and sag slightly, which reduces the power of the machine.
And if you leave things to chance and do not monitor the condition of the belt, it may break. But this will be a real problem, as it will cause the pistons and valves to meet. This will certainly lead to bending of the valves and, accordingly, to wasting money on serious car repairs. Pistons can also be damaged by this encounter, and cylinders are often scratched. To avoid this, you just need to change the timing belt in a timely manner.
Consequences of untimely replacement
If the belt is not changed on time, the risk of it breaking increases over time.
A break can lead to the following disastrous consequences:
- Bent engine valves;
- Destroyed piston group;
- Crack in the cylinder head;
- Lack of maintainability of the power unit.
If the belt breaks, a major overhaul of the power unit will be required, which is quite expensive. In rare cases, it may be necessary to replace the entire engine. To prevent this, during each scheduled inspection it is necessary to monitor the condition of the timing belt and change it in time.
Article number and cost of good analogues of the original Z16XER timing belt from third-party manufacturers
The original timing belt for the Z16XER power plant has a very high cost. For this reason, car owners have to buy consumables from third-party manufacturers. The best timing belt alternatives for the Z16XER powertrain are presented in the table below.
Table - Good analogues of the Z16XER timing belt
BrandArticle numberCost, ruble
| Contitech | CT1077 | 1000-1500 |
| Dongil | 146STS24 | 700-1100 |
| Gates | 5603XS | 1100-1600 |
| Bosch | 1987949590 | 800-1200 |
| Flennor | 4592V | 1200-1900 |
Original timing drive maintenance kits are not always easy to find in retail stores. The price of branded sets is very high. Therefore, car owners purchase similar kits from third-party brands.
The table below provides a list of kits from alternative manufacturers. These kits not only have decent quality, but also have a very attractive price.
Table - Good alternatives to the original Z16XER timing belt replacement kit
Brand Catalog number Approximate prices, ruble
| Hepu | PK03630 | 6000-6500 |
| Bosch | 1987948800 | 4900-5500 |
| SKF | VKMC35260 | 4900-5700 |
| Contitech | CT1077WP2 | 5900-6700 |
| INA | 530045030 | 5000-5900 |
Opel Astra H 16XER – do-it-yourself timing belt replacement
Some of the actions are performed on a raised car (a pit or a lift will do).
Catalog numbers of suitable spare parts:
- 1987949590 – timing belt Opel Z16XEP from BOSCH (STDM1168S8M24);
- EPG1592H – GOODYEAR timing belt;
- 40928881 – SWAG poly V-belt;
- 278 19 – return timing pulley Febi;
- 277 92 – Febi tensioner pulley.
Tools for work:
- set of keys and TORX heads;
- 12-point spanner 19 mm;
- hex key 6 mm;
- socket head 11.
Procedure for replacing the timing belt Opel Astra H 1 6 Z16XER:
- Remove the front wheel and engine mudguard from the right side of the car.
- Remove the auxiliary drive belt - to do this, you need to turn the tensioner pulley counterclockwise using a wrench.
- Remove the air filter - to do this, you need to loosen the clamp securing the air duct sleeve to the filter, remove the sleeve from the pipe, and disconnect the bolts holding the filter element.
- Move the piston of the 1st cylinder to top dead center - the shaft marks are in a horizontal plane opposite each other (see figure below).
- Unscrew the 2 bolts of the front drive cover, and then remove the cover itself.
Attention! In the case where the belt is not intended to be changed, before removing it, it is necessary to draw arrows with a marker indicating which direction it rotated. This is done due to the fact that the teeth of the inner surface of the belt “break in” to the pulleys of the operating shafts. If you put the belt in the opposite direction, it will exhaust its service life much faster.
- Remove the crankshaft pulley by unscrewing its bolt.
You need to know this! The crankshaft pulley bolt is tightened with a large torque. To prevent the crankshaft from turning while removing the fastening, it is necessary for a second person, while in the cabin, to engage 5th gear and press the brake.
- Remove the accessory belt tensioner roller.
- Remove the lower timing cover.
- Unscrew, but not completely, the fastening of the intermediate roller.
- To remove the tension of the timing belt with key “A”, you need to completely rotate the roller in a clockwise direction (you will feel resistance from the spring) and, without removing the key, remove the bolt and dismantle the intermediate roller.
- Remove the timing belt from the crankshaft pulley and remove it from the system.
- Remove the tension roller by unscrewing the fastener that holds it and replace the part.
You need to know this! During the work, you need to change the tensioning and intermediate timing rollers - the service life of these parts is not much longer than the period of use of the belt, and in order to change them after, you will have to repeat all the steps to disassemble the car again, which will take a lot of effort and time.
Instructions in the photo
Unscrew the timing cover bolts
Remove the cover If the belt is not being removed for replacement, make a mark indicating the direction of rotation. Unscrew the crankshaft pulley mounting bolt.
Remove the pulley
Unscrew the bolt securing the tension roller. Remove the roller.
Unscrew the bolts securing the rear drive cover
Remove the cover Loosen the bolt securing the intermediate roller Using wrench A, loosen the tension on the drive belt
Holding the tension roller, unscrew the bolt securing the intermediate roller and remove it. Remove the belt from the toothed pulley.
Remove the belt from the remaining timing elements
This element must also be replaced when installing a new timing belt This element must also be replaced when installing a new timing belt
To remove the tension roller, you need to unscrew the mounting bolt.
Thus, the replacement procedure requires certain dexterity or skill. Armed with instructions, an assistant and a tool, as well as having looked at the topic, you can handle this stage of servicing the Opel Astra H with your own hands.
Consequences of a broken timing belt Opel Astra H
If the belt on an Opel Astra N breaks, oil leaks from under the valve cover, and if a pump is installed on it, then antifreeze may leak. On the Astra's dashboard, the oil pressure icons, the check mark, the machine with a wrench and the oil level sensor will light up.
If you suspect a break, you should not try to start the car with a manual transmission, pushing it, or holding it on a cable. When you try to start the car with the key, the starter will spin and make a characteristic buzz, but nothing else will happen. The Astra can be towed to service in neutral gear, regardless of the gearbox.
When the Astra's timing belt breaks, the intake and exhaust valves hit the pistons and bend. Also, depending on the valve timing of the vehicle speed, the pistons and cylinder walls may be damaged.
Simple replacement of the timing belt on the Opel Astra H 1.6 Z16XER
Finally, an old friend of mine exchanged his rusty bucket for a normal car and immediately came to our sales post. So, we have an Opel Astra H 1.6 Z16XER replacing the timing belt, rollers, oil and filters.
Since this is an Opel, in addition to regular keys, we will also need Torx sockets, but they have long been in every tool kit. We will also make a clamp for variable valve timing clutches from an eight bolt and two washers. If this method seems unreliable to someone, you can buy clamps in any online store for only 950 rubles. Let’s make a reservation right away that if the car is equipped with a manual transmission, then there will be no difficulties, but if it’s a robot, then you will have to either make a crankshaft clamp or use a pneumatic impact wrench. We do not change the pump since it is driven by the alternator belt. It took an hour and a half and one mug of tea to replace the timing belt.
Actually, the patient himself.
Under the hood is a 1.6-liter engine called Z16XER.
First, disconnect the air filter with pipes from the throttle valve.
We remove the front right wheel, the side plastic protection and jack up the engine through a plank. We remove the generator belt, using a nineteen key, using a special protrusion, turn the tension roller, thereby loosening the belt. In the photo it has already been removed.
Remove the engine mount.
Remove the upper protective cover of the timing belt.
Remove the middle part of the plastic protection.
Set the top dead center. We turn the crankshaft by the bolt, always clockwise, until the marks on the crankshaft pulley and the lower protection coincide. It's not very visible, but it won't be difficult to find them.
The marks on the top of the camshaft couplings should also match.
Unscrew the crankshaft pulley bolt. If the transmission is manual, then this procedure will not pose any special problems. We place stops under the wheels, turn on the fifth wheel, insert a specially trained screwdriver into the brake disc under the caliper and, with a slight movement of the hand, unscrew the bolt. But if the robot is like in our case, then a wrench helps us, but if there is no current one, we make a crankshaft pulley clamp. In the corner we drill two holes by eight and insert two bolts there, tightening them with nuts; we eventually insert these bolts into the holes in the pulley. You will get the dimensions yourself by measuring the distance between the holes. In the photo, the lock is shown schematically with a red rectangle; any holes can be used.
Remove the pulley and lower timing belt protection. On the left we see a tension roller, on the right a bypass roller.
We check the camshaft marks and, if they are gone, we bring them down. The marks on the crankshaft sprockets, in turn, should also match.
We install our Russian clamp on the camshafts and mark the old belt, just in case.
You can purchase special clamps; you can find them on Ali or on Vseinstruments.ru.
It will turn out like this.
Using a hexagon, we turn the timing belt tension roller counterclockwise, thereby loosening the belt and removing the belt and rollers.
Let's start the installation.
We put the new rollers in place, and the tension roller has a protrusion on the body that should fit into the groove during installation.
We check all the marks again and install a new timing belt, first on the crankshaft sprocket, idler pulley, camshafts and pulling the tension roller onto it. Do not forget about the direction of rotation indicated on the belt. We remove our clamp.
We check the marks and, having replaced the lower protective cover and the crankshaft pulley, turn the engine two turns and check all the marks again. If everything matches, install all the remaining parts in the reverse order of removal. In principle, there is nothing complicated here, the main thing is to be attentive.
Video of replacing the timing belt Opel Astra H Z16XER
That's all for today, see you again.
In what cases is replacement necessary?
The gas distribution mechanism is one of the most important components of a car. Thanks to it, the fuel-air mixture and air are supplied to the cylinders and exhaust gases are removed. This operation is carried out by timely opening and closing of valves. The camshaft ensures the functioning of the timing belt. There are cams on the shaft, thanks to which the valve timing is determined, that is, the valves open and close. Each engine has its own cylinder firing order.
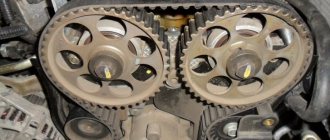
The camshaft works thanks to a drive that connects it to the crankshaft. The crankshaft makes two revolutions, but the camshaft makes only one full revolution during this time. Thus, during one cycle the valve opens only once. The Opel Astra uses a belt as a drive. It ensures synchronous operation of the shafts, so the quality of the gas distribution mechanism depends on its condition.
The Opel Astra timing belt is a closed rubber ring, on the inside of which there are teeth necessary for better adhesion to the shaft gears. In addition to synchronizing the shafts, the belt serves as a drive for the oil pump and pump, and therefore experiences double load. This leads to increased wear of the product and reduced service life. Therefore, it is important to monitor his condition. Over time, the belt drive can weaken, causing the vehicle to lose power.
If replacement is not carried out in time, this may lead to belt breakage. When the belt drive breaks, the valves meet the pistons, as a result, the valves bend, the pistons are damaged, and the surface of the cylinders is often scratched. All this leads to expensive repairs or replacement of the engine.
Replacing the strap according to the Opel Astra operating manual is carried out after 150 thousand kilometers, but there are factors that affect the service life of the belt:
- quality of the installed product;
- driving style;
- vehicle operating conditions, under constant loads the belt wears out faster;
- quality of strap installation: if it is installed incorrectly, wear will increase due to friction.
Therefore, it is periodically necessary to perform a visual inspection of the condition of the belt drive and replace it if the following defects are found:
- traces of wear on the outer surface: cracks, folds, bulges;
- wear, tear of teeth;
- oil traces on the surface;
- frayed sides;
- separation of the material from the base.
Crack on the surface of the product
If traces of oil are found on the surface, the cause of their appearance must be eliminated. Oil stains shorten the life of rubber products. Typically, the cause of oil stains is wear of the shaft seals. They must be changed before replacing the belt.
Along with the strap, it is necessary to change the tensioner and rollers, as well as the water pump if play or surface defects are detected.
Do-it-yourself Opel Astra H timing belt replacement
This is a labor-intensive process, but you can replace the Astra timing drive with your own hands.
- Before replacement work, you need to remove the negative terminal from the battery.
- Next, the wheel on the passenger side and the fender liner are dismantled.
- Then the crankcase protection is removed and the engine is jacked up. It is worth placing boards or other wooden spacers so as not to damage the Astra's power unit.
- The engine support is removed from the belt side.
- Next, the tension roller is loosened by pressing the tensioner against the clock, and then dismantled. For convenience, it is worth removing the generator with tensioner.
- Then the timing case is removed.
- The flywheel is secured against rotation, and the mounting bolt is removed from it. If you can’t do this, you can engage 5th gear and apply the brake.
- After this, the crankshaft pulley and the cover under it are dismantled. Turn the crankshaft as the clock progresses until the Opel Astra timing marks on the camshafts look at each other. The lock locks the camshaft gears.
- The bolt holding the tensioner is loosened, and only then the belt itself is removed.
- The tensioners, rollers, if any, the pump are dismantled and replaced with new ones.
- Before installing a new belt, all Opel Astra timing marks must be in place.
- You need to start tightening the new one from the crankshaft gear. Then pull it behind the pump (if there is one) and behind the tension roller. Then put it on the right camshaft, then on the left.
- Having loosened the tensioner, it is rotated so that its marks and the marks of the bracket coincide.
- Then the tension roller fasteners are tightened. After this, you need to turn the crankshaft 2-3 turns and check the timing marks of the Opel Astra. If everything matches, then you can unlock the camshafts.
- Installation of the remaining parts is carried out in the reverse order.
Replacement instructions
It is more convenient to replace the belt drive on a special device: an overpass, a lift or an inspection ditch. You can also use a jack. The procedure should be performed on a cold engine.
A set of necessary tools
To carry out the replacement procedure, you should prepare the following tools:
- set of socket wrenches;
- set of heads;
- hexagon;
- torque wrench;
- wrench or extension;
- jack;
- clamp for shafts;
- screwdrivers: Phillips and flathead;
In addition, you need to purchase all the necessary consumables. It is better to purchase originals, this will reduce the likelihood of buying a fake. If the pump is changed, then you need to purchase coolant, since the old one will need to be drained.
Replacement consumables
Don't skimp on consumables. Poor quality parts wear out faster and can lead to unpleasant surprises on the road.
Stages
Replacing the timing belt on an Opel Astra consists of the following steps:
- Before carrying out work, you need to turn off the power to the car. To do this, remove the negative terminal from the battery.
- To provide access to the drive, it is necessary to remove the air filter housing. Before doing this, you need to remove the air filter sensor and disconnect the air duct.
- Next, you need to dismantle the right front wheel and put it on a support.
Car without front wheel - After removing the wheel, the right engine mudguard is removed. To do this, the mounting bolts are unscrewed.
- Next, you should remove the protection of the power unit and use a jack to lift the engine, placing wooden shims so as not to damage the crankcase.
- Then we dismantle the bracket and the right motor mount.
Removing the right support - Use a marker or chalk to mark the direction of rotation of the attachment drive belt. Then, using a spanner wrench, press the tensioner counterclockwise to loosen the belt.
- We dismantle the belt drive of the auxiliary units. For convenience, you should also remove the tensioner with the generator.
- Next, unscrew the mounting bolts and disconnect the crankshaft sensor, if provided by the design.
- Then we dismantle the upper protective cover of the gas distribution mechanism.
- Using a special device, you need to secure the flywheel from turning and unscrew the fastening bolt. If the bolt does not break off immediately, you can put the car in fifth gear and press the brake pedal. If there is no assistant, you can insert a board or pipe between the pedal and the driver's seat.
- After unscrewing the mounting bolt, you need to remove the crankshaft pulley and the protective cover under it. We temporarily screw the bolt into its original place.
- Next, turning the crankshaft clockwise, you need to set the engine to TDC. To do this, it is necessary to correctly set the installation marks on the camshafts. They must look at each other. In addition, the marks on the crankshaft must match.
Tags required - Then, using the lock, you need to lock the camshaft gears.
- The next step is to loosen the tensioner bolt. To do this, you need to insert a hexagon into a special hole and, turning it, move the tension roller.
- Now you can remove the timing belt.
- Next, dismantle the tensioner and rollers. We replace the old parts with new ones and install them in their original place.
Removed tension roller - Before installing a new strap, check all alignment marks again.
- Tensioning the belt drive should begin at the crankshaft sprocket. Then, moving counterclockwise, insert the pump pulley and the tensioner pulley. Then you need to put the branch first on the exhaust camshaft, and then on the intake camshaft, located on the left.
We tighten the belt on the exhaust camshaft.
If the gear jumps one tooth during tensioning, it must be returned back using a key. - After installation, the tension between adjacent gears should be checked. When pressed, the belt should not bend much.
- Having loosened the tension roller, you need to turn it so that the pointer on the tensioner and the mark on its bracket coincide.
- Then you need to tighten the tension roller bolt. Thanks to the spring, the tensioner will take the position necessary for normal belt tension. Replacing the belt drive
- After replacing the belt drive, you need to turn the crankshaft two full turns and check all the alignment marks again. If they do not match, you should reinstall the strap.
- The camshafts can now be unlocked.
- Next, you need to install all the removed parts in reverse order.
- When installing the accessory drive belt, you need to check its tension.
- After final assembly, you need to start the engine and check its operation. If you hear any extraneous noise, you need to eliminate it.
You can replace the timing belt on an Opel Astra at a specialized car service, but a novice car enthusiast can easily perform the procedure on his own. The main thing is to have an understanding of the structure of the Opel Astra engine and experience in performing repair work. This will save the car owner’s time and money.
Required tools for DIY replacement
In order to replace the timing belt on the Z16XER power unit, it is important to first prepare a set of tools, the list of which is given in the table below.
Table - Tools for replacing the timing belt
NameDescription
| TORX head | "E14", "E18", "T50" |
| Spanners | Set |
| open-end wrench | Kit |
| Twelve-sided socket wrench | "at 19" |
| Socket head | "at 11" |
| Hex key | "at 6" |
| Rags and wire brush | To clean dirt |
When is it necessary to change?
Replacing the timing belt on an Opel Astra is carried out approximately once every 50-70 thousand kilometers. But in addition to the recommended mileage, at which the timing belt needs to be changed, there are other factors for the need for replacement.
Signs that replacement is needed:
Related Posts
- Jamming traffic police cameras is an easy way to save on fines
- Poor external technical condition of the belt. The presence of cuts, cracks, abrasions, oils on the surface of the consumable;
- Sagging element between pulleys. Over time, the consumable item becomes obsolete and stretches;
- The appearance of extraneous knocks that are produced in the area of the internal combustion engine;
- Inability to start the power unit;
- Loss of power;
- Black smoke appears from the exhaust pipe.
If one or more of the above symptoms appear, the belt will need to be replaced urgently. But to do this, you first need to choose a high-quality belt from a well-known manufacturer.
What is needed to replace the timing belt on Astra Z16XER (Z18XER)
Changing the timing belt on an Astra 1.6 is not the easiest task, but an incentive will be the fact that for work at a service station, craftsmen charge at least $100-120 in a poor way. There are no particularly difficult operations, and no special tools are needed. To replace it, it is enough to have:
- standard set of sockets and keys, Torx E and Torx T heads, without them there is nothing to do in Opel;
- penetrating lubricant WD-40, if difficulties arise with the threads;
- torque wrench for proper tightening of bolts;
poly V-belt driving the generator and additional equipment;
- timing belt;
- belt deflector roller;
- tension roller;
- crankshaft pulley bolt GM 24447224;
- if necessary, a pump.
Repair kit INA
The most popular timing belts are for Opel Astra J 1.6 GoodYear EP G1592H, Contitech CT1077WP1, Gates 5603XS (aka original GM). Among the rollers, the INA 530045010, Gates, Febi 27819 and Febi 27792 kits, SWAG 40 92 8881 or Dayco 6PK1555 serpentine belt have a good reputation. If everything is ready, let's get to work.
Necessary equipment and tools
This work must be carried out in a garage on an inspection pit or a lift. For different operations you will need a tool:
- crankshaft retainer for robotic gearboxes (can be made independently);
- hydraulic or compressed air jack (lifting weight of at least 600 kg);
- pneumatic impact wrench (if it is not possible to make a clamp);
- set of socket heads and TORX;
- car locksmith keys of different sizes;
- screwdrivers, magnet, pliers;
- set of hexagons;
- support for wheels on both sides;
- gasket sealant.
When performing any actions, you must be careful and follow the instructions. Violations during work can lead to breakdowns in the gas distribution mechanism.
How to determine if the timing belt is faulty?
The main, indirect symptoms of timing belt wear in Opel cars:
- Worsening cold start;
- Change in the composition of exhaust gases (there is a black tint);
- Excessive vibration of the power unit during operation;
- The appearance of extraneous sounds, rustling and noise in the engine, especially at low oil pressure (at idle)
In addition to indirect signs of malfunction, there are direct signs of timing belt wear. In order to determine the direct symptoms of a timing belt failure, a certain amount of work will be required. Moreover, if indirect signs of malfunctions are detected, this procedure is a mandatory stage of verification.
Sources
- https://drive2me.ru/2020/10/31/%D0%B7%D0%B0%D0%BC%D0%B5%D0%BD%D0%B0-%D1%80%D0%B5%D0% BC%D0%BD%D1%8F-%D0%B3%D1%80%D0%BC-%D0%BD%D0%B0-%D0%BE%D0%BF%D0%B5%D0%BB%D1 %8C-%D0%B0%D1%81%D1%82%D1%80%D0%B0-%D0%BD-%D1%81%D0%B2%D0%BE%D0%B8%D0%BC/
- https://PrideSaratov.ru/dvigateli/zamena-remnya-grm-opel-astra-n.html
- https://remontiruemrenault.ru/vopros-otvet/zamena-remnya-grm-opel-astra-n-z16xer.html
- https://AutoLions.ru/sovety/z16xer-zamena-remnya-grm.html
- https://mazda-moscow.ru/opel-astra/zamena-remnya-grm-opel-astra-n-z16xer.html
- https://autogrm.ru/opel/grm-astra-h-z16xer.html
- https://FokSevmash.ru/elektronika/metki-grm-opel-astra.html
- https://zapchasti.expert/grm/remen-grm-z16xer.html
- https://moftop.ru/zamena-remnya-grm-opel-astra-n-z16xer
- https://auto-park24.ru/opel-astra/zamena-remnya-grm-opel-astra-n-z16xer.html
- https://adaptsport.ru/opel-astra/zamena-remnya-grm-opel-astra-n-z16xer.html
- https://i-love-mycar.com/remen-grm-opel-astra/
- https://garage-mo.ru/sovety/zamena-remnya-grm-opel-z16xer.html
[collapse]