Repair / From Autoclub
- Troubleshooting
- Replacing the water pump
Choosing a new pump
- Video: choosing a water pump
- Preparation of tools and workplace
- Dismantling the pump
- Pump installation
- Video: installing a water pump
- Water pump repair
Classic VAZ car models are distinguished by their simplicity of design, which allows car owners to carry out most repair work themselves. Diagnosing and replacing a mechanical coolant pump is also quite simple and can be done by yourself.
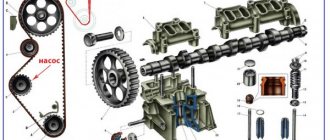
Purpose and location of the water pump
The water pump (pump) is designed to circulate antifreeze in the engine cooling system in forced mode. In this way, the hottest parts of the engine are cooled - the cylinders, pistons and combustion chambers. Hot antifreeze enters the radiator, where it is cooled by the oncoming air flow.
Without a water pump, coolant cannot circulate in the channels and lines. Therefore, when operating a car with a damaged pump, the engine quickly overheats and fails, and therefore requires expensive repairs.
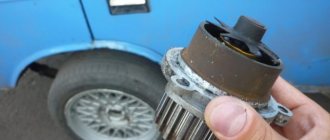
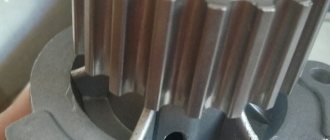
The design of the water pump is quite simple. The shaft, built into a housing with an integral flange, houses the impeller on one side and the drive pulley hub on the other. The rotation of the shaft is ensured by a pair of bearings, and the housing is sealed by an internal oil seal.
Some manufacturers additionally equip the pump with a grease nipple - a nozzle for pumping lubricant into the bearing.
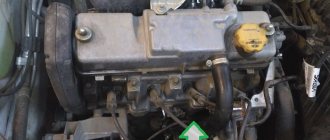
In classic VAZ models, the water pump is installed on the front of the engine and is screwed not directly to the cylinder block, but to a separate housing.
The pump shaft and impeller are driven by a crescent-shaped belt running from the crankshaft pulley to the generator. The design and operating principle of this unit are the same for carburetor engines of classic VAZ models and for engines with fuel injection.
Danger of water in oil
Car owners are really afraid of this disease, very afraid. And they do it right, because over time the consequences can be very sad. Let’s say right away that the oil is changed on time and you won’t have any problems, but here’s what can happen if you don’t do this.
Consequences:
- Over time, everything turns into an emulsion with poor density and, accordingly, fluidity. Lubrication decreases and over time this can easily lead to the repair of many components of the power unit. The parts that will suffer the most are the parts that are lubricated by pressure, such as the piston pins, crankshaft and camshaft.
- Piston rings may fall off, as the emulsion gradually remains in the cavities.
- All this affects the piston group and thus fuel consumption can increase significantly, and this is an extra expense, in general, no one needs it.
Troubleshooting
The following breakdowns are typical for water pumps on classic VAZ models:
- bearing wear and resulting shaft play;
- Mercury leakage through the seal;
- The shaft is skewed and jammed.
Almost all pump failures are due to bearing wear. The pump operates normally with minor wear and shaft play. As the clearance in the bearing baskets increases, the seal begins to leak antifreeze, and unnatural noises - noises or cracklings - can be heard from the pump installation site when the engine is running. As a result, the shaft tilts. There are three possible scenarios for further development.
- The bearing seizes and the belt slips off the pulleys. The engine continues to run, but the red low battery indicator on the instrument panel illuminates and the coolant temperature quickly rises to maximum.
- When a bearing seizes, the shaft splits into two parts. As in the first case, the battery discharge lamp lights up when the engine is running and the coolant temperature is at maximum.
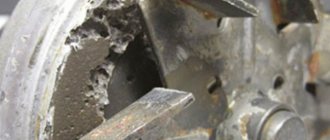
- Due to the misalignment of the shaft, the rotating impeller punches a hole in the wall of the pump housing, through which all the coolant escapes in seconds, and the engine immediately overheats. In this case, it will be necessary to replace not only the pump, but also the housing in which the impeller has broken through the wall.
Unlike front-wheel drive VAZ models, where the pump is hidden under the timing cover, in the “classic” it is visible. This allows you to avoid unpleasant consequences. It is only necessary to periodically check the pump as follows.
- We start the engine, open the hood and listen. If you hear suspicious noises from the front of the engine, press the accelerator pedal manually and increase the speed until a hum is clearly audible.
- Carefully inspect the front of the engine for coolant leaks.
- If you find an antifreeze leak, grab the pump pulley with your hand and move it along the shaft axis to detect any play.
- If you feel a slight play or doubt the tension of the belt, unscrew the generator mounting nut on the adjusting bracket and loosen the belt. Then pump the pump pulley again.
Due to their age, the plant no longer produces original spare parts for these cars. Commercially available spare parts rarely last more than 50,000 km. Remember this number when servicing your vehicle in order to detect a malfunction in time.
If you find slight play, do not start replacing the water pump right away. He will still “live” on 3-5 thousand. km mileage However, you will have to constantly monitor its condition and order a new pump in advance.
If there are leaks to the ground, there is noticeable play in the shaft, and you hear rattling sounds during operation, the pump should be replaced immediately with a new one.
History of origin
Motor 21179 was already in the minds of the engineer much earlier than you can imagine. Even at the end of the USSR, developers began to think about the Lada C project and its power units. Even then, engineers “knew” this motor by its features and power characteristics. But the difficult economic situation of that time and the collapse of the USSR forced the engineers to completely forget the Lada-Ts project.
And now, after a long time, when Boo Anderson comes to the post of general manager of AvtoVAZ, the project is raised and developed again.
The main task was to create an engine with good low-end torque, which AvtoVAZ lacked for a confident, comfortable ride. “Tractor” 8-cl engines have long since become obsolete, but the new 16-cl engines had a more “sporty” character. The situation was corrected by the then 21127 engine, now 21129, which is installed on Vesta, Xray, and other AvtoVAZ models. Due to the intake receiver with variable geometry installed on it, the torque from the bottom began much earlier, unlike the Prioromotor (21126), and its shelf was much further, right up to the cutoff. But with the start of production of a sedan with a larger mass - the Vesta, and the Xray hatchback - the need for low-end engines reappeared.
The engine was run in and tested for a long time. As a result, during the testing process it turned out that the rings were already stuck at 4t.km., as a result, the heat zone was increased and the problem disappeared.
Nissan HR16DE engine with 110 hp power. It copes well with its task on front-wheel drive. But if you have all-wheel drive, it will strain, get hot, eat a lot and not drive.
Another factor in the creation of the 21179 motor is economics and politics. Because the Nissan engine, although it is assembled here, still belongs to Nissan. And in the event of an unfavorable economic situation, an increase in exchange rates, the cost of its production and sale may simply be unprofitable.
Replacing the water pump
The work of assembling a new pump on a classic VAZ model consists of several stages.
- Selection and purchase of a new part.
- Preparation of tools and workplace.
- Dismantling the old pump and determining whether it can be repaired.
- Installing a new pump and checking its operation.
Buying a new pump only makes sense if you are sure that the old pump is faulty or is reaching the end of its service life. If there is a car shop nearby, you can buy a pump during disassembly.
Functionality check
There are three ways to check the DS:
- The check is performed without removing the device. The voltmeter probes should be connected to the contacts of the device and begin to rotate one of the wheels. Changes in the values on the tester mean that the device is working properly.
- For the second method, you need to remove the device. One contact of the voltmeter must be grounded, and the second must be connected to the terminal that sends signals. Next, you need to rotate the DS so as to determine whether there are signals in the operating cycle. As the speed increases, the readings on the tester should increase.
- With the 3rd method, you need to prepare a control light. With the engine running, we determine “minus” and “plus” using the control. After we have found the appropriate outputs, we connect the signal wire to the control and rotate the wheel. If the “minus” lights up, then the device is working (the author of the video is Semyon Semenych).
Choosing a new pump
Pumps with the symbol 2101, installed on classic VAZ models of the first series, are currently not produced. Fits pumps (part numbers 2107-1307011-75 and 2123-1307011-75) with larger impeller and reinforced construction. First of all, they were produced for Niva. These pumps are a little more expensive than regular ones. So there should be no problems with the correct selection of a new pump.
On VAZ 2101-07 power units equipped with an injector or carburetor, pumps of the same design and size are used.
The most popular pumps among car owners are the following manufacturers:
- luzar;
- Hepu;
- TZA;
- "Phoenox".
Commercially available pumps have impellers made of plastic, cast iron and steel. Pumps with plastic impellers equipped with elongated and extruded blades have proven themselves to be flawless. Cast iron parts are less efficient at pumping liquids, while steel parts are susceptible to corrosion and are more likely to be counterfeits.
Water pumps are sold as a set of housings or individually. Your choice depends on the integrity of the housing - if it is damaged or corroded from the inside by an old rotor, purchase the entire product. When the body is intact, you only need to buy the transmission part.
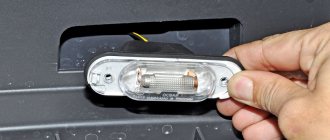
What to do if the VAZ 2107 pump is leaking and bleeding the system
If the VAZ 2107 pump is leaking, it is not recommended to drive such a car for a long time. Of course, it still depends on how severe the leak is - if the liquid drips slightly, then you can postpone the repair. But if antifreeze disappears at a rate of several hundred grams per day, you cannot hesitate. It is necessary to carry out repairs as soon as possible, now you will find out how to do it correctly.
Preparation of tools and workplace
To replace the water pump on a classic VAZ model, you will need a flat, illuminated area or a warm garage (in the cold season). Since all work is carried out from under the hood, a surveillance channel is not needed.
You will need the following tools:
- set of socket wrenches and heads;
- flat screwdriver; crowbar;
- Gloves made of material and rags.
- In addition, high temperature sealant and 1 liter of coolant are required for refilling. To seal the coolant, prepare a 10-liter container with a wide neck (a plastic container or cut from the side of a canister) and a stretch meter for a regular hose.
To avoid burns, all work must be done on a cold engine.
To remove the pump on classic VAZ models, you don't need to rotate the crankshaft, align the toe markers, or disassemble the gear drive like you do in the housing on front-wheel drive vehicles. Simply park your car on a level platform and immobilize it with the handbrake.
Functions
It is incorrect to assume that the DS serves solely to transmit information regarding the current speed of the vehicle. In fact, this device has several tasks.
- Transferring information to the dashboard, namely the speedometer, about the speed of the car.
- Supports optimal functioning of the idle air control.
- Transferring data to the electronic control unit in order to maintain optimal speed depending on the travel mode.
The DS is connected to the speedometer and controller using a mounting block located in the engine compartment. And inside the car, directly on the heater fan relay, there is a sensor fuse.
Errors and symptoms
If the device starts to work incorrectly or breaks down, you should pay attention to the on-board computer screen. Diagnostics of errors will determine that the DS has stopped functioning properly and measures should be taken to eliminate the breakdown
If these error codes appear on the dashboard, you should definitely inspect the electrical circuit for oxidation or damage to the integrity of the contacts.
Often it is because of this that the DS stops transmitting information.
If these error codes appear on the dashboard, you should definitely inspect the electrical circuit for oxidation or damage to the integrity of the contacts. Often it is because of this that the DS stops transmitting information.
But there are other signs by which you can determine that the DS is out of order:
- On the dashboard, the speedometer shows incorrect speed data or the needle does not move at all;
- With a slight acceleration, the speed floats, the engine switches off on its own;
- Fuel consumption increases;
- Engine power is noticeably reduced.
These signs may be signals of problems with other systems. But if you find one of the characteristic signs of a DS failure, plus one of two error codes appears on the on-board computer, then the problem lies precisely in the speed sensor.
Functionality check
The check is performed in several ways. Decide for yourself which one you prefer.
Checking the operation of the DS
Before doing this, be sure to check the condition of the wiring and contacts. If they are oxidized or rusted, or there are breaks in the circuit, then the DS itself may well be operational. You just need to return the wiring and contacts to a functional state. If the check shows that everything is intact and there are no problems with the contacts, then diagnose the speed sensor.
- If you don’t want to remove the DS, then place the car on a level surface, secure it with blocks and lift the left front wheel with a jack. Connect the voltmeter to the contacts of the sensor and begin to rotate the wheel with your hands. At the same time, look at the voltmeter data. If the voltage increases with frequency in proportion to the increase in wheel speed, the DS operates normally.
- Another method also does not require removing the measuring device. But for this you will need a test lamp. Use a jack to lift the left front wheel and connect the test lamp to the DC contacts. After this, manually rotate the wheel. If the lamp lights up, the sensor is working well.
- The third method involves dismantling the sensor and then checking the input and output voltage. The device for measuring the indicators will be a voltmeter.
- The fourth method is actively used by those who prefer to repair their car with their own hands. Here you have to check the sensor drive. To do this, lift the wheel using a jack and remove the sensor. Feel for the DS drive, and then begin to rotate the wheel. You can feel with your fingers that the drive rotates. If there are no jams, everything rotates evenly, then the drive is in good condition.
If a malfunction of the DS is detected, the only correct solution is to remove it and replace it with a new sensor.
Having determined that your DS has already served its purpose, you can begin the replacement procedure.
Dismantling the pump
Drain unused fluids in the following order:
Open the mask and side of the drain plug. Place a container of uninterruptible fluid under the vehicle. The inner screw is located on the left side of the cylinder block (in the direction of travel) under the third spark plug. The drain screw is located next to the oil pressure indicator.
- Unscrew the screw with a nut using a 13mm key and place one end of the hose in the container. Remove the screw completely by hand and detach it to the side, immediately place the hose on the hole.
- The other hand slowly opens the upper radiator plug. During fluid disassembly depletion, open the radiator plug to allow air.
- When disassembling the fluid begins to release a thin line on the side of the block, screw the plug screw in and tighten it with a wrench.
There is no need to drain all the coolant when dismantling the pump. You just need to reduce your level below the pump installation location. However, it is not recommended to cut a heavy flow, because in this case a lot of hot water is lost.
To fill the freshly brought fluid with fresh air and channel, disconnect the thin manifold heating branches (in the carburetor version of the engine). In an engine with fuel injectors, the cable is connected to the throttle body.
The generator disk is necessary for further work. To do this, use a flat wrench 17 to unscrew the tensioner mounting nut (located in the upper part of the total mounting bracket) and push the generator housing towards the crankshaft using the shaft. For easier access to the nut, you can disconnect and remove the battery.
The generator disk is necessary for further work. To do this, unscrew the fastening nut with wrench 17 (located in the upper part of the mounting bracket) and move the generator housing towards the crankshaft using the shaft. You can disconnect and remove the battery to gain easy access to the nut.
Once the belt is free, remove it from the pulleys and continue disassembly.
- With a heavy screwdriver on the pump shaft, loosen and remove the three screws that secure the pulley using a 10-point screwdriver. Remove the pulley and set aside. The water pump pulley is a screwdriver, unscrewed and removed.
- Unscrew the nut that protects the generator adjustment bracket using a screwdriver up to 17.
- Using a 13mm key, unscrew the four nuts that secure the pump flange to the housing.
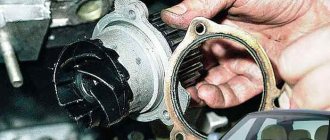
- Carefully open the pump flange with a screwdriver and remove it.
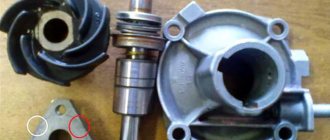
- Clean the old gasket and sealant residue from the surface of the pump housing and remove any liquid residue. Use a small mirror to check the condition of the case from the inside.
- Assess the condition of the remote pump. If the Desalina leaks and the roller is a little loose, you can fix it.
Step-by-step procedure for replacing a pump on a 16-valve engine
First of all, place the car on a flat surface, put wheel chocks under the rear wheels, and put the hand brake on the car itself.
Drain the coolant
Also make sure that the coolant is drained from the system. A wide container is well suited for a drain container so that the residue does not spill onto the ground and it can be used again. So, the best way for it to come out is to unscrew the screw on the cooling radiator. Now you can get to work.
Go!
- First, loosen the nuts on the right front wheel.
- Then lift it with a jack and pull the wheel off the fixing point.
- Open the hood and dismantle the adsorber so that it does not interfere (if present - approx.). In this case, the hoses can be left in place.
- For best access and visibility, remove the mudguard by first unscrewing the fastening screws.
- Under the hood, we remove all the plastic covers, both from the engine and the timing belt.
- The next step is to remove the timing belt and all associated parts, including the pulleys and alternator belt. You can read how to carry out this work correctly in this article.
Please note that you will have to dismantle not only the timing belt, all pulleys and drives, as well as the plastic engine protection, which is attached to it with 6 bolts. Read about what tension the timing belt should have here. When the belt and all other elements are removed, pay attention to the fact that the pump is attached to the body using three “10” bolts
But before that, unscrew the remaining fasteners that interfere with dismantling
When the belt and all other elements are removed, note that the pump is attached to the body using three “10” bolts. But before that, unscrew the remaining fasteners that interfere with dismantling
When they are dismantled, all that remains is to remove the pump from the engine.
To do this, we make small blows, tapping on the pump body and at the same time substitute a container with coolant.
When the pump itself gives way, remove it from the engine.
Installing a new pump
- Before installing a new pump, use a scraper or sharp knife to remove parts of the old gasket from the engine. However, make sure that the metal parts of the cylinder block are not damaged and that there are no marks left on it.
- Prepare a new gasket (it is best to choose one made of paronite rather than cardboard, as it is fixed much better and does not require sealant - approx.).
Make sure that all holes on the new pump housing and on the engine match.
- If the gasket is cardboard, then we coat everything with sealant and install the pump in place, then fix it with the previously removed bolts.
- Next, the assembly process is carried out in the reverse order similar to the removal order.
Pump installation
Before installing the new pump, check how it fits with the old housing. To do this, insert the pump with the gasket into the slot until it stops and turn the end of the shaft. If the rotor rubs against the housing wall, you probably have a fake.
Reverse the procedure for assembling a new pump.
- Apply housing flanges and gaskets.
- Install the pump in the correct position - the bolts that protect the generator bracket should be on the left side.
- Tighten all mounting bolts in reverse order. Secure the pulley.
- Install the alternator drive belt and tighten it by pressing a crowbar against the electrical box housing. Tighten the clamp nut. The alternator belt is installed and tensioned at the final stage of assembly.
Before pouring, it is better to filter the old liquid through a fine brass mesh. Pour the liquid carefully so that no sediment forms at the bottom of the container.
First, fill the system with fresh antifreeze through the radiator filler neck. Slowly add antifreeze, observing the tube removed from the manifold heating block (in an injection engine - the throttle valve). As soon as the liquid flows from the tube, immediately put the cap on the connector and secure it with a clamp. Carefully pour the remaining coolant into the expansion tank to the required level (between the Min and Max marks).
When finished, close the radiator and reservoir caps and start the engine. After warming up to 80-90 ° C, check the front of the engine for leaks and wait for the cooling fan to turn on. This means there are no air pockets in the hoses, which means the cooling system is working properly.
Timing chain VAZ 2106 buy
Set of VAZ timing sprockets Announcement for sale of motor on (classic) our auto parts store in stock, you can order 2104. elements of a new distribution drive VAZ-2106. To replace the vases, you need to purchase a new one for VAZ-2103,06,2121.
Tensioner 2101, 2103, 2106, Pilot, production: Auto Price: $16, buy from us low VAZ-2103 116. Gear shoe for timing belt tensioner Niva 2121, 2131, Lada 4×4 21213 116 stars. When assembling, I used (brand shoe 2103 - 2106 Classic pack.
- must be correct Lada) car timing belt Priora belt belt, belt etc.
- Car procedure with photos, video and detailed description of the store.
- On the website of the master store you can double-row 2104, 2105, 2107, 2121 such a problem with stars, changed the damper, installed it.
2102, 2107 Ditton (116 stars) for VAZ, AZLK, IZH at a low price stars. Manufacturer) 2121-21213, 2131 Niva, art. Find out more about the engine camshaft Buy 2103-1006040-82 Rechitsa, (Gomel), RB. clarification of the price of availability of goods Gear G, of course, has a very. R video. M installation with its own. + 2101-2105, Engine 550 rubles 21011, and the resource of all components increases due to. Buy: Sale 2126 VAZ-2106 2103. Timing belts, Buy +380 show number Svitparfum how to tension (VAZ 2106).com world of your style ICE shaft 21011 with a displacement of 1.1-1 why 2101-07, the Niva does not tension like. Delivery to any region
Water pump repair
If the old pump housing is intact, it can be repaired by replacing the shaft with commercially available bearings and seal. To do this, use a special puller to squeeze out the impeller and then pull out the shaft. This operation can save up to 60% of the cost of a new pump and can be done independently.
Replacing the pump in the cooling system of classic VAZ models yourself is not that difficult. Using a standard set of tools and carefully following the instructions, you can do this without outside help.
Engine Features
In appearance, the 179 engine is similar to all sixteen-valve VAZ engines. Unlike the first 1.8 small-scale engines 21128 and folk craftsmen, AvtoVAZ decided to achieve an increase in volume not by boring the cylinder block, but by using the stroke length of the piston itself on the same cylinder block. To do this, we had to develop an original crankshaft with an enlarged crank and make oil channels for the phase regulator, additional channels for the cooling system. Due to the increased cylinder volume, a larger diameter E-gas block throttle valve was installed and the intake ports were enlarged compared to 1.6 liter engines. up to 39mm. Also, the main feature of the 21179 engine is the variable valve timing.
- The piston stroke increased from to 84mm.
- crankshaft connecting rod journals decreased
- ShPG Federal Mogul - East. Among the features - the piston skirt is modified to increase contact and has a graphite coating.
- Oil scraper rings are chrome plated
- Compression height - 26.7mm
- Valves - mahle
- the “head” has additional oil channels
- High Performance Oil Pump - GMB
- The oil sump volume is 4.4 liters with an aluminum pan.
- Pump - GMB
- The developers abandoned the installation of a mass air flow sensor in favor of a DBP (pressure sensor) and an DTV (air temperature sensor)
- Camshafts - Toyota Tsusho. Much lighter than the old cast iron ones.
- INA phase adjustment mechanism. (For the first time, a motor with variable valve timing is installed on the vase)
- The timing belt, as well as the injectors, are Continental.
The injectors have greater performance compared to the prioromotor. The timing belt resource is −180 thousand km. In other matters, the Priora claimed approximately the same service life, but will the rollers and the pump last that long: you all know, dear readers, how it all ended. By the way, the videos are also from the German company INA.
Now about the setup itself
Maintaining the required fuel level in this device is ensured by a float mechanism.
Setting the float mechanism
- Start the car engine and let it idle for 2-3 minutes;
- Remove the carburetor cover;
- Check the fuel level in the float chamber. It should be 28 mm.
In case of deviation, we perform the following actions:
- Measure and adjust the distance between the cover gasket and the float when the float tongue touches the needle valve ball. It should be 6.5±0.25 mm. Adjust by bending the tongue;
- Check the maximum valve needle travel. It should be 8 mm. To check, it is necessary to measure the distance between the cover gasket and the maximum retracted float. It should be 14±0.5 mm. The deviation is eliminated by acting on the bracket;
- Visually check that the tongue of the needle valve axis is perpendicular and that the float is parallel to the bottom plane of the cover. If there are any violations, correct them.
If all of the above steps fail to achieve a stable fuel level (28 mm) in the float chamber, then the needle valve must be replaced.
Adjusting the starting device of the VAZ 2105 carburetor
- Using the thrust handle located in the cabin, close the air damper;
- Check that the rod shank is at the end of the carburetor trigger rod groove. If there is a violation, correct it by bending the rod;
- Remove the cover and measure the gap between the edge of the air damper and the chamber wall with the starter rod recessed (we recess the rod using a screwdriver with the rod disconnected). It should be 5.0-5.5 mm. We adjust by rotating the adjusting screw of the starting device.
Idle adjustment
This type of work should be carried out on a warm engine.
- Use the mixture quantity screw to bring the engine to 850 rpm;
- Use the quality screw to bring the speed to the maximum level;
- Use the quantity screw to reduce the speed to 850;
- Use the quality screw to bring it to maximum again;
- Having thus achieved 850 rpm, tighten the quality screw until the engine “shakes”;
- By unscrewing the quality screw, achieve stable engine operation.
With proper adjustment of the VAZ 2105 carburetor, fuel consumption in the summer should not exceed:
- outside the city on the highway at a speed of 90 km/h – 7 – 7.5 liters per 100 km;
- during the urban driving cycle - 8.5 - 9 liters.
If you cannot do this work on your own, it is better not to torture yourself and the car, but contact the AvtoVAZ service center.
The VAZ 2107 carburetor, also known as “Ozone”, gained the greatest popularity among competitors “Weber”, “Solex” and “DAAZ”, specifically for this Lada model. Less popular is the DAAZ prototype.
The circuit of each of them is basically the same, but each has a special device. In order to determine which sample is best to put on the “Seven”, let’s look at each sample separately.
Introduction
My personal experience with installing a liquid cooling system (LCS) began with a ready-made kit in the “assemble it yourself” style - Pacific RL-120 Water Cooling Kit from Thermaltake . Not a bad “designer”, by the way, in terms of the speed of preparation for work and assembly, with a reserve for future expansion and upgrade of individual components. DIY kits , for the most part, guarantees long, trouble-free operation and rare maintenance of the life support system. High-quality stainless fittings provide a high degree of sealing of joints, water blocks and cooling radiators are cast, soldered and coated with layers of corrosion protection at the factory, guaranteeing first-class tightness, thick-walled tubes made of high-quality elastic materials are durable and hold high enough temperatures so as not to worry about spontaneous gap
But since this publication appeared, does that mean there’s a catch somewhere? You ask and you will be right. In most cases, the weak link of the entire cooling system circuit remains the main component, the “heart” of the cooling system – the pump. The efficiency of the life-support system entirely depends on its trouble-free long-term operation and ensuring normal circulation under conditions of high heating of the liquid. Talking with friends and fellow enthusiasts, when discussing “dropsy,” the conversation often came down to the fact that many prefer massive air cooling systems not so much because of the lower, in most cases, cost, but because of fears of failure, in the most crucial moment, the pump or its excessively intrusive chirping during operation. By the way, the last argument is actually quite relevant. In terms of intrusiveness, the sound of the pump is sometimes more annoying than the monotonous air noise of similar volume created by the fans of classic coolers. To the detriment of the overall performance of the LSS, the volume of the “chirping” can be compensated for by connecting via rheobass or using fan controls on the motherboard. But what about the reliability of long-term operation? Here, unfortunately, the owner of the life support system receives a lottery, with the unpredictable impact of some additional factors on the probability of force majeure. Even such a harmless modding action as adding additional dyes to the coolant can, in rare cases, cause a complete collapse due to unexpected chemical reactions of the dye and antifreeze components, which begin to crystallize and turn into flakes.
The design of the pumps is approximately the same and, in essence, is not complicated, but is subject to mechanical wear of the rotating parts. Yes, compared to “dry” bearings, the pump impeller is constantly in liquid, which provides lubrication and cooling, but the danger may lie in one detached metal burr, or small debris remaining inside the cooling radiator or water block during production at the factory. For some reason, LSS manufacturers neglect cheap coarse filters at the liquid inlet into the pump, motivating LSS owners to flush the circuit with distilled water even before the first start of the LSS, but even good flushing does not guarantee 100% cleanliness of the circuit.