Briefly about gearboxes
First, let's look at what gearboxes are. In short, this is a unit that is built directly in the path of the main power flow from the car engine to the wheels. The job of the gearbox is to change the torque, i.e. traction on wheels. A change in thrust not only entails a change in speed, but also allows for more efficient use of engine energy. For example, in certain conditions it is better to drive in low gears. The gearboxes are as follows:
- Mechanical . Essentially, it is a set of gears arranged correctly. The system is also equipped with a clutch. This gearbox requires manual control, as a result of which it is considered the least convenient;
- Automatic . This is classic “mechanics”, supplemented by hydromechanical devices. Automatic boxes are easy to use, but they are heavy and expensive to manufacture;
- Robotic . May have several versions. The cheapest and simplest option: a manual transmission with attached electric drives that squeeze the clutch and also manipulate the control lever. More complex “robots” are 2 mechanical boxes and the same electric drives with a special electronic unit.
Separately, it is worth highlighting the variators, i.e. special continuously variable automatic transmission. Unlike classic gearboxes, CVTs use a pair of sliding pulleys with a metal belt. This is extremely convenient to use and allows you to reduce fuel consumption . The weak point of CVTs is metal belts, which quickly fail. Due to the low prevalence of such a transmission, I will not dwell on it in detail.
What are gearbox bearings?
Shafts and gears of gearboxes place high demands on supports. The supports must withstand heavy loads and vibrations (the main “killers” of metal and rubber-metal components). Pressed bearings fit perfectly. Depending on the type of gearbox and the number of gears, bearings are required from 4 to 12 , in rare cases, more. They take on the following tasks:
- Creating reliable support for absolutely all or most of the shafts. As a rule, there are two supports per shaft, but in some boxes the primary shaft has only one support, and the secondary as many as three;
- Maximum reduction of friction forces arising in the supports. The lower the friction force, the less the parts heat up and the less torque loss;
- Creating a support for the gears mounted on the secondary shaft.
Spare parts for Renault 12
Tie rod end external 1.3 (1170) 810-02
Spare parts for Renault 12
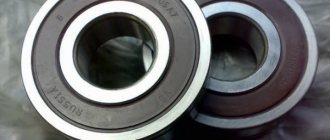
Front hub bearing 1.3 (1170) 810-02/97 As you might guess, heavily worn or even completely failed bearings have a detrimental effect on the efficiency of the gearbox. We are talking about excessive energy consumption and loud noise during operation. Needless to say, a worn bearing can cause a more serious breakdown followed by costly repairs . Normally, it lasts over 150 thousand kilometers or more, but only if we are talking about an original product and not a replica of low and average quality.
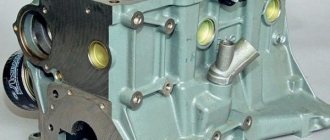
Gearbox assembly
Assembling a VAZ 2110 box
After replacing each bearing, the gearbox must be reassembled. In this case, the differential, input shaft and output shaft must be assembled in the opposite order to disassembly. Assembly must be carried out carefully to avoid any remaining parts. To complete the assembly process of the gearbox mechanism, you must:
- The surfaces of the crankcases must be cleaned of sealant residues.
- Each part is washed with diesel fuel or kerosene. After the washing process, it is necessary to wipe each part. After washing, lubricate each part with clean transmission oil.
- A new gear selector rod seal is installed.
- The gear selection mechanism rod and lever are installed.
- For stable fixation, adhesive fixative is applied to the cleaned surface of the lever fastening screw.
- The gear selection mechanism is installed.
- New bearing and differential outer races must be installed in the crankcase. Before mounting the bearings, it is necessary to install the adjusting rings.
- New drive seals are installed.
- The input shaft, secondary shaft, and reverse gear are mounted.
- A mandrel is installed to fix the gears.
Note: The subsequent assembly process is the opposite of the disassembly process. You should start from the last disassembly item and gradually move up the list. Before installing covers and crankcases, their surface must be degreased. Never install gaskets between the clutch housing and the gearbox. This setup can be quite frustrating when adjusting the bearings.
Detailed videos and photos on this topic can be viewed on the Internet. This must be done with full attention, since the work will be carried out with your own hands and mistakes cannot be avoided. But you shouldn’t despair, because the instructions give practical advice and recommendations. The price of bearings may vary depending on the place of sale. You should carefully select bearings, as there are many low-quality products and defective products on the market.
>
What affects service life
There is no clear answer regarding the frequency of replacing the input shaft bearing. Therefore, the procedure is carried out depending on the current condition. The wear rate of elements is influenced by several factors, including:
- The quality of the bearings used;
- Driving style;
- Conditions under which the vehicle is operated (weather, road quality);
- Frequency of visits to car repair shops or self-diagnosis of the car’s condition, etc.
Checking status
Let us say right away that it will not be possible to replace the bearing without removing the gearbox. Therefore, first of all, we get acquainted with the features of dismantling the gearbox, after which we proceed to further actions.
Make sure the bearing and its components are in good condition. To do this, check the following:
- There should be no cracks or defects on the shutdown plug;
- The bosses, which are used for mounting on the release bearing, should not show signs of severe wear;
- Check the spring bracket under the soldier. The casing contains a stand for fixing the fork. The spring bracket normally does not have any signs of defects or wear;
- The presence of signs of wear on a soldier is a bad sign.
The input shaft is a block consisting of drive gears. Some of them are made on the shaft, the other is pressed with great tension. That’s why we are talking about a non-separable design, where only the front and rear bearings are replaceable. If other components fail, the entire assembly must be replaced.
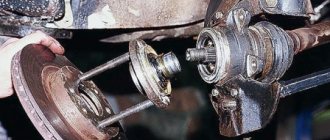
How to remove the transmission?
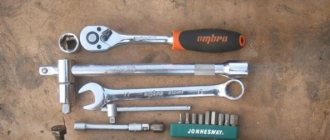
To remove the box you need an inspection hole or a lift. Also, for work you need a standard set of tools - a wrench, sockets, wrenches and a pry bar. The dismantling process is carried out in several stages:
- First of all, disconnect the terminal on the battery. Then the neutral gear is engaged and the parking brake is released. Raise and remove the rear axle. Next, unscrew the bolts holding the cardan and the gearbox flange. After this, you can disconnect the driveshaft.
- Then unscrew the bolts and dismantle the exhaust pipe of the exhaust manifold, disconnect the oxygen sensor, and remove the starter. Next, inside the car you need to dismantle the console and
- After this, remove the box protection and unscrew the clamps that connect the exhaust pipe to the catalyst. After this, you can dismantle the slave cylinder of the clutch system. Next, unscrew and remove the boot and reverse gear cable. Now you can remove the driveshaft. Then the traverses are unscrewed (you must hold the box so that it does not fall). Finally, you can unscrew and remove the gearbox assembly.
Types of gearbox bearings
Depending on the car manufacturer, the gearbox may use one or more types of bearings. Each type of bearing has its own advantages and disadvantages. For example, one type is characterized by high resistance to mechanical loads, but is characterized by large dimensions. Speaking about bearings, one cannot fail to mention two types of loads that they perceive: axial/thrust (along the axis of rotation) and radial (perpendicular to the axis of rotation). Both types of loads can be supported by a bearing at the same time, but in most cases one load is greater than the other. Gearbox bearings are divided into the following:
- Ball single row radial . These are the most versatile bearings. They are used in most passenger cars, although in some cases they serve as one of the supports in truck gearboxes;
- Ball single-row angular contact . Despite the obvious name, they can take both axial/thrust loads and radial loads. Structurally, they are an additional version of conventional radial bearings - their rings have special stops that prevent destruction of the bearing under heavy loads in different directions;
- Double-row angular contact balls . Due to their high resistance to loads, they act as a rear support for the gearbox input shaft. In rare cases, they also serve as support for the intermediate shaft. More expensive to produce than simpler single-row bearings;
- Roller needles . Can be single or double row. Extremely resistant to radial loads, because the bodies of rotation in them are needles of small diameter. Found application in secondary, less often in intermediate shafts;
- Roller single row radial . The bodies of rotation in such bearings are rollers. They have very high resistance to mechanical loads and are usually used in automotive technology;
- Single- and double-row conical rollers . They are used very widely. Good as supports for both primary and secondary shafts.
How to disassemble a checkpoint
Replacing bearings in a VAZ 2110 gearbox
To perform work on disassembling the gearbox, you must use:
- Impact screwdriver.
- Beard.
- Expanding pliers for removing retaining rings.
- Magnet.
- Mounting blades - it is better to have two copies of the tool.
- Two-jaw and three-jaw pullers.
- With a chisel.
- With a drift.
- Micrometer and dial indicator.
Note: This tool will be needed to replace the differential bearing adjusting ring.
- Locksmith's ruler.
- Glue-fixer.
- Sealant.
First of all, you need to remove the device from the car. The mechanism is cleaned from dirt, dust, and possible liquid residues. Each part is washed with detergent (outer part of the mechanism), diesel fuel or kerosene.
Replacement process
Often, replacing the VAZ 2110 input shaft bearings will in any case involve removing the gearbox from the car. Let's consider this situation using the example of a VAZ 2110 car.
Note! To change the bearings on the input shaft, you will need an inspection pit or a lift.
Removing the gearbox to change bearings on the input shafts
- The machine is installed on the inspection pit.
- The oil is drained from the gearbox.
- The cardan moves away.
- The functioning clutch cylinder is dismantled.
- To make removing the gearbox to change the front shaft bearing convenient, it is recommended to remove the “pants” from the exhaust system.
- The starter, the cable from the speedometer, and also the wires for the reverse gear are moved away.
- The shift rocker is removed from the interior.
- All fastening bolts of the box are unscrewed.
- Now it can be easily removed to change the bearings on the input shafts. It must be removed by moving it away from the engine; the rocker arm must pass freely into the body cutout.
- Before disassembling the gearbox, it must be cleaned and washed to remove dirt.
Replacing bearings on the input shaft begins with dismantling the gearbox clutch housing. Before these steps, you need to remove the clutch release fork and release bearing. These parts are checked for suitability for subsequent use.
Note! There should be no cracks on the release plug. The bosses intended for mounting on the release bearing must not be very worn, the spring bracket for the “soldier” (there is a stand in the casing for fixing the fork) must be absolutely intact. The “soldier” is not allowed to have signs of wear on the ball part.
Disassembling the box
It is necessary to disassemble the gearbox if you are replacing worn components. The process begins after the box has been removed from the vehicle. The VAZ 2112 gearbox is installed vertically on the clutch housing, the bolts and nuts are unscrewed. The back cover, bracket, and stem must be dismantled. Using a spanner, unscrew the installed mounting bolt on the 5th gear fork. To unscrew the shaft nuts, use a socket socket. Next, the fork, coupling, and hub are removed. It is necessary to dismantle all fixing, fastening elements, and the locking ring. The box housing is removed. All fastening bolts, rod, and protective cover are removed. Access to the shafts, differential, and gear selector is available.
To replace the rod hinge on a VAZ 2112, you should use a 10 mm spanner. When replacing the differential, you must remove the satellite axis and two satellites from the metal body. Next, the driven gear bolts are unscrewed. If the satellites or driven gear are damaged or the gear teeth are worn out, they must be replaced. Before installing new consumables, they must be lubricated with transmission oil. It is quite possible to repair a faulty box yourself.
Gearbox bearing malfunction
As with any automotive bearings, the symptoms of failure are approximately the same. Since bearings are subject to severe loads, they fail very rarely. Here, however, it is worth noting that bearings in gearboxes break less often than other bearings. As a rule, problems arise with the input shaft supports. The following is observed:
- Clutch failure . It may either not turn on, or, on the contrary, not turn off. In very rare cases, when the clutch fails, the shaft suffers greatly. Usually only the bearing itself jams, and the shaft remains intact. The bearing must be replaced as soon as possible;
- When the car moves, you can hear a characteristic sound . It is especially audible and can also be heard at idle when the clutch is released. As practice shows, when the gearbox bearing is partially destroyed, a howl or whistle is replaced by a knock;
- The command post began to whistle . In most cases, the source of the whistle is a bearing with loose grease. The problem is solved by applying a lubricant, or in some cases by replacing the component.
As already indicated, the bearing may not fail completely, but only require maintenance. In particular, in applying a new lubricant. Lubricant is selected based on the following parameters: bearing type and size, rotation speed. We advise you to refer to the lubricant selection method from SKF specialists. Experts also note that almost new bearings sometimes need lubrication. There are several options here:
We’ll immediately answer the question of how to replace a gearbox bearing. Although it is better to delegate this work to a specialist, in some cases, with the proper skill and availability of free time, an ordinary car enthusiast can handle it. Often, complete disassembly of the gearbox is required, but in some units the bearing is hidden under the casing. Here's what to do:
- Disconnect battery;
- Remove the chips from the body;
- Remove the speedometer drive;
- Remove the “pants” from the exhaust gas removal system;
- Remove the car gearbox from its place;
- Dismantle the bell (it may interfere with further work).
Other signs of clutch failure
When the friction linings wear critically, the behavior of the car changes significantly. The following are signs of a burnt coupling:
- It is difficult to start moving. The car can remain stationary even when the clutch pedal is fully released. This means that the disc is not pressed enough to transmit torque to the transmission. Here you can judge the critical wear of the driven disk.
- Car jerking while driving. In this case, you can still start moving, but the start will create discomfort - the car jerks strongly. When the speed increases, the jerking disappears. However, the next time you try to drive from first gear, the jerking and vibration will appear again. In addition, the car may accelerate atypically when switching to higher speeds. Since the disk is not pressed tightly enough to the flywheel, the torque is transmitted intermittently. The car loses acceleration dynamics. If you disassemble the coupling, you can see the play of the diaphragm springs. They are responsible for compensating and smoothing the loads coming from the flywheel to the transmission. If such play is detected, the mechanism must be replaced.
- Free play of the clutch pedal.
Replacement
Many people turn to a service station to replace this bearing. It is noteworthy that car services often refuse to perform such work. It’s understandable, because the procedure is painstaking, and you can’t get a lot of money for it.
Dismantling works
To do the job yourself, follow the instructions.
- You can often find advice about the need to completely disassemble the gearbox to replace the bearing. But this is optional. You can do without such complex manipulations.
- In any case, you will have to remove the box, so familiarize yourself with this procedure.
- Before removing the gearbox, remove the negative terminal from the car battery.
- All the chips are removed from the box, the wire from the speedometer is unscrewed.
- Next, the trousers of the vehicle exhaust system are dismantled.
- After this, you can completely remove the gearbox.
- At the next stage, the bell is dismantled. You can try to do without it, but then it will definitely constantly interfere with your work.
- Thoroughly clean the box from accumulated dirt.
- The bearing is secured using retaining rings. To remove them you will need a flathead screwdriver.
- The rings are pryed off and loosened a little, after which there will be no more problems with removal.
- To make it more convenient, arm yourself with tweezers that can be used to remove the ring.
- Using a flat-head screwdriver, pry the bearing by the ring groove, and at the same time move the input shaft slightly forward.
- Insert a pry bar between the gearbox and the bearing. It is unlikely that you will be able to do this without an assistant.
- You will operate the tools, while your friend will hold the pry bar.
- Your main task is to press out the bearing. To do this, precise, strong, but most accurate blows are applied to the input shaft.
- In the process of striking, the shaft must rotate.
- This work will take you about 20 minutes. But if you have a special puller at your disposal, you can speed up the work. Although it is really convenient to work with a puller only if you decide to disassemble the gearbox.
- Before installing a new input shaft bearing, be sure to lubricate the element with regular engine oil.
- Carefully press the component into place using gentle, light blows with a hammer. It is better to use a pipe of diameter or a stand.
- When pressing, apply blows to the inner race, in a circle, as evenly as possible.
- Once the bearing is pressed in, make sure it is seated properly. Scrolling should be calm, without obstacles.
- Reassemble the box in reverse order and install it on the car.
It will be useful: Tips on how to decode an audio system, radio unlock code calculator
Location at checkpoint
Lubrication issue
Many people do this kind of work on their own, and quite efficiently. But their main mistake is that the bearing does not always need to be replaced. Sometimes just lubricant is enough.
- Check the bearing for dryness. There is no lubricant on it, as well as visible damage, then all extraneous sounds can be caused precisely by a lack of lubricant;
- Treat the element with high-quality lubricant. Plain motor oil is often used;
- Reinstall the old, greased bearing.
Lubrication can be accomplished in two ways.
- Digestion in lithol. It is recommended to use a water bath for this procedure.
- Injection. The method is safer. To perform it, you need to draw lithol into a syringe and pour it into the element. The process is long but effective.
When choosing a lubrication method, it is better to focus on safety rather than the speed of repairs.
The gearbox is a constantly working element of the car, which leads to the inevitable occurrence of malfunctions. Try to detect the failure of the input shaft bearing as early as possible and carry out repair or preventive measures aimed at preventing complications of the situation.
Lubrication
If the bearing is dry, but there is no damage on it, then you can completely get by with lubricating it and install it back. It’s only better to do this if you don’t have a new spare part on hand. There are two ways to lubricate the bearing. The first is to boil it in lithol, preferably in a water bath. A safer method of lubrication is by injection. Using a syringe, lithol is driven into the bearing; this method takes quite a lot of time.
Read more in the article “How to lubricate a release bearing without removing the box.”
Causes of wear
Replacing the bearing of the input shaft of a VAZ 2110
You can find out about wear and when it is necessary to replace the bearings of the input shafts of gearboxes based on such signs.
- in neutral gear, with the engine running, extraneous noise may be heard;
- When the car is moving in any gear, you can hear a knock in the gearbox;
- transmissions may switch off spontaneously;
- the clutch may not disengage (this often occurs due to jamming of the bearing);
- If the bearing is misaligned, the clutch disc may be destroyed.
Note! If you do not pay attention to the above listed signs of malfunction of this part, in the future you will not be able to do without serious repairs to the clutch or gearbox. By changing the gearbox shaft bearings in a timely manner, you can avoid unwanted problems and additional cash costs for repairs.
When do you need to change the gearbox input shaft bearing?
Replacing the input shaft bearing on a VAZ 2110
Surely, many car enthusiasts are asking the question “when do you need to change bearings?” In fact, there is no definite answer, since the resource of this mechanism directly depends on:
- bearing quality;
- vehicle operating conditions;
- driving style;
- regularity of technical inspection.
Typically, problems that occur due to a worn bearing are detected during the next technical inspection. Diagnostics of the gearbox can be carried out in specialized technical centers, and it becomes possible to evaluate the resource of the components of the unit that remains. The same applies to PV bearings. In certain situations, you can get by with simply lubricating the bearing. Such measures will help normalize operation and eliminate noise in the gearbox. When undergoing vehicle maintenance, experts strongly recommend doing a clutch diagnostic (see: Repairing the VAZ 2110 clutch - we do it ourselves).
Bearing manufacturers
To say that the best replacement for the original bearing will be another original is only partly true. The fact is that none of the automakers produces bearings at their own factories. These parts are produced externally - each concern has its own supplier of individual components. So, if you decide to take a non-original , then it is better to take exactly the one that is produced by partners of automakers or offered by companies that repackage the products of the former. Pay attention to:
Many car enthusiasts also note ]Ruville[/anchor] (Germany), but since it is a packager that cooperates with both original manufacturers and outsiders in the auto parts market, we advise you to be careful with the gearbox bearings it offers. As for inexpensive bearings from lower-level packers and dubious Polish, Turkish and Chinese manufacturers, it is strictly not recommended to buy them.
Checking the serviceability of bearings
If the oil level is low enough, all parts work poorly and the clutch is low enough. All bearings are no exception.
I'll tell you what to do to check:
1. Place the car on the inspection hole. We carefully check for oil leaks. Pay attention to the contact of the crankcase, wheel drive seals, and the rod mechanism. This is where the leak may be.
2. Depress the clutch, while shifting each gear in order. Check that they turn on and off clearly. If necessary, adjust the gear shift mechanism.
3.Start the engine with the transmission lever in neutral. When you depress the clutch pedal, listen to how all the bearings operate. An unusual loud sound occurs when the pedal is released. Press again and the sound disappears. Such signs indicate that the roller bearing has failed.
4. You can check bearing wear while the car is moving. Accelerate first, then brake gradually. By changing gear, you check the operation of the synchronizer and the accuracy of the transition to another gear. No unnecessary sounds appear when the gearbox is running.
The load has increased, make sure that the gears are not switched on without permission. If it is necessary to replace only one part of the mechanism, do not disassemble the device completely. It will be enough to get the part that needs to be replaced.
Removing the bearing
To get to the bearing, you must be careful and careful.
For repair you will need:
- Before dismantling the shaft, it must be securely fastened using a vice, make sure that it is stable;
- remove the ball bearing from the input shaft using mounting blades;
- you have removed the bearing. See if lubrication is needed here, and if it is possible to get by with preliminary repairs. If all this does not help, we will change the bearing.
The VAZ 2110 has another bearing on the secondary shaft. It will also have to be disassembled to gain access to the worn part.
Using paddles will help you remove the ring from the inside of the roller bearing. Insert the puller grips into the resulting socket. This will remove the bearing ring.
Next, open the locking ring and remove it from the shaft. Also open the coupling ring and remove it. Such rings are used to engage 1st and 2nd gears.
You also remove the hub and clutch for shifting 1st - 2nd gears using mounting blades. You must do the same steps to remove the ring that blocks the 2nd gear synchronizer and gears.
Disconnect the roller bearing on the reverse side of the shaft.
Congratulations, now the bearing is free, there is normal access to it, then the secondary shaft does not require disassembly. If your plans include a major overhaul, continue to disassemble the secondary shaft further.
The differential has its own bearing. As before, all these devices will be disassembled.
What you need to do for this process:
- The bearing at the top of the device must be removed.
- When the bearing replacement is completed, select the adjustment ring again. Diameter required 1.25 mm;
- Mount the differential to the clutch housing. Tighten three nuts;
- Turn the base in the differential a couple of times or more. Turn as many times as necessary until the bearing is secured in the required position;
- use an indicator to measure the size of the differential in the axle;
The formula for calculating the size of the adjusting ring is: T=O+H+K.
Here:
- T is the thickness of the next adjusting ring;
- O is the exchange of movement of the axis in the mechanism;
- H is a number that determines the bearing tension;
- K is the width of the installation ring.
Conclusion
The gearbox bearing is one of the components of the gearbox, without which the entire unit will not be able to function normally. Unfortunately, a car enthusiast may encounter the need to replace this bearing up to two or three times during the entire life cycle of the car. If inexpensive analogues were previously installed, then there is a high probability that there will be many more replacements. We recommend purchasing only bearings from well-known manufacturers or automaker originals, and delegating the installation work itself to a trusted specialist. If problems arise with the gearbox, diagnosis and repair should not be shelved.
Replacing Bearings for Gearbox VAZ 2110 ~ AUTOTEXNIKA.RU
2110 gearbox with our own hands
The transmission of any vehicle, like any other unit, requires repeated repairs. If a unit breaks down, not every motorist is ready to drive 100 and pay for its repair. replacing the trapezium wipers of a VAZ 2110 - YouTube. Therefore, at the moment we will tell you how to disassemble the VAZ 2110 , what aspects should be taken into account when dismantling the box. Replacing the steering rack of a VAZ 2110 - instructions with video. You can also watch the repair video.
Features of the VAZ 2110 gearbox
As you realized, if the unit breaks down, you have only two options - either drive the car at 100, or do everything yourself. To repair a VAZ 2110 without the help of others, you will need to dismantle and disassemble the unit in order to then replace the failed elements with new ones. Replacing the VAZ 2110 timing belt - vaz-remont.ru. Accordingly, it will be necessary to assemble in reverse order.
2110
car tuning