One of the relatively simple types of repairs on any car can be considered replacing the driveshaft crosspiece. This procedure is performed not only when absolutely necessary, but also as part of scheduled maintenance. If desired, each driver can make a similar replacement in his garage. Next, we will talk about how to determine the need for repairs, what tools you will need, and also in what order to proceed in the process of replacing the universal joint or steering shaft.
We also recommend reading the article on how to replace the fuel pump yourself. From this article you will learn about the main nuances when removing and reinstalling an electric fuel pump, as well as how to correctly connect electrical connectors and fuel lines.
General information about the driveshaft and spider
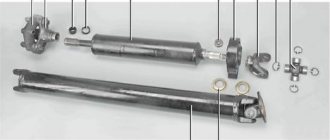
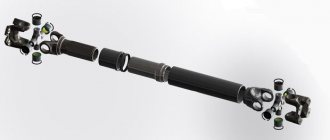
The driveshaft connects the vehicle's transmission to the front or rear axle. It transmits rotation from the engine to the axles. Available only on rear- and all-wheel drive cars. There is also a driveshaft in the steering, but this will be discussed below. The cardan is connected to the axles and gearbox using a hinge, the main part of which is the cross.
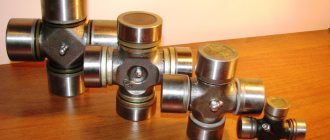
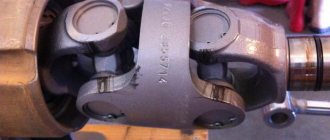
Already from the name itself it is clear that this part is made in the form of a cross. At each end there is a cup, inside of which there is a needle bearing. Between the bearing and the cross body there is a plastic or rubber sealing ring - an oil seal or cuff. The dimensions of the cardan crosses vary depending on the model and brand of the car.
Our advantages
- Huge experience. We have been working since 2000 and value our reputation as a reliable partner.
- Reasonable price and fast service. We have our own production and warehouse space. This significantly saves our clients time and money.
It also offers high-quality services for cardan diagnostics and spline joint repair.
To order, you can fill out the application form, send a request for a call back at the bottom of the page or in the “Contacts” section, or contact us by phone.
When and for what reason do you need to change the universal joint?
The crosspiece is a part in itself that is very strong and durable. Theoretically, it is capable of serving for five hundred thousand kilometers of a car. However, in practice the resource is significantly reduced. It depends on the operating conditions of the car, as well as on the quality of manufacture (or rather, on the quality of materials) of the part itself. Most often, the cardan crosspiece has to be replaced or repaired after traveling several tens of thousands of kilometers.
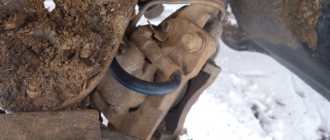
The most common reason why the driveshaft spider will need to be replaced is play in the joint itself. The fact that it has supposedly occurred will be indicated by various extraneous sounds when the cardan rotates: creaking, knocking or metallic ringing, as well as characteristic vibration in certain speed modes or during starting.
Note that all this can be clearly heard in the cabin, so the driver will quickly understand that something is wrong and it’s time to carry out diagnostics. In this case, diagnosis is a very simple operation. True, to carry it out you need an inspection hole, overpass or lift. Next, you need to put the gear in neutral and go down, that is, under the car. Then, holding the cardan cross with one hand, you should try to rotate the cardan shaft with the other. If there is any play, it will be immediately noticeable.
There are usually two reasons for the occurrence of play: wear of the needle bearing or wear of the cross itself. In turn, wear occurs due to leakage or drying of the lubricant in the bearing, exposure to moisture and dust that got there due to the fact that the oil seal was worn out or even flew out. It is necessary to pay attention to its condition during the purchase and installation of the cross. It will also not be superfluous to pay attention to the element during any routine inspection of the car.
Sometimes there may not be obvious play when the bearing wear is not too great. By the way, this malfunction is characterized by specific creaks and squeaks during rotation. In this case, you may not have to change the entire part at once, but just replace the lubricant. How this is done will be described a little later.
We also recommend reading the article on how to replace valve guides. From this article you will learn how to change valve bushings yourself, as well as what to pay attention to during the procedure for replacing valve bushings when repairing the cylinder head.
Don’t forget about how many crosses there are in the cardan. There are two of them: front and back. Both need to be examined during diagnosis. Please note, as practice shows, it is the rear cross that wears out more and more often. The fact is that it experiences heavy loads and is more strongly affected by dirt and water.
Preparatory work for replacing the VAZ 2107 suspension bearing
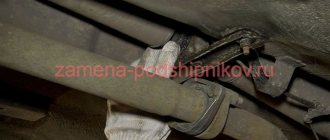
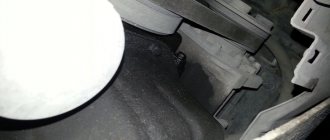
If characteristic sounds are heard indicating that the outboard bearing of the VAZ 2107 propeller shaft has failed, it is necessary to visually inspect its condition. Externally, the malfunction manifests itself in a deformed protective insert of the bearing, damage to the bearing and traces of grease on the housing. In this case, the part needs to be replaced.
To carry out the work, it is necessary to drive the car into the inspection hole and turn on first gear to prevent the car from moving and the driveshaft from spinning. Additionally, you can secure the machine using wheel chocks. In this case, its accidental displacement will be excluded. This is a very important stage on which the safety of work depends. If a car rolls into a hole, it can not only be damaged, but also injure people.
Connecting elements and fastening parts of the driveshaft are especially susceptible to corrosion, so before starting work it is necessary to treat them with WD-40 and leave them for a while according to the instructions for use. Without using WD-40, unscrewing the fastening nuts will be problematic.
While the product is absorbed, you should prepare the necessary tools and parts. Simultaneously with replacing the cardan bearing, it is worth changing the crosspieces. The service life of these parts is approximately the same, so they fail almost simultaneously. If you do not change the crosspiece right away, it will soon fail and to replace it you will have to remove the cardan again. Considering the low cost of the crosspiece, its preventive replacement will cost less than new work on removing and installing the driveshaft.
Before removing the cardan, marks should be made on it and the parts of the gearbox and gearbox. This will allow the cardan to be installed exactly in place, avoiding additional vibrations due to imbalance. The driveshaft is balanced relative to the axis at the factory, so you can often do without marks by installing the driveshaft arbitrarily.
How to replace a crosspiece
It is most convenient to change this with the driveshaft removed. Although, if the vehicle’s ground clearance allows it and there is no way to drive it onto a pit or overpass, then you can do it this way, especially in the case of trucks. You can also remove the shaft without a hole. Although it will take much more time, effort and nerves to repair. In the first case, the procedure will be as follows:
- Following safety precautions, you need to block the wheels of the car. After this, you need to engage any gear (so that the driveshaft does not rotate).
- Mark the location of all parts that will be removed relative to each other.
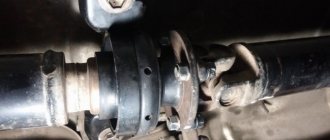
- Unscrew the cardan bolts (secure the shaft to the axle flange). There are four of them.
- Unscrew the suspension bearing mount (two nuts).
- Pull the driveshaft out of the gearbox (there is a splined connection).
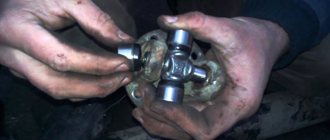
Once the shaft is removed, the universal joint spider can be removed. To do this, you will need pliers, a powerful flat-head screwdriver, a hammer and a round attachment (rod, tube). Its diameter should be slightly smaller than the diameter of the eyes in which the ends of the cross are secured. It will be much more convenient to work if you clamp the shaft in a vice.
Next you will need to do the following:
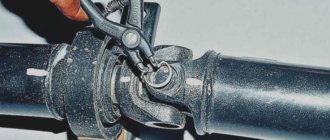
- it is necessary to remove the fixing rings that hold the ends of the cross in the eyes. For this operation you need pliers. If the rings are too tight, then you should tap them with a hammer through the adapter so that the cups at the ends of the cross sag a little;
- After removing the rings, you need to knock the cups out of the eyes. This is done using the same attachment and hammer. It is important to remember that striking the cardan itself is not recommended. In the process of removing the cross in this way, the cup that is being struck will move inward, and on the other side of the fork, the cup will come out to a certain limit. In some cases, the cups may fall out on their own, but often they need to be pulled out using various suitable tools: pliers, a gas wrench, and so on. All four cups are removed in the same way;
- When the cross is removed, it is advisable to clean the lugs and the fork itself from dirt using a wire brush. It is recommended to go over the internal surfaces with sandpaper, clean the grooves of the retaining rings and wipe everything well from dust.
It should be separately added that there are special pullers for crosspieces. However, in practice they are used extremely rarely, even in repair conditions at large service stations. Let us add that no special tools are required when replacing the crosspiece, since installing a new part is also not difficult.
- The two opposite cups can be easily removed by hand. You must act carefully so that the needle bearing does not crumble. It is important to pay attention to the presence of lubricant under the cup.
- The crosspiece is placed between the eyes on the shaft fork, after which the cups are put on. At this stage, they are easily recessed with your fingers as much as possible, and then, using a hammer and adapter, they are lowered so that the grooves of the retaining rings open.
- Retaining rings are installed.
- The same operation is performed with the other ends of the cross.
- Replacement of the cardan cross is completed. Now you can install it back.
As already mentioned, it is not always necessary to carry out this type of car repair. Sometimes lubrication is enough. This can be done without removal if a crosspiece with an oiler is installed - a special hole for introducing lubricant. There is nothing special about how to lubricate the cardan crosspieces. For this procedure you only need a special tool - a syringe. You can fill it with either a special lubricant for crosspieces, or use regular lithol.
Procedure for bleeding the clutch
To bleed the clutch hydraulic drive you will need:
- A rubber or plastic hose (tube) with a diameter suitable for tightly fitting the hose onto the drain fitting.
Wrench (usually 8 by 10).
A transparent vessel or reservoir for 200 ml of fresh liquid, for placing the second end of the hose into it.
Fresh fluid for topping up the clutch expansion tank.
Important! Old contaminated fluid drained from the clutch hydraulic system cannot be poured back into the system. On some car brands, the drain fitting is located at the bottom, so you may need an inspection hole to get to it.
To find out exactly where and how the clutch slave cylinder drain fitting is located in your car, read the “Operator's Manual”, in the “Clutch” section.
On some car brands, the drain fitting is located at the bottom, so you may need an inspection hole to get to it. To find out exactly where and how the clutch slave cylinder drain fitting is located in your car, study the “Operator's Manual”, in the “Clutch” section.
It is advisable to wear rubber gloves, since brake fluid is considered poisonous.
Important! DOT 3, 4 and 5.1 glycol-based fluids must not be mixed with DOT 5 and DOT 5.1/ABS. In the traditional version, clutch bleeding is carried out with an assistant, who only needs to press the pedal
In an emergency, the clutch can be pumped alone, using a brick or any other suitable object as an “assistant” to fix the clutch pedal in the fully pressed position
In the traditional version, clutch bleeding is carried out with an assistant, who only needs to press the pedal. In an emergency, you can bleed the clutch alone, using a brick or any other suitable object as an “assistant” to fix the clutch pedal in the fully pressed position.
Of course, the single option will take longer and be more labor-intensive, since one person will have to press the pedal in the cabin and unscrew/tighten the fitting in the hood or from below in the inspection hole.
Important! If bleeding the clutch hydraulic drive is carried out after repairing the clutch, then you must first ensure that the master cylinder piston pusher is correctly adjusted. If the pusher does not have sufficient free play, then it will not be possible to bleed the system
The pumping procedure is as follows:
- The first step is to check the fluid level in the clutch expansion tank. The tank must be filled completely, up to the neck. When inspecting the tank and adding fluid (if necessary), maintain cleanliness and prevent debris from entering the tank.
Release the head of the working cylinder drain fitting from the protective cap and place a hose (tube) on it. The opposite end of the hose should be lowered into a container with fresh brake fluid. When air comes out of the hose into the liquid, air bubbles will be clearly visible.
Important! During pumping, you cannot remove the second end of the hose from the liquid. Pump up pressure in the system using the clutch pedal
An assistant in the cabin must press the clutch pedal sharply and all the way 3-4 times. In this case, it is necessary that the pedal not only goes down to the stop, but also returns back to the stop. If the pedal “falls to the floor” and does not return to its original position on its own, you will have to return it with your hand or toe. The key here is to build up the pressure using maximum pedal travel. The interval between pedal presses should be approximately 2 seconds.
Pump up pressure in the system using the clutch pedal. An assistant in the cabin must press the clutch pedal sharply and all the way 3-4 times. In this case, it is necessary that the pedal not only goes down to the stop, but also returns back to the stop. If the pedal “falls to the floor” and does not return to its original position on its own, you will have to return it with your hand or toe
The key here is to build up the pressure using maximum pedal travel. The interval between pedal presses should be approximately 2 seconds.
Having pressed the pedal for the last time (the third or fourth), it must be left and held in the pressed position until it stops.
While your partner holds the pedal all the way down, another person should unscrew the drain fitting of the working cylinder with the hose attached to it, about half a turn. After opening the drain fitting, old fluid from the working cylinder will begin to flow into the container with new brake fluid through the hose. With the old liquid leaving the cylinder, air will also come out, the presence of which can be judged by the air bubbles in the container with the new liquid.
As the old contaminated fluid exits the clutch hydraulic system, the pedal pressed all the way by the second partner will begin to be pressed and lowered. You need to wait until the pedal is pressed all the way to the floor, and then immediately screw in (close) the drain fitting. The pedal cannot be released until the drain fitting is closed.
Repeat the procedure of squeezing the pedal and opening/closing the fitting several more times until clean liquid without air begins to come out of the hose. If aired fluid continues to come out of the hose even after the system has been completely pumped and the fluid has been completely changed (approximately 1 liter), then you need to look for the reason why air is entering the clutch hydraulic system.
Important! During the pumping process, it is necessary to carefully monitor the liquid level in the expansion tank and not allow it to fall more than 35 mm from the edge of the neck. During the pumping process, the old fluid will drain into a container and leave the hydraulic system.
Accordingly, the level in the tank will decrease, and if during the pumping process the liquid completely leaves the tank, then air will again enter the hydraulic system. Then you will not only have to start all over again, but also additionally waste new liquid, since the new liquid that has already been poured will merge into the container and mix there with the old one, and it will no longer be possible to pour it back.
After pumping and obtaining the desired result, the fitting must be screwed in well, remove the hose and put a protective cap on the head of the fitting.
In the process of bleeding the clutch hydraulic drive, the power reserve of the master cylinder piston pusher may change. Therefore, after bleeding the clutch, it is recommended to check the pusher travel reserve, which must correspond to the distance indicated. If the power reserve differs from that specified in the Manual, it will need to be adjusted to the desired value.
Conclusion
As you can see, it is not difficult to bleed the clutch hydraulic drive, and many people can do it without service at a service station, which will save money and time. At the same time, we should not forget that it is necessary to pump the clutch not only after repairing the clutch, but also after any routine maintenance affecting the components of the clutch hydraulic drive.
Video about several ways to bleed the clutch:
Signs of damage:
- presence of backlash;
- knocking when driving;
- creaking when turning the steering wheel;
- untimely reaction of wheels to steering wheel rotation;
- heavy rotation of the steering wheel;
- vibration when speed increases.
diagnostics must be carried out . It helps to accurately determine the cause of the breakdown. To carry out diagnostics, you need to install the car on a lift or inspection hole. The presence of play when the cardan rocks in different directions indicates that the crosspiece needs to be replaced.