VAZ engines have two, slightly different modifications of the torsional vibration damper and crankshaft hubs, in other words, the pulley. On a VAZ 2110, the crankshaft pulley can be made as a block, or also have a separate system with a hub - a damper.
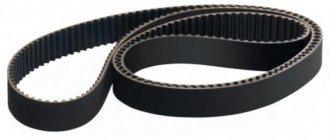
Cast iron crankshaft pulley
When the production of the “ten” had just begun, the crankshaft vibration damper was a single unit, and was secured with only one central bolt. Along with the injection VAZ 2110, a damper appeared. It is bolted to the hub.
Crankshaft damper pulley
Crankshaft damper pulley
Crankshaft damper pulley
Crankshaft damper pulley
Purpose
The crankshaft pulley serves to transmit rotation from the crankshaft to such important vehicle components as the generator, power steering and air conditioning. In addition to this function, in the injection engine there are special teeth on the damper-type pulley, which are read by the crankshaft sensor.
This is one of the most important indicators for the electronic motor control system, which is responsible for the correct operation of the entire unit.
If it fails (beating and deformation, cracks and tears), the VAZ crankshaft pulley will most likely need to be replaced. This part of the car can be repaired, but in very rare cases (if minor defects are detected).
It is not necessary to go to a specialized car workshop; if you have free time and skillful hands, you can do the replacement yourself, which will not only save money, but also increase your self-esteem.
Preparatory work
Before removing the crankshaft pulley, you need to prepare the necessary tool and perform preliminary procedures. In your work you will need the following tools:
- overlay key 19;
- pipe section;
- special pulley puller or pry bar.
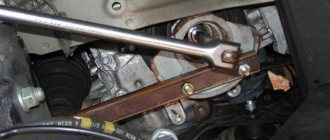
Place a support under the front wheels, remove the connector from the ignition coil and set the gear shift lever to neutral. Unscrew the tension bolt of the generator by 3-3.5 cm, loosen the fastening bolts to allow it to move freely and remove the belt. After this, you can remove the crankshaft pulley 2110.
Reverse actions
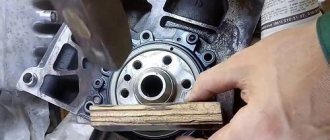
After removing the pulley, you can carefully examine it and put it aside for garage scrap metal. Take the new part in your hands and lubricate the key seat well with grease. Slightly tilting the key towards the hub, we slowly push the pulley onto the shaft. For this purpose, you should have a hammer in one hand, and in the other a piece of soft rubber, which is placed between the hammer and the body and prevents the hammer from damaging the crankshaft pulley.
Once the hub is in place, you need to tighten the fixing bolt. This must be done without any tricks: a wrench and a pipe will help tighten this bolt until it stops. To avoid turning the crankshaft when you begin to apply significant force to tighten the bolt, you need to lock it using a metal pin (large screwdriver), inserting the latter between the teeth of the flywheel ring. To do this, you need to open the clutch housing ventilation plug.
It is not recommended to tighten the bolt to the limit; you may miscalculate the effort and break it, and this is almost a disaster. To do this job correctly, you will need a torque wrench. As soon as the sensor shows a tightening torque of 400 N/meter, no further force is allowed.
After this, put the belt on the crankshaft pulley and tighten it using the tension bolt on the generator. Don't forget to tighten the generator mounting bolts and reconnect the connector on the ignition coil.
If you followed everything described above, then you now not only know how to remove the crankshaft pulley, but also know how to do it yourself.
Unscrew the locking bolt
The only bolt that secures the pulley to the crankshaft is not so easy to unscrew. The threads of this bolt coincide with the direction of rotation of the crankshaft, so if you do not have a pneumatic impact wrench, you will have to cope with this task with some trickery.
The crankshaft pulley bolt can be easily unscrewed using a spanner, a piece of pipe and your car's starter. We put a 19mm head on the bolt, and using a pipe we extend the handle of the key to the surface, and in such a way that it rests on the floor on the side opposite to the direction of rotation.
After that, we get behind the wheel, ask the nervous neighbors in the garage to leave and start the car with a quick movement of the key. The starter should not turn for more than a split second. After making five or six such attempts, you will be able to unscrew the “stuck” bolt without making titanic efforts. Be prepared to be accused of wasting the starter's resource, damaging your property, etc.
Yes, this method is not used in service centers, but there are witnesses to its effective implementation. Nothing was spoiled by this, except the mood of those who opposed this method of unscrewing bolts.
Unscrew the pulley nut
The nut that holds the pulley at the end of the crankshaft indicates that we are working with a classic version of the engine, namely a VAZ-type car. So, before starting work, you need to prepare the necessary tool, namely a socket or socket wrench for “36” or “38”, you also need to prepare a piece of pipe about 30 cm (later you will find out why). It is better to do the work above the inspection hole. If this is not possible, then it is better to use a jack and definitely a tree stump (better to be safe).
We set the gearbox lever to the fourth gear position and turn on the parking brake mode (handbrake). We try to unscrew the nut using a wrench with a long lever while being under the car. If the attempt fails, you need to use another option.
Set the gearbox lever to the neutral position and remove the spark plugs. We install the key so that it rests (in the case when the length of the key is not enough, a pipe is used) against the floor or the rear spar in the direction of movement of the crankshaft. When the requirements are met, it is necessary to turn the ignition key to give short-term pulses. Sometimes the nut fits so tightly that you can’t get it off the first time. Mostly it is released on the third or fourth try. Once the nut is stripped, it can be tightened with a wrench.
Pulley removal
A special key confidently holds the pulley hub on the shaft even with the bolt removed. A special puller allows you to perform this operation quickly with minimal effort. If you don't have it, you'll have to tinker a little longer. First, treat the interface between the pulley and shaft with a special liquid (like WD-40).
After this, you need to wait a little for the liquid to do its job. Using a pry bar, pry the crankshaft pulley around the circumference and swing it in the direction away from the engine. The procedure is long and tedious. The main task is not so much to remove the pulley hub as to avoid damaging the keyway.
What problems might you encounter?
There is a possibility that you may not immediately notice the characteristic disc part under the hood of your car. It may also be difficult to access. It will be difficult to fix the shaft. Over a long period of time, the joints of fasteners will “stick” and you will have to use special liquids.
To perform all the necessary steps step by step, you will need the following tools:
- impact wrench;
- puller set;
- jack;
- a set of wrenches or other tools for removing bolts;
- presence of an inspection hole.
Purpose, design and replacement of the VAZ 2110 crankshaft pulley
VAZ engines have two, slightly different modifications of the torsional vibration damper and crankshaft hubs, in other words, the pulley. On a VAZ 2110, the crankshaft pulley can be made as a block, or also have a separate system with a hub - a damper.
When the production of the “ten” had just begun, the crankshaft vibration damper was a single unit, and was secured with only one central bolt. Along with the injection VAZ 2110, a damper appeared. It is bolted to the hub.
Possible faults
Removal and, if necessary, replacement of the pulley may be required in the following cases:
- If the hub has turned. It must be said that most often this happens due to previous inept repairs. The fact is that the VAZ 2110 has a fixing sleeve in the seat for the damper, pressed into the gear. It tends to fall out of the gear, causing the hub to rotate;
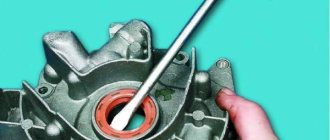
- Oil leaked from under the front crankshaft oil seal;
- The lightweight crankshaft began to resonate strongly;
- The old-style pulley or damper is loose;
- The damper seat broke. In case of such a breakdown, a replacement is needed, preferably together with the crankshaft gear;
- If it is necessary to remove the crankshaft - for repairs, replacement of liners, half rings, converting it into a lightweight one, etc.
Features of bolt location on cars of various manufacturers
When you lift the hood, you can inspect the engine, but the crankshaft pulley is almost invisible since it is located behind the generator. If you look closely (to the place where the belt stretches) you can see a disk that tightly secures the shaft. This is that very detail. Pulleys are of the following types:
- Standard.
- With damper.
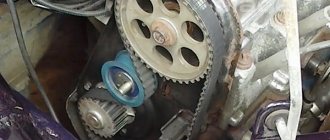
The difference between the latter option is that it has a massive ring, which is separated from the main part by a rubber gasket. The purpose of the gasket is to reduce vibration of the part during movement. You can see teeth on the outer edge of the damper. They are needed for the crankshaft position sensor to work.
To remove the pulley, you first need to get to it. Loosen the locking bolt on the generator, loosen the tensioner and lower the belt. Now you need to disconnect the container with antifreeze. The power steering belt can also interfere. To remove it, you need to find a 14 bolt on the pulley side, it is this that creates the tension in this belt. The last step is the most difficult - you need to unscrew the fastener that holds the pulley on the crankshaft. It is not difficult to find the fastening element; it is located under the right front wheel. You can start unwinding.
The location of the crankshaft pulley does not differ depending on the manufacturer. It is located near the front right wheel of the car. Which is very convenient, because after purchasing a car from another manufacturer, you don’t have to look for a part. On the other hand, the elements blocking access to the knee shaft may differ. For example, a power steering belt. Its location may vary depending on the make of the car, and the part may interfere (or not interfere) during operation.
Removing the damper
On a VAZ 2110, the damper is removed in the following sequence:
- Disconnect the ground from the battery;
- Remove the radiator fan and fluid coupling;
- After loosening the bolts securing the fan pulley, remove the belt;
- It is advisable to remove the radiator, but if it does not interfere, you can leave it, protecting it from damage from the engine compartment with a sheet of plywood or cardboard;
- Remove the pulley from the radiator fan;
- We gain access to the damper, unscrew the bolts, dismantle it;
- When removing the hub, you need to secure it from turning (for which there is a special tool).
Next we proceed depending on the purpose of the analysis. If you only need to replace the damper, we do it and assemble everything in the reverse order.
You should know that replacing the liners on a VAZ 2110 can be done either with or without removing the crankshaft. But this requires a special device, and besides, it is better to entrust such work to an experienced mechanic - a mechanic.
If the crankshaft was dismantled to replace the liners or half rings, then we continue:
8. Remove the lightweight or regular crankshaft; 9. We remove the half rings; 10. We evaluate the condition of the liners, and if they do not need replacement yet, then be sure to remove them and mark each of them; 11. But, unfortunately, no matter how carefully the owner treats his VAZ 2110, sooner or later the time for physical wear comes for the liners - they need replacement.
- Four repair kits of inserts are produced for the VAZ 2110. You need to buy them only as a set, and only in a strict sequence of sizes. Sometimes, however, situations are possible when you have to purchase them “through size”;
- thus, the crankshaft only lasts for four (and sometimes even three) overhauls;
- replacement of liners cannot occur without grinding the crankshaft. The only exception is if it is replaced with a new one. At the same time, an experienced craftsman can turn the crankshaft into a lightweight one.
How to unscrew a bolt?
- As a rule, the pulley is attached to the crankshaft with a bolt only on front-wheel drive vehicles. To unscrew the bolt holding the pulley on the crankshaft, you will have to work hard, because getting to the bolt is not easy. Before you begin, you need to prepare the necessary tools: a jack, a head to match the size of the bolt and a lever with an extension, a tool kit for a motorist and a “tragus” (you can use a tree stump as a tragus). The removal phase looks something like this:
- We install a jack on the right side of the car in the area of the front wheel. Jack up the car and remove the wheel;
- Under the car, near the jack, we slip a trestle or stump (whatever is at hand). This will ensure the reliability and safety of bolt removal;
- During the work it will become clear that the bolt cannot be reached. We open the hood of the car and remove all parts that prevent full access. The air filter, the protective brushes of the car engine and the generator belt are usually removed;
- To unscrew the bolt you need to fix the crankshaft. To do this, you need to lock the flywheel teeth. Open the plug on the clutch block and insert a pry bar or screwdriver into the resulting hole. It is not very convenient to carry out actions to hold the flywheel lock and at the same time unscrew the bolt alone. You can ask someone for help;
- We take a head selected to the size of the bolt, with an extension and an additional lever, push it under the wheel arch and put it on the bolt;
- Turn the lever counterclockwise.
By the way, not on all cars the crankshaft moves in the direction of the clock hand. In some Honda models it has the opposite direction, which means that the bolt must be unscrewed to the right.
In most cases, the bolt gives in immediately, but if it is still in place, then you can use a slightly longer lever, and then it will definitely work.
How to unscrew and remove the crankshaft pulley of a VAZ 2110
From the very first release in June 1995, the VAZ 2110, or “ten” in common parlance, won the love of middle-class people. This model was produced for 12 years. Not difficult to maintain and easy to break down, as well as replacing some parts is easy to do yourself, without resorting to the services of a car service. This will save not only time, because the wait for the service center to take on the car can vary depending on the workload of the technicians, but also money. Engine VAZ 2110 8-valve injector, volume – 1.5 liters, front-wheel drive, M5 gearbox. Engine power 56 kW, torque 118 Nm. A huge plus is low fuel consumption.
The maximum speed is 170 kilometers per hour, while acceleration is 14 seconds. Very well suited for urban heavy traffic. Starts even at -25 degrees below zero. The chassis is made of high quality, excellent for holes and potholes. The suspension is strong. Power steering can be installed, but to order. The components are not expensive, even original ones can be purchased by a middle-class car enthusiast.
The interior is not very roomy, but it has a trunk capacity of 450 liters. The rear backrest reclines, the middle one reclines completely, and the side ones have a smaller deviation. Long loads can be easily transported. An internal combustion engine equipped with a belt drive, sensors and an electrical engine control unit control the operation of the systems. The most common breakdown for VAZ 2110 8 valves is engine friction.
- Poor quality fuel; as a result, one of the fuel system parts became clogged. In this case, you will have to study the fuel supply circuit and fix the problem. Doing this on your own is difficult and can take a lot of time. In this case, it is better to contact a car service.
- Damage to spark plugs and wires. You need to visually inspect everything and check the fragments with a tester.
- Malfunction of the electronic control unit and sensors. Home renovation enthusiasts cannot solve this problem. You will have to turn to craftsmen who have experience and special equipment.
VAZ 2110 8 valve injector has high technical characteristics. But, like all cars, over time some parts tend to wear out. The main breakdowns that car enthusiasts can fix themselves are replacing the Kalevala pulley of the VAZ 2110 8 valves. The gear or pulley of the VAZ 2110 crankshaft is one of the most frequently replaced parts. Their good service life is on average 3 years. Car owners will not find it difficult to replace it themselves as the process is simple. Having understood how to change the crankshaft gear, the driver will gain experience in repair work in the manual drive system of the gas distribution mechanism, but will also be able to further adjust the valve or make modifications.
Purpose and role of the crankshaft pulley
Purpose and role of the crankshaft pulley
Each drive of this car brand has 2 types of pulley:
- Block type.
- With a disconnected system with a bushing - a damper (acts as a shock absorber under heavy loads on the crankshaft).
At the very beginning of VAZ production, the pulley was one-piece and was fastened with one bolt. But with the advent of the injector, a damper was also mounted on the hub.
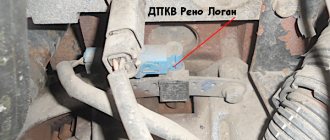
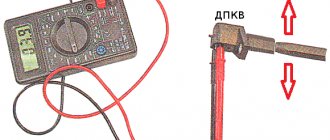
Lada 2109 › Logbook › 17. Replacing the damper pulley and crankshaft gear
Let me briefly remind you of what I wrote in the last entry. It's been 2 days since I replaced the timing belt and the car refused to drive at speeds above 2000 rpm. More precisely, it drove, but when the revolutions rose above 2000, it began to twitch and did not drive at all. The bortovik showed an error - incorrect DPKV signal. On the side of the road, I checked the DPKV chip and wires (at one time they were blowing my mind!) I realized that something was wrong here and decided to leave it as is until the morning. In the morning I decided to check my favorite sore! Crankshaft gear pin! And how he looked into the water! Once again it was torn off. More precisely, it broke halfway, but due to the fact that I also drove a self-tapping screw there, to be sure, the damper pulley did not turn due to this.
How to remove the damper
- It is necessary to disconnect the wire that connects the negative terminal of the electrical element to the body of the product from the battery.
- Remove the fan and coupling.
- Lightly undermine the choke pulley rod and remove the belt.
- Carefully, so as not to damage the heat exchanger, remove the gear from the fan.
- The approach to the damper opens. Then tighten the bolts slightly and remove it.
- When the hub is removed, it must be secured against rotation.
All engines consist of several systems and operate using a source of mechanized energy - the crankshaft. Some part of the tacking moment is redirected from it and driven into action by the shafts, generator, pump, etc.
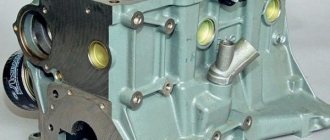
The crankshaft pulley 2110 is one of the engine parts of the gas distribution mechanism and additional components. Located in the front half of the crankshaft.
• Monitors angular velocity and shaft position. • Reduces noise. • Reduces the swing of the crankshaft.
The pulley is one of the most important parts of a typical engine.
Reasons for replacement
The crankshaft pulley is located on the right side of the engine compartment and is best accessed from below
Before proceeding directly to the process, it is necessary to consider the main reasons why it may be necessary to dismantle this part. In fact, everything is much simpler than it seems. So, let's look at the main reasons for dismantling:
- Major repairs will require removal of the pulley.
- Wear of the product (wear or broken teeth).
- Some repair operations will require dismantling the pulley ( setting valve timing , etc.).
Should we unscrew the crankshaft pulley?
So, when the reasons are considered, let's proceed directly to the process itself. It is worth noting that this operation cannot be completed alone, so you need to ask for help, in other words, you will need an assistant . Let's consider the immediate sequence of actions for removing the crankshaft pulley:
- We place the car on a pit or overpass.
- We dismantle the front right wheel. The car must be well secured in this position, since when unscrewed it may fall off the jack. Therefore, you need to install a stump under the threshold, and anti-roll bars under the rear wheels; you can use the removed wheel.
Car after wheel removal
Remove the plastic fender liner by unscrewing the 5 fastening screws
Generator drive circuit
We insert a crowbar into the flywheel so that it does not rotate when the nut is unscrewed
It is worth noting that the cutout on the crankshaft pulley, during installation, must coincide with the protrusion on the crankshaft itself.
Reason for changing the crankshaft pulley
The crankshaft pulley of the VAZ 2110 is a reliable car part, but it can become faulty.
If you observe at least one item with the ones listed below, it’s time to change it:
- If oil leaks from the shaft.
- Feeling of increasing resonance.
- A crack in the damper seat (mechanism for reducing or preventing vibrations). Needs replacement along with the crankshaft gear.
- Hub rotation.
- If the crankshaft is removed for any repair work.
How to unscrew the crankshaft pulley of a VAZ 2110
For a good overview and access to the car pulley, it is best to use an inspection hole or overpass. It would be a good idea to take an assistant because it is difficult to cope with some processes alone.
If there is no inspection hole, lift the car using a jack and you can begin dismantling, which consists of the following steps:
- To avoid breaking the bolt while unscrewing it, you need to treat it with some means (for example, WD-40) for better scrolling, since it can become rusty under the influence of temperature and other factors. As a result, it is very difficult to twist.
- Unscrew the bolt and carefully remove the right wheel, since the engine is located transversely, you will have to remove it to access the pulley.
- Remove the air filter present there.
- Unscrew the screws and remove the shield to protect the engine from dirt. [BR]• Remove the alternator belt, as well as all mechanisms that complicate access.
- Open the plug on the clutch box and insert a pry bar into the opened space to jam the gear teeth.
- Place a wrench with an extension on the bolt and turn it. Carefully remove using a special puller.
- We mount the new one, making sure that the notch on the pulley coincides with the tooth.
Often, beginners, when repairing their car on their own, are faced with not knowing how to remove the crankshaft gear.
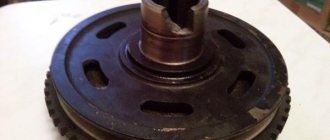
The crankshaft gear is a part that powers the mechanisms in the drive. It has the shape of a gear with teeth; a chain or belt can be put on them. Typically, timing gears and oil pump drives are attached to the crankshaft. The gears are placed with a tight fit and secured with a connecting rod with threaded fasteners.
Replacing the generator drive pulley on front-wheel drive VAZ and Lada cars
The generator drive pulley changes in the same way on cars of the “tenth series” (VAZ 2110, 2111 and 2112), the “Samara” series (VAZ 2113, 2114 and 2115), as well as the “new” models of Lada Kalina, Priora and Grant.
The generator drive pulley is located on the “toe” of the engine crankshaft on the side of the first cylinder (right wheel) and drives the generator and, if equipped, air conditioning and power steering using a belt.
The main reasons for replacing a pulley are damage to the ring gear or delamination of the pulley itself.
Damage to the ring gear leads to unstable operation of the motor. If the teeth are broken, the car may not start because the crankshaft sensor (CSS) cannot determine the top dead center (TDC) for the ignition count.
Delamination occurs on damper pulleys (not cast iron). The fact is that on these pulleys the outer part is attached to the central part through a rubber spacer. It acts as a vibration damper (anti-resonance) on the engine crankshaft. It happens that the outer race rotates a little. Then the toothed pulley moves relative to the dead center and, as a result, the car becomes “sluggish” during acceleration, and the idle speed becomes unstable. If the pulley is too misaligned, the car cannot be started. Also, the car will not start with the upper race completely peeled off from the central part of the pulley.
Such damage is easily diagnosed by the lack of rotation of the alternator belt.
In rare cases, the seat key on the shaft breaks, and the pulley begins to vibrate and rotate. If the movements are small, then the ECU does not display an error on the instrument panel, but at the same time the engine at idle is unstable and “troits.”
Checking the condition of the pulley is quite easy. To do this, you need to inspect the condition of the ring gear for chips and cracks. The ring gear is located on the outer race closer to the engine (indicated by an arrow) and is clearly visible from above: