Replacing the front brake pads of a VAZ 2106
This material will tell you how to properly remove and replace the front brake pads of a VAZ 2106. They will have to be removed not only if they are worn out, but also when removing the brake caliper and replacing the front brake cylinders.
Tools
What is needed for this:
- Pliers
- Punch
- Hammer
- Pliers or thick screwdriver
How to remove the front brake pads of a VAZ
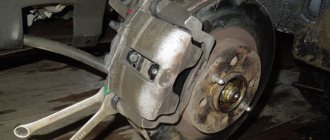
- We lift the car on a jack and install a safety log under the lever (a safety measure to prevent the car from falling off the jack).
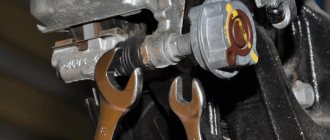
- Lubricate the contact points between the caliper and the guide pins with WD-40 or its equivalent.
Dirt often accumulates in these places and corrosion occurs. To simplify the work process and remove the guides without problems, it is necessary to lubricate these places with a special lubricant.
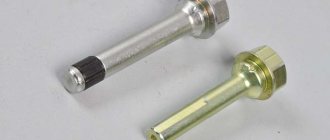
- Pull out the cotter pins that secure the guide pins
The cotter pin (retainer) may “resist.” To remove it, lightly press on the guide rod to relieve tension on it. Use a screwdriver or pliers to remove it from its seat. At this point, the fasteners may become damaged. Therefore, it is recommended to buy a repair kit in advance, which will contain new ones. This will save you from inconvenience when installing them in place.
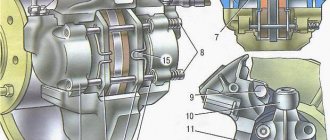
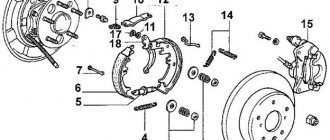
- Use a punch to knock out the guides, holding the pressure springs from flying out
They serve to press the pads to the caliper, to the guide pins, so that when the car moves, the brake pads do not rattle in the pits. Over time, these springs lose their properties, stop pressing tightly, and on bumps, drumming occurs in the area of the front brakes. If you press the brake at this moment and the noise disappears, it is the springs (“chains”) that have weakened and must be replaced.
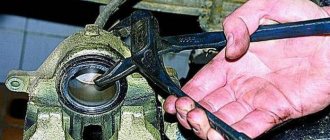
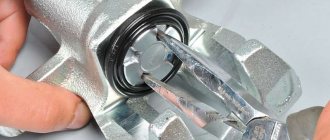
- Using pliers we open (retract) the pistons of the brake cylinders
We grasp the bottom of the cylinder with one edge of the pliers or a mechanic's wrench, and with the other we grasp the protruding side of the block. Smoothly squeeze the pliers, pushing the cylinder piston inside. We do it without “fanaticism” so as not to crush the cylinder.
You don't have to do this, maybe you can pull out the pads this way. But it is worth remembering that when replacing them, you will install new ones with thicker friction linings. There is a possibility that they will not fit into the old sizes of worn parts. In this case, you will still have to recess the cylinders to fit new ones.
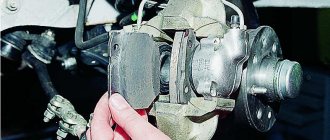
- We take out the pads
Installation is carried out in reverse order.
How to properly install pressure springs
This question has divided all professional car mechanics into two camps. Some argue that it is correct to install from the brake disc side, as shown on the left side of the screenshot below, others - from the brake cylinder side, as shown on the right.
The first ones say - there is no difference, the main thing is that they press the pads and do not let them “rumble”. The latter explain it this way: if you install “gulls” on the disc side, then with their edges they will press the brake element against the disc, increasing wear on the friction clutch. If you install it with the side facing the cylinders, they seem to move them apart; they do not come into contact with the disk, so there is no wear during movement.
If you think logically, then the second part of the people is right. The springs have a design in which they, with their rounded edges, attract the pads in the direction of their installation. Therefore, if you place the springs on the inside, their edges will slightly press them against the disk - they will wear out faster. If from the inside, then there will be no such effect.
Video on how to shoot a classic in a garage:
Recommendations
If for some reason you do not want to install new ones, then you can swap the inner pad with the outer one. Thanks to this, their wear will be uniform, and they will brake with uniform force.
Front brake pads are replaced when the friction lining thickness is 1.5 cm or less. With such wear, you will be bothered by squeaks and squeaks when you press the brake, and the quality of braking will be worse.
Remember, a properly functioning braking system is the key to safe driving.
Before you start removing it, it is recommended to buy a repair kit for the front calipers. It includes: “gulls”, guide fingers, and their springs. This is necessary so that during the replacement process the pressure springs may “fly out” in an unknown direction, the fingers will not want to lick out of their seats, they will have to be cut off, the guide springs and “gulls” may lose their elasticity.
Before installing the fingers, it is recommended to lubricate them with a thin layer of lubricant (lithol) so that they fit freely into the holes. If the new pad does not want to “climb” into place, you need to try to recess the piston of the brake cylinder even more or lightly tap it with a hammer, driving it in. Knock only on the steel part of the block, without catching the feredo. It will fit in with tension, but after several tens of kilometers it will rub in and take its position.
Before leaving, be sure to press the brake pedal several times to bleed the brakes. During the replacement process, we compressed the cylinder pistons; now they need to be returned to their original position so that they press the pads against the brake discs. Don't be alarmed, the pedal may fall to the floor the first two times. After the brake fluid fills the cylinders, it will regain its former elasticity.
Conclusion
Today we learned in a garage how to change brake pads on a Zhiguli 2106 with our own hands. This method is suitable for all “classic drivers”, owners of “sevens”, “kopecks”, etc. We learned the nuances and recommendations from a specialist auto mechanic.
By the way, when diagnosing the front brake cylinders, you also need to remove them, so be sure to watch the videos and leave comments. Share your experience and advice with novice mechanics.
Video on the topic
Brake pad malfunctions
The following characteristic signs indicate problems with the pads:
- sounds unusual for brake operation (creaking, squealing, grinding);
- car skidding when braking;
- the need to apply more force to the brake pedal;
- black or metal dust on wheels;
- increased braking time;
- The pedal does not return to its initial position when released.
Screech
Brake pads must be changed when the friction material thickness reaches 1.5 mm. If this is not done, a grinding (squealing) sound will occur. In addition, such sounds may be present when installing low-quality pads.
If the brake pads are heavily worn, a squealing or grinding noise may occur when braking.
Shocks when braking
The appearance of shocks during braking can be caused either by the condition of the pads themselves, or by a damaged surface of the brake disc or drum, soured pistons in the cylinders, or other malfunctions. To identify the problem, you will need to disassemble the brake mechanism and carefully inspect the parts for wear and damage.
Car skidding
There can be many reasons for skidding - severe wear of the pads, damage to the discs, loose caliper mounts or suspension malfunctions.
Once a situation arose with my car when, while braking, the car began to pull to the side. It would seem that it is necessary to diagnose the brake system. However, after a detailed examination, I discovered that the cause of this phenomenon was a damaged longitudinal rod (rod) of the rear axle. It was simply torn from the eyelet. After replacing this part the problem disappeared.
Video: why a car pulls to the side when braking
Stiff or soft pedal
If you notice that the pedal has become unusually tight or, conversely, soft, then most likely the pads have become unusable and will have to be replaced. Additionally, it is worth inspecting the hoses supplying fluid to the brake cylinders and the cylinders themselves. If the piston sticks in them, then the problem with pedal stiffness may also manifest itself because of this.
Appearance of plaque
Plaque can appear both when using low-quality pads, which leads to their rapid erasure, and with normal parts. However, in the second case it should be minimal. Dust can also appear during aggressive driving, i.e. during sudden starts and braking.
The appearance of black coating on wheels can be caused by active driving.
From personal experience I can say that after installing the front pads from AvtoVAZ, I observed black dust on the discs. The plaque was clearly visible because the discs were painted white. From this I can conclude that the appearance of black dust from the process of erasing the pads is a normal phenomenon. Perhaps installing more expensive parts will help get rid of this phenomenon. However, if you are sure that the car has good quality pads and their condition is normal, then there is no reason to worry.
Pedal sticking
If the brake pedal does not move back when pressed, this indicates that the pad is sticking to the disc. This phenomenon is possible in frosty weather when moisture gets on the brake elements, but it would be useful to inspect the pads. If the car cannot be stopped for a long time when you press the pedal, then the reason lies in worn out pads or air getting into the hydraulic system. You will need to inspect the brake components and possibly bleed the brakes.
Replacing brake pads on a VAZ 2110 with your own hands (video)
It is quite easy to determine a malfunction of the brake system by the first signs - a beating in the steering wheel and a metallic squeak coming from the front wheels. Such phenomena indicate that it is time to change the brake pads.
Brake kit
It is recommended to replace the rear brake pads on a VAZ 2110 simultaneously with changing the front ones. The fact is that the main part of the load during braking is taken on by the front elements. This is approximately 70 percent of the load. The rear ones serve more as a balance, so they wear out much less intensively than the front ones.
Let's take a closer look at how the rear and front pads are replaced on a VAZ 10.
Front
Before starting work on replacing the front brake pads on a VAZ 2110, be sure to arm yourself with a set of tools, which includes:
- Hammer with short handle;
- A small sharp chisel;
- Two wrenches - socket and socket 13;
- Open-end wrench 17;
- Pliers;
- Small crowbar;
- Jack;
- Balloon wrench;
- New pads.
When everything is ready to go, you can begin the replacement process.
- Park the car in such a way that it cannot roll away. It is best to put some kind of stoppers under the wheels. It is advisable to use special devices rather than simple bricks.
- Loosen the bolts on the front wheels and lift the car to one side using a jack.
- Completely remove the wheel mounting bolts, remove it and place it under a raised part of the machine. This is a simple safety measure in case the jack accidentally comes off.
- Now we determine the location of the front brake pads on the VAZ 2110. The calipers are located in front of the brake disc, so to easily replace the left pad, turn the steering wheel all the way to the left, and vice versa.
- To make it easier for you to access the part, arm yourself with a thin chisel and a hammer. These tools will unlock the top bolt.
- Unscrew it with a 13 socket wrench, holding it on the other side of the caliper with a 17 socket wrench.
- There is no need to remove the pad yet, since the caliper is now in its extreme position. That is, the new part will not fit into place.
- Do not completely unscrew the bolt; use a crowbar and insert it between the body and the pad, pressing the caliper all the way.
- Once this is done, unscrew the top bolt all the way. This will move part of the caliper to the side, thereby providing access to the pad itself.
- Remove the old pads and put new ones in their place.
- During assembly, simply follow the reverse order of dismantling. Just remember the importance of bolt countering. The washer must be bent onto the edge of the fastener. At this point the replacement can be considered complete.
How to properly install pressure springs
This question has divided all professional car mechanics into two camps. Some argue that it is correct to install from the brake disc side, as shown on the left side of the screenshot below, others - from the brake cylinder side, as shown on the right.
The first ones say - there is no difference, the main thing is that they press the pads and do not let them “rumble”. The latter explain it this way: if you install “gulls” on the disc side, then with their edges they will press the brake element against the disc, increasing wear on the friction clutch. If you install it with the side facing the cylinders, they seem to move them apart; they do not come into contact with the disk, so there is no wear during movement.
If you think logically, then the second part of the people is right. The springs have a design in which they, with their rounded edges, attract the pads in the direction of their installation. Therefore, if you place the springs on the inside, their edges will slightly press them against the disk - they will wear out faster. If from the inside, then there will be no such effect.
Video on how to shoot a classic in a garage:
Replacing brake pads on a VAZ 2107
The timeless “classic”, although left behind the Togliatti assembly line, continues to be in demand on the secondary market. The secret is simple - the car is extremely cheap, and its maintenance can be done almost entirely on your own due to its extreme simplicity (if not to say primitiveness).
Changing the brake pads on a VAZ 2107 with your own hands, as on any other car of the “classic” family, is not difficult. The only problem that may be encountered is corrosion of the joints, which can be solved with a regular penetrating lubricant such as WD-40.
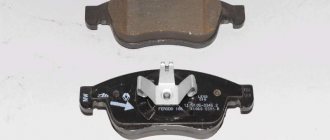
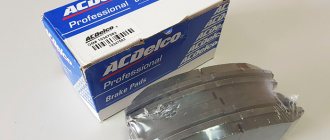
Brake pad selection
The design of the brake pads is the same for the entire 2101-2107 family, which can be seen even from the factory part numbers:
| Front kit | Rear kit |
| 2101-3501089 | 2101-3502090-01 |
Automotive stores offer a large number of different options. In addition to products from domestic manufacturers, among which it is worth noting VAZInterService (VIS), you can also find products from well-known foreign brands:
| Manufacturer | Front | Rear |
| TRW | GDB 140M | GS 8222 |
| Brembo | P 41 001 | S 41 501 |
| Ferodo | TAR 96 | FSB 59 |
In many ways they are superior to domestic pads, although they are significantly more expensive. For example, according to test results, TRW pads demonstrate a 20% increase in braking force at the same pedal pressure compared to standard ones, while its curve itself is more linear and practically does not change when heated.
Considering that, by modern standards, the brakes of the “classic” are not the most effective, such a replacement of the brake pads on the VAZ 2107 will significantly improve the safety of the car.
Preparation
The work is best done on a flat, paved area - most typical garages will be a bit cramped. Find a suitable support in advance - hanging a car on a standard jack is dangerous, especially considering the state of the jacking sockets on cars, the youngest of which is almost ten years old. Also for work you will need:
- narrow nose pliers;
- a thin drift (at worst - a piece of 4 mm electrode or a thick nail);
- metal brush;
- powerful flat screwdriver;
- rubber bulb or large syringe.
First, you need to pump out the old brake fluid from the reservoir - when the working pistons are recessed, it can overflow, and replacing it with fresh one would be quite reasonable. It is worth placing stops under the wheels and, having removed the tightened bolts, hang the car, place a support under the threshold and release it down.
Replacing front pads
It’s very easy to remove the front pads on the “classic” yourself thanks to the design of the two-piston caliper:
- Clean the caliper from dirt with a wire brush.
- Using narrow-nose pliers, remove the cotter pins of the pad guide pins.
- Knock the pins out.
- Using a flat-head screwdriver, press the caliper pistons so that they go as far into the caliper body as possible.
- Remove the pads and replace them with new ones.
- Install and tighten the pins.
Photo instructions:
Video instruction:
Replacing rear pads
Replacing the classic rear pads with your own hands is a little more difficult - after hanging the rear axle with the handbrake released, start in order:
- Remove the pins holding the drum to the hub.
- Knock the drum outward if it cannot be removed by hand (care is required - it is easily damaged!).
- Clean the mating surfaces of the hub and drum. It won’t hurt to apply a thin layer of graphite lubricant to one of them - in the future, removing the drum will be noticeably easier.
- Using needle nose pliers, remove the upper spring that presses the pads to the working cylinder.
- Remove the soldiers by pressing on their spring-loaded cups and turning them 90 degrees.
- After removing the front shoe from the groove of the working cylinder, remove the lower spring.
- Disconnect the handbrake cable from the lever on the rear block.
- Depending on the design of the purchased set of pads, it may be necessary to move the handbrake lever from the old pad to the new one - to do this, you only need to unscrew the lever axis.
Replacing brake pads VAZ 2101-2107
Almost any driver can feel that it is time to change the brake pads based on the behavior of their car on the road. It is quite possible to replace the brake pads yourself, with a minimal set of tools and a jack, and you don’t even need a pit or a lift - everything can be done on a flat surface.
Brake pads VAZ
Replacement of VAZ front brake pads.
To replace the front brake pads of a VAZ, you first need to put the car on the handbrake, then remove all the wheel mounting bolts. Then lift the desired side with a jack and fix it using available means - hemp, boards, several bricks, so that the wheel sag and does not touch the ground. Next, unscrew the bolts and remove the wheel.
The caliper is held together by two spring-loaded pins with cotter pins that need to be removed. Next, on the side opposite the springs, we knock out the fingers using a suitable drift, metal rod or screwdriver. This must be done slowly so that the spring does not fly off the finger. When the finger is knocked out, we gain access to the caliper pistons. We squeeze the pistons, freeing the pads, remove the old ones and install new pads. We put the fingers in place, lubricating them with oil for convenience, insert the cotter pins and put the wheel in place.
Replacement of VAZ rear brake pads.
There are drum brakes on the rear wheels. Just like when replacing the front pads, to replace the rear brake pads of a VAZ, we tear off the bolts, lift the car with a jack as high as possible and fix the bridge, placing the same bricks or boards under it to make it convenient to work. You need to put shoes under the front wheels to prevent the car from “sliding.” Then remove the rear wheel. We unscrew the two guides from the drum and screw them back into the adjacent holes so that they push the drum out and it can be removed. If this doesn't work, use WD-40, but don't use brute force.
First you need to remove the fixing cups from the pad body, to do this, clamp them and turn them 90 degrees, then pull them out along with the springs. Then pry the pads from below and pull them towards you so that the lower spring tightens. Let's take it off. We move the pads apart and remove the spacer that is located between them. Remove the handbrake cable from the lever, then remove both pads and the upper spring. The parking brake lever is attached to the pin using a cotter pin, which must be removed.
You need to transfer the upper spring to the new pads (if there are no defects on the spring, then there is no point in changing it) and fix the lever, then put them in their seats along with the spacer. It is most convenient to tighten the lower spring with pliers. Then throw the handbrake cable over the lever, install the drum and wheel.
Selection of VAZ brake pads.
Your safety directly depends on the quality of brake pads. There are now many cheap options on the market, usually from Asian manufacturers, that do not provide sufficient friction between the pads and discs or drums. Optimal quality is provided by original pads, which are manufactured in Tolyatti, but there are also other trustworthy foreign manufacturers, such as Brembo, Ferodo, Finwhale, TRW. These manufacturers have been on the market for a long time and have proven themselves well. Some experts suggest determining the quality of brake pads by smell - the sharper and stronger the smell, the better the pads. They are partly right, since the friction coating contains many different components, which give off a strong, unpleasant odor.
Replacing rear pads
The brake elements front and rear wear unevenly. Therefore, rear pads are changed much less frequently. However, you should not delay the repair, since both the braking efficiency and the holding of the car when using the handbrake directly depend on the condition of the pads.
To carry out the procedure you need to prepare the following tools:
- screwdriver with flat and Phillips blade;
- pliers;
- long nose pliers;
- "balloon".
How to remove a brake drum
We dismantle the part in the following sequence:
- We hang up the rear of the car and remove the wheel.
- Unscrew the guide pins.
Removing drums on “classics” is a “disease” of these cars. Pulling the part together is very problematic, especially if it is done rarely. However, there is an old-fashioned method that is used not only by me, but also by other motorists. To dismantle, screw the pins into the drum, then start the engine and engage fourth gear, causing the drum to rotate. Then sharply press the brake. You may need to repeat the procedure several times. After that we try to knock the drum down with a hammer again, usually it works.
Removing the pads
We dismantle the pads in this order:
- Remove the spring-loaded bolts holding the brake elements.
Replacing a brake disc with your own hands on a VAZ-2107
Hi all! I decided to tell you about my experience of replacing brake discs on an old VAZ-2107; in principle, this is not as difficult a matter as it might seem at first glance. Last year, during a routine inspection of the brake pads, I noticed uncharacteristic arc-shaped wear on them closer to the center of the disc, which should not be there, and it was on all pads on both sides. I decided to change the pads to new ones, ride off the winter and check again: as it turned out in the spring, similar wear appeared on the new ones, plus when braking at high speeds, a beating in the pedal began to be felt.
When measured with a caliper, the thickness of the disks was only 8-8.5 mm, while the factory recommends replacing them already at a thickness of 9 mm - most likely, the disks were warped and deformed.
Therefore, I decided to replace them quickly, since safety should not be neglected in this matter. I ordered it on the website of the already verified company Lada-Image, as usual, everything arrived on time and without delays.
The discs are smooth, without casting or milling defects; in any case, it is better to inspect them thoroughly before installation. The initial thickness of the working part is 10 mm.
So, we fix the car on a level surface, hang the front part, and remove the wheel. We will need a 17, 7 or 12 socket wrench, a hammer, an iron brush, a core, a mounting blade or a large flat-head screwdriver, emery cloth, a gas torch, as well as copper or graphite lubricant, WD-40. In addition to the disks themselves, you can also buy spare bolts, pins and lock washers, since they often stick to this unit and require replacement after dismantling.
Recommendations
If for some reason you do not want to install new ones, then you can swap the inner pad with the outer one. Thanks to this, their wear will be uniform, and they will brake with uniform force.
Front brake pads are replaced when the friction lining thickness is 1.5 cm or less. With such wear, you will be bothered by squeaks and squeaks when you press the brake, and the quality of braking will be worse.
Remember, a properly functioning braking system is the key to safe driving.
Before you start removing it, it is recommended to buy a repair kit for the front calipers. It includes: “gulls”, guide fingers, and their springs. This is necessary so that during the replacement process the pressure springs may “fly out” in an unknown direction, the fingers will not want to lick out of their seats, they will have to be cut off, the guide springs and “gulls” may lose their elasticity.