Good brakes are the key to your safety on the road.
This truism, despite its obviousness, is unfortunately not known to everyone. Some simply do not attach any importance to this, while others simply believe that they will be “carried away” and something bad will happen to anyone but them... Unfortunately, the road does not forgive mistakes. Therefore, it is always necessary to monitor the condition of the brake system and all its components, including: brake discs and pads, calipers, brake hoses and cylinders. Today we will talk about how to replace brake pads on a Lada Priora with your own hands. We will describe in detail and show the process of replacing friction pads yourself so that you can easily do this work at home.
On the pages of VAZ Repair there are already articles on how to change pads; we once told you how to replace them on a VAZ 2115, as well as how to replace brake pads on a Lada Kalina.
Snapshot
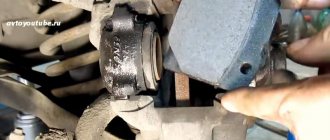
Through the caliper window we estimate the thickness of the brake pads.
Through the caliper window we estimate the thickness of the brake pads.
Through the caliper window we estimate the thickness of the brake pads.
We replace the brake pads of both front wheels if the thickness of the friction lining has reached the maximum permissible value - 1.5 mm. Rotating the brake disc, inspect its working surfaces on both sides. There should be no cracks or deep grooves on the working surfaces of the disc.
Reasons for replacement
AvtoVAZ recommends changing the front pads every 30-50 thousand kilometers. But you don’t always need to strive for the indicated numbers, since different cars are used in different modes.
There are drivers who constantly use the car on the highway, and there are also those who only drive around the city. When in city traffic jams you have to brake more often.
Regardless of operating conditions, it is important to inspect the pads monthly. If they wear too much, the brake disc is damaged. And this puts the driver of the vehicle at risk.
Parameters under which the pads need to be changed:
- overlay thickness less than 1.5 millimeters;
- the lining is unevenly worn or does not contact the brake disc tightly;
- the pressure spring is faulty;
- The lining is damaged, there are cuts and deformations.
Depending on the manufacturer, the cost of the pads varies from 500 to 2000 rubles.
Snapshot1
Using a caliper or micrometer, we measure the thickness of the disk, which should not be less than 17.8 mm.
Otherwise, both disks must be replaced. Using a caliper or micrometer, we measure the thickness of the disk, which should not be less than 17.8 mm. Otherwise, both disks must be replaced.
Using a caliper or micrometer, we measure the thickness of the disk, which should not be less than 17.8 mm. Otherwise, both disks must be replaced.
Do-it-yourself replacement of front brake pads on a Lada Priora
Good brakes are the key to your safety on the road. This truism, despite its obviousness, is unfortunately not known to everyone. Some simply do not attach any importance to this, while others simply believe that they will be “carried away” and something bad will happen to anyone but them. Unfortunately, the road does not forgive mistakes. Therefore, it is always necessary to monitor the condition of the brake system and all its components, including: brake discs and pads, calipers, brake hoses and cylinders.
Snapshot2
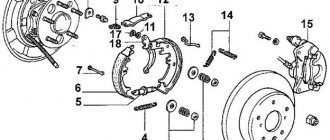
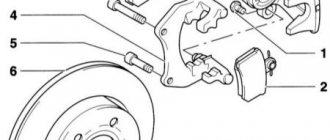
Brake mechanism of the left front wheel: 1 - screw securing the cylinder body to the caliper;
2 — brake hose; 3 — wheel cylinder; 4 — hydraulic brake bleeder fitting; 5 — caliper; 6 — brake pads; 7 - guide pin; 8 — guide pin cover; 9 — pad guide; 10 — brake disc; 11 — brake mechanism shield; 12 — ring gear for ABS sensor; 13 — locking plate; 14 - bolt securing the cylinder to the guide pin. Brake mechanism of the left front wheel: 1 - screw securing the cylinder body to the caliper; 2 — brake hose; 3 — wheel cylinder; 4 — hydraulic brake bleeder fitting; 5 — caliper; 6 — brake pads; 7 - guide pin; 8 — guide pin cover; 9 — pad guide; 10 — brake disc; 11 — brake mechanism shield; 12 — ring gear for ABS sensor; 13 — locking plate; 14 - bolt securing the cylinder to the guide pin.
Brake mechanism of the left front wheel: 1 - screw securing the cylinder body to the caliper; 2 — brake hose; 3 — wheel cylinder; 4 — hydraulic brake bleeder fitting; 5 — caliper; 6 — brake pads; 7 - guide pin; 8 — guide pin cover; 9 — pad guide; 10 — brake disc; 11 — brake mechanism shield; 12 — ring gear for ABS sensor; 13 — locking plate; 14 - bolt securing the cylinder to the guide pin.
Attention! The brake pads of the front wheels must be replaced as a set - all four pads. Replacing the pads of only one brake mechanism can lead to the car pulling to the side when braking.
If the fluid level in the brake hydraulic reservoir is at the MAX mark, then before installing new pads, use a syringe or a rubber bulb to pump out some of the liquid from the reservoir so that when the piston is recessed into the wheel cylinder of the brake mechanism, liquid does not flow out from under the reservoir cap.
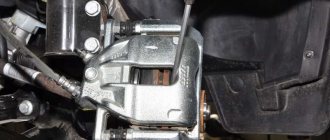
After removing the front wheel, we securely fix the car on a factory-made support stand.
Adviсe
To ensure a smooth replacement, it is important to:
- check the functionality of the entire braking system;
- If the protective covers are cracked or otherwise damaged, replacement is required. It is better to use Uniol-1 lubricant or any high-temperature lubricant;
- Do not operate the car immediately after replacement. It takes time for the pads to get used to the discs;
- To make the grinding process complete faster, drive out onto a flat road and perform several stages of movement. Accelerate first and then slow down.
You can change the front brake pads on a Priora without ABS and with an anti-lock braking system according to the same principle as for all VAZ cars. There are no differences in the process of replacing parts.
To change the pads, you do not need to take the car to a pit or overpass. To work, you only need a jack, with which you can easily remove the wheel. After studying the detailed instructions, you can easily replace parts yourself and save on it.
Snapshot7
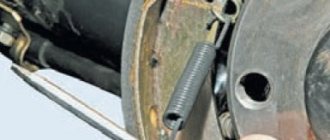
We remove the brake pads from their guide.
We remove the brake pads from their guide.
We remove the brake pads from their guide.
Attention! Once the caliper has been rotated relative to the shoe guide, do not press the brake pedal as the piston may come out completely from the cylinder.
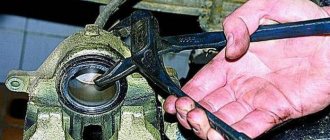
We clean the pad seats in the caliper and the pad guide from dirt and corrosion.
Before installing new pads, it is necessary to move the piston as much as possible inside the cylinder. This operation can be performed in different ways.
What Causes Brake Fatigue/Reduced Braking System Performance?
In simple terms, brakes function by converting kinetic energy into heat. Each time you press the brake pedal, the system generates heat, which under normal driving conditions is dissipated into the atmosphere and transferred to other components when braking stops. However, since kinetic energy increases with the square of speed, braking from high speeds or while carrying a heavy load exponentially increases the demands on the braking system, which will generate significantly more heat. This excess heat can quickly build up in the system, which can lead to brake fade if there is no effective heat dissipation.
Snapshot9
We insert a screwdriver with a wide blade or a mounting spade through the caliper window and, resting it on the brake disc, move the bracket, recessing the piston into the cylinder.
We insert a screwdriver with a wide blade or a mounting spade through the caliper window and, resting it on the brake disc, move the bracket, recessing the piston into the cylinder.
We insert a screwdriver with a wide blade or a mounting spade through the caliper window and, resting it on the brake disc, move the bracket, recessing the piston into the cylinder.
After replacing the pads, press the brake pedal several times to set the gaps between the pads and discs. We check the fluid level in the tank and, if necessary, bring it up to normal.
During operation, the surface of the brake disc becomes uneven, as a result of which the contact area of the new, not yet worn-in pads with the disc decreases. Therefore, during the first 100 km after replacing the pads, until the new pads have broken in, be careful, as the car’s braking distance may increase. In this case, the pads may become hotter than usual, up to the appearance of slight smoke and odor, especially in hot weather.
Lada Priora: checking and replacing the brake pads of the front wheels
Removing the rear brake drum
Now let's look at the most important thing - how to remove the rear drum on a VAZ 2114, what tools are needed for this and how to then install a new one instead of the old drum.
To begin with, it’s worth saying that it is strongly recommended to remove the rear drums at least once a year (and if more often, even better), even if there is no indirect suspicion of their wear. This is due to the fact that brake drums, which have been standing in place for many years, become very sticky, and they can only be removed by pouring them heavily with VeDeshka and using enormous force (which can result in harm to both the motorist and the car).
That is why, preventive annual dismantling of the drums, their inspection and installation in place is a guarantee that in the future there will be no problems with such an operation.
Treating the drum with WD-40
And so, let's move directly to removing the brake drum.
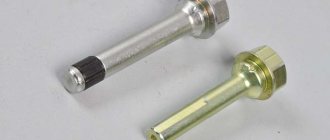
First, let's collect a set of necessary tools:
- jack;
- wheel wrench (17 or 19 - depends on the installed wheel bolts);
- wrenches 7, 10 or 12 - depending on the size of the guide pin;
- hammer;
- a wooden plank (as a spacer when working with a hammer - so as not to damage the metal parts);
- lubricant like WD-40 or similar in properties.
Regarding the last point, you should immediately make a clarification - you need to use exactly the specified lubricant or as close as possible to it. The use of any other liquids - solvents, kerosene, gasoline and the like - is strictly not recommended. Now let's look at how to remove the rear brake drum on a VAZ 2114.
This should be done according to the following scheme:
- securely stop the car (put the handbrake on and place a shoe under the wheels);
- raise the rear of the car using a jack (roll or bottle);
- remove the wheel;
- thoroughly and generously treat all joints with VeDe-40 type lubricant;
- wait about 5 minutes (so that the lubricant has time to act) and remove all dirt with a rag;
- unscrew the mounting pins;
- carefully apply a series of blows to the edges of the drum (through a spacer or using a rubber/wooden mallet) until it begins to move by hand;
- remove the brake drum.
Removing the brake drum using a hammer
Installing the new drum in its place is done in exactly the same way, but in the reverse order. Also, there is another, often faster and at the same time safer, way to dismantle the old drum (you can also try it in a situation where prolonged hammering did not lead to success and the part did not move from its place).
This should be done as follows:
- fix the car in place and hang it up (all as in the previous method);
- remove the wheel;
- unscrew the two installation bolts from their sockets;
- screw the same bolts into the other mounting sockets of the drum (there are four of them on the drum - two have bolts screwed in, the other two are empty);
- begin to gradually tighten one bolt, then the other, so that their heads always remain parallel to each other (in order to achieve this, you can turn each bolt half a turn in turn).
Removing the brake drum using bolts
Thus, passing through the drum and resting on the reverse side, these bolts, when tightened, will pull it out of place, as a result of which the entire dismantling process will be as safe as possible and will not cause any damage to the car parts.
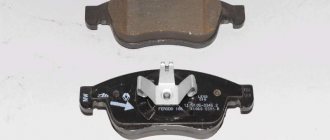
Which pads to choose
To replace parts on a Priora, you need to purchase suitable ones. Front pads can be selected by the number under which they are indicated in the catalog: 21100-3501080-00.
These brake elements are not only suitable for Priora. They are used on the VAZ-2110, Lada-Granta and other models. Judging by the reviews, Ferodo front pads can be a good choice for Priora. Premier (“red”) are more rigid, they provide better braking, and belong to the comfort class. Ferodo Target (“green”) - they are softer, but at the same time they are gentle on the disc, which many drivers consider a plus.
The companies Ate, TRW, Bosh, which produce front pads for Priora, also have positive reviews.
A more budget-friendly option is replacement parts made in Asia (BM and Pilenga).
New front pads must be purchased and installed as a set (4 pcs.)