If there is excessive play in the rear axle bearing or it is damaged, it will be necessary to dismantle it and, if necessary, even replace it. This article will discuss the procedure for removing and installing the rear axle shaft on cars such as VAZ 2101 - 2107. This repair is not particularly difficult and can be done without any problems with your own hands. But you will need a lot of tools, namely:
- Jack
- Balloon wrench
- 17 mm head
- Extension
- Driver and ratchet handle
- 12mm socket and small ratchet (for removing drums)
- Penetrating lubricant
What are axle shafts, why are they needed and how are they designed?
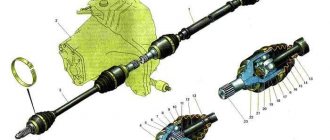
In rear-wheel drive cars, which the “seven” actually belongs to, the rear wheels are driving. It is they, rotating, that make the car move. The torque is transmitted to them from the gearbox through the drive (cardan) shaft, gearbox and axle shafts. There are only two axle shafts: one for each rear wheel. Their role is to transmit torque from the corresponding gear of the gearbox to the wheel rim.
Axle shaft design
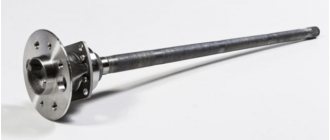
The axle shaft is an all-metal shaft made of steel. At one end there is a flange for attaching the wheel disk, and at the other there are splines for engagement with the gearbox gear. If we consider the axle shaft assembly, then in addition to the shaft, its design also includes:
- oil deflector;
- sealing gasket;
- oil seal (cuff);
- bearing.
In addition to the shaft, the design of the axle shaft also includes an oil deflector, a gasket, an oil seal and a bearing.
Each of the axle shafts is installed in the corresponding (left or right) rear axle housing. An oil deflector with a gasket and an oil seal are used to prevent lubricant from leaking out of the casing. The bearing is designed to ensure uniform rotation of the axle shaft and distribute shock loads coming from the wheel to the rear axle of the vehicle.
1 — oil deflector; 2 - gasket; 3 - seal; 4 - oil seal; 5 - axle shaft; 6 - casing; 7 — bearing mounting plate; 8 — brake shield; 9 — bearing; 10 — fixing sleeve
Replacing the axle shaft
Let's look at the process of replacing the axle shaft, its bearing and oil seal in detail. Tools you will need:
- wheel wrench;
- a jack and a safety stand (in extreme cases, a stump or a few bricks);
- wheel stops;
- reverse hammer;
- wrenches 8 mm, 17 mm;
- slotted screwdriver;
- Bulgarian;
- round nose pliers;
- hammer;
- chisel;
- workbench with a vice;
- blowtorch or gas torch;
- spacer made of wood or soft metal;
- a piece of steel pipe with a wall diameter of 33–35 mm;
- Litol type lubricant;
- dry clean rag.
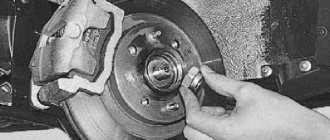
Removing the axle shaft
To dismantle the axle shaft, you should:
- Place the car on a flat surface and place chocks under the front wheels.
- Use a wheel wrench to unscrew the wheel bolts.
- Raise the car body with a jack.
- Unscrew the wheel bolts and remove the wheel.
- Using a size 8 wrench, unscrew the drum guide pins.
- Remove the drum. If it does not come off the blocks, carefully knock it down using a spacer and a hammer.
- Using a 17mm wrench (preferably a socket), unscrew the nuts (4 pcs) securing the axle shaft. They are located behind the flange, but you can access them through specially provided holes by turning the axle shaft.
- Using round-nose pliers, remove the spring washers that are located under the axle nuts.
- Disconnect the axle shaft from the rear axle by pulling it towards you. If it does not give in, use a reverse hammer. To do this, the tool flange must be screwed to the axle flange with wheel bolts. By sharply moving the hammer weight forward, knock out the axle shaft. If you don't have a reverse hammer in your tool arsenal, you can use a removed wheel instead. It needs to be screwed with the back side to the axle shaft flange and struck with a hammer on the tire from the inside until the axle shaft comes out of the casing.
- Remove the axle shaft assembly with the bearing and its retaining ring.
- Remove the sealing gasket located between the brake shield and the axle shaft flange.
- Using round nose pliers or pliers, remove the oil seal from its seat.
How to remove a broken axle shaft
If the axle shaft is broken, it will not be possible to dismantle it in the usual way. But there are other methods. If the shaft breaks directly in front of the flange and its broken end sticks out of the bridge casing, you can weld a piece of reinforcement to it, and then use it to pull out the rest of the axle shaft.
If the axle shaft breaks inside the casing, you can try to knock it out with a piece of reinforcement inserted from the back side of the bridge, after first removing the opposite axle shaft. In extreme cases, to remove a piece of shaft, you will have to disassemble the gearbox.
Removing and installing the bearing on the axle shaft
When replacing the axle shaft with a new one, it is recommended to replace the bearing, but if the old one is still fully functional, you can install it too. But to remove it you will need to remove the retaining ring.
To do this you need:
- Securely fix the axle shaft in a vice.
- Using a grinder, saw through the outer part of the ring.
- Crack the ring body using a chisel and hammer.
- Remove the remaining ring from the shaft.
- Carefully knock the bearing off the axle shaft using the same tools. Apply blows only to the inner race of the bearing. Otherwise, you will damage it and will no longer be able to use it.
- Inspect the new axle shaft and bearing for manufacturing defects.
- Remove the rubber boot from the bearing housing.
- Place grease between the bearing races.
- Reinstall the boot.
- Place the bearing on the axle shaft. Be careful: the bearing is installed so that the boot “looks” at the oil deflector.
- Place a piece of steel pipe against the bearing so that its walls rest against the end of the inner race.
- Applying gentle blows with a hammer to the opposite end of the pipe, seat the bearing in its place.
- Use a blowtorch or gas torch (you can use a burner from a regular kitchen gas stove) to heat the retaining ring. Don’t overdo it: you don’t need to heat it until red hot, but until there is a white coating on the surfaces.
- Using pliers, place the ring on the axle shaft.
- Shrink the ring by hitting it lightly with the back of the hammer. To make it cool faster, pour motor oil on it.
Installing the oil seal
To install a new oil seal:
- Wipe the seat with a clean, dry cloth.
- Lubricate the socket surfaces with grease.
- Lubricate the oil seal itself with grease.
- Install the part into the mounting socket.
- Using a hammer and a piece of pipe, carefully press in the oil seal.
Installing the axle shaft
Once the bearing and seal are installed, you can install the axle shaft. Installation is carried out in the following order:
- We install the sealing gasket.
- Insert the axle shaft into the housing until it stops. Check how the splines engage with the gear teeth by turning the axle shaft in different directions.
- Apply a few gentle blows with a hammer to the axle shaft flange to make sure it is seated correctly.
- Install spring washers onto the axle shaft studs. Install and tighten the nuts securing the axle shaft with a 17 mm socket wrench.
- Place the drum on the shoes and secure it with guide pins.
- Mount the wheel.
- Check to see if there is any play in the axle shaft or bearing by trying to shake the wheel along the vertical and horizontal axes.
- Lower the body and remove the chocks from under the front wheels.
- Tighten the wheel bolts.
- Check whether the signs of axle shaft malfunction have disappeared by driving on a flat section of the road.
Main technical characteristics of VAZ 2107 axle shafts and their elements
Axle shafts for the “seven” in Russia are produced under catalog number 21030–2403069–00. The right and left parts, unlike some other rear-wheel drive cars, are absolutely identical in the VAZ 2107. They have a diameter of 30 mm (for the bearing) and 22 slots. On sale you can also find so-called reinforced axle shafts with 24 splines, but to install them you will need to change the design of the gearbox.
Axle bearing
The bearing is the element that bears most of the loads. And although its declared resource is about 150 thousand kilometers, it can become unusable much earlier. It all depends on the operating conditions of the car, the serviceability of other transmission parts, as well as the quality of its manufacture. The most reliable today are considered to be bearings from the Vologda Bearing Plant, produced under article numbers 2101–2403080 and 180306. Imported analogues have catalog number 6306 2RS.
Table: dimensions and technical characteristics of bearing 2101–2403080
| Position | Index |
| Type | Ball |
| Number of rows | 1 |
| Direction of loads | Two-way |
| Outer/inner diameter, mm | 72/30 |
| Width, mm | 19 |
| Load capacity dynamic/static, N | 28100/14600 |
| Weight, g | 350 |
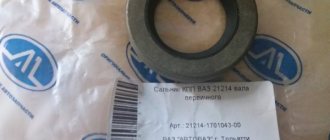
Stuffing box
The axle shaft cuff has a much shorter lifespan than the bearing, since its main working material is rubber. It needs to be changed every 50 thousand kilometers. Axle shaft seals are available under catalog numbers 2101–2401034.
Table: dimensions and technical characteristics of the VAZ 2107 axle shaft seal
| Position | Index |
| Frame type | Rubberized |
| Type of rubber according to GOST | 8752–79 |
| Internal diameter, mm | 30 |
| Outer diameter, mm | 45 |
| Height, mm | 8 |
| Temperature range, 0С | -45 – +100 |
“Quiet, the operation is underway!” or Replacing the rear axle gearbox seal on a VAZ 2107
The sequence of work when replacing the gearbox seal is as follows:
- We measure and record the moment of resistance to rotation of the flange (the axle shafts must be removed!).
- Unscrew the flange nut.
- Remove the flange from the shaft splines.
- Using expansion pliers, remove the oil seal. If you don't have pliers, you can pry it off with a screwdriver. Be careful not to damage the surface of the socket.
- We inspect the flange. If its surface has a pronounced groove in the place where the working edge of the oil seal rubbed, then before installing the new oil seal, insert a washer 1 mm thick into the socket. If the flange is damaged on the working surface, replace it with a new one.
- Lubricate the outer surface of the oil seal with lithol and carefully drive it into the crankcase socket using a mandrel of suitable diameter. If there is no mandrel, press in the oil seal by evenly tapping the end along the circumference of the outer diameter. Make sure that there are no distortions - the working edge should be strictly perpendicular to the shaft axis.
- We inspect the lead-in chamfer on the flange. It should not have defects that could damage the working edge. We install the flange, avoiding sudden movements and impacts, so as not to knock the spring off the oil seal. Before installation, you can lubricate the flange chamfer with transmission oil to make the process easier.
- We tighten the nut, periodically checking the moment of resistance to rotation of the flange. Remember that at the end of the tightening the resistance in the bearings increases much more intensely than at the beginning. The moment of resistance to rotation should be 1–2 kgf.cm greater than what we recorded before unscrewing the nut. In any case, if the moment exceeded 9 kgf.cm, and the bearings in the bridge were still old, remove the flange again, take out the inner ring of the bearing and change the spacer sleeve. If the bearings are new (new means they have not traveled a single kilometer, because after a hundred kilometers they can be considered old for adjustment purposes), then the normal moment of resistance to rotation after tightening the nut for them should be in the range of 16–20 kgf. cm. Replacement of the rear bearing affects gear alignment, so please refer to the appropriate instructions for this procedure.
We reinstall the axle shafts and brake drums, screw on the driveshaft, and fill in the oil. We make a test drive and if everything is in order, we enjoy life, until we suddenly find a treacherous spot under the bridge again...
Malfunctions of VAZ 2107 axle shafts, their causes and symptoms
The main failures of axle shafts include:
- shaft deformation;
- fracture;
- wear or cutting of splines;
- Damage to the wheel rim mounting threads.
Deformation
The axle shaft, although made of high-strength steel, can become deformed under high loads. Such a malfunction is often a consequence of gearbox jamming, bearing problems, or the corresponding wheel falling into a deep pothole. A sign of deformation of the axle shaft is strong vibration of the wheel rim, sometimes accompanied by a hum, knocking, or crackling noise.
Fracture
The result of a wheel hitting a pothole or a strong impact on a bump can be a fracture of the axle shaft. In this case, the car loses control because one of the drive wheels stops rotating. If the axle shaft is broken, the gears of the gearbox may also fail, so if such a malfunction occurs, it must be checked.
Worn or cut splines
Natural wear of the axle shaft splines may appear after 200–300 thousand kilometers. More often they are cut off, which occurs when one of the wheels jams and the gearbox malfunctions. Also, the splines are cut off due to wear of the axle gear teeth that mesh with them.
A sign of spline damage is a crunching noise from the gearbox.
A sign of wear or cutting of the splines is a crunch (crack) from the axle shaft, which usually occurs when starting or moving downhill. The crunching sound indicates that the gear teeth are slipping between the axle shaft splines.
Damage to wheel threads
It is quite difficult to damage the threads on the flange, but such troubles still happen. The reason for this may be non-compliance with the tightening torque of the wheel bolts, incorrectly set direction of the bolts when tightening, or violation of the thread pitch on the bolts. A sign of thread damage is vertical play in the wheel, or beating in the rear of the car while driving.
If the listed malfunctions are detected, the axle shaft (one or both) must be replaced. Continuing to drive a vehicle with faulty axle shafts is extremely dangerous.
Restoring the node's functionality
To fix the problem, you need to remove the old retaining ring. If a special device is not available, then the operation can be performed using a grinder. The ring is carefully cut off without damaging the axle shaft. This part is for single use and must be replaced every time the unit is repaired. The new bearing is put on the axle and secured with a new ring, which is preheated.
Repairing a component such as an axle shaft on a VAZ 2107 does not take much time from an experienced specialist. At the same time, going to a service station does not always guarantee a good result; often, in the absence of special devices, they simply knock down the ring with a sledgehammer, which leads to runout and rapid destruction of the bearing.
Procedure for bearing replacement
To get to the faulty unit, you will have to remove the gearbox, clutch and flywheel. Carry out similar work on a lift, pit or overpass, using a special crankshaft bearing puller (a device for pressing out of blind holes).
The replacement procedure is as follows:
1.First, disassemble the crankshaft bearing removal tool into its component parts, otherwise you will damage the thread when installing it. After this, lubricate the conical protrusion on the puller bushing with engine oil or grease - this will protect its surface from damage.
2.Install the press-out spacer sleeve into the inner race of the bearing and drive the device in until it stops.
3.To remove the bearing from the crankshaft, do the following. First tighten the puller screw by hand. Then, holding the press-out sleeve from turning with a 14-point open-end wrench, tighten the screw with a 17-point socket. Resting against the blank wall of the hole in the crankshaft flange, the shank of the device moves out of the coupling, pushing it along with the bearing out of the socket.
4. Having removed the damaged part, wipe the seat in the crankshaft from dust and lubricate it with engine oil. Don’t forget to check and, if necessary, replenish the amount of lubricant in the new bearing - manufacturers often sin with excessive efficiency.
5. When installing the new VAZ 2107 crankshaft bearing in place, make sure that it does not warp. The final pressing is carried out with a hammer and a suitable mandrel. If one is not found, then use the dismantled unit or hammer the bearing with a hard rubber mallet.
6.Installation is complete when the top plane of the bearing is flush with the flange.
If you are unable to find a press-out, do not despair. Every experienced auto mechanic knows how to remove a bearing from a crankshaft without a tool. In this case, you will need: a drift with a diameter of 15 mm (you can use a suitable bolt) and plastic material - lithol, plasticine or bread crumb mixed with sawdust. It is placed through the opening in the inner race in such a way as to fill the space under the bearing. Then a drift is inserted into the hole and hit with a hammer. Expanding to the sides, the soft mixture squeezes the bearing out. This way you can replace the faulty unit and avoid troubles in the future.
Something else useful for you:
- How to replace the rear crankshaft oil seal of a VAZ with your own hands?
- How to replace the front crankshaft oil seal of a VAZ yourself?
- What are the types of engine knocks, causes, diagnostics?
What functions do bearings perform?
With the help of axle shafts, rotation is transmitted from the rear axle gearbox to the wheels. The axle shaft itself is very reliable; it can only be broken during an accident. But the bearing, which ensures smooth and easy rotation when moving, fails much more often.
This usually happens due to frequent travel on uneven roads, sudden braking and acceleration. This mechanism is located directly next to the brake drums. That is why, in order to gain access to them, you need to remove the brake drums and pads, after which you need to completely remove the axle shaft.
How to change a bearing?
Repair and replacement work can be done in the garage or outside. The main thing is to choose a relatively flat surface to work on, so that the car stands more stable during repairs.
To begin, stock up on the necessary tools, prepare a socket wrench (or an open-end wrench) for “ten”, a socket wrench for “seventeen” (if you have a head of this diameter, then this is only a plus), prepare a jack.
Please note that a regular “17” key is not very convenient to use, so it is better to optimize the tool - weld the head to the collar in the shape of the letter “T”.
It is better to buy spare parts after you have taken everything apart, since there are times when after dismantling you will have to buy a new axle shaft.
So, you will need:
Brand new bearing
axle shaft seal,
locking sleeve.
The sequence of actions for changing the bearing on a VAZ 2107 axle shaft:
1. Place the machine on a flat surface, install the locking shoes on the rear wheel and the front wheel on the other side.
2. Slightly unscrew the screws on the rear wheel and jack up the car.
3. Install a special support that will protect one of the sides of the car from accidentally falling. Alternatively, you can use an empty metal canister.
4. Unscrew the bolts completely and remove the wheel.
5. Using a ten-point socket wrench, screw in the guides and carefully “squeeze out” the brake drum (the easiest way is to knock it down using a wooden block and a hammer).
If these methods do not help, then try another method. Make sure that the car is well secured, depress the clutch, put the gearshift knob in the second gear position, start the engine, release the clutch, spin the silent drum (do not accelerate too much). After this, press the brake pedal sharply. As a rule, after just a few attempts the drum can be easily removed.
6. Using a “seventeen” wrench, through the special holes in the flange, unscrew the fastening bolts that secure the axle shaft.
7. Remove the axle shaft. If this cannot be done, place the wheel on two bolts and, tugging it (the movements should be as sharp as possible), remove the product. If it does not give in, then proceed by rocking.
Next, proceed to replace the bearing. Please note that if you do not have a special puller at hand, this operation will take you much longer.
Step-by-step instruction
- Loosen the wheel bolts, jack up and remove the wheel.
- Remove the brake drum.
Using pliers, remove the “soldiers” and remove the tension springs of the pads.
Remove the rear brake pads and set them aside.
Unscrew the 4 nuts securing the axle shaft. Head nuts for seventeen.
Push the hub towards you using the mounting lever and remove the axle shaft. If the axle shaft cannot be removed, use a three-legged puller.
Use a grinder to cut the retaining ring. It is better to make the cut a little not completely and cut through the remaining rings with a chisel. In order not to damage the axle shaft, make the cut very carefully.
Use a chisel or drift to knock the bearing out of its seat on the axle shaft. In our case, only the bearing race remained.
Place the bearing on the drive and use a pipe and a hammer to press it into place. As a rule, seating a bearing is quite easy.
- The bearing retaining ring is hot pressed. Take the ring and secure it to a piece of wire. Next, light the gas burner and heat the ring almost to red.
- Have a helper hold the axle shaft upright and keep the pipe and hammer handy. Next, use pliers to put the hot ring on the drive, and then, without hesitation, an assistant puts it in place using a pipe and a hammer.
Using a slotted screwdriver, remove the oil seal from its seat.Using a piece of pipe along the outer diameter of the oil seal, press it into place.
- Install the rubber O-ring.
- Install the axle shaft into the seat until it stops.
- Fit the fastening nuts and tighten them in a cross pattern with a force of 50 Nm.
- Install the brake pads, drum and wheel.
You can see the procedure in this video: