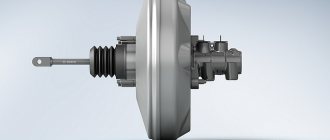
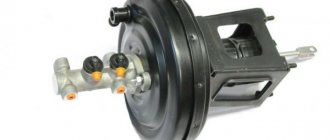
A vacuum brake booster, or VUT for short, is one of the main operating mechanisms of a car’s braking system. The effectiveness of braking, and therefore your safety, largely depends on its serviceability. Therefore, the VUT must be regularly checked to promptly detect its malfunctions or malfunctions.
In this article you will learn about malfunctions of the vacuum booster, signs indicating problems in the operation of the VUT, as well as how to check and replace the VUT on a VAZ 2114 at home.
Causes of vacuum booster malfunction
The vacuum brake booster and its accompanying elements are fairly simple devices, so experts identify the following main and possible malfunctions of the VUT:
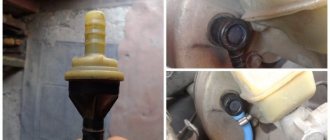
- Depressurization of the vacuum pipeline. It creates a vacuum necessary for normal operation of the braking system. Accordingly, if air is sucked into it from the outside, the VUT will not work. Depressurization (air leakage) due to old rubber can occur in a variety of places - in rubber hoses, joints, clamps.
- Check valve malfunction. Its task is to remove air from the brake system and prevent it from entering both the system itself and the master brake cylinder. The valve itself may be faulty, for example, due to natural wear, or due to significant wear of its rubber seals.
- Depressurization of the working chambers of the vacuum amplifier. This is a fairly rare cause, which most often occurs due to mechanical damage to the VUT. For example, during repairs or an accident.
- Diaphragm rupture. This is a critical failure, since it occurs inside the amplifier itself, and it is usually irreparable and, accordingly, must be replaced. In this case, the amplifier will poison the air and emit a hissing sound.
- Formation of an additional gap in the VUT. The fact is that as a result of the operation of the car and, in particular, the mounting mechanism of the vacuum booster, its membrane moves slightly forward, which actually makes it easier for the driver to press the brake pedal. However, as a result of this, an extra gap appears in the mount, which can sometimes cause a knocking noise during heavy braking. To solve this problem, simply adjust the rod by moving it forward a little. Such repairs are possible both in a garage and in a car service center.
If the car is equipped with an additional vacuum pump, then a fourth fault is usually identified - partial or complete failure of this unit. In this case, the brake system itself will work, but not in optimal mode. In particular, during sharp braking, the force that the driver will need to physically exert on the pedal will increase significantly.
Checking the serviceability of the amplifier
In this section we will tell you how to check the performance of the vacuum brake booster on a VAZ-2114. All of the recommendations given can be used when checking the unit, both on the thirteenth and fifteenth car models.
To check, follow these steps:
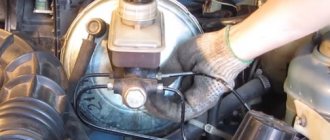
- Press the brake pedal all the way about 5 times with the engine off. This action will create uniform pressure in both components of the VUT. When the brake is pressed, the valve will immediately release itself. If you notice a squeak, this is a clear signal that the part needs to be replaced.
- As soon as the pressure is uniform, you need to start the car while holding the brake pedal to the floor. If everything is fine with the unit, the pedal will rise after starting the internal combustion engine. Otherwise, repairs will need to be made to replace the device.
- When you have already realized that the part needs to be replaced, you need to additionally check how well the hose is fixed, as well as the condition of the flange. If these elements are in a condition that does not meet the standard, this may affect the performance of the amplifier. Accordingly, in this case, you may need to tighten the fastenings and the problem will solve itself.
We recommend: Replacing the crankshaft oil seal Lada 2107 (VAZ 2107)
Replacement
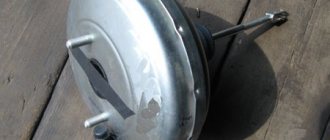
VAZ 2109 vacuum brake booster
To do this, you need a simple set of keys:
- open-end wrench No. 17;
- head No. 13;
- Phillips and flathead screwdrivers.
The repair is carried out in the garage, where the hood should be raised and a support installed.
Removing the vacuum
Sequence of work:
- remove the negative terminal from the battery;
- disconnect the rubber tube from the brake vacuum, first unscrew the clamp;
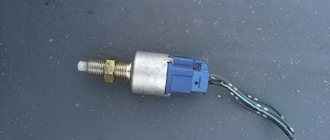
- disconnect the electrical power supply terminal for the level sensor from the brake master cylinder cover;
VAZ 2109 checking the vacuum brake booster
- then, inside the car, move the driver’s seat to the farthest position, as far as the runners will allow;
- lower under the steering column towards the brake pedal.
Note: if necessary due to lack of lighting, use a portable lamp with a safety flashlight.
- Using pliers, remove the locking ring from the sleeve that connects the pedal itself to the vacuum rod connector;
- remove the rod, lower it to the floor of the body.
Note: the rod connector is a U-shaped plate with holes for attaching to the pedal bar.
- return to the set vacuum;
- Now you have to carefully remove the brake master cylinder;
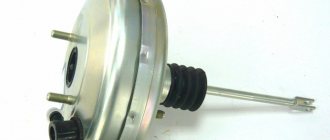
VAZ 21093 vacuum brake booster
it must be removed together with the corresponding brake system pipes.
Note. This must be done so as not to add additional work of filling the brake fluid and pumping the entire brake system to all four calipers.
clean the threaded connection on the master cylinder bushings and use a metal brush to carry out this work.
Note. Carefully unscrew the nuts, turning them forward and backward several times, so as not to strip the threads on the screws. Remove the nuts from the screws, and also remove the washers that are in a compressed state.
Vacuum brake booster
To make the work easier, use a flat screwdriver to go along the cylinder body and lightly, as carefully as possible, release them from sticking.
Note: if the nuts cannot be unscrewed, you need to drop a few drops of 70% acetic acid on them, wait 30 minutes, clean the threads with a wire brush and repeat unscrewing.
Scheme
After removing the washers, you need to begin removing the brake master cylinder. It will be difficult to remove. Therefore, you need to be careful, so as not to break or bend the brake pipes too much, to apply force sharply, but not too much. The brake cylinder must be removed forwards, without deviating to the side. The last final step is removing the vacuum. It is attached to the interior partition on a bracket.
- The bracket is attached to two studs; clean the threads as indicated above.
- Unscrew the nuts and remove the vacuum along with the bracket.
Then after removal, unscrew the two blind bolts from the vacuum. Set it aside. Carefully screw the new vacuum to the bracket. Reassemble in reverse order. The price of a vacuum brake booster is 2500 rubles
When choosing it, you should pay attention to the packaging. Manufacturer's guaranteed packaging must be made of corrugated cardboard
The box must have a manufacturer's label that is clearly legible:
- manufacturer's name;
- batch number;
- Date of issue;
- The article number must also be indicated: 2108-3510010TM.
Because there are fakes on the market. Therefore, you need to buy from trusted sellers, in stores that have been able to establish themselves on the positive side. When doing the work yourself, you need to watch the video very carefully. The most important thing will be to remember the order of repair work. For a better understanding, take a photo of the repair site. At home, number them in order in advance. Performing work one by one, move the photos down. Don’t be lazy to do this, since during assembly you can check the sequence of correct execution of the process. It also doesn’t hurt to read the instructions for car repairs to avoid unexpected situations.
Malfunctions and ways to check them
It is possible that you may need to replace the vacuum booster on your VAZ 2110. The cause may be various malfunctions, the characteristic symptoms of which are as follows:
- When you press the brake pedal, a hissing noise occurs, and at the same time, the engine speed often increases;
- The car starts to shake;
- Spark plugs stop working efficiently;
- Fuel consumption increases noticeably.
You yourself understand perfectly well that if the vacuum brake booster hisses on a VAZ 2110, there is nothing good about it. Therefore, it is necessary to take appropriate action. This applies to all malfunctions that may occur.
Before replacing the vacuum booster on a VAZ 2110, it should be checked.
This procedure is performed as follows:
- As with normal bleeding of brakes, with the engine not running, press the gas pedal several times;
- After 5 or 6 presses, keep the pedal in the down position, resting it on the floor, and start the engine;
- After starting, the pedal itself will move forward a little.
This situation is typical only for a working vacuum amplifier. Therefore, if a vacuum has not formed, check the connections and the hose for leaks, plus examine the condition of the check valve. Often the reason lies in the destruction or deformation of rubber components, which can be easily replaced.
There is also a high probability of damage to the diaphragm, on which a hole is formed over time. You can purchase the diaphragm with a repair kit, the cost of which is no more than 500 rubles.
Replacement
To replace an element, you need to understand the main issue - how to remove the vacuum booster from a VAZ 2110. Directly replacing the old element with a new one will not be difficult, just like the reassembly process.
Therefore, we will tell you about the main thing - dismantling the amplifier. Let's start with the fact that the procedure is not complicated, but it requires accuracy and sequence of steps. If you follow the recommendations, the work will take little time and will not take much effort.
- Disconnect the block with wires, which includes brake fluid level sensors in its design.
- Hold the booster check valve with one hand and carefully disconnect the hose with the other. It is advisable to disconnect the hose with a strong hand, since this will require a lot of force.
- Remove the two bolts connecting the booster and master cylinder.
- Carefully remove the cylinder from the amplifier.
- There is no point in disconnecting the brake lines.
- Give access to the dashboard, which will allow you to unscrew the nuts holding the brake pedal bracket. There should be 4 of them.
- It is recommended to dismantle the bracket and amplifier through the engine compartment, since there is enough free space for such manipulations.
- Remove the pin lock plate. To do this, pry the finger with a screwdriver and squeeze it out.
- Now you can easily disable the brake pedal and booster.
- To disconnect the amplifier and bracket, you will have to unscrew the two nuts on the mount.
- A new one is installed in place of the dismantled old vacuum amplifier, and the reassembly procedure is performed in strict sequence of the dismantling process.
How does a sorcerer work?
The regulator itself consists of a cylinder, valve, spring and rod. The latter is connected to the rear beam, which ensures the operation of the VAZ-2109 sorcerer. Also, brake fluid circuits pass through the rear brake pressure regulator. For their mounting on the device there are 4 threaded entries. How does the sorcerer regulator work on a VAZ? During emergency braking, the front of the car is pressed to the ground, and the rear is raised. This causes the regulator rod to move, which blocks the flow of fluid to the rear cylinders. A spring located under the valve prevents it from closing completely. Therefore, the rear mechanisms still work, but later and weaker than the front ones.
Functionality check
This instruction will be relevant when checking the vacuum booster on VAZ models from 2113 to 2115. So the technique is clearly universal.
- Press the brake pedal all the way to the floor about 4-5 times. In this case, the engine should not be started. Due to these presses, you will create equal pressure in two sections of your vacuum booster. The valve will report problems as soon as you start pressing the pedal. If you hear squeaks while pressing, this indicates a serious malfunction.
- Once the pressure is even, start the engine while keeping the brake pedal to the floor. If the brake booster system is working properly, then the pedal will rise by itself after the engine is started. If this does not happen, then you will definitely have to face repair work.
- If the check shows problems with the amplifier, do not forget to additionally check the quality of the hose fastening and the condition of the flange. When the mount is abnormal, this may result in the brake pedal not lifting.
Sometimes poorly fixed fasteners cause quite expensive and actually unnecessary repairs or replacement of the vacuum booster. Conduct a preliminary check so as not to complicate your life.
When to change the amplifier
Brakes are a whole system that consists of many elements. Each of them must function correctly and efficiently.
In addition to checking the vacuum booster itself, you should inspect the condition of the brake fluid pipes, make sure there are no brake fluid leaks, and look at the current condition of the brake pedal.
If no faults were found in the braking system, you can think in more detail about the issue of replacing the vacuum booster.
There is no point in repairing the element. It's easier to start replacing right away. The functionality of the car and the power that your engine is capable of producing depend on the quality and timeliness of the work performed. Lack of power negatively affects the speed and comfort of movement around the city and beyond.
Replacement
To replace a vacuum booster you will need a certain set of tools and materials. It includes:
- Screwdriver Set;
- Pliers;
- Socket wrench for 13 and 17 millimeters;
- Special wrench for brake pipes;
- New plugs;
- New fittings.
Replacement procedure
Let's get straight to work.
- Removing the vacuum booster can be difficult due to the brake cylinder. Therefore, we advise you to remove it first. Another option is to disconnect the pipes from the brake cylinder and move them to the side for a while. Here you decide for yourself what is more convenient for you.
- The cylinder is not the main problem. It is difficult to cope with the mounting of the vacuum booster. It's just not very convenient to do this. This is the design of the VAZ 2114.
- Start with the valve - remove the hose fasteners from it, remove the support bush, after which you can pull out the brake pin.
- Next, using a 13 mm wrench, all four fasteners of the vacuum booster are dismantled.
- After all the inconveniences of the work done, you can remove the element and get ready to install a new amplifier in its place.
- To do this, you will have to install a special mounting frame. The frame is tightened with a 17 mm wrench, after which the new component is installed inside the car.
- If you want to make your work as easy as possible, do not forget to first connect the brake pedal to the booster with your finger when reassembling it. After this, it is much easier to cope with putting the vacuum seal back into place.
When replacing the vacuum booster, be sure to change the old vacuum hose at the same time. This element is far from eternal, therefore, as it wears out, it will negatively affect the quality and efficiency of the new vacuum seal.
The process of replacing VUT with a VAZ-2114
The brakes in a car are a whole system. Accordingly, if you have already checked the amplifier, then additionally make sure that brake fluid is not leaking anywhere. Check the condition of the pedal itself. There are situations when it would be a good idea to check the brake cylinder and diagnose the entire system as a whole.
If checking the brake system did not show obvious problems, and the device we need refuses to work normally, then the VAZ-2114 vacuum booster will need to be replaced.
Please note that a malfunctioning amplifier has a significant impact on the operation of the internal combustion engine. The engine power it will produce depends on this.
How to check the vacuum brake booster on a VAZ 2109?
The method of checking the device is very simple and does not require any tools or mechanisms
To see the problem, just turn your attention to the brake pedal. For example, when in order to achieve braking of a car it is necessary to press the brake pedal harder to the floor, the braking process itself has become not as effective as before and others - this indicates the presence of defects in the operation of the VUT
To check the VUT VAZ 2109 you must:
- Stop the car and turn off the engine.
- Press the brake pedal firmly several times, and then release the pressure mid-stroke.
- After this, without removing your foot from the pedal, start the engine.
If the VUT is operating normally, there will be a feeling that the pedal has fallen down a little; if this does not happen, then the vacuum booster or braking system has failed.
Visual inspection of VUT VAZ 2109
- Check the integrity of the connection, pipe and check valve.
- Make sure there is no damage to the flange.
- Then conduct a thorough inspection of all bends in the pipe. If you find cracks or wet marks on it, you must replace them immediately.
- If there are defects or problems in the tail seal, which is located under the steering column, the vehicle itself may slow down a little. To prevent such a problem, you should check it by removing the mat and inspecting the protective cap. If it starts to stick, this indicates a malfunction.
- Next, remove the cap and start the engine. After this, swing the valve shank several times, and if you hear a hissing sound, you can talk about a breakdown of the device.
Self-replacement of the vacuum brake booster of VAZ 2109
To carry out an independent replacement, you will need to have a set of open-end and socket wrenches with sizes 10, 13 and 17, as well as a new device.
Instructions for replacing the vacuum brake booster:
- Disconnect the rod that comes from the VUT from the brake pedal.
- Unscrew the brake cylinder from the booster, which is located in the engine compartment.
- Next, you need to remove the cylinder from the vacuum; to do this, you can unscrew all the tubes passing from the brake cylinder to the body, or remove one nut at “10”.
- Disconnect the hose leading from the booster valve to the intake manifold.
- Using the cardan, disconnect the mounting bracket from the body.
- The VUT is attached to the car body using four nuts at “13”.
- After removing the device, place the mounting bracket on the new amplifier by unscrewing the two nuts to “17”, and then install it on the car.
By completing this simple procedure, you will insure yourself and your family from unforeseen situations arising from a breakdown of the VUT VAZ 2109.
Latest articles
What are lubricant compositions for the Suprotec engine and the opinions of car enthusiasts What are lubricant compositions for the Suprotec engine and the opinions of car enthusiasts
How brand engine additives work
How to register the replacement of a car's power unit this year? How to register the replacement of a car's power unit this year?
Procedure for dealing with paperwork.
How to adjust the valve mechanism on the engine of a GAZ 3110 Volga? How to adjust the valve mechanism on the engine of a GAZ 3110 Volga?
Why do you need to adjust the valves on the engine?
Adjustment of the valve mechanism YaMZ 238 Adjustment of the valve mechanism YaMZ 238
Precise valve adjustment on diesel YaMZ 238:
Organizational diagram for changing the front door window regulator on the "seven" Organization diagram for changing the front door window regulator on the "seven"
Design and procedure for replacing a window regulator
Chevrolet-Niva heating system: changing the interior heater heat exchanger Chevrolet-Niva heating system: changing the interior heater heat exchanger
Recommendations for replacing the interior heater radiator
Standards for the use of fuels and lubricants at the disposal of the Ministry of Transport of the Russian Federation Standards for the use of fuels and lubricants at the disposal of the Ministry of Transport of the Russian Federation
What basic fuel standards does the Ministry of Transport offer?
Factory and actual fuel consumption for Lada Priora, reasons for overconsumption Factory and actual fuel consumption for Lada Priora, reasons for overconsumption
Declared and measured fuel consumption per
NECESSARY TOOLS FOR THE JOB
Upon completion of the diagnosis, when the need to replace the part is obvious, before starting work it is necessary to prepare the tools and spare parts required for replacement.
First of all, purchase a new vacuum brake booster for your VAZ 2114; we also recommend replacing the connecting hose at the same time if it shows any signs of wear.
Replacing the vacuum on a VAZ 2114 requires the following tools:
- Pliers;
- Open-end and socket wrenches with a diameter of 10, 13 and 17 mm;
- Screwdriver.
Look at the condition of the plugs and fittings; you may need to replace them too, so when purchasing the necessary materials, do not forget to purchase them.
Hisses when braking (with video example)
In the following video you can hear this characteristic sound:
By the way, according to the instructions, the standard “vacuum unit” of the VAZ-2110 cannot be repaired, only replaced, but we “do it ourselves.” And judging by the number of different instructions for self-repairing cars posted on the Internet, it can be argued that any domestic car enthusiast with more than five years of experience can safely be awarded the title of design engineer in absentia. Therefore, we will consider the repair procedure, especially since the difference in cost between the repair kit and the vacuum booster itself is disproportionately high.
In any case, first we will have to dismantle the VUT; for this we will need a minimum of available tools.
Tools
- Open-end and socket wrenches in sizes “10”, “13”, “17”;
- Powerful flat screwdriver;
- Repair kit or VUT assembled;
- Sealant and a little desire to do it yourself.
At this stage, we have a choice: either do everything as the manufacturer’s instructions say (disconnect the main brake cylinder from the VUT, unscrewing all the brake pipes from it, and then bleed it) or a little simpler and with little cost (simply moving it away to the side).
In any case, the choice is yours, but I will take the easy way:
- Disconnect the push rod from the brake pedal: Remove the latch and pull out the pin.
- Disconnect the block with wires from the brake fluid level sensor: Disconnect the block.
- In the engine compartment, unscrew the two nuts securing the master brake cylinder to the “vacuum chamber”:
Two nuts at “17”. - Holding the check valve, remove the vacuum pipe from it: Removing the vacuum pipe.
- It is at this point that all “manuals” require disconnecting the brake pipes from the brake pipe, but I suggest unscrewing just one nut securing the brake lines to the passenger compartment and simply moving the brake pipe to the side:
Nut at “10”. - In the cabin, under the instrument panel, unscrew the four nuts securing the brake pedal bracket:
Nuts at “13”. - We dismantle the vacuum booster together with the bracket: Dismantling the VUT.
- Having unscrewed the two nuts securing the pedal bracket and prying it up with a screwdriver, we disconnect it from the “vacuum unit”: Nuts for “17” Repair.
- We purchase a repair kit for VAZ - 2108/2109 in the store:
Contents of the repair kit. - Using a powerful screwdriver and a hammer, carefully flare the vacuum amplifier housing: Flaring.
- Since there is a return spring inside, to prevent the free half from “shooting out”, we tighten the previously unscrewed nuts onto the studs. This is the picture that opened up to us: Aperture defect.
- It will not be possible to disassemble the diaphragm further, since the pins securing it to the body are riveted. We simply remove its cuff from the body with a relatively light movement of the hand: Dismantling.
- You can see for yourself that the catalog number of the “native” and the purchased cuff matches! Catalog number.
- We install the cuff into the diaphragm body, while carefully using a screwdriver to help its edge get into the internal groove: Internal groove of the diaphragm.
- Next, lubricate the seat of the washer on the stud with the corrugation with sealant... Lubrication with sealant.
- ...and the junction of the pedal bracket with the vacuum booster housing: Sealing.
- At this point, the repair of the vacuum amplifier can be considered complete; all that remains is to carefully roll the attachment points of the previously flared halves. Installation of the “vacuum seal” occurs strictly in the reverse order.
This problem occurs when air leaks in the vacuum pipe of the brake booster. It is necessary to check for the presence of leaks both the pipe itself and its connections with the intake manifold and VUT. Since this malfunction causes depressurization of the engine intake system, the air mixture in the third and fourth cylinders becomes depleted and the engine begins to “sputter.” You can learn more about diagnosing this malfunction in this video instruction.
What is VUT and why is it needed?
To determine the malfunction of the VUT, it makes sense to describe its purpose, operating principle, as well as the effect of the vacuum booster on engine operation. So, the main task of the “vacuum man” is to increase the physical force (usually 3...5 times) applied by the driver to the car’s brake pedal. This is vital because even a very strong person is not able to create enough force in the hydraulic brake system so that all the brake pads are compressed to the required value at the critical moment. This force is created due to rarefaction of air, and the area in the engine intake manifold is used as its source or is pumped by an additional pump.
Structurally, the VUT consists of two chambers - atmospheric (on the driver’s side) and vacuum (on the engine side). The vacuum chamber is connected to the intake manifold using an appropriate pipeline. When you press the brake pedal, the vacuum chamber is connected to the atmospheric chamber using a pusher, which has a so-called tracking valve. Next, the diaphragm is connected to the rod and brake fluid is pumped to the brake cylinders. If there is no force on the brake pedal, then under the influence of the return spring the diaphragm returns to its place, the pressure on the brake fluid weakens, which is why the brake pads move apart and braking stops.
In the simplest case, the vacuum brake booster takes vacuum from the intake manifold. To do this, it is connected to it by an appropriate pipeline. However, in many modern cars there are separate vacuum pumps for the vacuum pump. They come in two types. The first is mechanical, it is driven by the engine camshaft. The second is electric and is driven by a separate electric motor. The use of additional pumps not only increases the comfort of using the braking system, but also increases its reliability (for example, in the event of damage and/or depressurization). But still, the pump is only an auxiliary element, and the main vacuum is taken from the intake manifold.
Design features and operating principle
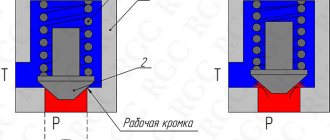
The first thing you should understand is the design features of the vacuum brake booster and the subtleties of its functioning in the system. As a rule, the device is located in a common block with the main cylinder. In the initial state, the channel connecting the system with the surrounding air is closed.
In turn, the second channel remains open. At this stage, the diaphragm, which is located inside, receives identical pressure on one side and the other. In addition, thanks to the action of the return spring, it is always located in its original position.
When the driver presses the brake, a special rod moves, deflects slightly and closes the entrance to the channel. At the same time, another channel opens, connecting the VUT with the surrounding air.
After this, atmospheric flows converge on both sides and press each with its own force. Due to the pressure difference, the return spring is compressed, and the rod itself moves with the cylinder piston.
After reducing the force (while the foot remains on the pedal), the channels open so much that the movement of the piston assembly is completely blocked, and the VUT itself is in standby mode and ready for work. In such a situation, any change in the position of the pedal leads to an adjustment of the pressure difference in the device. As a result, the car stops if the driver presses on the pedal, or continues to move when the foot is released.
Vacuum booster device
When you press the pedal hard, there is a sudden change in pressure, causing the brakes to work at their limit. It is believed that thanks to VUT, the efficiency of the vehicle’s braking system increases by 5-7 times. As soon as the pedal is released, the diaphragm returns to its original position.
If the vacuum brake booster system does not work, diagnostics, identification of the cause and prompt elimination of the defect are required. How to do this will be discussed below.
Adjustment and repair of the unit after checking the vacuum brake booster
In general, adjusting the VUT comes down to adjusting the free play of the brake pedal. To set it correctly, you need to adjust the length of the rod. The adjustment bolt controls the gap/protrusion. Correctly adjusting the position of the bolt itself will allow you to set the ideal timing of the valves.
When the leak test is completed, do not forget to adjust the free play of the brake pedal. Adjusting the rod length creates a gap that determines the amount of pressure on the brake cylinder
Therefore, it is very important to set the rod length correctly and set the appropriate gap.
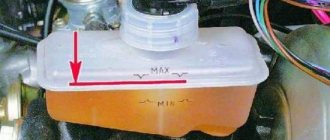
The free play of the pedal when the engine is not running should be from five to fourteen millimeters. This gap is controlled by a bolt located above the plane of the vacuum brake booster. A small gap leads to jamming of the working cylinder, resulting in rapid wear of the pads and increased fuel consumption of the car. In addition, the car begins to slow down randomly, as if you were driving with a handbrake. A large gap, on the contrary, leads to an increase in pedal travel, which indicates a violation of the tightness in the assembly.
Above we described how to check the operation of the brake vacuum device and adjust its operation if necessary. Now let's say a few words about its repair.
To ensure your own safety if your amplifier breaks down, take immediate action to repair or replace it. And if you can replace vacuum hoses in gasoline cars or pumps in diesel cars yourself, without resorting to the services of a car service, then it is recommended to entrust more serious work to professionals.
Of course, it costs some money, but when your own safety is at stake, it is better not to skimp. Contact the specialists. They will not only carry out the inspection competently, but also perform all the necessary work efficiently and with a guarantee.
It should be noted that after repair, it is important to synchronize the wheels when braking and check the ABS/ESP system. This requires a diagnostic stand and specialized equipment.
There are times when it is more expensive to repair a vacuum cleaner than to purchase a used amplifier that is in good condition. Therefore, it is recommended to look for the device at a disassembly site if necessary.
If you feel confident in your own abilities and, after checking, decide to repair the faulty vacuum booster yourself, then proceed as follows.
To begin, remove all the upholstery in the engine compartment and remove the windshield trim. Do not remove the tubes leading to the GTZ. This may allow air to enter the system.
Next, unscrew the cylinder from the vacuum booster and carefully tilt it forward to prevent deformation of the brake pipes. Before doing this, the vacuum transfer hose must be removed from the amplifier fitting.
Carefully study the recommendations given by the manufacturer and proceed to dismantling the amplifier. Unscrew the mounting bolts and disconnect the terminal of the wire going to the brake light.
Only then remove the pedal using a special tool. If you are well versed in the design of the car, you can cope with checking and repairing the VUT. However, it is better to first go online and find instructions with an amplifier circuit. This will significantly speed up the implementation of the task and increase your chances of success.
Signs of VUT malfunction
Partial output of the vacuum brake booster will certainly manifest itself, and from the worst side and quite clearly. So, symptoms of a malfunctioning amplifier include:
- Significant effort when pressing the brake pedal. To feel this for yourself, you can press the pedal four or five times with a known good vacuum seal and the engine turned off. At the last squeeze, the force on the pedal will increase significantly. Sometimes the opposite situation occurs - the pedal is too soft. This indicates “airing” of the brake system.
- The influence of the vacuum booster on engine operation. Since the VUT takes vacuum from the intake manifold, the engine can change its operating mode during braking (although this should not happen in normal mode). This happens because excess air is sucked into the manifold, affecting the composition of the air-fuel mixture.
- The vacuum brake booster hisses. In particular, hissing occurs when the pedal is depressed. A hissing sound clearly indicates the presence of depressurization either in the vacuum amplifier itself (for example, when the diaphragm ruptures), or in its pipeline or in the check valve (for example, when its rubber seals are significantly worn).
- Vacuum pumps knocking. If a mechanical vacuum pump fails, the usual sign of this is a hum emitted by its drive rod (error p1479 may also appear). If an electric vacuum pump is installed on a car, then motorists often experience overheating of its drive motor.
- Knocking noise when braking hard. Moreover, the sound is inertial in nature, since it is caused by the membrane fastening becoming loose.
Accordingly, the occurrence of one or more signs directly indicates to the car owner that it is necessary to check the vacuum brake booster and its components.
Error p1479
In modern cars equipped with an electronic control unit (ECU), an error code p1479 is often generated in the device’s memory - “Brake booster vacuum system mechanical malfunction.” Owners of a wide variety of cars encounter it - Audi, Volkswagen (Touareg, Passat), Ford and others. The cause of an error in the control unit can be very different. For example, when air is sucked in the hose between the intake manifold and the vacuum brake booster itself.
Another common option is the result of measuring the vacuum value with a vacuum sensor. In particular, it occurs if moisture appears inside the vacuum booster and/or its tubes. The solution is to clean and dry the tubes, and in rare cases, replace the sensor itself.
It also makes sense to check the integrity of the fuse going from the control to the sensor. Each machine will have its own electrical circuit, so it is impossible to provide specific information within the framework of this material.
Another option is the performance of the electric vacuum pump. In particular, its electric motor, impeller, bearings, fastenings, connection blocks, as well as relays and fuses.
Engine misfire (misfire) when pressing the brake pedal
An air leak through the brake booster can cause misfires while the engine is running. Damage to the diaphragm or internal valve leads to the fact that the optimal ratio of air and fuel is disrupted. Misfire usually occurs when you press the brake pedal while idling.
If checking the vacuum hose, connections and check valve does not reveal anything, you need to perform the following check:
- start the engine at idle speed;
- tighten the handbrake;
- ask another person to press the brake pedal;
- pinch the vacuum hose using pliers (do not forget to place a rag so as not to damage the hose);
- If the engine does not stall and its operation stabilizes, the vacuum brake booster is the culprit for misfires.
Checking engine vacuum using a vacuum gauge
Sometimes the VUT copes well with its tasks, but the motorist still has certain doubts that it is fully operational. If the amplifier on your car did not pass or barely passed the previous tests, you need to make sure that there is enough vacuum. Such diagnostics are performed using a vacuum gauge.
- Disconnect the vacuum hose from the brake booster and connect it through a tee so that you can use a vacuum gauge.
- Start the power unit.
- The sensor should display approximately 400-540 mmHg. Art. If you see a lower value, there is a vacuum leak through the intake manifold (gaskets or crack), hose, engine (cylinder head gasket, etc.) or other components.
Checking VUT with a manual vacuum pump
This method allows you to definitively check the operation of the amplifier. Everything can be done in just a few minutes.
- the engine must idle for about 15-25 minutes to reach operating temperature;
- stop the engine and disconnect the vacuum hose from the check valve on the VUT;
- connect the vacuum pump to the valve;
- apply approximately 500 mm Hg. Art. vacuum to the amplifier;
- wait 5 minutes, a working vacuum booster should hold vacuum normally;
- Without turning off the vacuum pump, press the brake pedal - the vacuum should drop by approximately 125-250 mmHg. Art.; if the vacuum remains at the same level or decreases to zero, the amplifier is faulty;
- Apply vacuum to the amplifier to return it to 500 mmHg. Art.;
- press the brake pedal and hold it in this position for 30 seconds; the vacuum should drop slightly and then be maintained for the remaining 30 seconds; a significant drop in vacuum indicates a faulty VUT.
The principles discussed in this article help to check the vacuum brake booster on most cars - VAZ 2106, 2107, 2109, 2110, 2114, GAZelle, as well as other models of domestic and foreign production.