Steering wheel braid “Leather rules”
The cover is intended for steering wheels NOT covered with standard leather!
Product weight: 0.3 kg
— Covering the steering wheel will take you no more than 2 hours. — The whole process of wrapping the steering wheel is simple and accessible to everyone. — The blank fits perfectly on the steering wheel of Lada Vesta and Lada Xray, including the steering wheel spokes. — No need to sew by hand, the braid is already sewn along the edge, you just need to put it on the steering wheel and lace it with thread (included in the kit). Attached are detailed instructions with photos of each stage. — The braid is made of high-quality genuine automobile leather, 1 mm thick, ideally matched to the interior color. Automotive leather is tougher and more wear-resistant, has a durable color and embossing pattern, and is less prone to stretching and the influence of chemical solvents.
— Leather braid, sewn and stitched along the edge — Special braided thread for lacing — Needle for lacing — Detailed instructions
Products under the “Kozha Rulet” brand are distinguished by high quality manufacturing, ease of operation and installation. Each product has branded packaging. You can find positive reviews about leather car accessories from the “Kozha Rulet” brand on the Internet and on car forums.
Attention! There is no need to remove the steering wheel; based on feedback from our customers, it is more convenient to mount the braid on the installed steering wheel using a curved needle.
We deliver goods throughout Russia by cash on delivery by Russian Post or transport company.
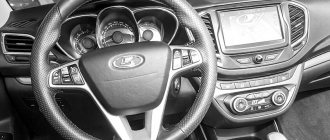
A leather steering wheel is the dream of many owners of inexpensive class B models. These also include those who drive Lada Vesta and X-Ray. However, the steering wheels of models of this type are extremely rarely covered with leather from the factory. The XRAY and Vesta trim levels have a similar option, but only in the top version. Therefore, owners of cheaper equipment have to do everything themselves.
Recommendations in general
The process of replacing the steering wheel is simple, but requires attention on the part of the repairman. A car enthusiast without basic skills in servicing a technical device is better off turning to service station specialists for help.
Sequence of actions when removing the steering wheel on a Lada Vesta:
- Remove the block - airbag module.
- Unscrew the central bolt - clamp.
- Remove the steering wheel.
- After maintenance, install the steering wheel again.
In general, it must be said that in order to completely install the multifunction steering wheel without problems, not only an installation specialist, but also a microelectronics specialist must be present during the installation.
Come to our installation center! We have everything, we successfully carry out this work!
Lada Vesta interior reupholstery - how much does it cost?
The KOZ-SALON company offers some of the most economical prices for car interior upholstery. From 30 thousand rubles for full coverage, plus a two-year warranty period. It will take a team of craftsmen 2-3 days to completely renovate the interior. For legal entities a discount of up to 20% is provided. And for every client who decides to completely reupholster the interior, the steering wheel is re-upholstered free of charge.
In addition to changing all fabric elements, the KOZ-SALON car studio also offers an interior repair service - removing burns and scratches, fabric tears and even cracks on the panel board (dashboard).
Steering wheel reupholstery in Lada Vesta car
Separately, the steering wheel can be reupholstered at KOZ-SALON from 3,500 rubles. Choose for yourself or get free advice from an in-house designer on which material is suitable:
- Suede
- Alcantara (artificial suede)
- Genuine Leather
- Artificial leather (eco leather)
- Velours
- Fabrics - corduroy, flock, carpet, etc.
How to install Vesta multifunction steering wheel of other configurations
The appearance of such a function as cruise control in the Russian Lada Vesta car evokes positive emotions among buyers. It makes driving more comfortable and safe, and also allows you to save fuel during long trips.
It is advisable to use this function during long journeys, when the route is relatively clear. In city mode, cruise control is clearly inconvenient and irrelevant. Based on this, we can conclude that those drivers who often travel long distances and want to feel more relaxed during a tiring trip should install this function on their car.
In simple configurations of the Lada Vesta, the design will have to be modified more. You will have to connect the cruise control system yourself, as this is not provided in the packages. Additionally, you will need a set of three wires with a snail.
The Lada Vesta multi-steering wheel in such cases is installed in the following order:
- Remove the regular steering wheel from the car.
- Install the new Vesta multifunction steering wheel, being careful.
- Route the wiring harness.
- Connect it to the connector. All operations are carried out by analogy, as in the “Lux” configuration.
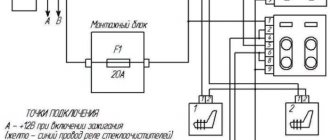
The three-wire harness is pulled through the technological hole, which is located above the pedals. The harness is routed to the electronic control unit. The electrical connection of the multifunction steering wheel must be made according to the diagram shown below.
The second end of the wiring harness is inserted into the block to connect the multi-steering wheel snail. This end of the harness runs along with the radio wiring.
Advantages of reupholstery
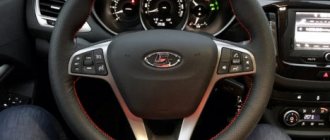
Covering the Lada Vesta and X-Ray steering wheels with leather allows you to give the interior gloss and solidity, because the leather steering wheel looks very presentable, and the wrapping also goes well with the rest of the interior elements.
However, everything is not limited to aesthetics alone. With a leather constriction, the steering wheel of the X-Ray and Vesta is pleasant to the touch and does not slip so much, also thanks to the perforations. And in hot weather, this point is more than relevant, because a steering wheel slipping in your hands can cause loss of control over the car and an accident.
After reupholstering, the Vesta steering wheel becomes plumper.
In addition, some find that the cross section of the X Ray and Vesta steering wheel rim is too thin, making it uncomfortable to hold. The situation is corrected by tightening with leather.
As you can see, this method has many strengths, so it is not surprising that it is so popular.
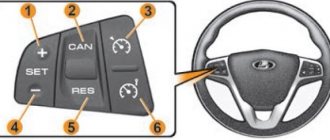
Setting the Keys
- ratchet;
- extension;
- Torx head T50;
- two-fingered puller;
- rags, gloves;
- additional lighting as needed;
- torque wrench.
Algorithm of actions for withdrawal:
- We place the car on a flat platform, provide safety measures, fix the rear wheels, and squeeze the parking brake.
- Open the hood.
- Remove both terminals from the battery.
- Open the driver's door.
- We set the steering wheel to the position of linear movement of the technical device.
- We move the metal latches on the steering wheel.
- We remove the airbag module.
- Disconnect the connectors with wires from the airbag and the transport fuse.
- Unscrew the steering wheel retaining bolt.
- We remove the steering wheel from the splines.
Then we carry out preventive maintenance and replacement as necessary. We install the steering wheel (hereinafter referred to as the steering wheel) again. Tightening torque 3.8-5.0 kgf/m (38-50 Nm) with a torque wrench.
The work will require materials and tools.
Materials:
- SMD LEDs categories 0603 and 1104.
- SMD resistors types 0603 or 0805 - the resistor value should be 4-8 Ohms. A high rating means the diodes will last longer, but will produce dimmer light.
Instructions for other configurations of Lada Vesta where there are no gray wires
This connection option is more complicated, since the connection to control the multimedia device is carried out independently. You will need a bundle of three wires and an additional block for the cochlea. Dismantle the old model and replace it with a new one. Wires are pulled from the audio system and connected to the steering connector. A pre-prepared bundle of three wires is supplied from the electronic control unit to the audio system. Together with the multimedia wires, it is connected to the steering block.
What tire size
Previously, the tire standard for AvtoVAZ passenger cars was within the range of 13–14 inches. With the advent of Vesta, we started talking about size 15, and after a while, the wheel size approached R16 and R17. The Lada Vesta Concept's wheel size has reached R18.
Thus, the most common tire size for Lada Vesta is:
- 175/70/R 15;
- 205/60/R 15;
- 185/60/R 16;
- 195/55/R 16;
- 175/55/R 17;
- 195/50/R 17.
Where the first indicator is the width of the tire itself, the second is the profile (height) of the rubber. To calculate it, you need to calculate the second one as a percentage from the first parameter, for example, 55%. The resulting value will be the rubber profile.
The last number is the most understandable - this is the diameter of the tire rims in inches. 2.54x17=43.18, that is, 43 cm and a little more. There are additional designations besides these standard sizes, for example, it can be designated as follows: 195/55/R16 88Н, but they are not considered within the scope of this article.
Braid with stitching around the edges
This is the most common type of garter tape. Different stitch patterns can be created by weaving the thread between the stitches in different ways. You can thread the thread under each stitch or skip 1-2 stitches. You can skip stitches alternately on one side or the other. Below we will look at a few stitches for this type of weaving. Here are some things to consider when re-braiding your hair.
- First, clean the steering wheel of any dirt.
- If the steering wheel is damaged, small irregularities can be eliminated by wrapping the damage with adhesive tape, thereby leveling the surface, and only then proceed with installing the braid.
- Pull the tape along all sides of the steering wheel.
- Lacing may take several hours. The length of lacing depends on the type of stitch you choose. After each stitch, pull the thread so that the edges of the braid come together.
- Start lacing from the wrong side along the edge of the needle. Thread the needle and thread through the hole in the existing stitch. This will help keep the thread knot under the weave.
- Only tighten the threads when the braid is in place, otherwise it will be difficult to unscrew them back.
- The braid can be glued in the knitting needle area. Use upholstery glue. Modern adhesives are water-based. It is non-toxic and washes off easily.
Zigzag stitch
A simple zigzag stitch to join the edges of the braid with stitched stitches.
This is the simplest stitch. A needle and thread are passed under each stitch of stitches sewn along the edges of the braid (or, for smaller stitches, an equal number of stitches are passed each time). At each stage, the needle changes direction (stitches are made alternately from one edge of the braid to the other). We recommend: How to properly install a child seat in a car?
Hexagonal seam
Hexagonal seam. Used to join the edges of braids using stitched stitches.
So named because of the similarity of the various sections of the stitch to the hexagon. This is done as follows: a needle and thread are passed under parallel stitches on different edges of the braid, two parallel stitches are passed, then two parallel stitches (or more if the stitches are small) are joined again, starting from the same edge as the previous one. This creates a hexagon with a diagonal stripe.
Pentagonal seam
The needle and thread are threaded through one stitch, then one opposite stitch is passed (or several if the stitches are small), and the thread goes into the next stitch on the opposite side. That is, the line is performed with one stitch. The stitch segments are shaped like a pentagon.
The process of sewing on the tape using the pentagonal stitch, also known as the Euro stitch as it is used by many European car manufacturers.
Diamond seam
Diamond stitch. Used to join the edges of braids using stitch stitches. The yellow threads are machine stitches along the edges, the blue threads are hand-embroidered connecting stitches.
The needle and thread are threaded into each stitch sewn along the edge of the braid. Unlike the basic stitch (shown first in this article), the needle and thread are always threaded in the same direction. This means that the thread goes through two opposite stitches, then goes through two more opposite stitches, entering from the same side as in the previous step. The stitch segments are made in the shape of a diamond with a transverse line.
Connection
- After connecting the cruise control circuit, we connect the block with wires to the multimedia device (blue).
- If a freelance MMC is installed, you will need an adapter for this brand of radio.
- We insert the plastic cover and assemble the RC again.
First you need to apply a voltage of 12V to pin 11 of the steering column switch. To add a contact to the plug, the connector must be disassembled, for which the white color retainer is first pryed off with a screwdriver.
As for 12V, you can get it from the steering angle sensor (pin 8), which is located under the steering wheel. But on X-Rays equipped with power units from Renault-Nissan, 12V can be taken from the plug plug, which is located between the headlight adjustment and mirror adjustment controls - pin 8 means 12V backlight, and pin 1 means 12V from the ignition, respectively.
Next, you need to make sure that the necessary wiring is present on the steering wheel - from the block with the keys to the 11th contact. If there is none, you will need to run the wire yourself.
At this point, the actual installation of the backlighting of the radio buttons on the steering wheel of the Lada X-Ray is completed and you can put everything back together.
Where can I buy?
It is usually easiest to purchase such products online. The reason is that at the car market or in a simple store there may not be a steering wheel cover specifically for the Lada X-Ray or Vesta. Some people order goods through Aliexpress, since the products there are cheaper. And if delivery time is not critical for you, you can use this platform. However, if you want to receive the braid faster, it is better to place an order in a Russian online store.
The table below shows the most popular resources where you can place an order, as well as their prices:
Benefits of Cruise Control
Having cruise control in your car allows you to:
- Maintain a constant speed regardless of the nature of the route;
- Don't worry about speeding;
- Do not constantly keep your foot on the gas pedal;
- Does without gear shifting (on manual)
This is very convenient, especially when traveling along a lightly congested highway. By turning on this function, the driver can move calmly and relaxed by simply setting the desired speed and taking his foot off the gas pedal. The brakes work as usual, and in case of emergency the car can suddenly reduce speed.
Review of Manufacturer Prices
The size of the steering wheel in the original version is 37-39 cm in internal and external diameters, respectively.
| Name/article | Price in rubles |
| Original steering wheel 8450009837 (18 years old) | From 5000 |
| Plastic cover with function keys 8450006832 | From 2500 – 3000 |
| Airbag module 8450149058 | From 4500 |
| Steering wheel complete with airbag 8450006832 | From 8500 |
How to remove the steering wheel cover on a Lada Vesta
- Carefully pry up the sides with a plastic spatula or something similar.
- Remove the latches from the grooves.
- After carrying out the preventive maintenance, guide the latches into the grooves and press them moderately.
Removing the steering wheel on your own is not difficult if you strictly follow the given algorithm. If difficulties arise, contact service station specialists for help.
As for installing a plastic cover on the steering wheel or buying a new original assembly, it is a personal matter for each car enthusiast. Based on the availability of funds, the size of the budget allocated for maintenance, and upgrading the machine. When purchasing, give preference to original products.
Reviews about the operation of cruise control on Vesta
| Positive | Negative |
| I thought that cruise control was not a very necessary option, but just recently I became convinced of the usefulness of this device. I went to Tula with my family over the weekend, and on the way the idea came to try this mode. I set it to 108 km/h and went along the highway! During smooth overtaking, you don’t even have to turn off the cruise control, just add 10 km with the buttons, and then slow down. | I tried to use cruise control on Vesta a couple of times, but it was unsuccessful. I don’t like that after braking it picks up speed very slowly. I just want to press the pedal, but I can’t, because the program will turn off. Cruise control may not be suitable for my driving style, but I never use it. |
| It’s a very convenient thing, you don’t get tired of driving at all. I often have to travel for work, so I use this feature all the time. It’s good, of course, when the highway is not busy. | I installed a multifunctional steering wheel on Vesta mainly to make it convenient to switch music and to be able to talk on the phone. At the same time, I set up the cruise control, I thought I would use it, but as it turned out, I wasted my time. The thing turned out to be extremely inconvenient. It may be necessary on a completely empty highway, but in the city cruise control is absolutely useless. |
| There is no point in using cruise control in the city, but it is great for country trips. I even noticed that this function saves fuel a little. | After installing the multifunction steering wheel everything was fine, but after a couple of months problems appeared with the cruise control. Namely, the green indicator does not turn on when the car picks up the desired speed. The unit has already been reflashed several times, nothing helps. I think that the original cruise works fine, but you shouldn’t “collective farm” yourself, it won’t work properly anyway |
| At first, for a long time I could not understand how to control the cruise control on Vesta, especially how to behave while overtaking. But then I watched a video on YouTube and realized that you can change the speed while driving. When the desired indicator is reached, the button turns green and the speed levels out. And if you start to brake or accelerate, the program automatically turns on. By the way, below 40 km/h it does not turn on at all. I use cruise control regularly on country trips. | After 30 thousand, the cruise control began to “kick out”. Either it doesn’t work at all, or suddenly all the buttons go out. The speed also changes every once in a while. You'll have to go to the dealers, it's good that the car is under warranty. |
| I installed the multifunction steering wheel myself. I have Vesta “comfort”, but for some reason this option was not included in the package. I turn on the speed limiter for my wife, since she is a beginner and still has poor control over pressing the gas pedal. It's also very convenient. | The idea that cruise control saves fuel is pure fiction. It can save a little if the track is relatively flat. When there are ups and downs, the program tries to equalize the speed and fuel is wasted even more, especially if the road is always uphill. |
Steering wheel reupholstery is the most reasonable car tuning
It is extremely difficult and in fact impossible to preserve and protect the interior of a car in factory condition.
For some car owners, this is not a disaster if a spot, crack, rubbing, etc. appears somewhere. But there are also those for whom a car is not just a means of transportation, but something more. For whom not only the technical part is important, but also the aesthetic appearance of the car’s interior. Probably the most worn element in the interior of any car is the steering wheel. Therefore, perhaps, we will focus on updating this particular part of the interior.
In order not to be unfounded, we decided to test what a steering wheel constriction is from our own experience. Our partner opletka.by
, who helped decide on the material and design, gave a couple of tips on how to properly care for the new steering wheel in order to maintain its new, original appearance. Let me remind you that all members of LADA Club BY receive a discount of 5-10%, depending on the type and complexity of the steering wheel, upon presentation of a club card. Link to partner website: www.opletka.by
Now we will describe the process and technology of re-upholstering the steering wheel in more detail. Let's start with probably the most difficult and important thing - this is, of course, the process of removing the steering wheel itself. You can remove the steering wheel on the spot, BUT it is better to do it yourself, that is, it is BEST to come with the steering wheel in your hands. By “on your own” I mean resort to the help of specialists. 10 minutes and the steering wheel is safe and sound in your hands. In fact, this is still a bit of a jewelry job that needs to be done carefully so as not to entail additional costs and a lot of problems.
An important and responsible stage has been completed, now it remains to decide what we want, how we want it, and, of course, from what material. Let's dwell on the choice of material. It will not be news to anyone that in most cases “natural leather” and so-called “Eco-leather” are used for such purposes. What are the differences and which is better?
What is most important: aesthetic function or practicality is a purely personal matter for everyone. For detail, we will consider each type of material separately.
Genuine Leather
. Automotive leather should be used to reupholster the steering wheel. The main difference between automotive leather and non-automotive leather is its manufacturing processes. Automotive leather uses more technological processes to better protect the leather from external influences. An important factor in the production of automotive leather is the application of the outer layer, which consists of polyurethanes. During use, this layer wears off over time, revealing the real texture of the leather, after which the steering wheel begins to wear out quickly.
Eco leather.
Eco-leather is a high-tech material created for maximum comfort, an analogue of genuine leather. In terms of tactile sensations and visual sensations, this type of finishing material cannot be distinguished from genuine leather.
What are the differences between eco-leather and natural leather?
Let's start with care.
Natural leather requires meticulous and constant care to avoid drying out and stretching. It is undesirable to wipe the skin with non-professional chemicals, since it is unknown how it will interact with the skin. If there is any contamination, it is best to wipe the skin with a damp sponge, in extreme cases with a soap solution, and for the most severe contamination - with purified gasoline "Nefras" "Galosha".
We absolutely do not recommend any other chemicals! Most people associate genuine leather with wealth and durability, but when it comes to leatherette, everyone has different associations, mainly cheapness, fragility and quick wear. But, unfortunately, in this case the opposite is true. Eco-leather is not picky in its care; it’s easy enough to wash, it does not tan in the cold, and therefore does not crack or fade in the sun. Plus, the cost of the material is significantly lower than the cost of genuine leather, as well as durability during operation. Of course, how this or that material will behave over time is difficult; the quality of the material primarily depends on the manufacturer, i.e. what technological stages the material goes through, and what material was used, and, of course, care. And yet, I repeat, by tactile sensations and visually this type of finishing material cannot be distinguished from leather.
Currently, people have more or less heard about eco-leather, and generally prefer it. But this is a purely personal matter for everyone.
Let's return to our mini-tuning - re-upholstering the steering wheel. We removed the steering wheel, chose the material and design, and now we’re leaving everything in the hands of professionals.
In order not to return to the beginning of our topic, the donor of our mini-experiment was the LADA Vesta SW Cross steering wheel. Using his example, we will consider all stages of the reupholstering process.
After approval of the steering wheel design (choice of material, color, thread and seams), the reupholstering process takes about 1 day; in our case, it was delivered in the morning, and by the evening the steering wheel was completely ready.
Stages of steering wheel reupholstery.
The steering wheel has been removed from the car. The steering wheel fell into the hands of specialists and this is where the fun begins. Cutting the seams is the initial stage of this process.
The next stage is making patterns and cutting the material according to the taken patterns
The cutting of the material is complete, then this whole miracle is put on the steering wheel and all excess is trimmed off. This is the most difficult and responsible part, since you need to take into account all the nuances and a lot of factors that can affect the quality of the upholstery.
Next – stretching and gluing new leather (eco-leather) onto the steering wheel rim
When all of the above stages have been completed very successfully, it is difficult to say that everything is going according to plan. A lot of interesting and unknown things are ahead for us. Next comes step by step - sewing the braid
After gluing the leather, stitching the braid and many other steps that were “before”, the braid is put on the steering wheel - the last fitting.
After completing the fitting of the braid on the steering wheel, all actions are tightened with a decorative seam “Sports seam”. The seam should be nice and even. The material must be well tightened so that there are no folds, and not overtightened so that there are no wrinkles.
And... Voila, our steering wheel is ready.
In addition to everything, an aquaprint of the interior plastic was made, but that’s a completely different story.
Summing up all of the above, I would like to express my gratitude to our partner opletka. by
for the opportunity to get acquainted with the reupholstery process and receive satisfaction from the result of the work performed. You can get acquainted with our partners in the “Discount program” section, or on the partner’s website directly.
Brief summary
At the end of all manipulations, the owner has the opportunity to use the buttons on the steering wheel to regulate the operation of not only the cruise control system, but also multimedia, as well as the speed limiter. It is worth noting that the work of the system does not end with these functions. You can also connect the Lada Vesta rear view camera here.
Today, manual cruise control is a fairly promising and rapidly developing development, actively used in many European countries. The device is useful in that, by visually contacting the driver, it creates significant safety conditions that prevent accidents. By combining cruise control with the emergency braking function, developers achieve a greater level of safety on the roads.
How to choose?
Before you buy a leather steering wheel for Vesta or X-Ray, you need to study this issue in order to navigate the many offers from different manufacturers. All braids are sewn from automotive leather, 1 mm thick. This leather is tougher, making it more resistant to wear and mechanical damage.
As a rule, there are 4 categories of goods on the market:
- Standard - products are made of artificial German leather Schweitzer Nappa, exclusively in black. The braid is smooth in combination with perforated. You can also choose any thread color. Price – about 1200 rubles.
- Normal - genuine Russian Vista Uruguay leather is used, only in black. The braid is smooth in combination with perforated. Threads are available in different shades. The cost is about 1600 rubles.
- Luxury - made from genuine Russian leather Vista Uruguay. A combination of different colors with different thread colors is available. The braid is smooth in combination with perforated. Approximate price tag – 1900 rubles.
- Premium - genuine Italian Nappa leather, without perforation, but various combinations of colors and threads are available. Italian products cost about 2,300 rubles.
Lada Vesta car interior reupholstery at KOZ-SALON - your benefits
Due to large wholesale purchases of materials, the auto workshop has the fabrics you need in its warehouse. All work is carried out on professional equipment KingTony and Pfaff. The specialists are familiar with all the features of the car’s factory parameters, and the fitting of both individual parts and complex parts is completed quickly and without flaws. Before handing over the work, the machine undergoes computer diagnostics to detect errors in the assembly of the interior.
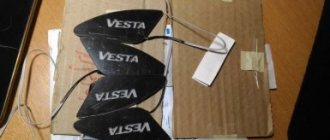
Braiding for Lada Vesta steering wheel
All work is done by hand by highly qualified craftsmen.
The extensive experience of our specialists allows us to obtain maximum quality results for a long service life.
Material: high quality leather
The kit includes everything you need to reupholster the steering wheel.