The appearance of puddles of coolant in the car’s interior makes the owner wonder where the valve for the VAZ-2115 heater is located. In the vast majority of cases, this unpleasant symptom occurs precisely because of the leakage of this part. To replace a faucet, it is absolutely not necessary to go to a car service center - this procedure is quite simple and does not require any special knowledge or skills.
The heater valve in car 2115 is located at the bottom of the dashboard. You can reach it from the passenger seat. At the same time, to replace a part, you do not have to disassemble half of the machine, since access to it is almost completely open.
Repair and replacement
Over time, the car wears out during operation, and at some point certain malfunctions appear. A heater failure is most often indicated by a specific murmur. This is often accompanied by oil leaking into the cabin. Its stains are usually found under the right seat on the carpet. All this indicates that the control valve or the radiator itself has probably failed. Malfunctions of the draft can also worsen the operation of the stove - this is usually indicated by cold air coming from the side deflectors. The problem is eliminated by adjusting the cables.
The most common cause of radiator failure is a leak. As a rule, the problem is found in those places where plastic parts are connected to metal ones. If the hole there is small, then the radiator will not be difficult to repair - just add a special composition to the antifreeze, which is sold in almost any car store. With its help, the gap actually closes itself.
The main task is to get to the faulty elements. Access to the tap is fairly easy, but it will be much more difficult to get to the radiator.
In this case, you must first perform the following steps:
- remove the negative terminal from the battery;
- drain the antifreeze into a prepared container;
- The cooling liquid located in the cylinder block is poured into a separate container (it has a special hole closed with a plug).
It is located in close proximity to the ignition unit. If it does not allow it to work normally, it is better to remove it completely. The plug is screwed together with a 13 mm socket wrench.
Next, you will need to dismantle the casing protecting the steering shaft and turn off the emergency lights. After these manipulations, it will be possible to remove the bolted side screens from the console. This, in turn, will allow the glove box to be pulled out. Then remove the diagnostic connector cover. It will also need to be removed - it is attached to two screws on the dashboard.
After this you will need to dismantle:
- cigarette lighter terminals and its illumination;
- heating regulator unit;
- radio
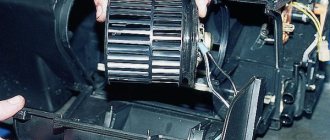
Now comes the turn of the instrument panel. It is held in place by 7 screws. Some of them are hidden under decorative caps. If you do not remove them all, then there is a possibility of breaking this element, made of ordinary plastic.
As a result, access to the central bracket opens. It is secured with two bolts, and to unscrew them you will have to use a size 8 wrench. Moving the bracket aside, you need to disconnect the ECU terminals.
Finally it’s the turn of the radiator. To remove it, you will have to loosen the clamps holding the pipes extending from the above-mentioned unit. However, you should not completely disconnect them, as coolant will most likely flow out, which can easily ruin the decorative floor covering. It would be best to install a basin underneath or, at worst, cover everything with film.
The radiator is held in place by three screws. The heating part that has become unusable is replaced with a new one, and all the above-described manipulations are repeated in reverse order.
Replacing the stove radiator
It would also be useful to talk about this procedure. It is not very difficult, but it takes a lot of time.
The procedure is as follows:
- disconnect the negative cable from the battery;
- remove the dashboard and steering column trim;
- also remove the glove box, the plastic from the center console, the ECU, the air duct, the casing that covers the heater and the air conditioner evaporator (if there is one).
After this, direct access to the radiator opens. It is inspected for leaks, and if any are found, the element is replaced with a new one or repaired.
Why do breakdowns occur?
As noted above, the shut-off valves of the heater are a very vulnerable element of the VAZ-2109. If it fails, then it will not be possible to ignore the breakdown. First of all, on the floor, at the base of the passenger seat in the first row, a puddle forms under the carpet. In addition, leaking antifreeze emits a very characteristic odor, which should also suggest a malfunction of the stove.
Leakage occurs for three main reasons:
- use of low-quality cranes by a domestic automaker;
- oxidation;
- mechanical destruction.
The Volzhsky plant supplies its products with membrane-type locking fittings. This system has one inherent drawback - poor tightness. Even with careful use, such taps break very quickly.
The second malfunction occurs due to the fact that the heating system is not used for at least 4-5 months a year. This period is quite enough for the valve casing and moving elements to become covered with sediment. As a result, his insides literally stick together. The owner of the car makes a significant effort to open it, and as a result the unit simply collapses. That is, a third type of breakdown occurs.
Repair process
https://www.youtube.com/watch?v=ytcopyrightru
Please note that replacing the VAZ 2114 stove (that is, the radiator) can be done in 2 ways: with removing the dashboard and without dismantling the dashboard. Professionals prefer the first method
That is, master mechanics of any service station replace the radiator with a 2114, having first disassembled the top down to the screw. Only someone who has already assembled and disassembled the dashboard with their own hands can handle this work. There are a lot of subtleties and nuances.
Speaking for us, we will replace the VAZ 2114 heater radiator without removing the dashboard.
But again, only highly qualified craftsmen can qualitatively change the design of the machine. We won't interfere there, out of harm's way.
For this job we will need:
- Screwdriver Set
- A set of keys
- A pair of new clamps for the diameter of the radiator pipes
- New radiator. By the way, it’s better to take something imported, for example, Fenox RO0004C3 (it costs twice as much as the original)
- New antifreeze for the heating system
Now let's look at the question of how to replace a VAZ 2114 stove without removing the panel (not the entire stove, but only the radiator).
- We turn off the car, open the hood, remove the wires from the battery and place a container under the antifreeze drain from the stove
- We switch the temperature controller to the strongest heating mode
Slowly unscrew the plug for draining the liquid from the heating circuit. If you remove it quickly, antifreeze may splash on the generator. Some also unscrew the cap on the antifreeze tank itself so that the liquid drains faster
We go into the salon and move the seats towards the rear seat, recline the backs, cover the seats with a large piece of oilcloth, and lay an old blanket on top
Unscrew the central pillar. We unscrew the fasteners to the floor (on the right and left sides) the self-tapping screw on top the side fasteners
Please note that some screws are covered with a plug.
We remove the glove compartment (the photo below shows its mounting diagram)
We unscrew the dashboard mount so that the entire dashboard shakes. This point is important for removing the radiator. That is, in order not to remove the entire tidy, we will simply move it away without disassembling it down to the screws. Replacing the VAZ 2114 heater radiator continues
Now we have access to the adjustment cables for the heating tap of the stove. Remove the ends of the cables on the driver's and passenger's seats. They simply fall off the eyes of the adjusting levers
Removing the radiator protective casing
Remove the clamps securing the pipes (can be from the hood or from below)
Now, in order to replace the VAZ 2114 stove without removing the panel (that is, the radiator), you will need a partner. Together with the second pair of hands, we lift the dashboard a little and pull it towards ourselves to take out the old radiator and push the new one in there. You need to be extremely careful at this stage
The torpedo must be moved with the utmost care so as not to damage anything anywhere.
We assemble the new radiator in the reverse order (clamps, cover, cables, etc.)
We recommend: What the markings on rims say: explanation of symbols, overview of parameters, selection tips
Pay attention to one more point. Having put everything back together, you need to fill the circuit with new service fluid.
After refueling, you need to bleed the heater (heat the interior), then turn off the engine and, if necessary, add antifreeze to the tank.
Operating principle and design of the VAZ-2115 heating system
If the heater in the car does not work, especially in the cold season, there is a possibility of being left without a means of transportation, since in the cold you can simply freeze inside the car. In severe frosts, it is very difficult to clear the windshield of ice to ensure visibility, and with a non-working stove this becomes doubly problematic. You may not even be able to get to a service station.
But most often, if you know the operating principle, circuit and design of the VAZ-2115 stove, you can solve the problem on the spot yourself.
How to choose the right stove tap
Finally, we would like to give some useful recommendations on choosing a heater tap for your car.
The modern market offers several varieties of these devices:
- The simplest option is a crane installed at the car manufacturer. It is built on a membrane element made of rubber, which often cannot withstand elevated temperatures and “sticks.” The solution to this problem is to replace the product. This is why it is better not to buy factory taps;
- a ball valve, which will cost much more than a membrane valve, but will also last much longer;
- ceramic device. The best option, which is deservedly considered the most reliable and durable. To make the body of such a faucet, a metal or polymer material that is resistant to overheating is used, and a pair of ceramic plates is used as a locking element.
Which faucet to choose for the VAZ-2115 stove? We recommend not saving on purchasing this part and choosing the most durable option. This will avoid frequent replacement and save a very decent amount of money.
Tips for purchasing and replacing pipes on a VAZ2115
As with any car, a moment arises when it becomes necessary to replace the pipes of the ventilation and heating system of the car interior. Malfunction occurs for various reasons. Pipes get cracked due to frequent temperature changes. Sometimes the ingress of oils and gasoline also leads to malfunction. Usually cracks and holes form in the pipes under the fastening clamps. If the pipes are of poor quality, a sharp increase in pressure in the cooling system (ICE) of the car engine also leads to malfunction of the pipes.
Saving tip
There is a need to replace the pipes with new ones. You should not spend money on new pipes manufactured specifically for the cooling and ventilation system of the VAZ2115. In a year they will crack and tear. It is better to buy a heater hose from a gazelle car with a diameter of 16mm. A 3 meter long hose will be sufficient. According to the outer diameter of the hose, clamps are purchased for mounting on fittings.
To replace faulty pipes, the machine is placed on an overpass, in an inspection hole. The car engine must cool down for at least an hour.
Cooling system design
When the engine is running, a lot of heat is generated for removal, which is used by the car’s cooling system, consisting of the following components:
- 1 - Heater radiator.
- 2, 3 - Outlet, underwater pipes of the heater.
- 4 - Pump hose.
- 5 - Pipe coming from the expansion tank.
- 6, 12 - Steam removal hoses.
- 7 - Tank cover.
- 8 — Expansion tank.
- 9 - Thermostat.
- 10, 19 - Outlet pipes.
- 11, 13 - Supply pipes.
- 14 - Cooling radiator.
- 15 — Radiator drain plug.
- 16 — Radiator blower fan.
- 17 - Pump
You need to drain the coolant from the system. Open the expansion tank cap. Remove the sides of the instrument panel in the cockpit. Open the liquid supply valve to the stove radiator. Drain the coolant into a 10-liter container by loosening the clamp on the liquid supply to the stove radiator and disconnecting the pipe itself. In this case, you need to be careful not to let the coolant get into your eyes. Direct the end of the pipe into the container, since the liquid from the container, after replacing the pipes, will need to be poured back into the cooling system. For ease of operation, remove the air filter.
First remove the external pipes, then the pipes from the stove radiator in the cabin. The heater hose is cut to fit the size of the nozzles. For ease of fitting onto the fittings, lightly lubricate the surface of the fittings with grease or lithol. First, attach the hose to the fittings of the stove radiator, then to the tap tubes, not forgetting to first put clamps on the hose. Clamps secure the hose to the fittings and tubes. The same actions are performed on the outside of the pipes and fittings. After assembly, check the tightness of the hose clamps on the tubes and fittings.
Pour coolant into the expansion tank, only up to the maximum mark, and replace the air filter. The expansion tank cap is closed. Start the car and warm it up until the cooling fan comes on. Check to see if there are any coolant leaks from the cooling system. With proper repair, there are no leaks. If necessary, add coolant to the reservoir until the average level between the minimum and maximum marks is reached.
What are the advantages of ordering pipes and other auto parts online?
First of all, I would like to note how convenient it is to sit on the couch at home and choose the necessary auto parts for your car. It doesn’t matter what the weather is like outside at that moment. In addition, using the Internet it is possible to buy parts for cars at work. This is explained by the fact that ordering goods online does not require much time. A few clicks of the mouse and products from the virtual car store will be ordered, all you have to do is wait for it to be delivered.
It makes no difference what make and model of the car. There are auto parts for all cars on the Internet. This purchase is beneficial for those who value their time. If necessary, it is always possible to order auto parts from any city. There is no need to worry about their delivery, because this is handled by the courier service. Usually the goods are delivered to the buyer as quickly as possible.
In conclusion, it remains only to clarify that the cost of parts in virtual stores is affordable. The car owner will not have to worry about this. When making a purchase in this way, he will have the opportunity to save money.
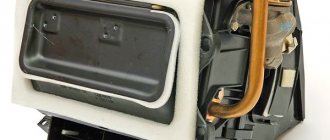
General information about the heater radiator VAZ 2115
In the interior of the Lada of this model, the temperature is maintained at the specified values by a built-in heater, which motorists often simply call a stove. The air heating process is regulated by a special automatic device that provides temperature control with an error of a maximum of a few degrees.
A car radiator, integrated into the heating system, heats the air entering the car interior. There is a handle on the dashboard of the car, with which the driver is able to distribute the air flow passing through the radiator deflector.
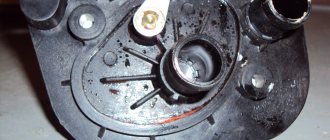
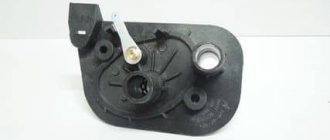
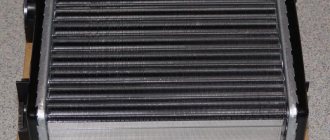
The specified radiator, packaged in a plastic casing, is located in a horizontal position under the instrument panel. It consists of aluminum tubes placed in two rows, two tanks (they are made of plastic) and plates pressed onto the tubes. Coolant is supplied and drained through the fittings on the left tank.
Causes of breakdowns
It so happens that replacing the VAZ-2114 heater tap occurs more often than working with other elements of the car’s heater. Apparently, even at the production stage, the engineers did not think through this unit well.
The heater valve breaks for two reasons:
- Locking devices become sour. Because of this, the driver cannot open or close the tap. Oxidation provokes sticking of the locking elements to each other. If you use force, you risk breaking the locking devices. This is not so scary in the warm season, since air flows can be controlled by dampers. How to check the faucets of the VAZ-2114 stove for souring? Just give it a spin. If this requires a lot of force, the element is worn out and needs to be replaced.
- Violation of tightness. Depressurization entails a leak of coolant. Such a breakdown is indicated by a decrease in the coolant level, the appearance of a smell of antifreeze or antifreeze inside the car, the formation of greasy spots on the windshield and traces of coolant on the floor (in the glove compartment area, at the feet of the front passenger). Checking for leaks is easy. If it is broken, you will notice it immediately by characteristic signs.
Important! The stove faucet has a non-separable body. Therefore it is impossible to repair it
If an element breaks, you only need to replace it.
https://www.youtube.com/watch?v=upload
If the heater valve fails, it will have to be replaced. There are two main reasons that lead to the need for such a procedure.
| Cause | Explanation |
| Oxidation | Due to oxidation, the performance of the faucet is significantly reduced. This is not the most difficult problem, but difficulties may arise when constantly opening and closing the faucet. It's better to replace it right away |
| Coolant leak | This problem is more complicated and can bring more problems. This is due not only to the likelihood that the interior will be filled with antifreeze, which will have to be washed out. Coolant leakage leads to engine overheating. |
We recommend: What to do if the turn signals do not work?
To prevent such problems, we strongly recommend that at the first sign of failure of this unit, you take appropriate repair actions.
There are several ways to detect that something is wrong with the stove:
- Inspect the unit visually;
- Check the current coolant level and monitor it if it drops sharply;
- Raise all the carpets inside the cabin, determine if there are any traces of coolant on the floor;
- Check the operation of the radiator;
- Make sure that the pipes through which the liquid passes are intact.
Traces of leakage
If the warm air supply regulator, that is, the faucet, cannot be repaired, it cannot be repaired, then be sure to urgently replace the unit. To do this, it is not at all necessary to go to a service station. This kind of work can easily be done with your own hands.
Before replacing, you must purchase a new faucet. Today, manufacturers offer VAZ 2114 owners a choice of three options:
- Factory product;
- Ball valve;
- Regulator made of ceramic plate.
It seems that to replace the faucet on a VAZ-2114 you need to remove the instrument panel. In reality, it will be enough to remove the side trim piece, as well as the glove compartment. The main rule is to unscrew all the screws that you can see.
Right sidebar
The result of our efforts is what is shown below.
And now you can see two “internal hoses”. What to do next is clear to everyone.
What can you see under the cladding on the right?
https://www.youtube.com/watch?v=ytpressru
Loosen the clamps installed on the faucet side and remove the hoses. By the way, antifreeze may leak here (it is poisonous).
Under the hood
Below, near the partition, you can see two “external hoses”. Loosen the clamps and remove the hoses from the pipes. Next, use a spanner to unscrew the two nuts (see photo).
All the actions performed under the hood
In the cabin
Without disconnecting the rod, remove the faucet (photo 1). Then immediately remove the “holder” (photo 2). And then, by pulling the assembly outward, it will be possible to remove the mechanical rod completely.
Three final steps
Do-it-yourself replacement of the VAZ-2115 stove tap: instructions
One of the most important advantages of VAZ cars is ease of maintenance and reliability. Nevertheless, the cars have a number of weaknesses that cause their owners a lot of trouble. One of these is the heater valve. The named unit on all models, and the 2115 was no exception, is rather imperfect and quickly fails. Fortunately, replacing a stove tap does not require much experience or high labor costs. We'll tell you how to make it further.
Preparing for replacement
First of all, buy a new faucet. Experienced car mechanics recommend not using the standard product installed on the VAZ-2115 by the manufacturer. Buy a ceramic element and an additional set of gaskets for it.
You will also need:
- can of VD-40;
- keys for 13 millimeters and 10;
- Phillips and flathead screwdrivers;
- a bucket or basin with a capacity of at least 8 liters;
- sealing compound (neutral silicone).
If the antifreeze has not been changed for a long time, then purchase it in sufficient quantities, because in order to replace the faucet, the old one will have to be completely drained from the system. And finally, install the VAZ-2115 on a pit (ramp or lift) - you need access to its bottom.
Replacement procedure
First, make sure that the car engine has completely cooled down, since working with hot coolant is not only difficult, but also dangerous.
If the engine is cold, then immediately go under the vehicle with an empty container. Initially place it under the radiator. Unscrew the plug from the last one. Next, in the engine compartment, slowly unscrew the distributor tank cap. When the coolant drains, move the bucket under the cylinder block - it also has a drain. Its location: directly behind the ignition module.
When there is no antifreeze left in the system, tighten all the plugs and the distribution tank cap and begin removing the pipes. They are held in place with clamps. To loosen the bolts on the latter, you should use WD-40 and a flat-head screwdriver.
Remove the freed hoses from the hood side with great care - there is usually some coolant left in them. Drain it into a container.
Now go directly to the salon. Unscrew the screws securing the side insert of the center console on the passenger side
Having gained access to the tap, disconnect the pipes from it, also being careful (put a rag on the floor in case of antifreeze leakage)
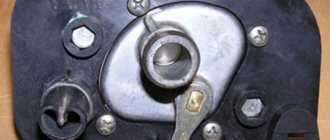
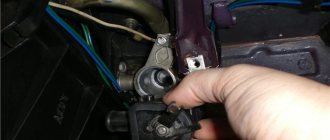
At the bottom, unscrew the nuts securing the faucet - they require a 10 mm socket wrench. After this, return to the VAZ salon and carefully pull the heater tap towards you. Next, disconnect the cable drive from it by first removing the spring clamp. When installing a new device, do not forget to install fresh gaskets, as well as the seal located at the junction of the part with the body.
Before fixing the stove tap, connect a cable to it, since this will be inconvenient to do later. Replace the pipes, treating their ends with a sealant, and tighten the clamps thoroughly, but do not overdo it - the plastic body of the faucet may crack. The hoses are fixed in the engine compartment in a similar way.
After replacement, fill in with fresh coolant, close the hood, turn on the engine and check if the heater is working and if antifreeze is leaking somewhere.
What kind of heater valve can be purchased for installation on a VAZ 2115?
Retail outlets that sell spare parts for passenger vehicles offer motorists three different types of such devices:
- Ordinary. According to professionals, there is no point in purchasing a standard switch due to the fact that it is easily oxidized and fails very quickly. An ordinary domestically produced faucet is made in the form of a rubber membrane, one type of which literally “screams” about its unreliability.
- Ball. A more “advanced” option in the form of a small ball with holes. It is usually used a little longer, but still fails relatively quickly, since it oxidizes quite quickly.
- Ceramic. This type of crane on the VAZ 2115 is perhaps the most modern and truly reliable. Its plastic body contains two ceramic plates, which act as a locking component.
It is worth noting that a ceramic switch, for all its advantages, can hardly be called a flawless element. It does not provide a high level of heat transfer and has a low throughput. From this point of view, it is better to purchase a ball valve.
List of new spare parts and tools for repair
High-quality parts that will be needed to replace the heater valve on a VAZ 2115 and similar models 2113, 2114 must be certified by the manufacturer and have original part numbers, which guarantees their compatibility and long service life. To fix this problem, the car owner will need the following spare parts:
- New heater valve (art. 21080 - 8101150 - 00) Here it is worth giving preference to a ball valve, which has reliable structural elements and greater heat transfer, in contrast to the ceramic and membrane type.
- Two pipes from the tap to the heater radiator (repair kit 237РШ).
- Four metal sealing ties (clamps).
- A can of coolant compatible with what was previously poured into the vehicle's system.
Repair work is carried out using standard tools, the list of which looks like this:
- a set of screwdrivers with a short tip;
- open-end spanners 10 and 13 mm;
- compact-sized coupling heads with a cardan and a knob;
- container for draining old coolant;
- sealant;
- flashlight for a better view under the torpedo space of the vehicle;
- gloves for hand safety.
In official Lada car repair shops, at the end of 2022, the price for replacing a heater valve on a VAZ 2114 is, without taking into account the cost of new parts, from 2000 to 2500 rubles; small, private workshops will ask for about 1500 rubles for the work. The work itself is not difficult and any car owner can do the repairs with his own hands after studying the steps below.
Stages of self-repair
After watching the video on replacing the heater valve on a VAZ 2115, you can familiarize yourself with all the stages of work and begin to carry them out, following the following instructions:
The car is placed indoors, and with a cold engine, the coolant is drained through a special technical plug into a container provided for this purpose. The drain plug is located at the bottom of the crankcase housing on the front side of the machine. The front passenger seat is moved back to the maximum possible distance, then the shelf in the lower part of the dashboard, located under the glove compartment, is dismantled, which will provide access to the fastening of the side decorative trim of the lower part of the center console. By unscrewing the five screws securing the side trim, we gain access to the heating system pipes and to the faucet itself
Having loosened the clamps of the pipes, we proceed to carefully remove them, placing an old rag on the floor, on which the remaining antifreeze may spill. Important! Keep in mind that the seats on the heater radiator are plastic, and when exposed to high temperatures, the pipes may sour a little on them, so their dismantling must be carried out very carefully, otherwise you can break the radiator housing with excessive efforts.
From the engine compartment of the car, we remove the two coolant supply pipes on the heater tap, unscrew, using a 10 mm wrench, the two fastening nuts on its studs, after which we dismantle the old part from the interior, having previously disconnected the damper control cable. A new faucet is installed on the seat, we tighten the fastening nuts, and we treat the seats of the cooling system pipes with sealant, put them on carefully and tighten them with metal ties. We clean the seats on the heater radiator, treat them with sealant, as well as on the faucet itself, install new pipes for supplying antifreeze to the car's heating system, and then tighten the clamps on them. We reinstall the decorative side panel and the additional shelf under the glove compartment, tighten the engine cooling fluid drain plug, and then proceed to remove air from the system. We remove the plug from the expansion tank on the engine intake manifold, disconnect the antifreeze supply pipe and pour new liquid into the cooling system until it begins to flow out of both the manifold and the pipe, which we immediately reattach.
At this point, the do-it-yourself work on replacing the heater valve on a VAZ 2115 is completed, we start the car’s engine, carefully inspect the tightness of the cooling system, check the heat supply to the cabin and the functionality of the damper for switching between summer and winter modes, and if no problems are found, the vehicle can be started to operate . Also watch the video of installing a heater valve on a VAZ 2115 (similar work is carried out on models 2113, 2114):
What types of taps are there?
The store will offer you three options for taps:
- Factory ones. This option is the cheapest. These are the types of taps that are installed in factories. The main component is a rubber membrane. Peculiarities of use: often “sticks”.
Ball. This option is more expensive, but works better. Acidification is possible, but a ball valve is more reliable than a standard one. The main element is a ball with holes.
The ball valve can have a reinforced design
Faucet made of ceramic plates. This one costs an order of magnitude more than the factory one, but is considered the best. Its body is made of metal or plastic, and the mechanics are based on a pair of ceramic plates.
A ceramic faucet is more expensive, but at the same time more reliable than similar parts of other types
When choosing a faucet, the buyer must take into account that the third option has a lower capacity than the second, and therefore the heat of the stove will become weaker.
Tool
You will need the following tools:
- sets of wrenches (No. 10 and 13 required);
- pliers;
- capacity from 4 liters;
- coolant for the same volume;
- screwdrivers - Phillips and flat;
- rags for cleaning.
Tools needed for replacement - gallery
To replace the stove faucet, keys No. 10 and 13 are useful. Use a screwdriver to remove the pipe clamps. You will need 4 liters of coolant. Pliers are needed to adjust the stove valve. A flat screwdriver is needed to dismantle the clamps.
How to remove an old faucet
- Unscrew the side of the center console (passenger's side).
The first step is to remove the side part of the car's center console.
Place a pre-prepared rag under the faucet in case of antifreeze spillage. Lift the hood and unscrew the clamps on the hoses near the stove. The arrows point to the clamps that need to be loosened. Then remove the pipes from the tap and let the coolant drain. Using a Phillips screwdriver in the passenger compartment, unscrew the clamps of the radiator pipes and remove them.
The pipe clamps are unscrewed with a Phillips screwdriver
After removing the faucet lever rod bracket, remove it from the hole - use pliers to do this. Unscrew the heater fasteners located under the hood (2 pieces) to the shield.
To release the faucet, you need to unscrew the nuts indicated by the arrows.
Remove the faucet and pull it towards you.
- After placing the tap in place, secure it with two nuts (in the engine compartment).
- After opening the faucet completely, put on the bracket.
- Install the pipes.
- Add antifreeze.
- Start the engine and let it warm up.
- Tighten the faucet clamps, then turn on the stove.
Checking the functionality of the heater tap
If the cold or hot air supply modes do not switch, the cause may be a loose damper control cable or souring of the mechanism itself. How to open the tap of the VAZ-2109 stove in this situation?
To do this, you need to remove the side panel of the dashboard on the passenger side. Then check the condition of the cable and if this is the reason, then connect it back into place. You can also, without removing the panel, put your hand under the dashboard, where the VAZ-2109 heater tap is located, and move the VAZ-2109 heater damper lever to the desired position. If the lever does not give in, then most likely it has gone sour and must be replaced.
Removing and replacing the heater valve
To replace the VAZ-2109 heater tap, you need a set of tools available to most drivers:
- a set of Phillips and slotted screwdrivers;
- a set of open-end wrenches No. 10 and No. 13 or socket heads of these sizes, as well as a wrench with a ratchet mechanism and a cardan;
- silicone sealant;
- container for draining coolant;
- metal brush;
- universal penetrating lubricant WD-40 or its equivalent;
- inspection hole, overpass or lift;
- rags to protect the interior flooring from antifreeze.
Ceramic, ball, and electric valves for the VAZ-2109 stove are available for sale. Which heater valves for the VAZ-2109 are better than those listed? With rare use, ball mechanisms are more susceptible to souring, and the electronic automatic heating control system “SAUO” is much more difficult to install. Ceramic mechanisms produced in Russia or “LUZAR” are free of these shortcomings.
Many experienced drivers advise simply replacing the heater taps with water taps. The benefit of this solution is not only in cost, but also in reliability - the coolant either constantly circulates or is easily closed manually at the pipe. Another way to make it easier to change the heater faucet of a VAZ-2109 is to abandon it altogether; the cabin temperature in this case is regulated by air dampers.
Instructions on how to change the heater tap of a VAZ-2109:
- Before replacing the valve of the VAZ-2109 heater, place the car on an overpass and, unscrewing the cap on the radiator, drain the coolant into a container prepared in advance.
- When the radiator is empty, use a screwdriver to loosen the clamps on the pipes going from the engine to the heater, then use WD-40 and a metal brush to clean the threads on the studs securing the part to be replaced. When finished, completely unscrew the clamps.
- Carefully remove the hoses one by one; they may contain residual antifreeze that needs to be drained.
Important! Do not skip this step, because it will not be possible to remove the valve of the VAZ-2109 stove with the hoses connected
- Having removed the side trim of the torpedo from inside the cabin, check the condition of the pipes and change them if necessary.
- Then, under the car, using a socket wrench No. 10, unscrew the nuts securing the part to be replaced on the VAZ stove
- Returning to the car interior, pull the faucet towards you (where the right passenger seat is), remove the spring clamp and disconnect the control cable from the part being replaced.
- We take a new spare part and reassemble it in the reverse order.
Important! To prevent future leakage of coolant at the joints of the pipes, it is necessary to treat it with silicone sealant, and also to increase the service life, install rubber seals where the heater faucet is located on the VAZ-2109. We make sure that the radiator plug is in place and fill it with coolant to the required level
Then we start the engine and, having gotten rid of air pockets, check the proper operation of the heater modes. This completes the replacement of the VAZ-2109 heater valve
We make sure that the radiator plug is in place and fill it with coolant to the required level. Then we start the engine and, having gotten rid of air pockets, check the proper operation of the heater modes. This completes the replacement of the VAZ-2109 heater valve.
Having learned how to replace the heater tap, you can repair your car yourself, without visiting a service station and avoiding unnecessary repair costs.
Find out how I changed the heater tap of a VAZ 2114 in 20 minutes
The stove valve in the car opens or blocks access to warm air into the car body, thereby regulating the heat supply to the cabin. Sometimes the heating and cooling system refuses to function properly, stops supplying heat, or supplies it in unlimited quantities. What this may be connected with and how to eliminate such malfunctions, you will find out below.
A working faucet is the key to a warm car interior
Why doesn't the stove tap work?
One of the reasons for a non-working faucet is souring. As a result of corrosion under the influence of chemical liquids, the flag loses its mobility, and the tap stops opening or closing. If this happened when the tap was open, then warm air will flow inside even when no one needs it.
Sometimes a failed heater faucet in a VAZ 2114 leads to air in the system, the stove does not heat, and cold air enters the cabin.
But the most common defect is a leaking stove tap. Antifreeze gets into the car body and stains the floor mats. In both the first and second cases, it is necessary to replace the VAZ 2114 heater valve.
If you find antifreeze under your feet, do not rush to immediately buy a new faucet. The leak can come from a burst pipe; even the heater radiator can leak. First, find out where the antifreeze is leaking from, and only then go to the auto parts store to make purchases.
Which faucet is better?
All owners of VAZ 2114, 2115 and other models unanimously claim that the original faucets that are equipped with the stoves of these cars are the most unreliable.
The locking mechanism is a rubber membrane. Aluminum housings are susceptible to corrosion and quickly turn sour. True, the price of these parts is low - 80-120 rubles.
Apparently, the price is calculated on the fact that the faucets will change every season.
Ceramic faucet is considered the most wear-resistant
But car owners don’t want to crawl under the car every time it gets cold, spoil their shoes with leaking antifreeze, and freeze inside the car. Yes, and this is a troublesome task - replacing the faucet on the VAZ 2114 stove. Therefore, motorists give preference to more reliable models of faucets:
- ceramic, their locking mechanism is made of ceramic plates, and the body is made of high-quality plastic;
- Ball valves, the locking element of which is a ball with holes.
Most VAZ 2114 owners prefer the Yavva ceramic faucet as one of the highest quality and most reliable. Although these models have lower heat transfer than ball models. The latter are susceptible to oxidation, but to a lesser extent than the duralumin models of AvtoVAZ cranes.
Tools for work
To change the heater valve on a VAZ 2114 you will need the following tools:
- Pliers,
- Double-sided screwdriver (straight and curved),
- Socket or socket wrenches No. 10 and 13.
And of course, you need a container for the coolant. Before you begin to disconnect the failed heater tap from the system, you need to drain the antifreeze from the radiator.
How to change the stove tap with your own hands?
You will need a pit to work with because the heater valve is located at the bottom of the hood, under the side trim on the passenger side. Replacing the stove valve on a VAZ 2114 is carried out in several stages:
- On the faucet, you need to brush the fasteners, rinse them with brake fluid, and leave them for a while so that the fluid cleans the threads on the studs and the nuts are easier to unscrew. To wash studs, it is better to use WD-40, if available. This is an important stage in the work, because rusted bolts can grab the nut so much that unscrewing them becomes problematic. Sometimes when unscrewing nuts, the bolts need to be held with an additional wrench or pliers.
- In the cabin, remove the side trim. Now you can see the pipes leading to the tap. Loosen the hose clamps and remove the hoses one by one. At the same time, keep a container with antifreeze near you, which you immediately place under the emptied pipes so that the remaining antifreeze flows out.
- If you decide to replace the hoses, they must also be released from the radiator. But if they are in satisfactory condition, then when you start assembling, you will only need sealant.
- Return to the pit and use a 10mm wrench to unscrew the nuts holding the tap in place.
- Go back to the body again and try to remove the heater valve of the VAZ 2114 towards the passenger seat. In this position, remove the lock and release the cable that controls the tap.
- Now you can install the new faucet. First put the cable on it, secure it with a spring clip, and only then can you screw it into place. Install O-rings between the valve and the body. Use sealant to secure the stove pipes in place. Don't forget to pour the antifreeze back into the radiator at the end.
Replacing the stove valve of the VAZ 2115, as well as the VAZ 2113, is carried out in the sequence described above. The design of the heater in these VAZ models is the same as that of the VAZ 2108.
Replacing the heater tap
The heater tap on a VAZ car is replaced if the heater tap leaks. A sign of a leaking heater tap is the formation of puddles of coolant on the carpet at the feet of the front passenger in the car interior.
With the onset of cold weather, all drivers move the heating switch to the “red” zone, and many immediately discover a puddle of “Antifreeze” under the passenger’s feet. The same thing happened to me in the spring when I turned off the “stove”. So you should touch the delicate tap less often. Better - twice a year, the rest of the time regulating the temperature with the “outboard” air supply damper. But the experienced ones keep a spare unit at the ready.
To complete the job of replacing the heater valve, you will need a new heater valve, a worm clamp with a diameter of 16-23 mm and coolant.
We carry out the work of replacing the heater valve on a VAZ car with a cold engine. In the engine compartment, loosen the tightening of the clamps securing the heater inlet and outlet hoses to the faucet nozzles, and remove the hoses from the nozzles. In the cabin, use a Phillips screwdriver to loosen the tightening of the clamps securing the heater radiator hoses to the faucet nozzles and remove the hoses.
We remove the rod bracket and remove the rod from the hole in the valve lever. In the engine compartment, using a “10” wrench, unscrew the two nuts securing the valve body to the front panel. In the cabin, remove the valve. We assemble everything in reverse order... The faucet was installed in ceramic...
Replacement
Replacing the VAZ 2115 heater radiator valve with your own hands is not a difficult procedure, except that it is a little inconvenient due to the fact that getting to the culprit of the repair is a little difficult. So we'll do without the video, just leave a few photos.
Advice! This repair is best carried out in a pit or overpass, since removing the tap and pipes from the floor is an extremely inconvenient procedure.
Tool
In order to replace the VAZ 2115 heater valve we will need the following:
- Container for coolant.
- Screwdrivers (phillips and flathead).
- "10" wrench (socket and socket).
- Socket wrench set to “13”.
Advice! A set of socket heads with a “cardan” will greatly facilitate the repair process.
Repair process
So:
- We unscrew the plug on the engine block and drain the coolant into a previously prepared container.
- We soak the bolts and clean their threaded part with a metal brush. While the bolts are soaking, you can start removing the pipes.
Attention! If this procedure is neglected, it is possible that the bolt heads in the plastic body of the faucet may turn, which will make the dismantling process too labor-intensive.
Inside the car, remove the right trim.
We unscrew the clamps from the pipes (you can see how convenient it is to do this with a “cross”).
- We go back under the car and use a 10mm wrench to unscrew the loose nuts on the heater radiator valve mounting bolts.
- Then we go into the salon and pull the switch towards ourselves. Remove the clamp and disconnect the cable.
This completes the dismantling process. Reassemble in reverse order:
- Since it will be problematic to secure the cable with a clamp on a new crane that has already been installed, we do this in advance.
- Then we attach the cable and screw the tap itself to the car interior.
Advice! I would like to remind you that no matter what you forget to install rubber sealing rings between the car interior and the tap, and use sealants when installing pipes.
I hope that the instructions presented to your attention on replacing the heater tap on a VAZ 2115 are clear and will be extremely useful to you in the future. All that remains is to tighten the plug on the engine block and fill in antifreeze.
Earlier in the article: we have already figured out what a faucet is for, why it breaks, and which is more reliable. It's time to move directly to replacing the heater tap. I’ll say right away that the work ahead is not difficult, but very painstaking and inconvenient. Also, for greater convenience, you can remove the instrument panel: How to remove the instrument panel of a VAZ-2114? and completely drain the coolant: How to drain the coolant (antifreeze, antifreeze), but you can do without it.
- Crosshead screwdriver.
- Empty container with a volume of 5 liters or more.
- New heater tap.
- Worm clamp 16-23 mm.
- Coolant.
- Rags.
- The key is "10".
The work must be done on a cold engine.
Install the new faucet in reverse order
If cold air is blowing from the heater, then most likely there is air left in the heater radiator. To expel the air, read the article: How to remove an air lock?
If, after expelling the air, the result has not changed, pay attention to the article: The stove does not heat well or does not heat. It is worth noting that if you install a ceramic faucet, then you will not achieve the heat transfer that is characteristic of a ball valve
This problem is due to the design of the ceramic faucet.
https://youtube.com/watch?v=QxX3tCjapJE
Sources
- https://masteravaza.ru/sistema-otopleniya/u-sovremennyh-modelej-sistema-otopleniya/vaz-2115-zamena-krana-otopitelya-144
- https://vaz-2114-lada.ru/2013/01/kak-zamenit-kran-pechki-otopitelya/
Purpose, location and design of the VAZ 2113–15 stove
Unlike classic Zhiguli models, the VAZ 2113–15 stove copes with its duties quite well. If it is in good working order, the inside of the car will always be warm. The air flow distribution system is also implemented quite well, so the windshield, even in severe frost, is completely cleared of ice in a few minutes.
Purpose of the heater
The main function of the stove is to heat the interior and windshield. Hot air supplied through the duct system to the windshield prevents it from freezing in winter. In the warm season, the stove is used for forced ventilation of the interior.
Location and design of the stove
The VAZ 2113–15 stove is located in the front part of the cabin under the center console of the dashboard. Only the heater controls and deflectors through which air flows are brought into the cabin.
The interior heater of the VAZ 2113–15 is closed by the center console
The stove consists of the following elements:
- casing;
- radiator;
- tap;
- inlet and outlet pipes;
- electric motor with a cylindrical impeller;
- windshield defroster;
- control valve;
- foot air damper;
- control module (mode switch, resistor, damper control levers).
Operating principle of the stove
The operation of the stove is based on heat exchange between the heated coolant (coolant) and the air entering the cabin. The basis of the design is the radiator. It is a system of tubes within which heated coolant supplied from the power unit circulates. The tubes are equipped with thin lamellas, allowing for more efficient heat transfer to the air.
The radiator is covered by a casing, which is the body of the stove. On one side there is an electric fan that pumps air into the device. By varying the fan rotation speed with a switch that changes the resistance of a special resistor and located on the central panel, you can regulate the intensity of the air flow entering the cabin.
Circulating between the radiator lamellas, the air heats up and enters the passenger compartment through air ducts located in the front part of the heater. The distribution of flows is carried out using three dampers, one of which (control) regulates (opens or closes) the flow of air into the cabin, and the other two (air blowing for the legs and windshield) change its direction.
The basis of the design of the interior heater is the radiator
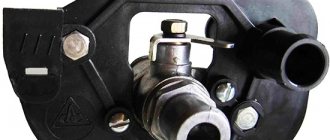
The stove can be completely disconnected from the engine cooling system using a tap that shuts off the coolant supply to the radiator of the heating system.
Operating principle of the device
The heater valve serves as a tool for controlling the flow of coolant that flows through the radiator of the so-called heater. It is opened with the onset of cold weather, when there is a need to warm up the windshield and interior. Passing through the radiator, the working medium heats the air pumped by the fan. In the warm season, there is no need for additional heating, so the tap must be turned off.
It is easy to control the flow of warm air when the system is working properly: in winter, to open the tap, just move the lower lever to the right (“red zone”) on the climate control panel in the cabin. Accordingly, in the summer, in order to shut it off, you need to turn the tap to the left (“blue zone”). We should not forget that we also need a stove in the summer.
At this time, it serves for ventilation. The damper, which blocks the flow of coolant in a small circle through the radiator or bypasses it, is actuated by a cable from a lever on the panel.