A constant velocity joint (CV joint, “grenade”) is a device that transmits torque from the car engine to the wheels. It was invented in the 20s of the XX century. Before the advent of the CV joint, cars with front-wheel drive, which were distinguished by high cross-country ability and maneuverability, lost power when cornering, vibration occurred, and torque was distributed unevenly.
Created for a special purpose, CV joints have high strength. There is an opinion that the CV joint mechanism - with proper care and proper handling, of course - can even outlive the car itself. Unfortunately, problems can arise with the grenade. Read on to learn about the characteristic signs of problems and how to replace a CV joint with your own hands.
What is needed to install a new CV joint
The CV joint, despite its strength, has parts that can wear out over time or if used incorrectly. Often, CV joint replacement occurs due to damage to the boots - during driving, cracks and holes appear that become clogged with dirt, water and dust. This way you can drive hundreds, or even thousands of kilometers, which will finally finish off the mechanism. Boot problems are expressed in a crackling sound when turning the wheels (when turning to the right, the left wheel cracks, when turning to the left, the right one). Sometimes the CV joint has to be replaced due to incorrect actions by the driver. Acceleration of the engine with slipping, starting on the wheels turned out, braking by the transmission - often the cause of the malfunction lies in this.
Play in the ball joint has a negative effect on the CV joint. It occurs when the support itself is already severely worn out. If this problem is not identified in time, it will have a very negative impact on the CV joint. Thus, driving at high speed can tear out the support pin, which can cause the grenade to break.
It is extremely rare that CV joint failures are caused by factory defects in the mechanism parts or initially incorrect installation. Coupled with a worn boot, the problem can reach unimaginable proportions. Many reviews on automotive forums mentioned the poor quality of some parts - both basic functional elements and additional little things, like clamps.
Regardless of the source of the problem, a grenade that is not working properly will require replacement. Machine manufacturers claim that when parts wear out, the entire mechanism must be replaced, even those elements that were not damaged by failure. Considering the high quality of materials, the repair will cost quite a lot. In this regard, the car owner tries to replace the CV joint with his own hands. What will the driver need?
- pit or lift;
- hammer, screwdriver, pliers, jack;
- a set of keys or heads;
- bench vice;
- new clamps, lubricant (CV joint-4, for example), hub nut with stopper.
The latter (consumables) are often provided with a new grenade. All of the above are suitable for replacing outer and inner CV joints.
Malfunction prevention
In order for this part to last as long as possible, it is necessary to completely eliminate the possibility of dirt and water getting under the rubber cuffs of the CV joint. If there is the slightest damage, this part must be replaced with a new one.
For this purpose, it is better to use original spare parts that are made from high-quality rubber. If you purchase counterfeit cuffs, the procedure for replacing this part will have to be carried out too often.
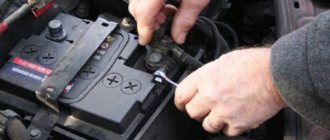
Another reason why the CV joint often fails is its insufficient fastening to the main gear shaft. If the bolts are not tightened well enough, then over time they begin to unscrew randomly. In this case, the outer CV joint moves significantly away from the shaft, and with a significant gap, knocking noises will be observed in the transmission. If this malfunction is not detected in time and the fastening bolts are not tightened, then in a short time the CV joint will be completely “broken.”
How to change the CV joint and how to determine the malfunction of this part is described in detail in the article. The operation of replacing the CV joint will not take much time, but if you do not want to fix this problem yourself, you can always turn to a car repair shop for help.
If you have any questions, leave them in the comments below the article. We or our visitors will be happy to answer them
Checking the condition of the CV joint
Experienced motorists know that there are external and internal CV joints. There are differences between them. Let's take a closer look at them.
- External (external) CV joints - two pieces, located on the hubs, transmit torque to the wheels. The steering angle is significantly higher than that of an internal CV joint. They also take on more load. Accordingly, they break down more often and require regular inspection and replacement if necessary. They have a smaller size.
- There are two internal CV joints that make the axle shaft move; they are located in the gearbox, one on each side. They are larger in size. They are less subject to stress and, accordingly, can work longer.
You can assess the condition of the CV joint yourself. The easiest way to inspect the external one is to turn the steering wheel all the way (to the right or left) and quietly move away. If there is a problem, a cracking or crunching sound will appear. The more damage is done to the CV joint parts, the louder the sound will be.
If problems with the external grenade are accompanied by a crash when turning, then problems with the internal grenade are accompanied by a crack when moving straight. The sound will intensify if you drive off-road - every bump, hole or ditch will clearly remind you of the problem. If you notice a crunching sound, carry out repairs immediately - problems with the internal CV joint are very dangerous. It's a little more difficult to inspect:
- We put the car on the lift.
- We turn on first gear, the wheels should rotate slowly (the car should be slightly raised).
- The presence of a distinct crunching sound is evidence of problems.
If you hear a cracking sound while driving - when turning, when overcoming off-road obstacles, or sudden acceleration - immediately fix the problem. Timely inspection and repair will help the car owner remain a driver and not a pedestrian. In addition, a problem detected in time will help to avoid critical situations on the road.
How to properly assemble the inner CV joint
The presented instructions “how to assemble the inner CV joint” are suitable for all “Constant Velocity Joints”. Sometimes, after removing the inner CV joint, it becomes necessary to assemble it correctly. If a person is not familiar with the assembly procedure, then most likely he will not succeed. In this publication, you will become familiar with the device and learn how to correctly assemble the outer CV joint of a car.
Internal CV joint device
- -outer ring
- -inner race
- -separator
- -balloons
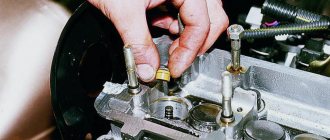
A CV joint is somewhat similar to a bearing, but its parts do not rotate relative to each other, but only have a certain degree of freedom of movement. On most VWs, internal CV joints come in two diameters, 94 and 100 mm. For Golf 2 with a 1.3 engine, the outer part is slightly different, the outer race of small CV joints is symmetrical
large, 100 mm, on the side adjacent to the box flange, have a recess for a cork gasket
The inner race is also not symmetrical, the part that needs to be oriented towards the gearbox flange
The side that should be facing the drive shaft has a pronounced entry for the splined part
Internal CV joint. Assembly
Now all this needs to be collected into one unit. First, insert the inner race into the separator, turning them perpendicular to each other.
then we place this sandwich inside the outer ring
And this is where attention is required: if you look closely at both races of the inner CV joint, you will find that the distances between the grooves for the balls are different. And you need to assemble the inner CV joint so that the small gaps are opposite the large ones
Now you need to insert the balls. To do this, you need to tilt both the separator and the inner race at the same time and at the same distance.
insert the first ball
slightly recess the cage with the separator in this place, and lift the adjacent sector
and so on in a circle
It is quite difficult to move the race of a new inner CV joint without lubrication, so you can apply a thin layer to both races before assembly. And now the inner CV joint is assembled. If it is 100mm, glue the gasket to the outer part (it is not provided for smaller diameters)
Now you need to put the inner CV joint on the drive. First of all, put on a duster
then put on the disc spring
This spring is a cone spring, it is very important to install it correctly. Cone from CV joint
then put on the CV joint and the retaining ring
make sure the stopper is completely recessed into the groove
Now you can start lubricating the CV joint. Pull it towards you without twisting it
apply lubricant to protruding parts
Move the outer race back and forth several times. Spread the resulting excess lubricant evenly over parts of the CV joint. Do the same on the other side.
but the grease should not get on the gasket the drive is ready for installation
Yakov Finogenov
Motorist's benefit
Is it possible to do without replacement?
Having seen the cost of repairing or completely replacing the CV joint, inexperienced motorists think that they can drive anyway: just think, something crunches down there, a big deal. And it's actually a big deal.
Some car enthusiasts think that the strength and durability of parts makes them completely invulnerable, which is absolutely not the case. Replacing the grenade is the only possible option that will allow you to drive comfortably.
It is necessary to change the CV joint after identifying the slightest problems in its operation. Have you noticed any wear on the boot? Does your wheel crunch when turning? Don't over-tighten, otherwise the machine will just fall into place one day. Why do we need a car that can only remain in the garage as a dead weight? That's right, an experienced driver is not interested in such a car. Moreover, replacing the external CV joint is quite feasible on your own.
Fault diagnosis
How can a novice car enthusiast who has never encountered a similar problem check the CV joint on his own? It is not at all difficult to determine the malfunction and replace the CV joint with your own hands, but you will first need to determine which part is faulty.
With significant wear of the inner race, significant play in the CV joint is formed, which makes itself felt with various sound effects. The CV joint most often crunches when turning. This defect, with significant wear, can also be manifested by small jolts on the steering wheel. This effect is especially noticeable on cars not equipped with hydraulic or electric power steering.
Significant wear of the CV joint can also be determined by shocks when starting the car, as well as by a sudden change in engine operating mode, especially at low speed. This technical problem can also be caused by other transmission malfunctions, which, under certain conditions, can produce similar sounds, so before passing a final verdict on the old CV joint, you need to make sure that the diagnosis is correct. To determine the radial clearance, you will need to hang the front suspension of the car one by one and, having fixed the main drive shaft, turn the wheel in different directions; if the free rolling of the wheel is significant, and a knock is observed, the CV joint can be considered faulty, and it must be replaced immediately. In some cases, the cause of this phenomenon may be a weakening of the CV joint to the vehicle shaft. This problem is solved by tightening the bolts holding the CV joint. In this case, the conditions for tightening this part with the necessary force must be met. If the tightening torque is less than that set by the manufacturer, then this malfunction will make itself felt again after a short period of time.
If the cause of a CV joint failure is excessive wear on the race, the CV joint must be replaced using original spare parts.
Replacing the outer CV joint
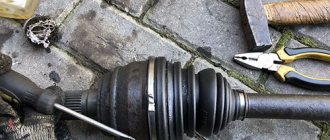
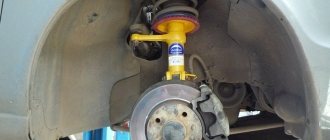
An experienced car owner with practical skills will not encounter any problems when taking on the task of replacing the outer CV joint. The list of tools necessary to carry out the “operation” has already been presented above. In addition to tools and supplies, there are a few other things worth doing. Before removing the wheel, drain a little oil from the gearbox - this will make it easier to work with. You will also need a pry bar - it will serve as a lever when removing the drive shaft.
Let's assume that the problem is on the right. Replacing the right CV joint begins with removing the wheel. We unscrew the hub nut, remove the brake disc, caliper, ball joint and steering tip. We take a pry bar or crowbar and remove the splined drive shaft. Using light blows of a hammer (a support, such as a wooden block, will come in handy), we knock out the outer hinge. Next we perform the following steps:
- It is necessary to remove the hub nut and tear off the wheel bolts. We put stops under the rear wheels.
- We jack up the car, hang it up and then remove the wheel.
- Remove the bolts holding the steering knuckle to the ball joint.
- Turn the steering wheel all the way. Pulling back the steering knuckle, we pull out the outer half of the hub along with the old CV joint. If the grenade does not budge, hit it lightly with a hammer.
- We remove the old boot and clamps and throw them in the trash.
- We remove the CV joint with hammer blows, rotating it along the axle shaft.
- We fix the installed new hinges in the hub together with the boot.
Replacing the left CV joint is carried out in the same way. When returning parts to their place, the above procedures should be done in reverse order. When knocking down a CV joint with a hammer, hit it clearly - some models are equipped with an ABS ring, which does not like strong blows to it. Don't forget to add gearbox oil. When installing the wheels back, be extremely careful to avoid falling apart.
Causes and signs of a grenade breaking down in a car
During operation of the machine, the CV joint is subject to severe wear. First of all, for the simple reason that this part works under high loads that tend to tear it apart. And more often it is the outer CV joint that suffers, since it is located near the wheel, which makes more oscillatory movements, especially when driving on uneven roads. It is quite easy to understand that this mechanism has failed, because all the signs appear clearly or otherwise:
- Crunching noise when making turns or directly during straight-line movement.
- No wheel rotation when starting to move.
- Knocks and other problems while driving caused by wear in the channels.
The main causes of wear are usually the following:
- Aggressive driving and choosing uneven roads, due to which the mechanism is subject to severe wear and shock.
- Damage to the boot and untimely replacement of it, due to which dirt penetrated into the mechanism.
- Loose tightening of clamps.
- Using poor quality lubricant.
Diagnostics of CV joints
How to understand whether the outer CV joint is faulty or the inner one. Symptoms are usually always visible or noticeable. Most often, the boot is the first to tear, causing sand to penetrate into it and smooth surfaces to be scratched. This causes an unpleasant crunching sound. A faulty grenade can not only crunch, but also completely jam, which will lead to even more serious consequences. To eliminate the possibility of unforeseen repairs and reduce car repair costs, you need to regularly diagnose the car's chassis. The hinge is checked as follows:
- Visual inspection for torn boots and traces of grease, loose screws, damaged drive axis.
- Check for beats. They shouldn't exist. It’s easier to implement it in a pit, pulling them, grabbing them with both hands.
- On a flat section of the road, examine the sound to see if there is a constant crunching sound.
- On a curved section of the road surface with unevenness, they will check the crunch in the outer CV joint.
Boot replacement and repair
The boot can be changed without removing the grenade if you have special equipment. His work is demonstrated on video. ” alt=””> If you do not have such a device, to remove and replace it, you must perform the above-described procedure for removing the drive and dismantling the hinge. The procedure is necessary if there is even minor through damage on the boot.
Temporary repairs to the CV joint boot can be made without removing it from the vehicle. To do this, you need to thoroughly clean and degrease the damage, then seal it with a piece of rubber and cyanoacrylate-based glue (superglue).
An alternative repair method is to seal the holes with silicone caulk. It should be remembered that it takes a day to completely polymerize.
Note: express repair is a temporary measure. Replacing the inner joint boot may be delayed for a short time, but not completely cancelled. Typically, these types of repair methods are used to get to the point of repair.
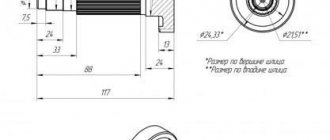
CV joint puller: principle of operation and its necessity
It happens that it is necessary to replace not the entire CV joint, but its front part or the outer boot. In this case, the rationale for completely dismantling the “grenade” drive is called into question. Most experienced motorists in such situations choose partial disassembly of the CV joint, that is, removal of its outer part. Sometimes such an event is quite difficult to carry out without special devices - pullers, which greatly facilitate the process, making it less labor-intensive and chaotic.
The CV joint puller is a squeezing and pulling mechanism. With the help of some bolts, the device is fixed on the open part of the shaft, and with the help of others, the inside of the grenade is pushed out. For a clearer understanding of the operating principle of the puller, study the image below.
A few movements with a wrench when using a removable CV joint device help, as they say, to kill several birds with one stone:
- reduce the risk of breakage of the “grenade” and its surrounding elements to zero, which can happen when using handicraft repair methods (hammer, pry bar, etc.);
- facilitate the repair process;
- do the procedure without getting particularly dirty;
- carry out replacement quickly and efficiently.
As you can see, a device for removing constant velocity joints is very effective for partial repair of a part (replacing the outer part or boot, for example). Purchased accessories
It is worth noting that in addition to pullers for the outer part of the CV joint, there are similar devices for the internal “grenade” and universal ones (suitable for both repair options). If for the first case it is quite possible to make the device yourself, then for removing the internal hinge it is very difficult. In this case, it is easier to resort to buying a ready-made device from a car store.
To be fair, we note that there will definitely be no problems in this aspect. Almost every auto shop has CV joint pullers in its assortment. The price category of these products varies widely, since the cost of the device depends on the quality of the metals used and its reliability. Moreover, if you wish, you can find not only a puller for removing the CV joint (its various parts), but also a puller for CV joint clamps, which is sometimes simply necessary during repairs.
When choosing and purchasing a removable device for grenades, you should follow simple recommendations:
- By first studying reviews about certain pullers or manufacturers on the Internet, you can quickly and without risks make the right choice.
- Do not buy the cheapest devices (100-300 rubles), as they are often made of low-quality metals and are “disposable”. Often such pullers break during the repair process.
- However, you shouldn’t take too expensive devices, because in most cases the markup is for the brand (excluding multifunctional universal pullers).
By following the tips above, you are guaranteed not to make a mistake and make the right choice.
Types of CV joints, their design and operating principle
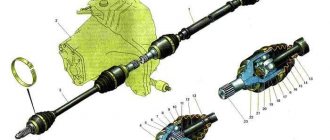
CV joint device: 1. Right front wheel drive; 2. Gearbox; 3. Left front wheel drive; 4. External joint housing; 5. Retaining ring of the hinge cage; 6. 18. Hinge cage; 7. 19. Hinge separator; 8. 17. Hinge ball; 9. Outer clamp of the cover; 10. 15. Protective cover for the hinge; 11. Thrust ring; 12. 14. Left wheel drive shaft; 13. Inner clamp of the cover; 14. Internal hinge lock; 15. 20. Retaining ring of the inner joint cage; 16. 21. Shaft buffer; 17. 22. Internal hinge housing; 18. 23. Axle gear retaining ring.
There are several types of CV joints, but only two are widespread in passenger cars:
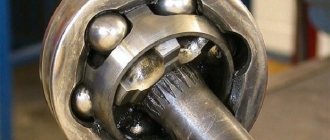
The design of a ball CV joint includes two cages - an internal one, in the form of a spherical fist (fitted onto the shaft), and an external one (made integral with the shaft end, which is inserted into the hub or gearbox). Between them there are balls placed in special grooves, which are kept from falling out of the hinge by a separator. It is the balls and the grooves along which they move that are the main working elements of the CV joint, since they transmit rotation and allow you to change the angle of one race relative to the other.
Kinds
The order of crossing the roadway
In modern cars, only 2 types of designs are used for internal CV joints.
- “Retseppa” is used in the vast majority of external grenades, and on some cars as an internal CV joint (for example, Volkswagen Transporter T4). The unit consists of the following parts: a housing with a splined part that fits into the wheel hub, a separator, a race, balls and a retaining ring.
- “Tripod” is a three-pin joint that works in relatively small angles (up to 25º). Nevertheless, this is quite enough to compensate for suspension travel, displacement of the power unit and gearbox in turns, when driving over uneven surfaces, which is why the Tripod is most often used for the manufacture of internal CV joints. Structurally, it consists of a body in which running tracks are machined, a hinge with rollers and a locking ring.
Rzeppa
As an example, let's take the internal velocity joint of the VW Transporter T4. In order to assemble a ball CV joint, you need:
- fix the drive shaft in a vice;
- put a boot with a metal shield on the shaft;
- install a limiting ring;
- the housing with the separator and inner race can be assembled separately. It is necessary to put the separator on the holder and place it inside the housing. Then, turning out the cage and separator, insert one ball at a time. The video shows the assembly process of a CV joint fixed in a vice. Initially, a race, separator and housing are put on the drive shaft. Then, as in the previous case, balls are inserted into the grooves one by one.
Tripod
It is much easier to assemble a tripod-type CV joint. All you need is:
- install the boot on the drive shaft in advance;
- place a hinge with rollers on the slots;
- fix the hinge by installing a retaining ring (there is a groove for it on the drive shaft);
- generously lubricate all rubbing pairs;
- install the housing;
- fix the anthers;
- manually develop the mechanism by making several turns in different directions.
For a visual representation, we suggest watching a video of the assembly of the outer and inner CV joints.
Important points when replacing
Useful tips that will not only help you assemble the inner CV joint correctly, but also extend the life of the joints and angular velocities in general.
- If you notice a torn boot in time and the CV joint has not yet begun to crunch before disassembly, you can get by by washing the unit and replacing the lubricant.
- Litol, grease or graphite grease cannot be used as a lubricant. Only special grease for CV joints is acceptable.
- If you disassembled the old CV joint to wash it and replace the lubricant, mark the location of the race and separator relative to the body. When removing the balls, arrange them so that you can then install them in their original places.
- Gasoline, a small brush and clean rags work well for washing.
- Factory crimp clamps are considered disposable. If you reinstall them, be prepared for the fact that when the wheel is turned out (especially in cold weather), the boot may come off. As a result, installing a new one or washing an old grenade will go down the drain. You can crimp such clamps with thin pliers.
It is most convenient to compress and release retaining rings with special pliers. Without them, assembly and disassembly may require more time and nerves.
What is the risk of CV joint failure?
CV joints cannot always be repaired even if only one of the boots is damaged. In most cases, their repair is not provided by the manufacturer; in case of wear or damage, the front inner CV joint is replaced with a new one.
However, on some cars, severe wear or breakage of the front hinge can lead to more serious problems. The fact is that the needles that fall off the roller bearings penetrate into the gearbox housing, and then, rising with the lubricant, are ground by gears. The consequences in this case are simply catastrophic.
If the front inner CV joint is not replaced in time, it may jam, causing the axle shaft to break and making it impossible for the vehicle to continue moving. The danger of such a situation is clear without further ado.
In order not to lead to trouble, it is worth inspecting the anthers of the front internal and external hinges every 5 thousand kilometers traveled. If there is a suspicion that the components are leaking, the best option would be to replace the boots with new ones and update the lubricants at the same time. If a crunching noise occurs while driving, you need to contact service as soon as possible or replace it yourself.
What lubricant to use for CV joints
The main tasks of lubricants used in CV joints are protection against friction and prevention of corrosion. Also, the lubricant must be inert with respect to the polymer boots, which prevent moisture and debris from entering the mechanism. Most of the above requirements meet the following types of lubricants:
1. Lithium. These are viscous yellowish compounds, which at low temperatures acquire an even thicker consistency, making it difficult to spread on parts. They are able to significantly reduce friction and loads acting on the hinge elements, protect them from moisture and neutralize accidentally trapped dirt. Their only drawback is the ability to dissolve some types of anthers made from organic polymers. One of the representatives of this type of lubricant is the domestic Litol-24, which is replaced after a run of 100 thousand km.
2. Based on molybdenum disulfide. More universal lubricants that are characterized by increased resistance to corrosion. Their composition has a reduced content of organic acids, thereby reducing aggressiveness towards polymer products. Such lubricants are recommended for use in CV joints of cars of any manufacturer. Their main drawback is sensitivity to moisture ingress when the seal of the boot is broken, due to which the lubricant loses its properties. Domestic manufacturers produce lubricants with molybdenum disulfide under the general name SHRUS-4.