There is one big problem - the risk of burning out the electronics unit, which, by the way, happened to many Vesta owners. For example, if you put LEDs in the DRL of a sedan, then after a short time they will simply stop shining. As a rule, in such cases, the fuses are replaced, which are marked in the instructions with the symbols F16 and F17.
However, there are none under the cover that covers the fuse box. In the end, it all ends with a burnt-out electronics unit, which has to be replaced. It's all about the higher resistance of the diodes, which is why Vesta's electronics unit cannot withstand it.
The most unpleasant thing is that this is not a warranty case, so contacting the dealership for a warranty replacement will not help. You have to buy the unit yourself, and it is quite expensive - it is not always possible to find a part even for 8,000 rubles, and sometimes the price tag for an element reaches 19,000 rubles!
Moreover, such a problem can arise not only because of LEDs. If you thoughtlessly select and install components, it is more than possible to end up with a burnt-out unit.
Installing a recorder in a Lada Vesta car: photos, videos | ▼ About Lada ▼
We insert our wire into the standard wire clips. This way we will secure it, it will not dangle inside the rack and create extraneous noise.
Expert opinion
It-Technology, Electrical power and electronics specialist
Ask questions to the “Specialist for modernization of energy generation systems”
Lada Vesta and 4 secret functions in it, which almost no one knows about - 4 WHEELS - March 12 - 43630650421 - MirTesen media platform Press the lock of the working cylinder of the headlight range control and by turning the cylinder counterclockwise until it stops, remove the working cylinder of the headlight range control from the headlight housing . Ask, I'm in touch!
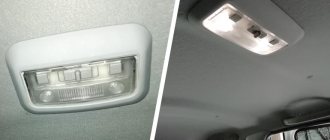
How does the interior lighting of the Lada Vesta work?
You should start getting acquainted with the main lighting unit located above the dashboard. The following functions can be controlled from the driver's and front passenger's seats:
- general lighting;
- switching mode when doors are open;
- lighting of the driver and passenger seats.
When equipped with atmospheric interior lighting, the following options are available:
- lighting for the driver's and front passenger's footwells;
- LED inserts for door handles;
- illumination of the shelf under the climate control unit.
Photo source: https://rus-auto26.ru/product/avtomobili-lada/lada-vesta/lada-vesta-cross/
A separate Vesta rear lamp is provided only in the “Lux” configuration and has two buttons:
- turning on the lighting;
- switching mode when doors are open.
You can make the illumination of the rear seats yourself if you have the lamp itself, wires, a sharp blade (knife), thick wire, a flashlight and a set of screwdrivers.
Front panel illumination
The front panel backlight is activated when external lighting devices are turned on. Car owners note that they experience some inconvenience when reading indicators when exposed to direct sunlight. Car owners are trying to independently improve the LED lighting of Lada instruments. Car enthusiasts should take into account that any intervention, modification or improvement of lighting fixtures will result in loss of warranty coverage. If the owner nevertheless decides to improve the lighting, it is necessary to adhere to the algorithm of actions.
Sequence of events
Remove the glove container. To do this, open it and press out the latches that hold the lid. Apply a little force, pull the cover towards you, it will come off. Remove the glove box light. Using a small screwdriver, press out the lamp and disconnect the wires. Unscrew the five bolts and remove the glove compartment. To improve lighting, purchase two 600 V LEDs. Unscrew the hook and screw securing the body of the pulp and paper machine. In connector c1 you need to cut the dark blue wire. In connector c2, strip the blue-red wires. Connect two diodes. In the received kit, connect the dark blue wire to the end of the wire of the same color in connector C1. The green wire is connected to the end of the dark blue wire, which is located inside the harness. The red wire is connected to the end of the blue-red wire in connector c2. Next, the steps are performed in reverse order. If all steps are followed, the panel illumination will be improved. Switching on will be done by turning the ignition key.
Foot light
If there is no lighting in this area, the driver of the car will be able to install the lighting for the feet independently, if he deems it necessary. To perform such a procedure does not require large expenses. The driver will only need a piece of LED strip. Before purchasing a strip, decide what color and power of light you want.
Stages of implementation
Divide the profile into four parts. Each of them is approximately 25-35 cm in diameter. Degrease the surface of the profile. Attach the LED strip to the parts (use available means - glue, adhesive double-sided tape). Connect the LEDs to the standard lighting lamp, or central lighting unit. If you want to install backlighting for the rear row of seats, it is better to place LEDs under the driver’s and front passenger’s seats.
How to make backlighting for the back row of Vesta
You can install a rear light on the Lada Vesta:
- native, which comes in the “Lux” package (article number 8450030708/8450031513);
- any analogue for Kalina and Granta models.
Installing additional lighting for rear passengers on Vesta and Vesta Cross begins with determining the location where the lamp will be located. It is best to do this approximately at the level of the backs of the front seats, so that the light is directed towards the feet:
- Using a pre-prepared stencil (put the lampshade on cardboard and outline its back), transfer the outline to the ceiling upholstery.
- Using a sharp blade, carefully cut along the line.
- Wrap the soldered wires from the rear lamp with a tight seal so that “crickets” do not form during the operation of the car.
- Wrap their end to the wire, push it into the cut hole to the place where the front lighting unit is located.
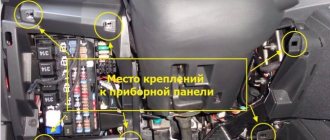
Now remove this block and find the necessary wires in the block:
- White and pink is a plus. It loses power a few minutes after the ignition is turned off (for your safety, turn off the car).
- Blue-black is a constant minus.
- White is a minus for door switches.
There is a standard diagram that clearly shows the connection.
Photo source: https://www.drive2.com/l/494120526596276644/
All that remains is to use self-tapping screws to secure the rear lamp to the upholstery and insert the front lighting unit into place.
You can add lighting to the back row of Vesta and Granta Sport by connecting the lampshade to the trunk lighting:
- ground - black wire;
- the second +12V.
In order not to confuse the purpose, it is better to ring the wires first.
Connecting interior lighting
If the Lada Vesta model is not equipped with LED lighting in the niche on the control panel, the car owner can easily install it himself.
To do this you will need wires, a plastic corner, double-sided adhesive tape, and LEDs.
Algorithm of actions
Secure the LED to the plastic corner using double-sided adhesive tape. Secure the corner into the recess on the front panel so that the LED faces the cigarette lighter. Remove the side cover of the recess in the center. To do this, just unscrew one mounting bolt. Connect the LED to the cigarette lighter socket. To replace or install a new interior lamp, first remove the old lamp, then install a new one in its place. The algorithm of actions is identical to the algorithm for installing the lamp in the rear part of the cabin. No additional measurements or stencil making are required.
Why are the lights not on in the Vesta cabin?
In addition to the lack of standard lighting for the rear row (except for the “Lux” configuration), the domestic car has several unpleasant features. One of them manifests itself as follows: the light in the Lada Vesta’s interior does not turn on, regardless of the position of the lighting keys.
This is due to the limit switch located in the doors - the rubber that protects it has different hardness and in some places may not reach the sensor.
It is a misconception that the fuses may blow and therefore the lighting does not work - it is powered directly from the TsKBE.
Way to solve the problem
On a Lada Vesta, when the interior light is not on, do the following:
- Remove the boot from the end cap. A simple option, but you just need to know that if dirt gets in, the sensor may again incorrectly read the door position.
- Replace the limit switch itself if, even with the rubber band removed and the surface clean, the problem with the light remains. Just pull it out, disconnect the terminal and connect a new one.
The owner can do all this independently.
Photo source: https://www.drive2.com/l/496319000096014965
What to buy?
- Low beam – LED lamps OPTIMA CL-6 LED HEADLIGHT. Installing such lamps will also require the purchase of universal rubber covers for the headlamp.
- Dimensions and DRLs are MTF W21/5W LEDs. They fully comply with the requirements and match the polarity.
- License plate light – PHILIPS.
Most likely, for some reason the circuit controller saw a parameter perceived by its logic as K/C. Disconnect the negative terminal for 10 minutes.
Any LED lamps that are just the right size may not work with your controller, you need to select them.
Most likely, for some reason the circuit controller saw a parameter perceived by its logic as K/C.
Any LED lamps that are just the right size may not work with your controller, you need to select them.
What kind of lighting do you prefer?
Built-in Chandelier
Why doesn't the light in the cabin turn off?
This problem is also associated with sensors on the doors; it most often appears in the cold season, when the rubber hardens. In this position, the limit switch sticks and the system “thinks” that the doors are open, and the light in the cabin does not go out.
Way to solve the problem
There are two fairly simple options for dealing with this situation:
- Install an additional spring under the rubber band, which will act on the stiff boot.
- Purchase an alternative Hans Pries 104 035 756 sensor. All you need from it is the rubber band itself, which must be replaced in place of the old one. On analogues this part is softer and more elastic.
The price for solving the problem is from 70 to 100 rubles.
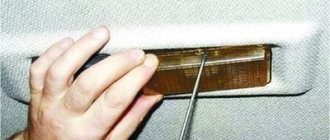
Room lighting
Lighting for the Lada Vesta number is provided by two light bulbs. Lamps often burn out, so drivers must be able to fix this problem themselves and replace the lamps.
The procedure is not complicated and does not require special skills or abilities.
Sequence of events
Use a sharp object to pry the lid of the lantern. Take it out. Remove the lamp and install a new one in its place. A 5V light bulb is built into the lantern. Reinstall the flashlight in reverse order. When removing the flashlight, pry it with a sharp object from the left side.
The interior light turns on over bumps and holes
Another trouble that owners of Kalina, Vesta or Granta may encounter is that when driving over sensitive uneven road surfaces, the interior lighting may come on. The problem is solved independently, without visiting a service station.
Way to solve the problem
First you need to find the hood opening sensor; it is located on the right side when you stand facing the car. On the hood itself there is an elastic band that presses on it, it is adjustable, you can twist it and tighten it. In the case when the light turns on in the pits, you need to unscrew the rubber band a little. This will ensure the limit switch is closed and solve the problem.
Photo source: https://www.drive2.com/l/496319000096014965
It should be adjusted so that when the hood is completely closed, the light does not turn on, but when closed by one click, it continues to light.
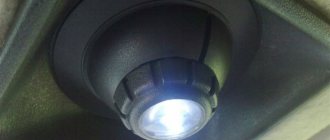
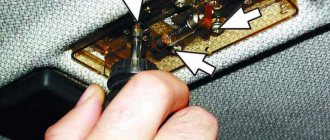
How to remove the ceiling light on Vesta
In order to remove the ceiling light on the Lada Vesta without damage or visible defects, you should act very carefully and consistently:
- We insert a flat-head screwdriver between the upholstery and the block frame and gently press it down.
- After this, we pull the frame towards the glass to remove the rear latches.
- Using a Phillips screwdriver or a torx wrench, unscrew the screws securing the block.
- We insert a flat-head screwdriver into the hole located in the upper part of the case and press the latch.
- Disconnect the block with wiring.
If difficulties arise with this process, it is better to watch a video of how the owners carry out all these steps with their own hands.
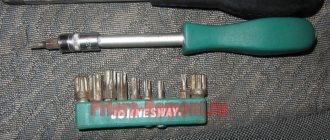
Required Tools
Considering the fact that on some car models the ceiling lamps are secured with spring clips, removal will require a thin slotted screwdriver.
First of all, you need to decide on the mounting method. To do this, you should carefully examine the ceiling. If there are small special grooves on the sides, this means that spring clips are installed.
The lampshade may have one or more spring clips that will need to be released with a thin screwdriver.
Having pressed the latch with a screwdriver, you must carefully pull the lamp down and remove it from its seat. If there are several latches, they should all be sequentially removed from the hook, pulling the lamp down with your fingers.
General scheme
Despite the external differences, all ceiling lamps have almost the same design and electrical connection diagram. The housing contains contacts for installing and connecting one or more lamps. Switching is carried out by a switch that has three positions, allowing you to turn on the light manually or automatically when the doors are opened.
Removal features for various popular car brands
On Suzuki brand models, as well as on many cars from Japanese manufacturers, the lampshade glass is not separated from the body and if the lamp is replaced, the entire lamp is removed. A screwdriver is used to disengage the latches.
On domestic cars Lada Vesta, Lada XRAY and Lada Granta FL, the ceiling lamp is combined with the ERA GLONASS emergency response system; to replace the lamp, you need to remove the decorative cover with the glass of the lampshade using a screwdriver inserted into a special recess.
Expert opinion
It-Technology, Electrical power and electronics specialist
Ask questions to the “Specialist for modernization of energy generation systems”
LADA Granta, removal of the interior lamp, instructions online To independently replace the license plate lamp on a Lada Vesta or other modern LADA car, you can use the guide below. Ask, I'm in touch!