Good day to all! In this article we will tell you how to replace the Lada Granta fuel filter . This procedure is very simple, so you can do it yourself without trips to a car service center. In addition, by doing the work yourself, you can save additional money, which can be directed in another direction. When do you need to change the fuel filter on a Lada Granta and how often should you do it?
Maintenance regulations require replacing the VAZ Granta fuel filter every 30,000 km. However, it is better to reduce this figure if the car uses low quality fuel. Or the main signs of a clogged fuel filter began to appear, which will be discussed below.
Signs of a clogged fuel filter in Lada Granta
If the fuel filter is clogged, the first thing you will notice is a floating idle speed. The engine will not run smoothly, but intermittently due to lack of fuel. Secondly, starting the engine will be difficult. Most often, you will need to press the gas pedal additionally when starting the engine. Thirdly, you will feel a loss of power. The car will respond more slowly to pressing the gas pedal.
These are the main signs, when they appear, you should first change the fuel filter. So, from words to action.
Which fuel filter should I choose to replace on a Lada Granta?
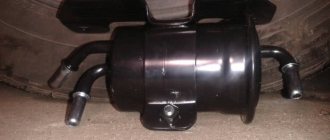
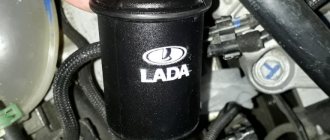
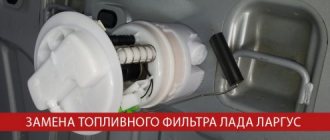
A fuel filter with a fitting (clip) is installed on a Lada Granta car. The fuel filter does not have a thread, i.e. secured using quick-release fasteners. The appearance of the filter is shown in the photo below:
Original filter number:
21230-1117010-82
Using this number you can easily find a list of analogues if you do not want to overpay for the original.
Air filter
The Granta air filter is installed in the engine compartment in a plastic box. Serves to clean the air supplied to the combustion chamber. Catches the smallest particles of sand and does not let them into the rubbing parts of the engine.
Replacement is carried out every 30,000 km of the vehicle.
Replacing the Grant air filter
To replace, you need to unscrew the 4 screws securing the air filter cover and lift the cover. Remove the old filter and install a new one after first clearing the air filter box of dust and debris.
The filter must be installed in folds along the movement of the car.
Replacing the Lada Granta fuel filter - step-by-step instructions
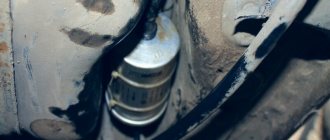
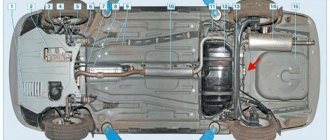
The fuel filter on the Lada Grant is located next to the fuel tank at the rear of the car. Replacement work is best done in a pit or overpass.
1. Relieve the pressure in the system. There are two ways to go.
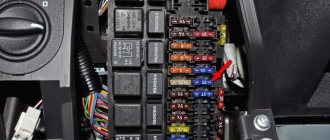
1.1 You can pull out the fuel pump fuse, which is located under the front console at the passenger's feet. Then start the car. After 1-2 minutes, the engine will stall because the fuel line will run out of fuel.
1.2. Or you can relieve pressure from the fuel rail by pressing on the valve with a sharp object.
2. Disconnect the fuel supply hoses from the filter. This is done very simply. Just press the lock and pull the hose to the side. Be prepared for the fact that gasoline will remain in the filter and it will inevitably spill. There is no need to be afraid of this, just be careful.
Why you shouldn't ignore replacement
The fuel filter will constantly become clogged. This means that its capacity is becoming less and less. This leads to a decrease in engine power and increased fuel consumption.
Many car owners get the situation to the point where the car simply stops starting. After all, gasoline cannot pass to the cylinders, as it is stuck in the filter.
Order of Operations
The fuel filter is located at the rear of the car, under the body. To replace, you will need to install the car on a viewing hole or jack it up.
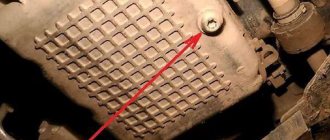
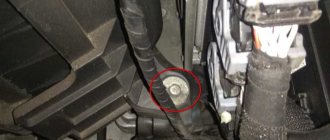
- The gasoline in the fuel line is under pressure. Any work under operating atmospheres, including replacing the fuel filter, will be accompanied by fuel splashing. Before starting work, you need to reduce the pressure in the system. This can be done in 2 ways: raise the rear seat, disconnect the power, or remove the fuel pump fuse F21.
2279-4-13-06 (Copy)
The arrow on the filter housing should be directed in the direction of fuel flow - towards the front of the car.
The arrow on the filter housing should be directed in the direction of fuel flow - towards the front of the car.
The arrow on the filter housing should be directed in the direction of fuel flow - towards the front of the car.
We put the tips of the fuel pipes onto the filter fittings until the clamps snap into place.
Let's summarize
Based on the above, it is clear that the work does not require qualifications or even serious skills in working with tools. Even a beginner can perform the operation. But, as you know, even the simplest works have their own nuances and tricks. For information on one of them when replacing a fuel filter, watch this video:
Old TF does not require special disposal conditions; it can be sent to a regular trash container.
In most cases, the warranty period of vehicle operation occurs without significant failures in the functioning of systems and components. Before the warranty period expires in the Lada Granta model, there is a need to change the fuel filter, which is shown in the photo. The reason for the need to replace this element is low-quality fuel. The fuel filter is used to prevent foreign impurities, various types of unwanted additives and other fuel contaminants from entering the power system.
The filter element protects the injection system and the cylinder-piston group in the engine. As dirt accumulates in the core of the Lada Grant, the throughput deteriorates until a critical moment occurs. Due to its design, the fuel filter cannot be restored and must be replaced with new elements. In this article we will tell you where it is and step by step how to change the filter.
Oil filter
This filter is used to clean the oil from chips and dirt formed during engine operation and from rubbing parts. To prevent debris from getting onto the working surfaces of parts, the oil passes through the filter, thereby being cleaned.
The oil filter on the Grant must be replaced with every oil change.
Replacing the Grant oil filter
Drain the oil from the car by unscrewing the plug in the oil pan. Then we unscrew the old filter and install a new one, having previously cleaned the surface on the engine block where the filter fits. It is also recommended to lubricate the filter sealing rubber with clean engine oil.
We hope our article was useful to you.
How not to make a mistake with your choice?
Replacing a fuel filter is one thing, but first you need to choose the right element. It should be taken into account that different models require the use of filters that differ slightly in their design aspects. Before purchasing and installing a new element, you should carefully determine its applicability specifically to a specific car, including the LADA Granta. The packaging of the part contains information about the compatibility of the filter with the list of car modifications. If the Lada Granta is present in it, then we confidently buy it. When this fact is absent, it is not recommended to resort to unjustified risks, but to find and purchase a “native” filter, especially since its price is very low.
It would also be useful to purchase and replace a Lada Granta air filter in parallel with the fuel filter. This will ensure that a high-quality mixture is supplied to the engine.
The used LADA Granta filter element cannot be thrown away normally, but requires special disposal. Since during operation it has accumulated a significant amount of chemicals hazardous to health, it should be taken to a collection point for such products.
And so, you learned how to change, and actually where the filter is located in the car. Replacing the fuel filter is not difficult, and the car owner can do it himself.
Which filter to choose for Lada Granta
To conveniently search for spare parts, use the article number: LADA 2190-1117010.
Fuel filter parameters for Granta:
- length – 163 mm;
- hole diameter – 8 mm;
- case diameter – 55 mm;
- fastening – quick-release plastic clamps;
When the question arises about selecting consumables for a car, the car owner is most interested in the financial side of the issue and the quality of the fuel filter.
There are a lot of manufacturers and it’s quite easy to run into a bad filter, and at an inflated price. It's time to show good filter elements for the Lada Granta fuel system:
- Mahle – price 530 rubles;
- MANN – price 420 rubles;
- Filtron – price 280 rubles;
There is not much difference between them. The differences in cost can only be explained by how each of the presented analogue brands values itself. Each manufacturer is good in its own way, but the car owner will not notice the difference.
The most important requirement for any filter element is only one - that it is not a fake. The same company produces consumables for different engines, so you can read reviews not necessarily about Grant.
It is worth noting that the Lada Granta uses more than one filter element. The fuel pump is equipped with a fuel coarse filter.
This mesh is not a consumable material. If it is clogged, just wash it and put it back. The same is used in many modern Ladas, including Kalina and Vesta.
Replacing the fuel pump mesh – Lada Kalina Blog
So, it all started with the fact that my Kalina began to have trouble starting.
Sometimes everything is fine, but several times a week, there are times when you have to drive the starter for 5 seconds, and there is no reaction from the engine . As a result, the car still starts the second time. Also, I noticed one more feature: sometimes when you press the pedal sharply, you feel a sharp dip, as if the car does not have enough fuel, and only then it starts to drive normally.
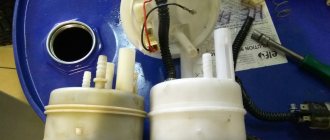
In general, the only thing that could be faulted was the fuel pump grid. And it was decided to replace it. To get to it, the first thing you need to do is remove the pump from the fuel tank. After this, you can begin the procedure with the mesh.
To directly get to the strainer itself, you need to remove the lower part of the fuel module. To do this, move the 3 side latches to the sides, which are visible in the photo below. 2 of them are marked with an arrow.
And at the same time we are trying to lift the pump itself up so that the lower part is separate. We also immediately disconnect the power plug from above by bending the latch to the side.
Also, we disengage the tube by prying it with a screwdriver:
Now the lower part can be released, and this can be clearly shown in the photo below.
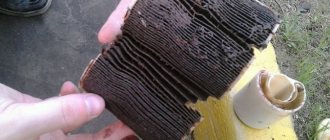
Pay attention to the condition of the mesh. It is worth noting that she has had this condition for 5 years and 70,000 km.
The fuel pump screen can be removed quite simply; to do this, just pry it off with a flat-head screwdriver and remove it.
Be sure to wash the entire pump inside, or rather its body, as well as the pump itself at the place where the strainer is connected to it. To do this, it is best to use liquid to clean the carburetor and the car's power system.
After this, we take a new part and install it in the reverse order. But first you need to remove the rubber plug from the new mesh, which is shown by the arrow in the photo below.