In order for the VAZ-2112 car to work normally, it is important to constantly monitor its technical condition. If during the inspection a worn part is found, replacement with a new one will be required.
Quite often, the VAZ-2112 begins to work not at full capacity due to worn-out valve stem seals. In this case, it is necessary to quickly replace the element that has become unusable so that the car starts up normally.
It is worth noting that this process is not easy, but if a car enthusiast understands the intricacies of automobile repair, then he will be able to independently repair the VAZ-2112. If you replace the valve stem seals step by step, taking into account the recommendations of experienced mechanics, you will not harm the internal systems. Of course, you can visit a workshop for this event and seek help from professionals. The replacement of valve stem seals by professionals will be carried out efficiently, but the price for the service may not satisfy the client.
How to replace valve stem seals on a VAZ-2112
To replace a worn element yourself, you need to carry out this activity in stages:
- The wires that are connected to the car battery are disconnected.
- The spark plugs are removed.
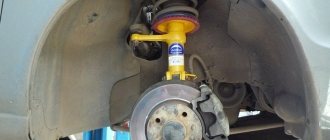
- The piston of the first cylinder is clamped with a special tool. This manipulation will not allow you to change the location of the phases responsible for gas distribution when the belt is removed from the camshaft. If the phases are disrupted, the machine’s motor will not be able to function normally in the future. The piston must be installed strictly according to the special mark provided on the camshaft. The same manipulation must be performed with the fourth piston of the car. If upon inspection it is noticed that the installation does not correspond to the marks, this will indicate that the gas distribution phases are disrupted.
To eliminate the malfunction, do the following: loosen and remove the camshaft drive belt; make rotary movements of the crankshaft until the marks are in the desired position. To make it easier to turn the crankshaft, it is recommended to put the car in 4th gear and install the drive belt in its permanent place. It is imperative to check that all the marks provided on the pulley and cylinder head match exactly.
- Next, you need to remove the cylinder head cover using a 12mm wrench if the piston is placed in the correct position. To do this, do the following:
- disconnect all wires that fit to the terminals;
- remove high-voltage wires from a special holder to the outer casing;
- unscrew the mounting bolts that connect the cylinder head cover and the ignition coil;
- Carefully remove the entire coil.
- After the coil is removed, you should find those connectors with the help of which the engine is ventilated. The drive cable associated with the throttle valve must be removed from the main holder and carefully moved to the side.
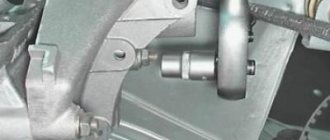
- The bolts that secure the power steering hose are unscrewed, and it is also moved to the side.
- The six fasteners securing the cylinder head cover are unscrewed and the cover containing the gasket is removed. If, after inspection, signs of wear are visible on the gasket, this element should be replaced with a new one.
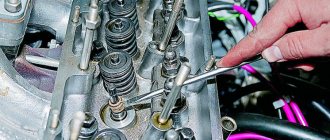
- Remove the fixing bolts of the valves and rocker arms; there should be thirteen of them in total.
- Using a special device, the springs are compressed in order to remove the valve spring and crackers in duplicate.
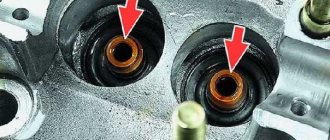
- The oil scraper cap, which is located in the valve sleeve, is pressed and the worn part is removed using a special tool or pliers.
After the worn element is replaced with a new one, all parts are assembled in the reverse order that was used during disassembly. Then you can not forget anything in the system of the VAZ-2112 car.
Signs of wear on oil seals
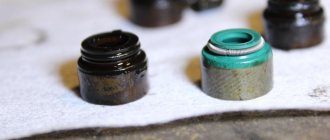
The main factor in replacing these caps is their wear, which occurs over time . After a long period of work, they already become unusable, especially if poor quality caps were installed on the car. Among the main signs of cap wear are the following:
- the appearance of bluish smoke when the engine starts or prolonged braking occurs;
- oiling of spark plugs, which occurs constantly;
- very high oil consumption.
To replace oil seals, it is not necessary to remove the head from the block.
VESKO-TRANS.RU
Content
Oil cap for VAZ 2110 scraper. Why change it?
VAZ 2110 valve cover oil valve
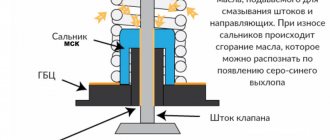
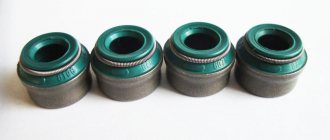
Purpose of valve stem seal. This is a guide bushing seal that connects the valve stem to prevent oil from entering the clearance. Previously, such products were made of fluoroplastic, non-reinforced, with a wide sealing surface. Modern engines have rubber caps that have a narrow iron sleeve and an expansion spring that presses the sealing edge against the valve stem. The design used has the least sensitivity to deformation of the coupling and valve stem, ensures a good and reliable fit of the cover, and the introduction of acrylate or fluorine ensures the highest seal life of more than 150,000 km of the vehicle.
- the cost of “original” caps is more expensive than those available at a remote car dealership;
- if one of the covers is damaged, but there is almost no time to search. Replacing thresholds on a VAZ 2110. video. Repair the vase Plate Vase 2110, 2111, 2112 7 70k 0 Make yourself a vase 2110 Replacement. Therefore, you will have to use another option, but make sure that the replacement will not affect the reliability of the engine.
Basic moments
For any repair or any installation on a car, you need to know the main points or secrets. It is the knowledge of these nuances that distinguishes a specialist from an amateur. When installing new oil seals, using the tips presented below will come in handy. So:
- Before installing new caps, it is recommended to remove the springs from them, as the caps can be damaged;
- The inner surface of the valve stem seal must be lubricated with engine oil.
In the above article there are many photos through which you can get the necessary information. All of the above recommendations are carried out with your own hands, but strictly as the instructions advise. The article will help you save a lot of money, because the price for services of this kind today is quite high.
Causes of wear
When an internal combustion engine is running, the valve stem seals are subject to a large load. It must be remembered that each valve makes 1000 strokes or more per minute. And if we add the chemical impact from practically boiling oil and exhaust gas, then we can understand why the rubber part of the oil seal wears out. Based on such data, we can conclude that the oil seal, like any consumable, needs to be changed in a timely manner. After a run of 100 thousand km, you should pay attention to the condition of the engine, monitor the oil level and its consumption.
Replacing caps (seals)
First you need to prepare to replace the valve seals. You will need the following set of tools:
- Open-end and socket wrenches.
- A device for compressing springs.
- Puller and mandrel for valve stem seals.
- Tin rod 7-10 mm thick.
- You will also need a hammer, pliers, tweezers and screwdrivers.
It is recommended to clean the entire head with kerosene. Only after this can you begin to dismantle the air filter, fuel pump and ignition distributor (on carburetor engines). Dismantling is carried out according to the following algorithm:
- Unscrew the nuts securing the cover and remove it.
- Unscrew the nuts that secure the ground wires.
- Unscrew the cylinder head cover fasteners from the rear.
- Loosen one by one the four nuts that secure the front camshaft bearing housing. The rear housing is secured with six nuts.
- Remove the key from the groove.
- Remove the camshaft and its seals.
conclusions
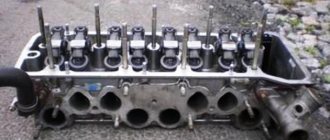
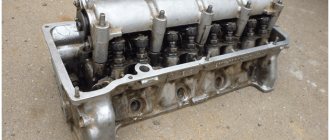
As practice shows, you can actually do it yourself by replacing the valve stem seals on a 16-valve VAZ-2112 without removing the cylinder head . Of course, the procedure will take a sufficient amount of time and effort. So, usually inexperienced car enthusiasts go to a car service center and pay 4,500 rubles. for a replacement, but those who are braver save this amount of money.
Dear friends, today we will tell you in detail and with photographs how to independently replace valve stem seals on VAZ-2112, 2111 and 2112 equipped with a 16-valve engine. The beauty of our story is that in order to replace the oil caps we will not remove the head from the engine, and this is a significant saving of time and labor costs, there is no need to drain the antifreeze, unscrew the manifold, etc.
At the same time, we will do this without using an expensive valve depressurizer, which allows us to do this, but will use a regular valve depressurizer for the VAZ-2110, which can be bought on the car market for 200 rubles. Even before starting work, I recommend purchasing this desiccant, if you have little experience in desiccaning and drying, then take a stock of heels of crackers, we will also need an anaerobic (do not use silicone) sealant, unlike conventional silicone, when in contact with oil, it does not clog the channels but dissolves in it, and also buy a key for tensioning the timing pulley for 50 rubles, since the belt will have to be removed and then set according to the marks. By the way, it wouldn’t hurt to replace the timing belt and rollers at the same time, ideally. If you are ready to do it yourself - no problem, if you lack determination - I can recommend contacting the guys in Minsk to replace the timing belt, they will definitely do it well and inexpensively.
Disconnect sensors, hoses, cables
Well, if you’re ready to do everything yourself, then let’s get started. First, remove the plastic cover from the engine and gain access to the “intake manifold”