The Seven, like all cars, includes an exhaust system. The main purpose of the VAZ 2107 exhaust system is not only to remove exhaust gases from the rear of the car, but also to reduce noise levels. The presence of problems in the system is indicated by such signs as the appearance of extraneous noise under the bottom of the car.
Features of the injection model
At the same time, the VAZ 2107 model, in which an injector and the corresponding exhaust system are installed, has a number of disadvantages.
The main one is that the vehicle's ground clearance has decreased significantly, resulting in a value of 7 cm. This circumstance primarily reduces the vehicle's cross-country ability not only off-road, but also on them. This should definitely be taken into account when traveling. Another problem of the VAZ 2107 car is the low survivability of the exhaust system. The high temperature generated in the collector can cause dry grass or debris to catch fire. To avoid this development, the machine should be placed so that there are no plants or dry debris underneath it that could be ignited by the collector. The injector and exhaust circuit are turned off, which allows the temperature to decrease.
Why do you need tuning?
There is no clear answer yet that would confirm the need for tuning. But quite often, when any part of the exhaust gas exhaust system fails or begins to function incorrectly, car owners begin to consider an option such as tuning. Some decide to do this work with their own hands, while others immediately turn to specialists - it’s up to you to decide. For those people who have decided to tune the exhaust system on their car, it is worth familiarizing themselves with all the possible types of tuning for this part of the car. In addition, some of them can be done independently, without outside help.
Threaded connection
White smoke from the exhaust pipe
The old spare part is still cut off with a grinder. In order to install a new part, you must do the following:
- On the rings and exhaust pipe, drill eight holes with a diameter of 4-6 mm around the circumference at the points of contact;
- Using an M5 tap, cut threads in the drilled holes;
- Treat all structural parts with sealant;
- Screw the bolts into the holes;
- Install corrugation.
The use of high-temperature sealant will ensure the reliability of the connection. After completing these steps, you will receive a fairly high-quality and sealed car exhaust system assembly.
How to make forward flow quieter
To reduce exhaust volume, devices are used that reduce the flow area of the exhaust pipe of the muffler. Let's look at the damper and flute commonly used on cars.
Damper installation
The damper is installed either before or after the muffler. The volume of the forward exhaust will be clearly reduced only when the damper is completely closed. Technological clearances of 3-5% remain for the passage of exhaust gases - so the engine does not stall. In this regard, engine power is significantly reduced due to blockage of the exhaust system.
the damper is made by hand
A damper is also used to switch from a direct-flow to a return-flow muffler and vice versa, if necessary. In this case, a new muffler is installed parallel to the old one, and the damper is mounted in front of them. This scheme is already used on some brands of cars from the factory.
mechanical adjustment of the damper is carried out on the move by the driver from the cab
You can drive a short distance with the throttle closed, but driving constantly is unacceptable for the engine.
the damper is installed in front of the muffler
Making and installing a flute
The flute (silencer) has more preferable characteristics. It dampens the exhaust pipe clearance much less than a damper. You can buy a flute, knowing the internal diameter of the outlet pipe, or make it yourself. Various silencer designs are shown in the photo.
Flute mounting options
Possible versions of the flute.
- External - for outlet pipe diameters up to 50–60 mm.
method of attaching a flute to a small diameter exhaust pipe
a properly designed flute “helps” you ride more quietly
the sound becomes “more pleasant” to the ears of the traffic inspector
Tools and materials for making a flute
- Bulgarian;
- electric drill;
- welding machine;
- spanners.
It is better to choose blanks from stainless steel with a thickness of 0.8–1.2 mm, which guarantees long service life. Blanks made of “ferrous” metals are acceptable with a thickness of 2.0–2.5 mm or less if we plan to use the flute for short periods. As blanks we use two pieces of pipe and sheet metal for the flange.
Making a flute with your own hands
The order of work performed:
- We adjust all parts to the required dimensions. We measure the dimensions of the flange and larger pipe “on site”.
- We drill holes.
the notch divides the gas exhaust into two streams, which reduces the exhaust volume
To further relieve the exhaust system from excess exhaust gas pressure, holes are drilled in the flange.
additional holes allow for a freer exhaust
the flow of exhaust gases is suppressed due to unloading holes and counterflow
There is no need to paint stainless steel
Videos about the flute
Video: sound of exhaust through forward flow without flute
Video: sound of a flute on the same car
Seven exhaust system design
Smoke from the exhaust pipe and the reasons for its appearance
The exhaust gas system of the VAZ 2107 is designed to perform a number of the following actions:
- The release of combustion products arising after combustion of the fuel mixture.
- Ventilation of the cylinders, which occurs during the emission of exhaust gases.
- Reduced noise levels.
- Heat removal.
- The downpipe, which is better known as “pants”.
- Resonator.
- Muffler.
A downpipe is a device that connects directly to the exhaust manifold. From the exhaust pipe, the gases are immediately sent directly to the resonator, which is often called an auxiliary muffler. The resonator is designed to reduce noise levels and also extinguish fires coming out of the cylinders. The exhaust process ends with a muffler, which is designed to absorb the rest of the noise. However, it is almost impossible to make the motor operate completely silent.
In addition to the main components of the exhaust system, the diagram also includes:
- Muffler suspension mounting pad and rubber bands.
- Gaskets, which provide sealing and sealing of the connections of the constituent elements.
- The bolts of the clamps that secure the components.
The exhaust on the VAZ-2107 is realized due to the above elements, and the exhaust manifold is not an integral part of it, since it belongs to the engine.
Differences in carburetor and injection VAZ models
VAZ 2107 cars were produced in two types - carburetor and injection. They differ in fuel mixture injection systems. Differences in the injection system made some changes to the design of the exhaust system. The exhaust system of the VAZ 2107 carburetor models is described above. It differs from the VAZ 2107 injector system in the following ways:
- An oxygen sensor, which is designed to detect the composition of the mixture. It is located directly in the exhaust manifold.
- Neutralizer or catalyst. This device, which on injection models of the sevens, is located directly in front of the resonator. The neutralizer has a cylindrical design and is located in the central tunnel under the bottom.
These are the main additions that are present only on injection sevens. Due to the use of a catalyst in the design of the exhaust system, the resonator had to be moved closer to the rear.
The new exhaust system on the injection seven has become more complex in design, but due to the use of a catalyst, it was possible to reduce the level of exhaust toxicity. This made it possible to bring the exhaust system to the EURO-3 standard.
Repair of the exhaust system of VAZ 2107
Repair of the exhaust system on the VAZ 2107 is based on the replacement of component parts. Moreover, devices such as pants, a resonator or a muffler change. The reasons for the need for their repair are corrosion or burning of the metal. Internal parts corrode when exposed to moisture, which causes their destruction.
Moreover, there are two types of damage: both the internal components, which are presented in the form of meshes, and the outer walls of the component parts are damaged. It is not difficult to detect a breakdown and the need for repair. As soon as, after starting the engine, extraneous noise is detected coming from under the bottom, it is time to diagnose the system and identify the cause of the breakdown.
If the breakdown is due to a malfunction of internal parts, then the part must be replaced. If the cause of the noise is the appearance of holes in the body of the device - the resonator, muffler or pants, then you can try to eliminate them using a welding machine.
The VAZ 2107 resonator is replaced if it malfunctions
When replacing this device, it is important to consider the following recommendations:
Replacement must be carried out only after the car has cooled down, since the exhaust pipe gets very hot when the engine is running. When removing the resonator, it is important to take into account such a factor as maintaining the device. After all, this part is not fixed, but is held in place by connecting to the pants and the muffler
What muffler can be installed on the “seven”
There are 4 options for replacement:
- Standard VAZ 2101-2107 muffler made of ordinary steel with anti-corrosion coating. The plus is the low price of the product, the minus is the unpredictable duration of work. When purchasing, it is quite difficult to evaluate the quality of the metal and workmanship, unless the welds are made completely carelessly.
- Factory section made of stainless steel. The option is not cheap, but durable. The main thing is not to buy a fake made from cheap Chinese metal.
- The so-called direct-flow sports muffler, manufactured in a factory.
- Weld the outlet element of the desired design yourself.
If you do not have welding skills, the fourth option is automatically eliminated. All that remains is to choose between stock and sports parts.
A straight-through muffler differs from a standard muffler in the following ways:
- shape - round, outlet of larger diameter;
- design - inside is a straight perforated pipe, lined with fireproof sound-absorbing material;
- the operating sound is low-frequency, louder.
The forward flow resistance is significantly less than the factory model of the muffler. The design makes it possible to ventilate the cylinders more efficiently and increase engine power by up to 5 hp. With. A side effect is a higher noise level, which brings pleasure to fans of extreme driving.
The stock design muffles noise due to several internal partitions and additional perforated pipes, causing gases to change direction and be reflected repeatedly from obstacles. Hence the high resistance of the element and a small drop in power.
It is not difficult for a car enthusiast who owns a welding machine to make a forward flow independently:
- Make a round tank from sheet metal (you will need rollers) or select a ready-made can from another car brand, for example, Tavria.
- Place a perforated pipe inside, having previously drilled many holes with a diameter of 5-6 mm.
You can refine the outlet pipe using a nickel-plated decorative nozzle. The choice of products in size and shape is extremely wide, the prices are quite affordable.
Main advantages of the updated model
Exhaust smoke: blue, white, black
The modernized version of the VAZ 2107, which has an injector and an improved exhaust, has a number of advantages. The main advantages of the machine are as follows;
- The injector ensures high stability of engine parameters in different operating modes.
- The injection system increases specific power and torque, which adds dynamism to the car.
- During operation, the car's power unit produces less toxic emissions of CO and other compounds than its carburetor counterparts.
In practice, the operation of the machine is simplified for the driver; the injection system used is less demanding on the driver’s qualifications.
Why do they install forward flow?
The absence of partitions in the muffler provides a “growling” engine sound characteristic of sports cars. Therefore, a direct-flow muffler is often installed when “sporting” VAZ tuning. But there is another aspect. The partitions in the muffler not only reduce noise, but also prevent the free exit of exhaust gases and the pistons have to “push” them out of the cylinders. This reduces engine power by 10-15%. Accordingly, installing direct flow allows you to increase power, which is important for sports tuning, for example, for drag racing. Those who prefer “manual” finishing of their car make direct flows themselves.
What is needed to make a direct flow on a VAZ 2107
Making a direct flow yourself requires minimal plumbing skills and knowledge of how to make a forward flow on a VAZ 2107. You can make a forward flow in several ways. All of them can be divided into two categories: remaking an old muffler and making a direct flow “from scratch”. If you are going to convert the standard muffler of the “seven” to direct flow, before starting work you should stock up on the following devices and materials:
- pipe with a diameter of 52 mm;
- metal devices for cleaning burnt dishes (metal sponges), of which you will need about 50 pieces;
- angle grinder (“grinder”);
- circles for cutting metal;
- welding machine;
- set of locksmith tools.
To make forward flow on a VAZ 2107 with your own hands, you will need the following set of tools and materials:
- two flanges 130/42 millimeters;
- two pipes of similar diameters with a wall thickness of at least 2 mm;
- asbestos fabric, mineral wool or other fire-resistant sound-absorbing material;
- Bulgarian;
- drill;
- welding machine.
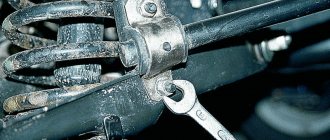
Instructions for replacing the resonator
Since the resonator on the VAZ 2107 is not attached to the body, it is necessary to hold it when replacing so as not to deform the exhaust pipe.
Resonator VAZ 2107
- Tap the pipe connections and clamps with a hammer, as in the previous case.
- First of all, we disconnect the resonator from the muffler, then from the “pants”. When connecting the resonator and the receiving pipe, we proceed according to the same scheme, bend the petals, use a “liquid key” or a grinder in the most extreme case, and very carefully.
- At the point where the resonator meets the muffler, the situation is more complicated. When the pipes have become stuck, we cut off a piece of pipe coming from the resonator, then remove the remaining part from the flaring using a gas wrench or pliers. Usually in this place the pipes are stuck tightly, when it is impossible to separate them, we also change the muffler
- We install a new resonator, observing its original position. If the resonator is installed incorrectly, it will start knocking on the underbody or hitting uneven roads. It is desirable that the resonator pipe running from the receiving tube to the tank be parallel to the ground
- In the same way, we align the connection of the resonator with the silencer so that the tank is parallel to the ground and does not knock on the body
Changing the “pants” (reception pipe)
When replacing VAZ 2107 pants, be sure to stock up on a new gasket between the pants and the manifold, because it is destroyed when removed. It is also recommended to replace the nuts securing the pants to the manifold. So:
First, disconnect the pants from the resonator. If problems arise, as in the case of the resonator, given the fact that the pants are replaced less often than other parts of the muffler, and the heating temperature of the connection during engine operation is quite high, we use an angle grinder.
Mounting for a carburetor engine. Nearby is the injector pants mount
After removing the resonator, unscrew the four nuts securing the exhaust pipe to the manifold.
Unscrew the nuts securing the pants to the manifold, take out the gasket
- Be careful not to strip the studs to avoid unnecessary work replacing them. It is recommended to immediately treat them with a “liquid wrench”, otherwise we cut off the nuts using a grinder
- Working with a grinder, we cut the nut diagonally so as not to damage the thread of the stud. Then we simply knock it down using a chisel or flat screwdriver
- When installing the pants, replace the old gasket, then screw them to the exhaust manifold
- We connect the pants with the resonator and compress the flaring using a clamp.
If after replacement the exhaust system is raised under the bottom or sags:
- First, the receiving pipe and resonator are fixed at the wrong angle. We simply rotate the resonator and achieve the correct position of the system
- Second, the engine mount sagged. We change the engine mount.
https://youtube.com/watch?v=bOzlK_Cr5qE
Fasteners
Separately about fasteners - suspension pads and clamps. It is recommended to change them every time you change any part of the exhaust system. So:
- If the clamp looks like new at first glance, do not forget about metal fatigue. The thread “floats” over time, the clamp no longer holds the connection tightly, exhaust gases leak through and create additional noise. You will have to crawl under the car to change one clamp, and this, you see, is extra work.
- A simple inspection often fails to assess the level of wear on cushions and rubber belts. By installing old cushions with rubber belts in place, you risk losing the muffler as a result of their breakage. Considering that the price of a pillow or belt is much less than the price of a muffler, it is better to replace them immediately to avoid unnecessary costs.
How tuning is performed
Initially, you need to take care of the necessary tools and materials. And if you can easily find all the tools in your garage, then you will have to go to the auto store to get the materials (a new spider and part of the muffler). You can buy a spider, or you can weld it yourself (if you have the opportunity and skills).
Types of spiders
If you are unhappy with the sound of your car, there are two ways to fix it. The first is to go to a workshop, where they will do everything for you for a certain amount. The second (cheaper) is to find a car model on the Internet with the sound you like. Have you chosen? Great, now go to the disassembly site and buy the latest can of the exact model you found on the Internet.
Having prepared everything you need, you can begin installation. After removing the old collector, install the spider in its place. Then you need to tighten the fastening nuts thoroughly.
Important! In most cases, you will not be able to remove the manifold just like that. The fact is that the old nuts stick to the body. In this case, you need to drill them out. If your garage is not equipped with a cutter, grinder and drill, then you need to go to a service station.
The next step on the path to getting a good sound from your car will be installing the purchased can on the muffler. Often you will be hampered by the fact that the two parts have different diameters. But this is not a very serious problem, especially if you have a welding machine. It is necessary to pay due attention to the junction of the new muffler can with the engine so that it can fit perfectly into place. If necessary, the jar will need to be slightly altered.
This is what the can looks like at the end of the muffler
Important! Never use old earrings when installing an exhaust system. Always buy new ones for this.
We smoothly approach the final part of tuning, which is also considered the most enjoyable. Start your vehicle and listen carefully to the sound coming from the exhaust pipe. At the same time, choose different engine speeds, changing them periodically. The result of your work will not go unnoticed. Now, as a reward for the work done, you can drive through the streets of your city at different speeds, enjoying the new sound - this is how your car now sounds.
Replacement of resonator VAZ-2107i injector
Hello everyone, back in the winter on New Year’s Eve the resonator burned out, it was 4 years old, it was inherited from the previous owner, I changed the main muffler about a year and a half ago. I decided to wrap it with asbestos cord until spring, but after a month it burned out, so I wound it again.
Recently it became warmer, and the whipping started again - I decided to replace it.
I bought a resonator made in Tolyatti in advance; the main muffler was from the Seversky Pipe Plant, near St. Petersburg.
It turns out that there are 2 types of injector: Euro-2 and Euro-3. It differs in the bend of the flange and, it seems, in length. Before purchasing, I had to look under the car to make sure I have Euro-2, so the pipe with the flange has a bend, while for Euro-3 it is straight.
For some reason I bought a metal-graphite ring with bolts, which is used to connect the exhaust pipe and the catalyst, in my case they are not needed - the resonator with the catalytic converter has a rigid flange connection. But I think sooner or later they will also come in handy.
I prepared the tools, lubricant and sealant, there was an extra clamp left over from the last time.
With sin, I unscrewed two stuck bolts from the flanges; the clamp on the muffler came off easily, since it lubricated the threads even when replacing the muffler. During removal, the resonator flange completely came off - it was already held on “by snot.”
I had to unhook the muffler to disconnect the pipelines; the fastening belt broke, but fortunately I have a spare repair kit, also from last time.
The catalyst honeycomb is visible.
Just for fun, I decided to measure the thickness of the metal pipe of the new resonator - it is about 1.5 mm.
They look well made, the seams are from an automatic machine, for some reason the article number comes from a “six”, although it seems like no injectors were installed on them.
Before reassembling, I lubricated the joints with a thin layer of graphite paste.
During installation, a problem immediately arose - the bend of the muffler began to rest against the bottom of the car - this is the geometry.
I tried this way and that, but still something stuck somewhere - either in the handbrake cable bracket, then in the cable itself, or in the shock absorber.
There was no autogen, to heat it and bend it, I had to cut off a couple of centimeters from the tip of the resonator pipe with a grinder.
Somehow we managed to move it a couple of centimeters away from the bottom. Before the final tightening, I also lubricated all the bolts with copper grease, and on top of that with graphite grease, and installed new engravers.
I also lubricated the wire securing the muffler belt with pushsal, since everything there also rusts and you have to tear the belt with a mounting tool or saw it.
Upon inspection, it turned out that siphonage was coming from the new resonator at the place where the 2 halves were welded from a small hole of half a millimeter. It was discovered by the condensate coming out - such is the quality of production, they don’t even check the tightness of the seams.
I didn’t have time to drip it with electric welding or cover it with epoxy, I’ll fix it next time.
Subscribe! Good luck on the roads!
Why do they install forward flow?
The absence of partitions in the muffler provides a “growling” engine sound characteristic of sports cars. Therefore, a direct-flow muffler is often installed when “sporting” VAZ tuning. But there is another aspect. The partitions in the muffler not only reduce noise, but also prevent the free exit of exhaust gases and the pistons have to “push” them out of the cylinders. This reduces engine power by 10-15%. Accordingly, installing direct flow allows you to increase power, which is important for sports tuning, for example, for drag racing. Those who prefer “manual” finishing of their car make direct flows themselves.
What is needed to make a direct flow on a VAZ 2107
Making a direct flow yourself requires minimal plumbing skills and knowledge of how to make a forward flow on a VAZ 2107. You can make a forward flow in several ways. All of them can be divided into two categories: remaking an old muffler and making a direct flow “from scratch”. If you are going to convert the standard muffler of the “seven” to direct flow, before starting work you should stock up on the following devices and materials:
- pipe with a diameter of 52 mm;
- metal devices for cleaning burnt dishes (metal sponges), of which you will need about 50 pieces;
- angle grinder (“grinder”);
- circles for cutting metal;
- welding machine;
- set of locksmith tools.
To make forward flow on a VAZ 2107 with your own hands, you will need the following set of tools and materials:
- two flanges 130/42 millimeters;
- two pipes of similar diameters with a wall thickness of at least 2 mm;
- asbestos fabric, mineral wool or other fire-resistant sound-absorbing material;
- Bulgarian;
- drill;
- welding machine.
How to repair a muffler with your own hands
Before you begin repairing the muffler, you need to evaluate the feasibility of these actions. Not every car owner has the skills to work with a welding machine. In addition, the muffler cannot always be properly repaired - in cases of severe burnout, it is best to immediately replace it with a new one.
Reasons for failure
Most often, mufflers on the VAZ 2106/2107 lose their functionality for the following reasons:
- mechanical damage while driving on uneven roads, impacts;
- rapid changes in temperature conditions, especially in winter, when it is cold outside, and inside the case there are very high temperatures due to exhaust;
- impurities in gasoline that come out along with exhaust gases and affect the condition of the metal surfaces of the muffler.
It is unsafe to operate a car with such damage to the muffler.
However, how urgently do you need to repair the muffler if you suddenly notice some damage to its body or black exhaust from the pipe? What are the dangers of operating a Zhiguli with a burnt out or deformed muffler?
Firstly, if there are holes in the body of any element, then the generated gases will enter the cabin. The main danger is that the exhaust is colorless and odorless and cannot be felt. In this case, the driver begins to experience headaches, nausea and dizziness. If you stay inside a car with the engine running for a long time, you can lose consciousness and even die.
Secondly, if the exhaust system does not work properly, engine power is reduced. This is especially noticeable when accelerating, starting from a standstill, or overtaking.
Thirdly, if the plug is faulty, the engine begins to consume a lot of gasoline. The carelessness of the car owner will lead to the fact that the muffler will work worse and worse, and the displacement per 100 km will increase.
How to weld a muffler
Most often, the muffler loses its tightness and therefore cannot work normally. In this case, holes can appear both on the pipes themselves and on the welds.
It is recommended to clean the weld seam and paint the work area with heat-resistant paint
Using a welding machine and metal patches can be considered the most reliable way to repair mufflers.
In order to weld a “muffler”, you need to prepare electrodes of a suitable size (it all depends on how large the hole is burned in the muffler) and a sheet of metal of the required size. After which it is recommended to carry out welding as far as possible from the edge of the holes, since the thinned edges of the metal can quickly collapse:
- Clean the torn edges of the muffler from rust and dust.
- Degrease the metal with a solvent.
- Apply a metal patch to the body and grab it in several places around the perimeter of the hole.
- After this, you can begin to apply full welds.
- After the seams have hardened, it is recommended to clean the slag with a wire brush.
It is recommended to apply welds carefully so as not to burn through the muffler body
How to change the gasket
There is a reinforced gasket between the main muffler and the resonator part. Its purpose is to prevent the resonator from heating, so it is made of heat-resistant metal.
After dismantling the muffler, it is recommended to change the gasket. This does not take much time, since the element is inserted into the muffler pipe and clamped between its parts.
How to replace hanging rubber bands
This is perhaps the simplest procedure in repairing Zhiguli mufflers. The rear part of the pipe is attached to the body with three hanging rubber bands. During the ride, some of them may get lost or seriously deformed.
To change these rubber bands, you just need to drive the car into an inspection hole or overpass, remove the old products and install new ones in their place. Some car owners change suspension rubber bands without an overpass, simply crawling under the body from the rear left side.
Video: changing the resonator and muffler on a VAZ 2106/2107 car
The muffler in classic VAZ cars cannot, of course, be called a durable element. However, it is up to the owner to carry out the necessary repairs in a timely manner or change the plug if necessary. Moreover, the procedure is simplified as much as possible by the design of the VAZ 2106/2107 themselves. Therefore, any work on the muffler can be done with your own hands in a garage.
What muffler can be installed on the “seven”
There are 4 options for replacement:
- Standard VAZ 2101-2107 muffler made of ordinary steel with anti-corrosion coating. The plus is the low price of the product, the minus is the unpredictable duration of work. When purchasing, it is quite difficult to evaluate the quality of the metal and workmanship, unless the welds are made completely carelessly.
- Factory section made of stainless steel. The option is not cheap, but durable. The main thing is not to buy a fake made from cheap Chinese metal.
- The so-called direct-flow sports muffler, manufactured in a factory.
- Weld the outlet element of the desired design yourself.
Standard mufflers are made of ordinary metal with an anti-corrosion coating.
If you do not have welding skills, the fourth option is automatically eliminated. All that remains is to choose between stock and sports parts.
A straight-through muffler differs from a standard muffler in the following ways:
- shape - round, outlet of larger diameter;
- design - inside is a straight perforated pipe, lined with fireproof sound-absorbing material;
- the operating sound is low-frequency, louder.
The factory-made forward flow is painted on the outside with heat-resistant paint, the pipe outlet is equipped with a decorative nozzle.
The resistance of the forward flow is significantly less than that of the factory model of the muffler. The design makes it possible to ventilate the cylinders more efficiently and increase engine power by up to 5 hp. With. A side effect is a higher noise level, which brings pleasure to fans of extreme driving.
The stock design muffles noise due to several internal partitions and additional perforated pipes, causing gases to change direction and be reflected repeatedly from obstacles. Hence the high resistance of the element and a small drop in power.
VAZ 2107 replacement of mufflers yourself
In a conventional element, sound and gases change the direction of movement several times; in a direct flow, they are dissipated through the perforation of the pipe
It is not difficult for a car enthusiast who owns a welding machine to make a forward flow independently:
- Make a round tank from sheet metal (you will need rollers) or select a ready-made can from another car brand, for example, Tavria.
- Place a perforated pipe inside, having previously drilled many holes with a diameter of 5-6 mm.
It's easier to make slits in a pipe, but it's better to spend more time making the holes - Fill the cavity between the straight channel and the walls tightly with non-flammable basalt fiber.
- Weld the end walls and supply pipes.
A curved element from an old muffler is perfect as an inlet pipe. If desired, the direct flow can be made double - then the noise level will decrease - At the required points, attach 3 fasteners corresponding to the standard hangers.
You can refine the outlet pipe using a nickel-plated decorative nozzle. The choice of products in size and shape is extremely wide, the prices are quite affordable.
Exhaust System Mounting Parts
A clear understanding of the algorithm of actions when carrying out such an event as replacing a VAZ 2107 muffler will help every car enthusiast carry out his plans quickly and without errors. On the one hand, removing the old muffler and installing a new one seems simple, but on the other hand, you need to be prepared for some difficulties.
Why and how often is it necessary to change the VAZ 2107 muffler?
The exhaust system of a car, despite its relatively simple design, performs many functions. The main ones are:
- removal of fuel combustion products;
- significant reduction in exhaust sound level;
- maintaining air balance with the intake system;
- ensuring effective cleaning and ventilation of cylinders.
The VAZ 2107 muffler experiences enormous loads like no other part of the car. First of all, constant temperature changes have a destructive effect on the metal, which actively destroys not only the protective paint and varnish coatings, but also the structure of the metal itself.
Gases heated to a high temperature literally “eat up” the internal filling of the muffler, mixing with water condensate and oils, dissolving the metal walls, forming through corrosion. Externally, the muffler elements are also adversely affected by moisture, road sand and gravel; salt solutions in winter intensify the decomposition process.
As a result, after some time the driver can observe under the bottom of the car the pitiful remains of what was once called a muffler. Whether we like it or not, the muffler of a VAZ 21074 or any other model will have to be changed periodically. To the question of how often you should change the muffler, every car enthusiast must find the answer himself.
The service life of an exhaust system, like many others, depends on factors such as:
- activity of vehicle operation;
- quality of fuel used;
- the car owner’s attitude towards the condition of the car;
- frequency of use of the machine in adverse weather conditions;
- quality of previously installed exhaust system parts.
Having come to terms with the fact that the VAZ 2107 muffler will not last forever, you need to buy a new one and start replacing it.
Replacing the VAZ 2107 muffler - procedure
An inherently simple procedure can take a lot of effort and time. Before installing a new muffler, you must remove the old one. To do this you should:
- install the car on an overpass or above an inspection hole;
- prepare a set of tools, ensure good lighting under the machine;
- The muffler is connected by a pipe to the resonator pipe in front of the rear axle. The ends of pipes with a slot and a male-female connection are tightened from the outside with a coupling;
- Corrosion under the influence of lubricant and temperature can solder the joints so much that it becomes very difficult to remove them. It is better to moisten the pipes at the junction and the coupling in advance with a solution that corrodes corrosion. For this purpose, as a last resort, brake fluid or used oil is suitable.
The procedure for replacing the muffler is as follows:
- the crimp coupling is untwisted or cut off using a cutting tool (grinder) (in this case, a new coupling should be on hand);
- use a thin chisel or screwdriver to bend the flared edges of the pipe;
- the muffler is disconnected from the resonator (if it comes out tight, you can help yourself with a hammer by tapping on the pipe);
- hanging pillows are detachable. By the way, when buying a muffler, it is advisable to buy three suspension rubber bands (two in the center and one at the rear).
After this, the old muffler is in your hands and you can install the new one in the reverse order.
How to replace the muffler of a VAZ 21074 and other modifications of classics
Very often, car enthusiasts, seeing in the title of the article that the make of the car does not exactly match what is indicated in the registration certificate, continue to search for instructions. VAZ cars are charming because they differ from each other for the most part only in appearance, but the internal structure is completely identical.
It doesn’t matter what kind of car is in the garage: 2105, 2104, 2107 or 21074 - their exhaust system is completely the same. Having studied the repair instructions for one car, you can safely begin repairing another classic model.
Price issue
Is it worth tuning the exhaust system for domestic car models? And how much will it be? You can hear from many experts that such tuning work can increase the power of your engine by about 8-10 horsepower. Moreover, this figure is not related to the place of engine production; you won’t be able to add many horses on foreign cars either. For more serious performance, you need to install a turbocharger, but we will talk about this later.
Exhaust system tuning – do you need it?
To determine the approximate cost of tuning, we collected average prices for the necessary parts. For example, a collector will cost you about $140, a corrugation - $20-25, a resonator - about $30, a muffler - $150-250 (depending on the manufacturer). The cost to install these components at a service station is $100. In total you will spend 400-500 dollars. If you are the happy owner of a VAZ-2109 or 2107, then it will cost you about $70 for everything, but with foreign cars the situation is different. Therefore, before tuning, think: do you need this lion's roar of the car?
Video - Replacing the exhaust system on a Mitsubishi Lancer. Tuning
- Sort:
- Name
- Price
- Bestsellers ↑
- Customer ratings
- Date added
- In stock
As practice shows, in most VAZ cars the factory equipment does not suit the owners. Users improve their cars in various ways by tuning systems. If the goal is to increase engine power, then the exhaust system should also be improved.
It is not possible to build a powerful engine if its exhaust system remains factory, the air leaving the engine (exhaust gases) meets resistance in the manifold, then in a narrow pipe, in the catalyst and finally in the muffler; a properly built exhaust system adds a lot of horses!
The approximate cost of the entire system for a front-wheel drive VAZ costs from 4,000 to 8,000 or more TR. depending on the muffler.
Tuning the exhaust system is a rather complex process. Tuning must be carried out so that the shock waves propagating in the pipes return to the outlet valve in the form of a significant pressure surge. Such an action is always followed by a rarefaction front. In this regard, it is necessary to ensure that the vacuum front is at the right time and in the right place. To organize such a process it is necessary: • Take into account the width of the overlap phase. The width of the phase depends on the revolutions - the higher they are, the wider the phase is required. If the phase was set to less than 70°, then this will not lead to noticeable changes. • Secondary pipe length adjustment. It will be necessary to prevent the simultaneous appearance of a rarefaction pulse and a reverse atmospheric pressure pulse at the pipe connection point. The exhaust, when properly configured, will add power to the car. One of the main nuances of tuning this system is the use of flexible connections. In their absence, there is a risk of system failure due to regular breaks in the suspension elements.
The Seven, like all cars, includes an exhaust system. The main purpose of the exhaust system of the VAZ 2107 is to not only remove exhaust gases to the rear of the car, but also to reduce the noise level. The fact that there are problems in the system is indicated by such signs as the appearance of extraneous noise under the bottom of the car.
Features of replacing the rear muffler on a VAZ 2107-2105
Usually, if you bought a car from scratch, then the factory muffler and other parts of the exhaust system can easily last at least 70,000 km, which has been verified by personal experience in operating many domestic cars. And after installing another one, bought in a store, a constant problem with burnout begins, even after less than 20 thousand km. If this is your first time performing this procedure, then I think that the instructions I made will help you with this.
To make this repair as quick and convenient as possible, it is better to use all kinds of tools, including sockets and ratchet handles, a list of which I will list below:
- 13 open-end or socket wrench
- Deep head for 13
- Ratchet handle
- Pliers
- Hammer
- Flat head screwdriver
Since the bottom of the car and the exhaust system of the VAZ 2107 and 2105 are constantly exposed to environmental substances, water, snow, and all kinds of reagents, unscrewing the fastening nuts can be very problematic. Therefore, it is better to first spray the connections with a penetrating lubricant, such as WD-40. Personally, I use Ombra lubricant, just like the tools from this company, and I am completely satisfied. This is what a can of this thing looks like:
When the bolts have become slightly acidic, you can try to unscrew them, first using a regular wrench to rip them off at the junction of the muffler and the resonator:
And then it’s best to use a ratchet, since you can unscrew everything with it in half a minute:
When the nuts are unscrewed, it is necessary to move the clamp to the left so that it does not interfere with us during further work. Next, we try to slightly push the edges of the muffler with a flat screwdriver, approximately as shown in the photo below:
Then you can knock the muffler off the resonator with hammer blows:
After which you should get something like this:
Next, it remains to free the muffler from the hanging rubber bands, two of which are located in the center:
And one rubber band is located at the very back of the muffler; there you first need to pull out the cotter pin with pliers, or a nail, since for many owners it is this that performs the function of a cotter pin:
Now you can freely remove the muffler from the car, since nothing else holds it:
Replacement is carried out in reverse order. If you are interested in the price of a new muffler for the VAZ 2107 and other classic models, then it is approximately from 500 to 1000 rubles, depending on the place of purchase and the manufacturer. But I don’t recommend buying a cheap one, since it may not last even 15,000 km, and the noise from it will be simply terrible!
Let's look at tuning in theory
So, you have finally decided to make some adjustments to the operation of the exhaust system. There are quite a lot of advantages to this. It’s worth starting, perhaps, with an audit that will be carried out during tuning. In addition, this way you can show your imagination. But don’t forget that tuning the exhaust system at home is not always easy, it’s not like changing a tire, you need to think about it. Of course, there are different types of tuning, which we have already mentioned, depending on which the amount and complexity of the work may vary. If the car owner decides to stick with the usual replacement of the exhaust pipe trim, then performing this operation will not be difficult for him. But we will consider a more complex option, in which the exhaust sound changes and the car’s power is increased.
This issue must be approached wisely
You need to approach this issue wisely, having studied the issue from all possible sides. Make a detailed plan, writing down on a piece of paper all the planned replacements. If we talk about the most optimal option, then this would be dismantling the manifold, converter and all other parts of the muffler of your car. Take all necessary measurements and record the data. If you were unable to obtain measurement data, then you can use the Internet and, by entering the model of your car, find all the information on this issue. After this, you can start tuning.
How the VAZ 2101-2107 exhaust system works and works, repairs and modifications
The exhaust system of a car has a special function - to remove waste gases from the engine. As you know, fuel after combustion leaves gases that must be completely released. The faster and better this process takes place, the higher the efficiency of the power unit. The gases first move in the direction of the exhaust pipe of the VAZ-2107 exhaust system, and then exit through the muffler. A hermetic seal is placed between the exhaust manifold of the internal combustion engine and the exhaust pipe, which prevents leakage of exhaust gas under the hood of the car. In some cases, instead of a gasket, corrugation is used to reduce vibrations. However, installing it is already a matter of tuning, adjusting all other elements of the system to the required parameters.
What's in the exhaust system?
The exhaust of the “seven” consists of several main parts: the exhaust manifold, the exhaust pipe, the resonator and the muffler. In addition, there are additional elements: rubber fasteners, flanges, seals.
The VAZ-2107 exhaust system includes the following elements: 1. exhaust manifold gasket; 2. exhaust pipe (pants); 3. bracket for fastening to the gearbox; 4. clamps for connecting pipes; 5. front resonator (first additional muffler); 6. rear resonator (second additional muffler); 7. main muffler; 8. Rubber suspension mount or cushion.
Exhaust system VAZ-classic
Let's take a closer look at the main parts of the exhaust system.
An exhaust manifold made of good quality metal (sometimes replaced by tuners with steel.) This part of the exhaust system has the function of collecting exhaust gases. It is a unit of several cylinders or tubes. It is made on VAZ-2107 from cast iron. One side is attached to the exhaust pipe, the other to the engine. During operation of the machine, the exhaust manifold is subjected to heavy loads, since due to its design features it operates in extreme conditions. Gases tend to heat up to a temperature of a thousand degrees, and after stopping the engine, they cool sharply, which inevitably leads to the formation of condensation. Corrosion appears on the collector. Thus, the exhaust manifold is responsible for: • removing exhaust gases from the engine chambers; • for filling and purging the chambers.
The operation of the exhaust manifold is inextricably linked with resonance. During the operation of the engine - the combustion of the fuel-air mixture - strong pressure is generated, which is used to circulate gases. The pressure or pressure wave flows back into the cylinders, thereby helping the next portion of gases escape. The higher the engine speed, the more pressure is created and the faster the exhaust gases escape.
Downpipe
“Pants” - this name was given to this part for the characteristic shape of the exhaust pipe receiving gases coming from the engine exhaust manifold. The exhaust pipe is also an integral part of the exhaust system. It is located after the exhaust manifold, in front of the resonator. Made from durable metal, tuned models include corrugated parts. The receiving pipe of injection machines is different.
The exhaust pipe of the exhaust system is “pants”, this one is for carburetor cars
The “pants” on the VAZ-2107 quite often fail. This occurs mainly due to environmental influences. The same condensate formed as a result of temperature fluctuations negatively affects the metal components of the pipe. In addition, in winter in Russia, roads are sprinkled with compounds containing salts and various chemicals. They also have a bad effect on the exhaust pipe body. On the VAZ-2107, trousers are made from ferrous metal at the factory. However, you can independently replace the model with modernized analogues.
-The best choice is a receiving pipe made of stainless steel. It is, however, expensive. But there are a lot of advantages: resistance to corrosion and long service life. -Aluminized version of the pants. It is made of ordinary steel, but coated with aluminum. The service life of such products is more than five years (a standard pipe can burn out after two years). Additionally, they can be equipped with corrugated spacers.
Main muffler - device and types
The factory-made element is made of refractory “black” steel and coated with a layer of anti-corrosion paint. The part consists of 3 parts:
- front pipe, curved to bypass the rear axle;
- three-chamber muffler tank with a system of partitions and pipes inside;
- outlet pipe with a bracket for mounting a rubber cushion.
The original Zhiguli mufflers are made of refractory steel with anti-corrosion protection.
The mufflers sold today for the “classics” are not reliable - spare parts are often made of second-rate metal and burn out after 15-25 thousand kilometers. It is quite difficult to identify a low-quality part when purchasing; the only way is to visually check the quality of the welds.
In addition to the factory version, other types of mufflers can be installed on the VAZ 2104:
- element completely welded from stainless steel;
- sports (direct-flow) option;
- a homemade section with a round cistern made from a thin-walled iron pipe.
The factory direct flow is externally distinguished by the shape of the body, a heat-resistant black coating and a decorative nozzle instead of a regular pipe.
An exhaust element made of stainless steel will cost 2-3 times more than the factory part, but can last up to 100 thousand km. I was convinced of this personally when I bought and installed a stainless exhaust system on my VAZ 2106 - the design is identical to the exhaust tract of the V4. I happily forgot about the pipe burnouts for several years.
The direct-flow type of muffler differs from the standard part in its operating principle. Gases pass through the perforated pipe and do not change the direction of movement, the resistance of the section is zero. Result: it is easier for the engine to “breathe”, but the noise is suppressed less well - the operation of the motor is accompanied by a rumbling sound.
The main difference between forward flow is the minimal resistance to the passage of gases, which gives an increase of 3-5 liters. With. to engine power
If you are “friendly” with a welding machine, the factory version of the muffler can be modified or the element can be made from scratch. In home-made products, the principle of direct flow is implemented, since welding a flat tank with partitions is much more difficult - it is easier to buy a ready-made part. How to make a main muffler with your own hands:
- Select pipes for the outer casing and direct-flow channel. As a tank, you can use a round muffler from a Tavria, or take a curved front pipe from an old section from a Zhiguli.
- Make an internal perforated pipe by drilling holes Ø5-6 mm and making through slots with a thin circle on the metal.
Perforation in the form of holes and slits is performed to allow the passage and further absorption of sound vibrations - Insert the pipe into the casing, weld the end caps and external connecting pipes.
- Fill the cavity between the tank body and the direct-flow channel with non-flammable kaolin wool or basalt fiber.
It is better to use non-flammable kaolin wool or basalt fiber as a noise absorber - Seal the casing cover by welding and install 3 eyes for rubber hangers.
The final stage of manufacturing is painting the part with a heat-resistant composition. After installing any muffler - factory or homemade - the protruding end of the pipe can be refined using a decorative nozzle, fixed from the outside with a locking screw.
The nuances of muffler repair
The muffler of “classic” VAZ cars, according to the manufacturer’s recommendations, cannot be repaired. If a malfunction occurs in any element of the exhaust tract, the part must be replaced with a new one.
In fact, motorists often prefer to repair holes burned in the muffler - the most common defect - by welding.
The occurrence of “fistulas” is indicated by a change in the sound of the engine and the appearance of smoke from under the car. To troubleshoot, place the machine on a platform and inspect the elements of the exhaust system.
If the cause is a burnt gasket, remove the muffler and replace it. When you have an assistant, you can do without removing all elements of the system. Proceed in the following order:
- Unscrew the pipe fastening to the gearbox.
- Unscrew the nuts securing the exhaust pipe to the manifold.
- Together with an assistant, pull the “pants” off the pins while simultaneously rotating the bend of the resonator pipe.
- Replace the gasket, install the pipe in place, tighten the fasteners.
Replacing a burnt muffler gasket eliminates extraneous sounds from the engine
A welded muffler usually lasts less than a new one. But welding is also cheaper than buying. Usually, if it is necessary to repair a muffler by welding, they turn to professionals. If you have the equipment, you can do the work yourself. For this you will need:
- welding machine;
- blanks for patches made of sheet metal 1–2 mm thick;
- a piece of pipe of the same diameter as the failed one;
- grinder with cutting disc for metal;
- metal brush;
- sandpaper;
- heat-resistant paint for metal.
To repair the muffler, follow this sequence:
- Remove the muffler from the vehicle.
- Using an external inspection, determine the location of the malfunction and the extent of the damage.
- If there is a large hole in the muffler body, evaluate the condition of the internal parts. It is possible that repairing the external surface will not bring the desired restoration of the functions of the muffler without replacing the internals. In this case, it is advisable to contact professionals or simply replace the faulty part with a new one.
- Cut out the burnt area. From the blank, make a patch larger than the damage. Weld the patch over the hole with a continuous seam.
- If there is damage at the junction of the pipe and the muffler body, cut out the defective area, replace the damaged part of the pipe, and weld the repaired pipe to the muffler with a continuous seam.
- Clean the repaired muffler from dirt and rust, paint the part with two layers of heat-resistant paint.
MALFUNCTIONS AND REPAIR OF THE RESONATOR
Resonator malfunctions include:
An annoying knock coming from under the car's bottom is usually the result of a loose exhaust pipe beating against the body and other components. The reason for this is the rubber fasteners, which wear out and stretch over time and cannot provide rigid fixation of the exhaust tract when moving. The problem is solved by replacing these fasteners.
Black soot indicates burnout of the resonator tank
Typically, exhaust tract hangers last much less than the pipe itself. Check the condition of the rubber bands at intervals of 10 thousand km; if cracks are found, immediately install new suspension mounts.
Other problems can be resolved in the following ways:
If there is a slight burnout, you can try welding the resonator tank directly on the car
Car enthusiasts with experience in welding can make a resonator tank with their own hands. To do this you should: