The choice of a new belt for auxiliary units, its removal, as well as the dismantling of the generator on a car such as the Lada Largus largely depends on the configuration.
Therefore, you first need to understand which version of the domestic station wagon we are talking about specifically in your case, and then choose the appropriate algorithm of actions.
Considering the difference between generator belts, as well as the different approaches to removing and installing generating devices, there will not be universal instructions for all occasions. Each situation must be considered separately.
What is the service life of the standard alternator belt on Lada Largus?
The alternator belt is a consumable item that must be replaced periodically. This is true not only for the Lada Largus, but also for all other cars with such a component in the engine compartment. The only difference is that the belts themselves have some differences, and can also serve for different periods of time.
AvtoVAZ, acting as the manufacturer of the Lada Largus, advises not to rely on whether the car has an 8 or 16 valve engine. It's better to rely on the package. Regarding the replacement of the drive belt of auxiliary units, AvtoVAZ gives the following recommendations on timing, depending on the equipment:
There is power steering, but no air conditioning. In this case, the interval between replacements should be 4 years or 60 thousand kilometers traveled. Whichever comes first.
There is power steering and air conditioning. Oddly enough, in this case the life of the belt increases to 120 thousand kilometers.
We must not forget that the belt may wear out ahead of time. Here, focus on the current state of the consumable. If you hear a characteristic whistle, and defects, cracks and tears are visible on the surface of the belt, then in this case the consumable must be replaced. Even if very little has passed since its installation. There is either a problem with the quality of the installed part, or the operating rules have been violated; there are factors that influence accelerated wear of the belt. They need to be found and eliminated so that the same thing does not happen to the new belt.
Diagnostics
In the case of scheduled maintenance according to the regulations established by the Togliatti automaker, as well as upon contact when signs of a malfunction of the generator drive and/or timing belt appear, first of all, diagnostics are carried out by the technicians.
The conversation is primarily about visual inspection. The engine is checked for traces of leakage of certain fluids, especially engine oil, and the condition of the generator drive is assessed (in some cases, additionally the drives of the power steering pump and air conditioning compressor). To check the condition of the timing belt, it is necessary to partially disassemble the engine
Attention is drawn to the presence of traces of deformation, various liquids, damage
The regulations indicate that it is necessary to check not only the condition of the belts, but also the degree of their tension. For this purpose, our specialists use instrumental diagnostics. Depending on the situation and type of belt, mechanical devices are used (their operation is based on the principle of a dynamometer; the force applied to bend and retract the belt is measured and compared with factory parameters) and electronic (high-frequency sounds are measured). The experience and skills of the craftsmen make it possible, if necessary, to use traditional methods of visual assessment of the degree of belt tension.
Price list for spare parts from 05/18/2020
Watch on the website Online
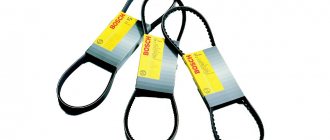
Which belt to use
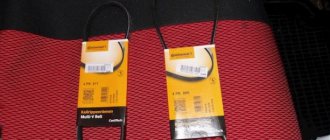
AvtoVAZ and Renault have made life somewhat more difficult for car owners. After all, there is not one universal belt. The choice depends on the engine, as well as on the power steering and air conditioning. That is, from their presence or absence.
To help you make your choice so that you can finally start replacing the alternator belt on your Largus, listen to the following recommendations.
- Without air conditioning and power steering with an 8-valve engine. In this case, a four-ribbed belt of the 4PK715 series will be required.
- Without air conditioning and power steering with K7M engine. Here look for a five-ribbed belt 5РК, the length of which is 1110 mm.
- With power steering, but without air conditioning and with a K4M engine. This is a 16 valve engine. Here you need a 6RK six-ribbed poly V-belt with a length of 1200 mm.
- With power steering and air conditioning and an 8 and 16 valve engine. A 6-strand element 6РК is again required, but with a length of 1820 mm.
- Without power steering, but with air conditioning and an 8-valve internal combustion engine. In this situation, a 6-ribbed 6RK belt is also used, but its length should be 837 mm.
As you can see, installing a new alternator drive belt on Largus cars with 8 or 16 valve engines is not as difficult as the process of selecting the appropriate spare part itself.
Although in practice everything is not so difficult. It will not be difficult for you to determine what kind of engine is under the hood, and also remember whether you have power steering and air conditioning.
PRODUCT NUMBER ONE
You can probably handle replacing the air filter on both modifications. Considering that the cover is attached with self-tapping screws, we recommend that before installation you feel for the entry of the thread: after turning the fastener counterclockwise, catch the gap and only then turn it clockwise. This way it will be possible to preserve the thread, and therefore the body itself, for many years.
Neither a fuel nor a cabin filter is provided - a huge minus. If you can live carefree without the first, as the experience of using Logans shows, up to 200 thousand km, then sometimes you can’t do without the second on our dusty roads. “Garage workers” propose to embed a filter from a Nissan-Micra (or Renault-Modus) into the body of a standard heater, cutting through a window 150 × 38 mm (ZR, 2008, No. 9). Most likely, this technology will also take root at AVTOVAZ official dealers. But why doesn't the plant improve the heating system?
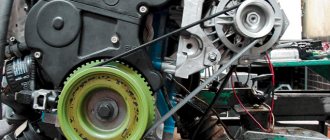
Replacing the belt on Largus
Removal, as well as installation of a new alternator belt in the case of such a car on the Lada Largus, equipped with an 8 or 16 valve engine, must be carried out according to the instructions. No amateur activities, as this can lead to serious and unpleasant consequences.
First, dismantling is carried out, then a new part is installed, after which tensioning is performed. You only need to tighten the belt if the configuration does not include an automatic tensioner. And this one is available in a version with air conditioning and power steering at the same time.
As for replacement, the algorithm is as follows:
- remove the dirt protection panel on the right side of the engine;
- take a socket wrench or a 13mm socket;
- grab the tensioner bolt and rotate clockwise;
- rotate until the hole in the bracket aligns with the recess in the body;
- hold the key in this position and insert a metal rod with a diameter of about 6 mm into the aligned holes (you can take a hex key of the appropriate size);
- fix the tensioner in this way;
- now there is no tension on the belt, and it can be easily removed;
- At the same time, check the condition of the support and tension rollers;
- Next, arm yourself with a new suitable belt;
- put it on the units, observing a certain sequence;
- lay the belt over the pulleys and then slide it under the tension roller;
- Finally, the belt should be placed under the support roller;
- remove the clamp inserted into the holes;
- Now the tensioner just has to put the load on the new belt;
- Using a 18mm wrench, turn the crankshaft several times;
- make sure the belt is installed correctly;
- Replace the mudguard.
If the equipment does not include an air conditioner, then during dismantling you will need to turn the tension bolt counterclockwise. This will release the tension and allow the worn element to be removed.
Pay attention to how many rivulets there are on the pulleys and on the belt itself. If the pulleys have 6 grooves, and the belt itself goes on 5, then the installation must be done by placing the belt closer to the outer edges on all pulleys. At the same time, the internal stream will remain free.
Downloading a book
After successfully completing the payment (by any method) and returning to the KrutilVertel store from the payment system website, you will be taken to the successful payment page:
The book you purchased will be in your personal account, from where you can always download it.
Please note that after making the payment, you need to return back from the payment system website to the KrutilVertel website. If for some reason you did not return back to the site and closed the payment system tab with a message about the successful completion of the payment, please let us know - we will send you a letter indicating access to download the book
If for some reason you did not return back to the site and closed the payment system tab with a message about the successful completion of the payment, please let us know - we will send you a letter indicating access to download the book.
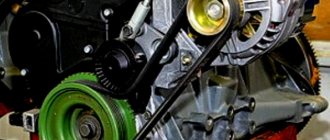
Drive belt tightening for Lada Largus
The installation diagram and location of the generator belt suggests that the Largus system automatically, that is, independently, tensions the element. This means that no additional interventions or manipulations are required.
This only applies to trim levels with air conditioning and power steering. You really don't have to do anything here.
If you have a different configuration, then you will still have to tighten the alternator belt yourself.
But first you need to understand that the part generally needs tightening. In general, to check the tension, the official instruction manual states the need to use a strain gauge tester. The only problem is that such equipment is available only at dealerships. There is absolutely no point in looking for and buying it for personal use. Here you can resort to another method. Namely:
- remove the mudguard from the engine;
- move under the car, which needs to be hung on a lift or placed over a hole;
- press on the lower branch of the belt so that it bends by 7-8 mm;
- if the belt moves easily, the tension is weak;
- loosen the 2 bolts securing the tension element bracket;
- turn the adjustment screw counterclockwise;
- achieve the desired tension level;
- tighten previously loosened bolts;
- Try not to tighten the part too much, as this will cause it to fail prematurely.
This completes the tightening. Check the result of the work done in action.
Take off777777777ok
Mounting points for the mudguard and fender liner: 1 — screw with a Torx T-27 key for general fastening of the mudguard and fender liner to the wheel arch; 2 — two Torx T-20 screws for general fastening of the mudguard and fender liner to the wheel arch and fender; 3 - Torx T-20 key screw for fastening the fender liner to the wing; 4 — four self-tapping screws “8” for fastening the fender liner to the wheel arch; 5 - four Torx T-20 screws for fastening the fender liner to the front bumper. Mounting points for the mudguard and fender liner: 1 — screw with a Torx T-27 key for general fastening of the mudguard and fender liner to the wheel arch; 2 — two Torx T-20 screws for general fastening of the mudguard and fender liner to the wheel arch and fender; 3 - Torx T-20 key screw for fastening the fender liner to the wing; 4 — four self-tapping screws “8” for fastening the fender liner to the wheel arch; 5 - four Torx T-20 screws for fastening the fender liner to the front bumper.
We install a height-adjustable stop under the engine oil pan so that it takes on the weight of the engine.
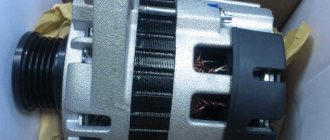
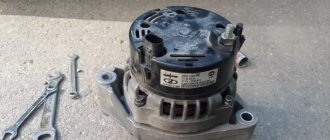
Removing and replacing the generator
Removal of the generator, with or without air conditioning, is required only in case of repair or replacement of the generating device on the Lada Largus model. It is better not to do this unless absolutely necessary.
In this case, you can remove the generator in different ways. This directly depends on the configuration in which the Lada Largus is presented.
The options may be the following, which affect the dismantling and installation scheme:
- K7M engine without power steering and air conditioning;
- K7M engine with power steering, but without air conditioning;
- with power steering and air conditioning;
- K4M engine without air conditioning, but with power steering.
But regardless of the configuration and equipment, before removing the generating device on all versions, you need to do the following:
- install the machine on a lift with a lifting capacity of at least 3.2 tons;
- turn on the handbrake;
- turn off the ignition;
- lift and securely secure the hood;
- disconnect the negative terminal from the battery.
Now each situation must be considered separately. This will clearly allow you to understand exactly how to remove and replace the generating device.
K7M engine without air conditioning and power steering
With this variation of equipment, the dismantling and replacement procedure is as follows:
- remove the front right wheel;
- remove the engine splash guard on the right side;
- remove the front arch skin from the right front wheel;
- remove the protective cap from the nut;
- disconnect the wiring harness from the generator;
- using a 13mm socket, unscrew this nut under the cap;
- disconnect the wire lugs from the existing B+ terminal on the generator;
- cut the old belt and remove it, since it is still not suitable for reuse;
- Using a 10mm socket, unscrew the mounting bolts from the bottom and top that hold the generator to the bracket;
- remove the problem unit;
- replace the tension and support rollers;
- secure the new drive belt;
- tighten the mounting bolts;
- for the bolt fixing the generator to the bracket, use a torque of 21 Nm;
- for wire fastening nut 14 Nm.
At this point the replacement can be considered complete. Check the node for correct operation. If everything works correctly, then complete the full assembly.
K7M engine without air conditioning, but with power steering
Here the instructions will look like this:
- remove the protective cap from the nut, disconnect the wiring harness and unscrew the nut itself with a 13mm head;
- disconnect the wire lugs from the generator terminal B+;
- Unscrew the adjustment bolt and the upper bolt securing the adjustment bar approximately 3-4 turns using a 10mm socket;
- dismantle the front right wheel, remove the mudguard and arch casing;
- taking the head at 10, make 3-4 turns of the lower bolt securing the bar to loosen the belt tension;
- remove the belt itself;
- Using the same head, unscrew the lower mounting bolts that hold the generator on the bracket;
- unscrew the upper bolt connecting to the bracket;
- remove the generating device from the machine;
- reassemble in reverse order;
- for attaching the generator bolt to the bracket, use a torque of 21 Nm;
- for the tension roller adjustment bar mounting bolt, also 21 Nm;
- the generator wire connection nut requires a torque of 14 Nm.
In addition to replacing the belt, you will also need to install a new tension pulley.
Equipment with air conditioning and power steering
This is quite a good package, since here the driver can count not only on easier rotation of the steering wheel due to the hydraulic booster, but also on comfortable conditions in the cabin created by climate control equipment.
As for replacing the generator, the procedure is as follows:
- remove the front right wheel;
- remove the front bumper;
- using a 16mm spanner, turn the tension roller clockwise;
- lock the tension roller using a 6 mm hexagon;
- remove the drive belt;
- unscrew the air deflector fastenings and then remove the reflector itself;
- Using a 10mm socket, remove the upper mounting bolts of the radiator bracket to the body;
- remove the brackets;
- remove the cooling radiator together with the air conditioner condenser from the lower mounts;
- to do this, carefully move it towards the left wing;
- Using a 13mm wrench, unscrew the fastening nut of the generator wire and remove the wire;
- disconnect the wiring harness from the generator;
- taking the head 10, unscrew the fastening bolt that holds the generating device;
- use the same head to unscrew the lower fastening and remove the generator from the car;
- perform assembly with a new device in the reverse order;
- tighten the bolt securing the generator to the bracket to a torque of 21 Nm;
- the wire fastening nut requires a torque of 14 Nm.
This is not to say that the procedure is easy. Some people are scared by the fact that it is necessary to remove the front bumper and radiator. Yes, here the scheme turned out to be not the most convenient. Although in reality, almost every Lada Largus owner, having theoretical knowledge and at least a little practical experience, will be able to cope with the task.
If you are afraid to take risks or are not confident in your own abilities, then it is better to send your Lada Largus to a specialist car service center.
K4M engine without air conditioning, but with power steering
In the case of this configuration of the domestic Lada Largus station wagon you will need:
- remove the front wheel on the right side, remove the mudguard and remove the alternator belt;
- unscrew the nuts securing the fuel rail protection, and then remove the protection;
- disconnect the fitting from the fuel rail pipe;
- Using a 13mm wrench, unscrew the nut securing the generator wire and remove the wire itself;
- disconnect the wiring harness connector;
- take the wiring aside;
- Using a 13mm head, unscrew the power steering tube mounting bolt on the cylinder block;
- Use a 10mm head to unscrew the bolt that secures the bracket for fixing the power steering pipeline to the generator;
- remove the bracket;
- unscrew the upper mounting bolt of the generator using a 10mm socket;
- Using the same head, unscrew the lower mounting bolt;
- remove the generator upwards along with the lower fixation bolt;
- perform assembly in reverse order;
- for the bolt securing the generating device to the bracket, apply a torque of 21 Nm;
- a torque of 22 Nm goes to the bolt securing the power steering pipeline bracket to the generating device;
- tighten the generator wire fastening nut to 14 Nm;
- fuel rail protection nut also with a force of 21 Nm;
- install a new belt;
- complete the assembly of all dismantled elements.
Finally the work is completed.
1447430331_4777777
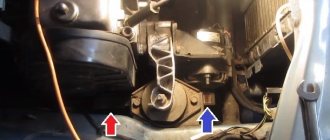
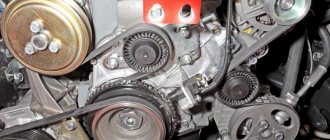
Diagram of the drive of auxiliary units of a car with power steering and air conditioning: 1 - auxiliary drive pulley;
2 - tension roller; 3 — power steering pump pulley; 4 — generator pulley; 5 — air conditioning compressor pulley; 6 — support roller Diagram of the drive of auxiliary units of a car with power steering and air conditioning: 1 — drive pulley of auxiliary units; 2 - tension roller; 3 — power steering pump pulley; 4 — generator pulley; 5 — air conditioning compressor pulley; 6 - support roller
Diagram of the drive of auxiliary units of a car with power steering and air conditioning: 1 - auxiliary drive pulley; 2 - tension roller; 3 — power steering pump pulley; 4 — generator pulley; 5 — air conditioning compressor pulley; 6 - support roller
The tension of the drive belt of auxiliary units of a car with power steering and air conditioning is adjusted automatically by a tensioner.
To replace the belt, remove the right mudguard of the engine compartment.
To loosen the belt tension, from below the car...
Preparatory work
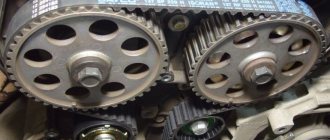
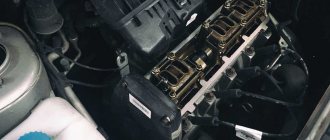
If you forgot when you changed the timing belt on the Largus (16 valves), it’s better to carry out the repair. If you do not want to make the replacement yourself, contact a service station. To repair on your own, you will need to do the following preparatory work:
- Disconnect the negative wire from the battery. This will ensure that your vehicle is fully powered.
- Disconnect the inlet pipe, and then remove the drive belt of the generator and other auxiliary mechanisms.
- The support on the right side of the engine will interfere with you, so it must be removed.
- The protection cover consists of lower and upper halves. They must be removed by unscrewing the mounting bolts.
That's all, the preparatory work is finished. You can begin replacing the timing belt on the Largus (16 valves).
Other disadvantages of the model
The gasoline consumption of the Lada Largus is higher than that of the Kalina station wagon by 1.5 liters, with a weight difference of only 80 kg. Engine vibration occurs as soon as the tachometer needle reaches 1500 rpm. The rpm often jumps or drops to 500. When driving at a speed of more than 90 km/h, the ears begin to pop, like in an airplane during takeoff. This upsets many car enthusiasts, because at these moments they want to stop the trip and get out of the car.
The lack of rear mudguards is a big drawback of the presented model. Ball joints pressed into the arms will make it difficult to repair the suspension in the future. The gap between the fender and the front bumper must be covered with some kind of gasket to maintain cleanliness. Dirt constantly accumulates in this area.
Limited functionality as standard - no ABC or front windows. During rainy weather, the windows constantly fog up; in this case, they need special treatment. In winter, the accelerator pedal freezes, the interior warms up very slowly, and the engine cools down quickly. Pump malfunctions occur when the car's mileage is more than 30,000 km; there are no floor mats in the cabin.
Sources
- https://www.dvigokcomtrans.ru/avto/vaz/vaz_largus/
- https://lada-avtovaz.ru/remont-generatora-na-lada-granta/
- https://expertvaz.ru/lada-largus/problemy-minusy-nedostatki.html
2163-13-12-07
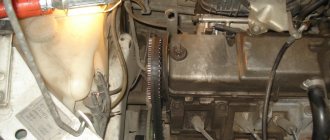
If it is necessary to replace the tensioner (for example, if a spring breaks), use a 13mm socket to unscrew the two bolts securing the tensioner housing...
If it is necessary to replace the tensioner (for example, if a spring breaks), use a 13mm socket to unscrew the two bolts securing the tensioner housing devices...
If it is necessary to replace the tensioner (for example, if the spring breaks), use a “13” head to unscrew the two bolts securing the tensioner housing...
...and remove the tensioner assembly with the roller.