AvtoVAZ, as a domestic manufacturer of passenger vehicles, has a controversial reputation among car enthusiasts. On the one hand, their cars are loved for a relatively low price, and this applies to both the cars themselves and subsequent operation.
On the other hand, this is, in fact, the only thing you can love them for, because in all other characteristics the Lada is hopelessly behind its foreign competitors. At the same time, two decades ago it set the pace of development in some areas and gave a head start to some overseas colleagues. However, the concern itself admits that their creations are not intended to set speed or roadability records. These are cars for every day, which, as they say, are not a pity - they do not lose their visual appeal even after external damage, because they do not have it, and repairing them, as a rule, is not difficult even for a novice car user.
VAZ-2110 is a very common model, especially on the secondary market. It cannot be said that it stands out as something special even against the background of its fellows, but it looks much more fun than the same “seven” or “nine”, which for more than 30 years have not undergone any changes either in the interior or in the technical component. In addition, the “ten” is distinguished by relatively good reliability of its components, and this applies not only to small consumables, but also to spare parts for the gearbox and internal combustion engine. However, of course, it cannot be done without problems: both due to natural wear and tear and as a result of other reasons, various types of breakdowns occur. A common problem on such cars is the need to replace bearings.
Of course, you can go to the nearest service station and ask its technicians to service your “ten,” but replacing generator bearings is not a procedure that requires enormous effort.
If you bring a VAZ-2110 to a service station, it won’t require any effort at all, but it will require a certain amount of money, albeit not that much. However, you can replace these parts yourself, thus not only saving money, but also gaining experience in independently servicing your car, which will undoubtedly be useful in the future.
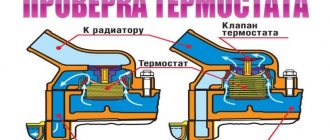
When replacement is required
If you hear creaking and howling while the generator is running, then you have discovered the main sign of bearing failure. The only correct solution is replacement.
Creaking and howling occur due to the fact that the bearing separators lose lubrication, they wear out, and are destroyed as a result of prolonged use under heavy loads.
Sometimes a thin creaking sound can be heard from the generator, which is often confused with bearing failure. In fact, it could be the timing belt pulley or the water pump. Because to make sure, just remove the belt. If the sound remains, then the culprit is the bearing.
What to use
Before you start replacing the bearings on the generator, you need to determine what elements are on your car, as well as what they can be replaced with.
| Bearing | Number | |
| Old generators | New generators | |
| Front | 6302 | 6303 |
| Rear | 6202 | 6203 |
When choosing bearings, pay attention to the hub manufacturers. For VAZ 2110, bearing hubs are produced in the city of Samara and are marked SPZ-4. But there are also Vologda and Saratov hubs marked 23 GPZ and 3 GPZ, respectively. It is not recommended to purchase bearings with unmarked hubs, much less use Chinese generator elements.
Dimensions
It will not be superfluous to know what dimensions the standard front and rear generator bearings for your “ten” should have in order to make sure that the spare parts are selected correctly.
The rear bearings of the new type, marked 6203, have the following dimensions:
- Inner diameter - 17 millimeters
- External diameter - 40 millimeters
- Width - 12 millimeters.
We recommend: Repair of power windows on VAZ 2110
The front bearings marked 6303 have the following dimensions:
- Inner diameter - 17 millimeters
- External diameter - 47 millimeters
- Width - 14 millimeters.
Based on the dimensions, you can understand why rear and front bearings are often called small and large, respectively. It’s easy to visually distinguish them from each other, so you definitely won’t confuse the elements when replacing them.
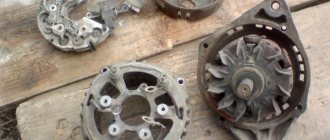
Disassembled device
Imported or domestic
Belarusian 90-amp BATE and Japanese Denso generators have bearings of the same size.
Imported analogues of bearings have a slightly different designation, namely:
Most 80-amp generators have bearings of similar sizes, at least this applies to domestic ones. If the generator has already been replaced before you, then you may be faced with the fact that a generator from a different manufacturer is installed and the bearings are of different sizes. Depending on the generator manufacturer, bearings of other sizes are sometimes found, for example, in the fairly common Bosch 14V 53-98A 0124 415 038 generator, bearings 6003-2RS (rear) are installed, the dimensions of which are 17 × 35 × 10 and 6303-2RS (front) , respectively, 15×35×14. The same bearings can be found in other imported generators. However, there are options where the rear bearing is designated as 6000-2RS, and the front bearing – 6203-2RS.
In order to accurately determine the dimensions of the bearing, it will have to be removed. If the markings on the bearing are not visible, then it is best to turn to professionals (you should not trust a caliper).
If you have decided on the size of the bearing, then to the repeated question “What bearings are on the VAZ-2110?” The answer suggests itself - original!
The quality of bearings varies from manufacturer to manufacturer; some prefer to install bearings from domestic manufacturers on their generators, while others prefer imported ones. When repairing a generator, everyone decides this issue for themselves, but after listening to numerous tips, some car enthusiasts are inclined to choose imported ones. If you focus on price-quality ratio, many experts recommend DAS LAGER Germany. But there are other suppliers of quality bearings: the French company SNR; FAG is one of the leading companies in Germany; NSK is another major bearing manufacturer from Japan; NTN – Japan; Kouo - part of the Toyota concern of Japan; Kraft or BOSCH.
Generator bearing replacement process
General view of the front and rear bearing of the generator
Existing play indicates that the bearing has indeed failed.
So, let's consider the step-by-step process of replacing a product with a VAZ-2112.
- We place the car on a pit or overpass. The main thing is that there is access from below.
- We dismantle the “minus terminal”.
- Remove the generator belt.
Pull the alternator belt through the slot
- To further carry out the work, you will need to dismantle the generator itself.
- Disconnect the appropriate wires to the generator.
Disconnect all wires that go to the generator
- Loosen the nut that holds the tension bolt.
- Remove the adjusting bolt.
Unscrew and remove the generator adjusting bolt
- Remove the lower engine protection.
We dismantle the engine protection
- Unscrew the 2 lower mounting bolts.
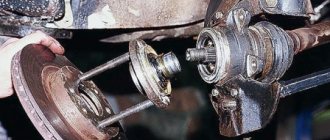
- We are dismantling the generator. It comes out through the bottom.
We unscrew the fastenings and dismantle the generator
- When the generator is in your hands, you can put it on the table. Now, you can proceed directly to the repair.
- Having blocked the rotor from turning, remove the pulley.
- We dismantle the casing. To do this, you need to pull back the latches.
Block the rotor and unscrew the pulley
- Remove the front and back covers.
Generator disassembly diagram
- Now feel free to move on directly to replacing the bearing.
Using a hammer, knock out the rotor from the cover along with the bearing
- The product can be dismantled using a special puller, or simply by knocking it out of its seat.
- Installation is carried out in reverse order.
Replacing bearings
- We clean the load-bearing elements well.
Disassembled generator
- Apply sealant to the seat.
Applying sealant
- We press in new bearings.
One bearing is pressed in
- The most difficult part is to press in the inner bearing. First we remove it. There is a puller, but if it is not available, then we use a regular key.
Removing a bearing without using a puller
- We put on a new one.
New bearing ready for use
Next, we assemble the generator and install it back!
What bearings are on the VAZ-2112 generator?
The choice of bearing should be taken seriously, since the stable voltage in the on-board network, as well as the wear of the generator itself, depends on this part.
Since there are 2 bearings in the unit - front and rear, each of them has its own markings and dimensions.
So, the front ones are marked - 6302 or 6303, but the rear ones - 6202 or 6203.
Generator front and rear bearings
Since there are many fakes on the automotive spare parts market , especially with regard to bearings, when choosing, you should pay special attention to the production of this product. The wear of many other parts of the generator will depend on the quality. Therefore, it is recommended to check the availability of a quality certificate, as well as the presence of markings and holograms.
Original
6303-10B is the original catalog number of the generator bearing for the 10 series of Lada cars produced by AvtoVAZ. The average cost of a product is up to 150 rubles .
Analogs
Not original bearings, strip, and plug. Vologda bearings VBF
In addition to the original, you can buy a substitute product. Of course, now bearings can be selected depending on the size or number, but manufacturers of analogues still decided to produce high-quality products for cars.
| Manufacturer's name | Catalog number | Price |
| F.A.G. | 6303 | 450 |
| Nachi | 6203ZZ | 150 |
| NTN | 6203ZZ | 180 |
| Koyo | 6303C3 | 200 |
| SNR | 6203.ZZ | 400 |
Reasons for failure
There are several reasons for generator bearing failure:
- Wear . Like any part, the generator bearing fails during operation.
- Violation of the rules of operation and maintenance will lead to the product failure.
- External factors such as dirt, salt and road chemicals lead to the part being subject to increased wear.
- Poor quality can cause premature failure.
- Lack of lubrication. The grease may have dried out over time.
The lubricant is almost invisible
Installing new items
Before replacing worn VAZ-2110 bearings on your own, it doesn’t hurt to check the presence of lubricant in the newly purchased parts. To do this, you need to pry up and remove one of the plastic protective covers of the separator with a sharp object. If necessary, add lubricant and replace the cover. Then you can start replacing, for which you will need a standard set of keys and tools available to every business car enthusiast.
It is most convenient to dismantle the rear bearing of the generator using a puller, but if this is not available, a regular open-end wrench measuring 22-27 mm will do.
It is better to remove the generator from the car from the inspection ditch in the following sequence:
- Disconnect the battery and disconnect the wires from the contacts of the unit by unscrewing the fastening nuts with a 10 mm wrench.
- Unscrew the belt tensioner bolt, loosen it and remove it from the generator pulley. Remove the tensioner bar.
- Using a 13 mm wrench, loosen and unscrew the nut of the lower support of the unit. Remove the bolt and remove the generator from the car.
According to the manufacturer’s recommendation, replacing the VAZ-Ten generator bearing located at the front should be carried out together with the cover into which it is pressed. But there is no point in changing the cover if it is in good condition, which should be ensured before disassembling. And such a replacement will cost more.
The main thing that needs to be done carefully when performing further work is to remove the old bearings. The procedure is as follows:
- Place marks on the body and covers of the unit to indicate the relative positions of the parts. Unscrew the bolts holding the covers together with the body (4 pcs.).
- Use a flat-head screwdriver to separate the housing parts. Remove the back cover along with the winding.
- The front bearing is knocked out of the cover through a round insert. This must be done carefully so that the lid does not crack, otherwise it will have to be replaced.
- Remove the rear bearing using a puller or an open-end wrench inserted vertically at one end between the part and the rotor. Tapping the key with a hammer and moving it around the axis, gradually knock down the bearing.
New elements are pressed into place with a hammer using old bearings as guides. Then the unit is assembled and installed on the car.
Source
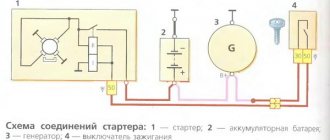
Why is the 2110 generator needed and how does it work?
The tens generator is an ordinary, most banal three-phase dynamo. Like an electric motor, but in reverse. The generator is driven by the crankshaft pulley and produces a nominal voltage of 13-14 volts at its output. at least it should give. Stop. Therefore, then it is three-phase, if we need constant +12, and not alternating current? very simple.
To answer this question, you need to find a grandfather who has a Moskvich 403 in his garage. Watch him when he goes fishing at five in the morning and ask him to open the hood. The atomic warhead, which takes up half of the engine compartment, is the DC generator. If grandpa doesn't come out for a long time, here's a photo of this generator.
Naturally, a modern car, even a dozen, cannot afford the luxury of devoting half of the engine compartment to a generator, so it has to convert alternating current to direct current. Alternating current generators are always several times more compact. And to convert it to a constant voltage, there is a rectifier unit in the generator housing itself. It is he who converts the change into the +12 volts we need. A more detailed picture of the generator structure for the curious is here:
For now, we’ll talk about malfunctions, mechanical malfunctions that can take a car enthusiast by surprise.
Signs of bearing failure and diagnosis
You can understand that the bearing in the generator has failed by the following characteristic signs:
- when the engine is running, a hum, whistle or grinding noise is heard from under the hood;
- the generator is hot to the touch when the engine is running or immediately after stopping it;
- The device pulley rotates.
In addition, some other symptoms may indicate this problem. And the ones mentioned above do not always indicate a bearing malfunction.
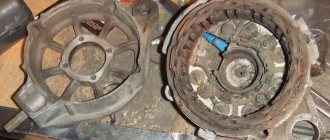
Comparison of worn bearings (left) with new ones (right)
The bearings in the generator can wear out due to time, lack of lubrication or poor quality, and also due to too much belt tension. The latter is usually typical for front bearings.
In order to accurately verify the failure of this element, you need to carry out simple diagnostics. Simply remove the alternator belt and start the engine.
If the extraneous sounds disappear, it means that the bearing is faulty. With the engine off, you can slightly shake the generator up and down by grabbing its pulley. In this case, no backlash should be felt. You can find out which bearing should be replaced after disassembling and inspecting all the elements. It's often better to buy a kit right away just in case.
What do you need to know when choosing new parts?
Initially, in the design of the 2110 generator, as mentioned above, two bearing devices are usually installed. In older versions of the car, parts marked 6302 or 6303 (these are front units), or 6202 (rear units) are used; in more modern versions, 6203 bearings are installed at the rear.
As for the sizes, they are as follows:
- for 6303 (or the domestic analogue under number 180302) the dimensions are 17*47*14;
- for marking 6302 (or domestic analogue 180303) - 15*42*13;
- for marking 6202 (Russian parts are marked as 180202) the dimensions are 15*35*11;
- for 6203 (domestic equivalent - 180203) dimensions - 17*40*12.
Parameters and design
The basis of the operation of each car, along with the power plant, is an alternating current generator. Like any other automotive equipment, this unit has its own characteristics, functions and features. An installation for generating electricity is one of the most reliable devices, especially considering the quality of components and assembly of domestic cars. The generator is able to withstand constant vibrations from the engine, sudden temperature changes and the ingress of moisture and dirt without any consequences, because protection is not always effective. The electric current at the output always remains constant - regardless of what modes the power complex operates in and at what speed.
The generator set has general requirements. The vehicle's on-board network is provided with a stable electrical voltage, regardless of the conditions under which the power unit operates. In this case, the battery must not be discharged. On the contrary, simultaneously with the power supply to the on-board network, the battery is recharged.
Insufficient electric current or its unstable generation will lead to constant undercharging of the battery and, as a result, difficult starting of the engine, especially at low temperatures. Excessively high voltage generated by the generator also does not bring anything good, causing premature failure of the battery.
Principle of operation
The generator is not the most complex mechanism; everything about its functioning is quite simple. After turning the key in the ignition switch, the following processes occur.
- An electrical impulse is received at the contacts and then transmitted through an assembly with graphite brushes to the armature winding (rotor).
- The rotor shaft begins to rotate synchronously with the crankshaft, a magnetic field is formed in the windings, which is transmitted to the stator winding. As a result of this process, an alternating current voltage appears at the stator output contacts.
- After reaching the optimal rotation speed, the self-excitation phase of the generator begins. This means that electric current begins to flow to the rotor winding from the generator set.
- Passing through the rectifier block (diode bridge), the alternating current is converted into direct current. This voltage can already be used to recharge the battery and power the energy consumers of the vehicle’s on-board network.
The voltage regulator does not start working immediately, but after the vehicle starts moving, i.e., when the speed and load on the device becomes unstable. The regulator's task is to turn on the excitation of the rotor winding at a certain moment when it is required. The excitation switching time depends on external loads and on changes in rotor rotation, i.e., when these parameters decrease, the time decreases, and when these parameters increase, the time increases.
There are cases when the energy consumption of the on-board network exceeds the capabilities of the generator set (connecting a powerful speaker system, lighting, etc.). In this case, with a working generator, the battery begins to supply the missing voltage, which inevitably leads to chronic undercharging and rapid failure of the battery.
The functionality of the device is indicated by a special lamp on the instrument panel. If there are problems with charging, the lit icon will notify you in time.
How the unit works
The rated voltage of the car's electrical network is 12 V. At the same time, the rated current of a standard VAZ 2110 generator is 80 A, and the rotor speed is 6000 rpm. The standard device is compact in size, which is not surprising given the low current.
Structurally, the device consists of several main parts
| Parts | Characteristics |
| Rotor. | This component, more often called an armature, is a rotating shaft with an excitation winding, which, when rotated, creates a magnetic field. Power is supplied from slip rings on the armature shaft. There is also a wire from the winding, a fan (impeller), bearings and a belt drive pulley. |
| Stator. | The part of the generator that does not move when the crankshaft rotates. There are 3 windings (three phases) on it, creating an alternating current. Each winding is connected to all the others in two types of ways: star and triangle. |
| Frame. | Made of aluminum alloy. Consists of a front and rear cover, which are connected to the body using bolted fasteners. In front of the front cover there is a drive pulley, in front of the rear cover there is an impeller and slip rings. |
| Fasteners | The VAZ 2110 uses a bracket for upper mounting with two bolts. A single bolt is used to secure the bottom bracket. Thanks to these fasteners, the generator is securely fixed in its position. |
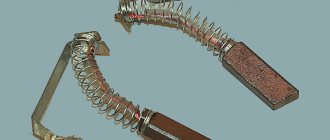
| Brush unit. | Graphite brushes, which are pressed against the rotor contact assembly by special springs, are fixed in brush holders. |
| Voltage regulator. | A non-separable (most often) unit with two graphite brushes, thanks to which the output voltage is regulated depending on the load on the rotor. |
| Rectifier block. Another name is diode bridge. | It consists of six diodes that transform alternating current generated by the magnetic field of the rotor and stator windings into direct current. It is subsequently used to power all electrical equipment of the car. |
| Drive pulley. | Serves to connect the rotating rotor shaft to the crankshaft using a belt drive. For these purposes, use a belt with 5 or 6 rivets. |
Most generator sets have such a device, regardless of how many amperes they are rated for. Differences may be in fastening methods, pulleys, and covers. Otherwise, all models are identical.
The resource of the standard VAZ 2110 generator is declared by the manufacturer to be at least 10 thousand kilometers.
This equates to 10 years of operation, provided that the rules of use of the device are followed according to the manual. When choosing an alternative option, you should take into account the number and power of energy consumers in the on-board network. So, for a standard set, 80 A will be enough, but when using, for example, powerful acoustics, it is better to pay attention to 120 A.
What types of bearings are in the top ten: part numbers and sizes
Bearings in generators of VAZ 2110 cars are closed type, ball, single row, have a double-sided seal.
- The front marking is 6202 2RS (in domestic catalogs under number 180202).
- Rear bearing - 6103 2RS (aka - 24940220).
An important point: when choosing bearings, you should pay special attention to the manufacturers of their hubs. Typically, VAZ 2110 bearing hubs are produced in Samara, their marking is SP3-4.
You can also find hubs on the market from 23 GPP (this is Vologda) and 3 GPP (this is Saratov). It is strictly not recommended to buy bearings on which the hubs are not marked. You also cannot buy Chinese generator bearings, which are now found everywhere, since the quality of these bearings does not stand up to criticism.
Parts Specifications
To purchase new parts, you need to know which bearings are specifically installed in your unit in order to avoid mistakes. The VAZ-2110 generator has 2 supporting elements: front and rear. Their markings vary depending on the year of manufacture:
- in units produced in recent years, the rear part is marked 6203, the front - 6303;
- in older versions the number is slightly different - 6202 and 6302, respectively.
The bearing cages are sealed on both sides with plastic caps, which can be removed to add lubricant if necessary. The overall and internal dimensions of the rotating parts are the same for any marking; their exact values are indicated in the table.
| Bearing size | width, mm | by outer diameter, mm | by internal diameter, mm | Catalog number |
| Front | 14 | 47 | 17 | 180202 |
| Rear | 11 | 35 | 15 | 24940220 |
As a lubricating filler for cages, you can use thick lubricant “Litol-24” or another intended for rolling bearings. It is easy to identify the manufacturer by the additional symbols on the labeling.
The most popular parts of Russian production are from the following enterprises:
- Samara plant, marking - SPZ-4;
- Vologda plant - 23GPZ;
- Saratov plant - 3GPP.
Also, quite often, motorists install 2110 generator bearings from the Koyo, Kraft and LSA brands.
It is strictly not recommended to install elements without inscriptions and markings, manufactured in an unknown location, most often in China.
You may run into trouble with such parts quite soon due to the poor quality of the products.
Dismantling and disassembling the generator (in detail)
Work order:
- Disconnect the negative terminal of the battery.
- Next, unscrew the terminals of the device itself, having previously unscrewed the fastenings of these terminals.
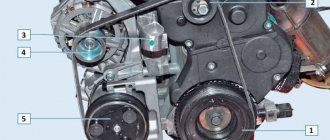
- We study the diagram of the generator fasteners in order to begin removing the unit.
- Then remove the crankcase guard and get under the car.
- Next, unscrew the fasteners securing the generator to the frame (positions 5 and 2 in the diagram).
- While unscrewing the last fastener, hold the mechanism with your hand.
- Remove the unit, remove dirt and wipe with a rag. Lubricate the threaded connections with WD-40.
- Use a screwdriver to remove the rear plastic cover on the generator.
- Using a Phillips screwdriver, unscrew the voltage regulator and brush holder fastenings.
- Remove the pulley from the axle and clamp the product in a vice.
- Using an adjustable wrench or other wrench, unscrew the nut on the pulley. To prevent the shaft from spinning, insert the hexagon into a special recess at the end.
- Remove the washer and, having unscrewed the corresponding bolts, disassemble the unit body.
- Remove the plastic cover and then the front ball bearing to access the armature.
Which bearings are better to install?
As a rule, KATEK brand generators were installed on cars of this model from the factory. It may also be suitable for spare parts from some other domestic and foreign manufacturers. It is not recommended to use original bearings from the Samara and Volzhsky plants (VBF and VPZ), as well as Chinese ones, due to poor lubrication and short service life. Products from German brands DAS LAGER Germany and FAG, French brands SNR, Japanese brands NSK, NTN and Kouo, as well as Polish Craft are considered to be of good quality.
Price of bearings for VAZ 2110 generator
The price of a VAZ 2110 generator bearing is very low. It starts from about 100 rubles for the rear and from 150 rubles for the front. Here a lot depends on the manufacturer of the parts. Russian-made spare parts are considered the cheapest. Products of foreign brands are more expensive, sometimes twice as expensive.
Replacement
The procedure cannot be called complicated, but it is very important to strictly follow the instructions. Based on our recommendations, as well as video tutorials, you can carry out the replacement yourself without any problems.
You have already found out what bearings are on VAZ 2110 generators, purchased a set of new spare parts, so you can start repairing.
Dismantling works
Front bearing
- Slightly unscrew the mounting nut on the generator, and also loosen the adjusting bolt.
- Reset the alternator belt and start the engine. This will allow you to verify that the problem is with the generator.
- If the noise disappears, then we move on. There is still a lot of work ahead of you.
- Let's move on to the battery, from which the negative terminal should be removed. This is important from a safety point of view and protection against accidental short circuits during repairs.
- Once the terminal is removed, unscrew all the wires going to your generator.
- If you have a crankcase guard, unscrew the mounting bolts and remove it. This will allow you to reach the lower mount of the generator and remove the device. Remove the generator by pushing it through the engine compartment.
- Using a regular screwdriver or other handy tool, you need to block the generator rotor and then unscrew the pulley.
- The next step is to look for special latches. By pulling them to the side, you will be able to dismantle the device body.
- Next, the generator brushes are unscrewed, as well as the mounting bolts holding the halves of the generator assembly. There should be 4 of these bolts in total.
- We recommend marking both halves of the generator housing to avoid problems during reassembly.
- Use a flathead screwdriver to pry up the cover and remove it.
- Practice shows that it is more convenient to remove the rotor from the front cover bearing in the following way. Take a nut and screw it onto the rotor threads. Then hit it with a hammer, first placing a wooden block under it.
- Find a part whose diameter will coincide with the diameter of the bearing being removed. For example, a 27 millimeter head may be perfect.
- Gently start tapping the element so that the bearing comes out of its seat.
- Take the new bearing and prepare to reinstall it.
- The first step is to treat the new bearing with lubricant so that it lasts as long and reliably as possible.
- To install a new component, you will need the old bearing. Place it on top of the new device and lightly tap with a hammer to install.
That's it, the front bearing has been removed and replaced. Let's move on to the back.
Press-fitting
Rear bearing
- To remove the rear element, you will need a special puller;
- If you don't have a puller, you will have to knock out the component with a chisel. An alternative option is a metal rod and a powerful, strong screwdriver;
- The selected tool is used to strike the bearing with a hammer. Here you definitely need to move along the surface, moving in the opposite direction;
- Some people can easily cope with dismantling; they use a regular strong open-end wrench;
- Now take the socket that you used to remove the front bearing and the old generator element that was removed. With their help, a new bearing is driven into its seat;
- If you don't like this method, use a tubular wrench or a metal pipe whose diameter matches the diameter of the rear bearing.
Having finished the work, all you have to do is assemble the assembly, following the steps in reverse order. You should start with the front cover of the generator, followed by all other components of the assembly.
If you carefully study the instructions, watch training videos, understand the structure and operating principle of the generator, replacing its bearings will become a fairly simple repair job for you, which will take no more than an hour of your time.
After completing the replacement, be sure to check the machine for noise. If everything was done correctly, the next operation to change the bearings will not be required soon.
Replacing the generator bearing on a VAZ-2112 is quite simple with your own hands. However, to complete the process you will need some knowledge of car design and auto electrics. Particular attention should be paid to the quality of the part, since low-quality components fail much faster than more expensive high-quality ones.
Methods for checking the unit
For timely detection of bearing failures, there is no better way than a preventive inspection and checking the rotation of the rotor shaft. To do this, it is not necessary to specially disassemble the unit if you periodically replace the generator drive belt with your own hands. During this replacement, shaft rotation is checked in the following ways:
- grab the pulley with your hand and try to swing it perpendicular to the axis to determine the play;
- actively rotate the pulley in different directions.
If you feel play by hand or the shaft rotates with jamming and noise, then replacing the bearings of the VAZ-2110 generator is inevitable. Another sign of wear on parts is the appearance of noise in the form of a humming sound coming from the unit when the engine is running. In this case, it is necessary to localize the malfunction, since a rotating element of another unit located nearby may be humming: a pump or a timing belt tension roller.
It is not difficult to determine where the noise originates: you need to remove the generator drive belt and start the engine for a couple of minutes. If the hum disappears when idling, it means that its source was the elements of the VAZ-2112 generator, and the pump and roller are in good condition. In the same way, the operation of the bearing of the VAZ-2114 generator and any other model of the “tenth” family is checked.
Reasons for failure
There are many reasons for bearing failure, but there are several main reasons, which are discussed below.
Wear
Wear is a typical cause of bearing failure, since the number of revolutions of the generator rotor is huge over the Nth period of time. Consequently, the lubricant in bearings under the influence of high temperatures loses its properties and the bearing ceases to receive the required slip coefficient, which causes heating and increased clearances in the ball part of the bearing.
Belt tension
Excessive tension on the alternator belt greatly affects the life of its bearings. It is necessary to tension the belt correctly, observing all norms. The generator belt should bend under the influence of 10 kg. by 5-7 mm.
Bearing 330802 (1НР16092)
Radial double-row bearing, combined, ball-roller (one row of balls and one row of rollers), the coding of which is subject to separate rules. The product has a double-sided seal and a roller instead of an inner ring. Bearings of this design are also called “pump”, since they are used in water pumps of cars (VAZ), which have a second name - pump. Another name for them is “popsicle”. Full marking is 6-1НР16092EKС17, but may differ between different manufacturers and depending on the design features. Thus, the Vologda plant completely switched to a foreign-brand system of symbols. A product with the outdated marking 330802 indicates exactly the same bearing, and is often sold in illiquid quality.
6 - degree of accuracy, HP indicates that the rolling elements are balls and rollers, the first number 1 is a smooth roller with an annular groove on a long ring, 16 and 115 are sizes. E - polyamide separator, K - design, 17 - type of lubricant used in production (Litol-24).
The bearing is produced at two factories in the country, both of which are famous for their high quality products - VBF (23 GPP, Vologda) and SPZ (Saratov Bearing Plant, 3 GPP), however, at the latter they have been discontinued, although many still have them in stock companies. To purchase them in bulk, you can contact EPK or VBF dealers in your region (some also carry out retail sales). The approximate price is about 130 rubles.
The bearing is used in the pump (water pump) of front-wheel drive VAZ cars - 2108, 2109, 2110, 2111, 2112, their modifications, as well as in such outdated models as VAZ 1111 "Oka", "Tavria", LuAZ and some others.
Dimensions and technical parameters of bearing 330802 (1НР16092)
Inner diameter (d) - 16 mm;
Outer diameter (D) – 30 mm;
Width (B) – 39/92 mm;
Dynamic load capacity - 6.5/12.7 kN;
Static load capacity - 2.7/11.8 kN;
Rated rotation speed: 10,000 rpm.
There are currently a variety of brands and manufacturers of water pumps on the market; each manufacturer claims that its products are the best. We will try to impartially figure out what’s what, and consider one of the most popular items - a pump for front-wheel drive eight-valve VAZ cars.
To avoid any confusion, let's clear things up right away. Eight-valve engines on front-wheel drive VAZs were constantly modernized and changed, so the pumps listed below are suitable for all engines equipped with the so-called “eighth” timing belt. If we take it by model, then these are VAZ 2108, 2109, 21099, 2110, 21013, 21014, 21015, as well as Kalinas and Prioras of the first years of production.
We purchased seven samples of pumps from different manufacturers - both domestic and foreign. But before we start introducing the products, I would like to explain some of the terms that are used below.
The impeller is a low impeller, which is located on the reverse side of the main impeller, its purpose is to relieve the shaft-housing seal
Equally important is the presence of holes in the base of the impeller - they also help reduce the load on the mechanical shaft seal with the housing