Hello, dear friends! At one time, angel eyes on BMW cars made a splash on the market. It was optics of amazing beauty, especially in the dark. But even now fashion has not disappeared, and many people want to make angel eyes with their own hands.
In practice, there is nothing particularly complicated here. You will have to tinker, but the result will certainly please you. You can start from different instructions and manufacturing options. Some people use sites with videos that can be watched in parallel with taking notes in a notebook. Also on the Drive2 resource, motorists share their own experience of making peepholes, like those on a BMW.
I suggest you consider 3 interesting options. 2 of them are homemade and one more can be purchased online. The kit usually includes an ignition unit or a stabilizer, depending on the light source used.
Expedition trailers: official website, products, owner reviews
- 5 mm white LEDs;
- a resistor of approximately 330 Ohms and 0.25 W;
- wires for connection;
- plastic rod;
- or a plexiglass rod (diameter from 8 to 10 mm);
- jar or lid (1-3 liters);
- drill with adjustable speed;
- soldering iron;
- silicone glue;
- construction type hairdryer.
Take a rod of suitable length to make a ring out of it. You will need to make holes on the end sides for installing LEDs.
To avoid damaging the rod, it is recommended to wrap it in polyethylene or fabric and then fix it in the machine. This will ensure immobility and the ability to carefully make indentations without scratches.
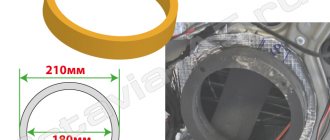
Typically the holes are made with a diameter of about 6 millimeters. The depth depends on the design of the tube itself. But it is better not to exceed the value of 10 millimeters. To make the body take the shape of an optical device, you can take a jar or a lid from it. By bending around the jar, you will get a perfectly even ring. It is important that the diameter matches the internal diameter of the headlight itself on your car. Using a hair dryer, the body heats up and bends around the jar or its lid. There is no need to completely connect the ends of the tube to each other.
At the next stage, diodes are installed. Here you need to solder a wire of a suitable length to the terminals, which is enough to connect to the power wires outside the car headlight housing. A resistor is soldered onto one wire. As a result, you need to assemble an electrical circuit of LEDs with a serial connection and the resistor itself.
Now insert the diodes into the holes of your tube and secure with glue. The number of LEDs is determined individually.
In this case, you should not count on a bright glow and the ability to replace DRLs. The option is rather decorative.
Ring connection
First of all, it is worth considering the rules for using light lights. The “angel eyes” themselves can be classified as daytime running lights. In this case, it is necessary to make the connection in such a way as not to violate the requirements of GOST R 41.48.-2004. This means that the rings and the DRLs themselves must turn on as soon as the engine starts and, accordingly, turn off when it stops.
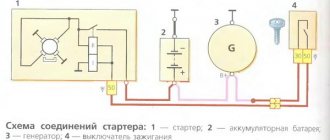
In this regard, you need to adhere to a certain connection scheme. There are two ways to solve this issue:
- You can use a 5-pin relay and female terminals (you need 4 pieces). In this case, the negative wire of the “eye” is connected to the machine body, and the positive terminal is soldered, after which it is connected to contact No. 30. After this, you need to find the wire under the hood that connects the “dimensions” and the switch. Contact No. 85 is connected to the “+” of the side lamps, and No. 86 is connected to the housing (that is, the relay will be powered simultaneously with the “dimensions”). You will also need to make one more wiring, which will go from “Ignition + 12V” to contact No. 87a. When the ignition is turned on and the dimensions are on, +12V reaches the “eyes” through the closed contacts of relays No. 87a and No. 30 and they begin to burn. As soon as the size switch is turned to the “off” position, the relay is de-energized, and contacts No. 87a and No. 30 open. In this case, the “angel eyes” will go out along with the “dimensions”, as required by GOST. If rings are purchased ready-made, then a current stabilizer is usually included with them. It must be connected between the 30th pin of the relay and the “eyes” themselves. If there is no current stabilizer, then it is better to purchase one, as this will help avoid situations when a voltage surge occurs in the on-board system and devices fail.
- Connect “angel eyes” through the DRL controller. It can be purchased at any specialty store. Then the assembly will be carried out in accordance with a specific diagram, which is demonstrated in detail in the instructions for the device.
If we talk about which connection method is better, then, of course, it is much more convenient to use the DRL control unit. It will help protect against possible overloads. In this case, homemade “eyes” will last much longer.
Towbar for Hyundai ix35: which one to choose, how to install it yourself
- to Priora;
- Toyota Chaser 100;
- BMWs deprived of such a privilege;
- VAZ 2106;
- VAZ 2109;
- 2110;
- VAZ 2115;
- VAZ 2114;
- Renault Logan;
- Hyundai Solaris;
- Daewoo Lanos, etc.
Objectively, angel eyes look more advantageous on foreign cars. Although no one will forbid you to install such solutions on any machine.
To implement the task, you will need to prepare a slightly different set of materials and tools.
The following is required:
- double-density white LED strip, but without silicone coating;
- wires for connection;
- transparent silicone;
- glue;
- varnish (silver color);
- screwdriver;
- pliers;
- Have a good mood;
- extreme concentration and accuracy.
LED strips bend perfectly, which will allow you to easily make a ring of the required diameter. Just keep in mind that one headlight requires about 30-40 centimeters of tape.
Then the pads at one end are stripped to allow additional wires to be soldered there. They allow you to connect to a +12V power supply.
Next, a piece of tape is pointed onto a flat surface with the diodes facing upward. Gradually the tape is filled with transparent silicone. Do this slowly and carefully, armed with a mounting gun. This will allow you to coat the diodes with a uniform and even layer of silicone. It is important to wait for the resulting structure to dry completely, otherwise you will ruin everything with your own hands. Silicone will protect the product and act as a light diffuser.
To avoid wasting light illuminating the reflector, coat the back side of the tape with silver varnish. You can borrow it from your wife, sister or mother. Or buy it at your nearest store. The varnish will act as a reflector.
We attach to the headlights
Installing angel eyes is no less important than assembling them. Here you need to do the following manipulations:
- we disassemble the headlight housing and take out the glass from it;
Note! It is necessary to disassemble the headlight very carefully in order to subsequently use the removed glass to cover the installed optical system.
Ring installation
- We clean the reflector from dirt. Use cotton swabs and cleaning chemicals for this;
- during processing, avoid touching the surface of the reflector with your hands;
- We apply sealant to the glass and install a homemade luminous ring on it, with the notches facing outward;
- after that we lay the wires;
- Apply silicone between the headlight itself and the protective glass, carefully filling all the pores;
- It takes at least half an hour for the silicone to dry.
Finished headlight
At the end, all you have to do is test the operation of the headlights with the new LED installation. To do this, connect all wires to a power source. Here you need to disconnect the plug that connects the turn signals. This is where the “eyes” should be connected. Now your car has a beautiful tuning. Moreover, such a homemade device is not only beautiful, but also practical. If all elements of the lighting fixture are assembled correctly, it will serve you faithfully for many years, providing bright light from the headlights.
Third method
In theory, it is the simplest, since you are simply buying a ready-made device, which has a diffuser, an ignition unit and other necessary components. It’s just important to choose a quality product, since the Internet offers many options that are not of the best quality.
Eyes based on CCFL rings have proven themselves to be excellent. They have high reliability indicators and are in many ways superior to their LED counterparts.
If we talk about Aliexpress, then I would not advise you to buy ready-made angel eyes based on LEDs. Low-quality products are used here, which can quickly overheat when the head optics are turned on. As a result, in less than a year they will have to be removed due to the significantly reduced brightness level.
What type of “eyes” is best to make?
If we talk about the features of structures of this type, the lighting can be:
- LED. LED devices can withstand low temperatures well and have a long service life. They rarely break. LED “angel eyes” can be bought ready-made (they are quite expensive) or made with your own hands without any problems (you will have to spend the most money on a plexiglass tube just for LEDs).
- Neon. CCFL is distinguished by a brighter and more uniform glow, since in this case there are not light bulbs inside the tube, but heated gas. However, such products cannot withstand frost and begin to fully glow only a few minutes after turning on the headlights. To make such “angel eyes” yourself will require more costs (you need to additionally buy an ignition unit), so it’s easier to buy a ready-made kit.
Upgrading headlights must be done very carefully. Do not forget about the main function of lights and traffic rules. For example, if you use red or blue LEDs for “angel eyes,” then a conversation with a traffic police officer cannot be avoided. The fact is that such colors can only be used in the optics of official vehicles. If an ordinary driver imitates a “flashing light,” he risks paying a fine of 2,500 rubles or his car may be sent to the impound lot. Therefore, it is best to use white, yellow or orange lights for tuning headlights yourself.
Why are owners of cars with such tuning fined?
Owners of cars in which such tuning is legally included in the vehicle package should not be afraid of claims from law enforcement agencies. Everything here is legal, correct, fair. But when installing it yourself, you need to be guided by legal acts regulating the lighting of the front and rear of the car. In traffic rules, codes of offenses, government regulations and GOSTs regulating safety requirements for technical condition, angel eyes are not directly mentioned anywhere.
But there is a legal requirement according to which white lights can be used on the front of the car (dimensions and headlights), as well as orange lights for turning lights. Eyes of other colors are not allowed and will result in a fine.
Blue color is outlawed
Therefore, there is no need to install yellow, red, green, purple and other colors in the headlights
We can advise all drivers CAUTION: you need to install angel eyes CORRECTLY, although even this advice does not guarantee problems when passing a technical inspection
A couple of important points
A car is a vehicle whose technical condition must meet certain standards and norms.
This means that any change in design requires prior technical expertise. If you follow the letter of the law, then the car owner must contact a specialized organization with an application “to make changes to the vehicle’s light signaling device.” The expert will conduct an examination and give an opinion on the vehicle’s compliance with the requirements of the Technical Regulations. A simple procedure at first glance has one significant drawback: the minimum cost of services is 5 thousand rubles. Not wanting to pay such a sum, many drivers continue to tune their car themselves, thereby violating Art. 12.5 Code of Administrative Offences. According to the article, every driver who independently installs angel eyes risks receiving a warning or a fine of 500 rubles. An exception is the installation of lamps emitting red light in front of the car, for which a penalty is imposed in the form of deprivation of rights for a period of 4 to 6 months.
Fines and optics tuning
Many car enthusiasts are interested in whether angel eyes are allowed for installation in a passenger car? As already written earlier, in accordance with the UNECE and Rosstandart Rules, the car must be equipped with white headlights. By installing white angel eyes, the driver will be able to parade freely in front of road service employees.
Of course, if such lights are included in the vehicle's package by the manufacturer, they are not a violation of the design documentation. If the car has angel eyes of other colors - blue, red, yellow, green, purple, orange - the car inspection staff will definitely consider this a violation of the rules. There is no penalty for such a violation of the rules. However, part 3 of Article 12.5 of the Code of Administrative Offenses states: “shall entail deprivation of the right to drive vehicles for a period of six months to one year with confiscation of the specified instruments and accessories.”
A similar penalty is imposed for installing white lights on the rear grille, bumper and fenders of the car. Everything in the car must be done technically correctly, according to the rules, in accordance with the design and settings of the manufacturer. After installing colored angel eyes, the driver will have to walk for a year or six months and travel only by subway.
Modern tuning of lighting equipment involves many modifications and installation of additional devices. The most popular types of work:
- installation of bi-xenon lenses;
- installation of alternative optics;
- installation of angel eyes in headlights;
- angel eyes on fog lights;
- angel eyes with inscription;
- LED angel eyes.
When installing additional lighting devices, each car owner must check his actions with the rules and not violate the design of the vehicle and the established lighting standards. It is best to use LED technology, that is, LED lamps that give a cool and efficient glow.
Installing angel eyes with LEDs on headlights with lenses
Angel eyes are sold in different sizes, usually from 60mm to 120mm. The LED angel eyes set contains rings with LEDs, one controller with a connector, and a remote control for changing the color of the angel eyes, including blinking modes. Diffuser caps can be added to the rings for a more traditional, uniform appearance.
“Angel eyes” in headlights with lenses are installed on the housing. It can be pre-painted black to make the rings more visible.
It is recommended that the rings be attached at three points at equal intervals. To attach the luminous rings inside the headlight, glue, double-sided tape or special wire are used. Glue has its drawbacks. Vibrations from driving and heat can weaken the adhesive bond. Double-sided tape cannot always be used, since there is not always a suitable surface inside the headlight for secure fastening in this way. It is better to use thin wire for hanging pictures. You need to drill small holes on the lens housing and screw the rings with wire. If you do everything carefully, you get an almost invisible fastening unless you look closely. The advantage of this method of fastening is that it is very reliable and does not weaken from vibrations and heat.
If you choose an adhesive connection as a method of attaching the rings, then apply a thin layer of glue to the back of the ring and to the reflector, in the place where the ring will be installed. Let the glue dry for 10 minutes before pulling the wires through. Gently press the ring into place for 5 minutes. Try not to move the ring until the glue dries.
We create beauty
When all the listed materials and tools have been collected, you can safely begin creating “angel eyes” on a vase or prior. In order for everything to work out correctly and quickly, you must adhere to the following instructions:
Curved tubes
- We heat the transparent tube until it begins to bend and easily give in to the necessary deformations. You can heat the tube using a hair dryer or a regular oven;
- take a round shape. In its role, you should use a round salad bowl or coffee can. Using pliers, we bend the heated plastic tube around the perimeter of a round shape;
- Next, we wait for the tube to completely harden;
- after that, we saw off the edges so that LEDs can be installed in the tube;
- then we assemble the resistor and LEDs, carefully insulate the contacts and grind the soldering points;
- then you need to make notches on the tube in increments of approximately 2-2.5 mm. In this case, you should retreat 1–1.5 cm from the edges;
Notches on the pipe
- In order for the glow emanating from the LEDs to be uniform and bright enough, the notches should be placed closer to the center. At the same time, they need to be made deeper: in the middle - 5 mm, and at the ends - 2 mm;
- after this, it is necessary to solder the diodes, making sure to observe the sequence so that the current flowing through them is equalized. The tape should be cut and soldered only in specially designated areas;
- We finally insert the LEDs into the tube.
As a result, the ends of the rings should have holes 5-7 mm long and 5 mm in diameter. It is recommended to use foil to cover the ends of the plastic tube. If an LED strip is used, it is simply glued to a plastic strip. In this case, the tape is soldered according to the standard scheme. Before installing your homemade “angel eyes” system on your car, be sure to check it for build quality, the glow of the LEDs and the strength of the resulting structure. Otherwise, if problems are discovered after installation, it will be very difficult to eliminate defects.
How to illuminate a car from the inside
Do-it-yourself interior lighting tuning of a car can be done in two ways: with a strip of LEDs and neon lamps.
Neon salon
You will need:
- Nylon clamps.
- Aluminum corner.
- Neon lamps.
- Self-tapping screws.
It is more correct to start tuning by installing neon lights at the bottom of the cabin.
Most often, neon lamps are manufactured with a cigarette lighter connector; it must be cut off and then the ends must be stripped. Then we saw off a corner corresponding to the size of the lamp and screw it under the dashboard in the cabin. We fix the lamp on the corner with nylon clamps. The same is done in other places in the cabin, except for the rear seats, where the corner is attached with the edge up to protect the lamp from damage.
We stretch the ends of the wires under the rugs to the dashboard near the driver's seat and insulate them at the connection points. Then we connect them to the door sensor, interior light switch and battery
It is also important not to forget to connect one of the wires to the throttle sensor, so that in the future it will notify about the available lighting when flashing the ECU, this is necessary so that the neon lamps do not burn out
The result will be a triggered light when the doors open, which will amaze with its unusualness not only you, but also those passing by.
LED salon
Connecting the backlight using LEDs is similar to neon, the only thing is to position the tape correctly (you may have to cut off individual pieces), and then clean the ends and solder them to each other; for safety reasons, bushings are put on the connections and heated with a hairdryer.
Why are owners of cars with such tuning fined?
Owners of cars in which such tuning is legally included in the vehicle package should not be afraid of claims from law enforcement agencies. Everything here is legal, correct, fair. But when installing it yourself, you need to be guided by legal acts regulating the lighting of the front and rear of the car. In traffic rules, codes of offenses, government regulations and GOSTs regulating safety requirements for technical condition, angel eyes are not directly mentioned anywhere.
But there is a legal requirement according to which white lights can be used on the front of the car (dimensions and headlights), as well as orange lights for turning lights. Eyes of other colors are not allowed and will result in a fine.
Blue color is outlawed
Therefore, there is no need to install yellow, red, green, purple and other colors in the headlights
We can advise all drivers CAUTION: you need to install angel eyes CORRECTLY, although even this advice does not guarantee problems when passing a technical inspection