The owner of a classic model of the Russian automobile industry needs to know how to set the ignition on a Moskvich-412. This is a fairly elementary process, which nevertheless can create difficulties if you do not know the procedure. It is how the ignition is installed on the Moskvich 2140 and other models of the brand that will be discussed in this article.
VALVE, characteristics, adjustment (order), clearance
1. General CHARACTERISTICS of valves on Moskvich (AZLK and IZH) 412
2. Procedure (sequence) for adjusting (setting) valves on Moskvich 412
Post an advertisement for the purchase (SALE) of a car on the FORUM
Post an advertisement for the purchase (SALE) of used SPARE PARTS on the FORUM
1. General CHARACTERISTICS of valves on Moskvich (AZLK and IZH) 412
The valves of Moskvich-412 are located obliquely, four in a row, in two planes at an angle of 52°, exhaust on the right side of the engine, intake on the left.
The valves have flat heads and cylindrical stems. The diameter of the intake valve head is 38 mm, exhaust - 34 mm; the valve stem diameter is 7.972–7.987 and 7.953–7.968 mm, respectively. Valve lift height 9 mm.
Each Moskvich 412 valve is pressed against its seat by two springs placed concentrically, one inside the other. The springs, compressed during installation, rest on the lower support washer. The second ends of the springs press on the upper plate, which is held on the valve stem by two crackers, which extend with their protrusions and the recess on the stem.
For a cold engine, the clearances in the valve drive should be 0.15 mm. The size of the gaps is determined with a flat feeler gauge. The valves are adjusted by turning the rocker arm adjusting screws in the required direction. After adjusting the valves, the screw is locked with a locknut.
The valve mechanism is closed from above by a cover adjacent to the upper planes of the cylinder head, the upper cover of the gas distribution mechanism drive and the rear technological cover of the head. The joint between the top cover and these parts is sealed with a gasket.
2. The procedure for adjusting (algorithm) the valves of a Moskvich car (AZLK and IZH):
2. The order (sequence) of adjusting (setting) valves on Moskvich 412
To adjust, use a special 12-14 mm double-sided wrench and a 5 mm socket wrench, as well as flat feeler gauges.
Thermal valve clearances are adjusted on a cold engine (coolant temperature should be approximately 15-20 degrees Celsius) in the following order:
1. Disconnect the pipe on the cylinder head cover from the crankcase ventilation pipe of the internal combustion engine. Disconnect the vacuum manifold tube from the carburetor and remove the cap from the head.
2. Set the piston of the first cylinder to the top dead center of the compression stroke, using the starting handle, turn the crankshaft of the internal combustion engine so that the TDC mark. aligned with the tip of pin 2 installed on the lower cover of the timing chain drive housing.
3. Using a flat feeler gauge, check the gaps between the ends of the tips 6 and the valve stems of the first cylinder.
4. Adjust the gaps between the ends of the tips 6 and the valve stems. To do this, loosen the lock nut 5 with a wrench and rotate the head of the pressure bolt 4 with a socket wrench until the required clearance of 0.15 mm is obtained for the exhaust and intake valves.
5. Tighten the locknut of the rocker arm pressure bolt and once again measure the gap between the valve stem and the end of the tip with a feeler gauge.
6. Turn the crankshaft exactly half a turn clockwise.
7. Check and, if necessary, adjust the clearances between the valve stems and the ends of the tips of the third cylinder.
8. Next, turn the crankshaft another half turn to adjust the clearances in the fourth and then in the second cylinder.
Reinstall the cylinder head cover and reconnect all the pipes.
Checking and adjusting the ignition distributor
To check and adjust the parameters of the ignition distributor, use a control stand for checking ignition system devices, which allows you to change the rotation speed of the ignition distributor shaft up to 3000 rpm.
Checking the angle of the closed state of the breaker contacts. To check, set the rotation speed of the ignition distributor shaft to (1000±100) rpm and determine the angle according to the indication of the pointer indicator. If the UZSK does not meet the technical requirements, adjust it in the following order: 1. Loosen the screws securing the contact stand to the movable plate of the breaker. 2. Insert a screwdriver into the groove on the stand and increase or decrease the UZSK by moving the stand contact closer or further away from the contact on the breaker lever. 3. Once the adjustment is complete, tighten the screws securing the terminal post. In operation, if there is no special stand for testing the UZSK, it is possible to check and adjust the gap between the contacts of the breaker instead of the angle. Perform the check in the following order: 1. Check the distributor shaft to the position where the textolite cushion of the breaker lever is positioned on the protrusion of the cam face, and the gap between the contacts will be greatest. 2. Check the gap between the contacts with a feeler gauge and, if necessary, adjust it. Adjust the gap in the same order in which the UZSK is adjusted. After adjusting the gap between the contacts of the breaker, the correct setting of the ignition timing is disrupted. Therefore, after adjusting the gap, check and, if necessary, adjust the ignition timing.
Checking the characteristics of the centrifugal ignition timing regulator. Perform the check by gradually increasing the rotation speed of the ignition distributor shaft. At the control points, record the ignition timing angles set by the centrifugal regulator. If necessary, make adjustments by straightening the weight racks in the following sequence: 1. Straighten the weight rack on which the thin spring is attached when adjusting the characteristics of the centrifugal governor at low rotation speed. 2. At a rotation speed of more than 100 rpm, bend the stand on which the thick spring is attached.
Sequence of valve adjustment on Moskvich-412
Moskvich-412 cars were produced at the Moscow (AZLK) and Izhevsk (IZH) automobile plants and were equipped with a four-cylinder UZAM-412 carburetor engine. The motor was in production until 2001 and is currently still very common.
Signs that adjustment is needed
A characteristic sign of the need to adjust the valves is knocking noises coming from under the valve cover when the engine is warm. Also, valve adjustment is required after grinding them into the seats.
Tools
To perform the work of adjusting the valves on the Moskvich-412, you will need a socket wrench with head sizes of 5 and 10 mm, a wrench with a throat size of 12 and 14 mm, as well as a standard set of feeler gauges. The adjustment is made at an engine temperature of approximately 20-22 degrees.
The camshaft on the UZAM-412 engine is located in the block head. The exhaust valves are located to the left of the camshaft mounted in bearings, the intake valves are located to the right.
Sequence of work
Let's take a step-by-step look at the procedure for adjusting the valves on Moskvich-412. It is necessary to disconnect the engine crankcase gas pumping hose from the valve cover and disconnect the carburetor vacuum corrector tube. On the Moskvich-2141 with the UZAM-412 engine, it is necessary to additionally remove the flexible air duct from the air intake pipe of the air filter. After unscrewing the seven fastening nuts with a socket wrench, you need to remove the valve cover from the head
It is important not to damage the cover gasket.
It is necessary to set the piston in the first cylinder to the top point for the compression stroke (TDC). The first is the cylinder next to the motor pulley. There is a special mark on the engine pulley that must be aligned with the pin on the crankcase. In addition, there is an additional risk on the gear for driving the camshaft. It needs to be combined with the tide on the head. When setting the dead center, you should rotate the crankshaft by the ratchet, and if it is missing, by the engine pulley.
Using a probe with a plate thickness of 0.15 mm, you should check the thermal gaps. The feeler gauge should fit through the gap between the rocker arm and the top of the valve stem with little force. If the gap does not match, it is necessary to adjust the Moskvich-412 valves.
To change the gap, loosen the clamp with a 14 mm wrench and rotate the pressure screw to set the required gap. After this, tighten the clamp and check the gap again. This operation is carried out on both valves of the first cylinder. The adjustment of the Moskvich-412 valves is completed on one cylinder.
Rotate the motor shaft 180 degrees clockwise. Carry out similar work in the third cylinder. By turning the shaft 180 degrees, set the gap in the fourth cylinder, then, turning the shaft again, in the second. Reinstall the removed parts. The valve adjustment in Moskvich-412 is completed. The check is carried out by starting and warming up the engine - the valves should not knock.
WE REPAIR AN OLD DISTRIBUTOR
2016-12-02 | “Behind the Wheel” No. 6, 1989
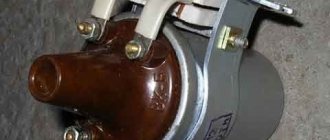
It is not always possible to purchase a new ignition distributor, especially for discontinued vehicles. These, in particular, include “Muscovites” of the “407”, “408” models and often even “412”, “Cossacks”. Therefore, if a P107, P118, etc. on a machine has large radial play of the roller, wear of the cam, contact plate, etc., which leads to interruptions in spark formation, I repair such a distributor on my own.
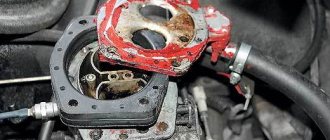
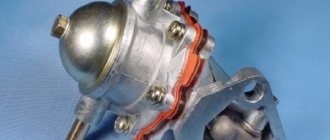
Having removed it from the engine, we clamp the steel shank of the distributor cast in a zinc alloy in a vice and check whether the housing has become loose (the housing of the four tested distributors was movable). The point, apparently, is that the vacuum chamber, mounted on a zinc housing, has a large mass and, when the engine vibrates, acts on the housing. The loosening of the octane corrector plate also contributes to loosening. In Moskvich-412, the distributor is generally installed inclined, and this increases the vibrations of the housing, and since the breaker contacts are installed in it, sparking failures are affected by both the backlash of the roller and the mobility of the housing.
In order to reliably connect the body to the shank, it is advisable to make one new octane corrector plate with a thickness of 4.5-5 mm instead of two weak (2-2.5 mm thick) octane corrector plates (Fig. 1), and also slightly increase the length of the window for the fastening pin to the engine. For marking we use a standard plate. In this case, we adjust the ignition by loosening the nuts securing the distributor to the engine.
Having installed the new plate under the body, tightly tighten the bolt in the hole (see Fig. 1) and weld its head to the plate, as shown in Fig. 2. Then, using a drill with a diameter of 5 mm, we make two (as many as possible) holes in the bottom of the body along its cylindrical neck and in the new plate. We pass M5 screws with a flat head (3 mm thick, can be countersunk) through them, tighten them from below with nuts, and then attach the screw from above to the plate by welding. All that remains is to remove the nuts and cut the screws flush.
You can make do with old plates by welding them at the corners. Pass the screws out of the body, tighten them with nuts to the plates and scald everything.
Now let's take on the bushings. As a rule, only the top one breaks. The necks of the roller, if there are no noticeable signs of wear (usually it does not wear out), are sanded to a shine with sandpaper - “zero” by hand. Using a hammer and a mandrel (Fig. 3) or a suitable drift, we move the lower bushing in place of the upper one, 3-4 mm short of the edge. We make a notch on the outer surface of the dropped upper bushing by hand using a file or a core to “raise” the size. Then we press the upper bushing with a mandrel into place of the lower one, deepening it from the end of the shank by 2.5-3 mm. It is usually possible to ensure that, due to the upset, the internal size of the sleeve becomes smaller and excessive play of the roller is eliminated.
If it is possible to find ready-made (metal-ceramic) bushings, after pressing it is necessary to process the holes in them with a reamer to a diameter that provides a minimum radial clearance with the roller. In all new distributors it does not exceed 0.04 mm.
All that remains is to drill holes for lubrication in the upper bushing, select 16X2 rubber rings or make fluoroplastic ones and place them in the recesses behind the bushings.
After assembly, the roller should rotate easily, otherwise the rings must be trimmed or sanded. These rings, acting as oil seals, will smooth out the angular vibrations that arise in the drive from the claw coupling and lever breaker.
When assembling the distributor, inspect the springs of the centrifugal machine. The stability of the sparking moment is disrupted if the small spring does not have at least minimal tension. At least on the inspected breakers, it sagged so that the cam freely rotated halfway through the groove in the plate before the large spring began to operate, and this is about 6-7°.
I stretch the tendrils on the small spring so that there is a gap between the coils for clearance. This ensures that the cam returns to its original position, that is, to the set ignition timing.
The large spring should have enough clearance to engage when the pin on the weight is approximately in the middle of the plate groove. The centrifugal regulator increases the ignition timing only to 2500-3000 rpm of the roller, bringing it to 14-17°. The weights cannot move further apart, since the pins rest against the ends of the grooves. With a further increase in speed, the advance angle increases by the vacuum chamber by another 3-4° (its maximum is 9.5°, but half has already been used up). So, when the roller rotation speed is about 3000 rpm, the advance is 20°, and at maximum speed it is 26°, which is clearly not enough. In this regard, it is advisable to check the angle of rotation of the plate using a protractor and, if necessary, lengthen the grooves by the same amount with a round needle file, bringing the angle to 18-19°.
You should also check the stroke of the vacuum regulator rod and, if necessary, increase the angle of rotation of the plate to 10-11° by cutting the end of the thrust bushing that limits the stroke of the diaphragm, or changing the number of washers placed under the end of the spring.
how to set tags on UZAM 412. Moskvich 2141 set ignition video
HomeIgnitionMoskvich 2141 set the ignition video
Timing adjustment star M412.
How to set the contact ignition on a Moskvich.
Features of installing the cylinder head on the engine.
Thank you for watching! OUR SPONSORS: https://vk.com/crazy_models_team Instagram of the old owner: https://vk.cc/5XgIbM VK group of the old...
This video was processed in the YouTube Video Editor (https://www.youtube.com/editor)
In the video I explain how to adjust the valves, timing and ignition distributor using a warning light.
This video is about how relatively easy it is to replace a chain guide on a UZAM engine. Link to excerpt...
This is how I have everything laid out.
GarageTools - Convenient supplier of professional tools and garage equipment. https://www.youtube.com/user/ThePetu…
One step forward, two steps back: some discrepancies in the valve adjustment work.
How to set the ignition on a Moskvich using a light bulb. And some thoughts about the future. Video
How to set the contact ignition on a Moskvich.
In the video I explain how to adjust the valves, timing and ignition distributor using a warning light.
This is how I have everything laid out.
Z534726278676 - for the development of the channel. How to set the ignition with a light bulb.
They washed down the BSZ into sadness.
Nowadays there are still sometimes Muscovites with a contact ignition system. In addition, be able to correctly display...
Carburetor manufacturers on the World Map - https://goo.gl/nHnuPa - near you! — Purchase from Nail: https://vk.com/page-60937161_48816656 — Product…
The distributor is installed on the engine. There is a small gap between the head and the distributor, which allows you to turn...
Source
Electrical wiring Moskvich 2140: features of electrical equipment
Did you like the article? Follow our channel for new ideas of useful car tips. Subscribe to us in Yandex.Zen. Subscribe.
A special feature of Moskvich 2140 cars is the modernization that took place in 1981. When carrying out routine maintenance, this fact must be taken into account, since the changes affected many components, including the electrical equipment of the car.
Specifications
Power unit
Moskvich-408 was equipped with a four-cylinder in-line overhead valve longitudinally located carburetor engine, which had a volume of 1.358 liters and produced 50 horsepower. Each cylinder had two valves. Preferred gasoline is AI-80.
If we compare the car with its previous models, the 408th model has increased the power of the power unit, which has a good effect on handling, and the reliability of the braking system. The engine received a new two-chamber carburetor K-126.
1.358 liter engine
Such engine power, at that time, was enough, but only for entry-level configurations. As a result, they decided to develop a modification of the 412th Moskvich, which had a completely different 75-horsepower power unit, made of aluminum and being an overhead valve. This motor had consistently good traction characteristics and high elasticity.
Transmission
The powertrain was paired with the same three-way, four-speed manual gearbox. Synchronizers were provided in 2nd, 3rd and 4th gear.
Until May-June 1972, the gearbox control lever was located on the steering column, in addition to cars that came in a right-hand drive version, and a little later they decided to move it to the floor. The switch lever on the side cover shaft has become slightly longer and cast.
Suspension
If you touch on the suspension of the 408th model, it was distinguished by high reliability and survivability. The front suspension was spring pinless independent with wishbones. It was assembled on a stamped cross member.
Suspension Moskvich-408
The rear suspension was dependent and was located on a pair of longitudinal semi-elliptical leaf springs. The installation of hydraulic telescopic shock absorbers was provided.
Steering
The steering device had a globoidal worm, where there was a double-ridge roller. Driving the car did not require much effort. When compared with the 407 model, the turning radius decreased by 1 meter (it was already 5 meters).
The two-spoke steering wheel had a recessed hub for safety and was made not of beige plastic, but of a reliable and more “long-lasting” black color.
Brake system
The braking mechanism had drum devices on all wheels.
There was also a hydraulic drive, and the first automatic adjustment of clearances in drum devices in the history of the Union of Soviet Socialist Republics. Specifications
| Number of places | 4-5 |
| Maximum speed | 120 km/h |
| Fuel consumption at a speed of 40 km/h | 6.5 l/100 km |
| Electrical equipment | 12 V |
| Accumulator battery | 6ST-42 |
| Generator | G-108 M |
| Relay regulator | RR-24G |
| Starter | ST-4 |
| Breaker-distributor | R-107 |
| Spark plug | A-7.5US |
| Tire size | 6,00-13 |
| Curb weight | 990 kg |
| Full mass | 1330 kg |
| Ground clearances | 178 mm |
| Smallest turning radius | 5 m |
| Front suspension | independent spring with wishbones, pinless, with hydraulic shock absorbers |
| Rear suspension | dependent on two semi-elliptic springs, with hydraulic shock absorbers |
| Steering gear | globoidal worm with double-ridge roller, gear ratio 17.0 |
| Front/rear brake | drum |
| Clutch | single disc dry |
| Transmission | mechanical four-speed with synchronizers in II, III and IV gears |
| Engine | MZMA-408 - in-line carburetor four-stroke four-cylinder overhead valve |
| Cylinder diameter | 76 mm |
| Piston stroke | 75 mm |
| Engine displacement | 1360 cm³ |
| Compression ratio | 7,5 |
| Engine cylinder operating order | 1-3-4-2 |
| Carburetor | K-126 |
| Maximum power | 50 l. With. at 4750 rpm |
| Maximum torque | 9.3 kgf. m at 2750 rpm |
Modifications
- Moskvich-427IE on the M-412IE platform - from the outside it was almost no different from the one produced at the same time and differing only in the M-426IE engine on the platform of the later M-408IE;
- Moskvich-408 – represents a standard sedan car;
- Moskvich-408E was an export version with a two-headlight radiator lining. The modification also met European safety standards;
- Moskvich-408I was an export variation of the sedan, which had a four-headlight radiator trim. Also met European safety standards;
- Moskvich-408IE - was an export version of the sedan, also complied with European safety standards;
- Moskvich-408P - represents an export variation of the sedan, which had a right-hand steering wheel. The model met European safety standards;
- Moskvich-408Yu - an export variation of the sedan for countries with a hot climate;
- Moskvich-408K was an export vehicle kit for large-scale production of a car;
- Moskvich-408M - a vehicle for medical services;
- Moskvich-408T - served in a taxi fleet;
- Moskvich-408B - the modification had manual controls (for the disabled);
- Moskvich-408U is a training variation of the sedan, where additional pedals and a steering wheel were installed.
AZLK 2141 | Engines | Moskvich
3.0 Engines
Cylinder operating order 1–3–2–4 Non-flatness of the lower surface of the cylinder head 0.05 mm Camshaft 1.8 l engine Cam heights: – intake 39.751 – 39.850 mm – exhaust.
3.2 Operations to repair an engine installed in a vehicle
Many engine repairs can be carried out directly on the car. Before starting repair work, it is recommended to thoroughly clean the engine and engine compartment. Depending on the type of work, you can remove the hood to facilitate access to the engine. Without removing the engine from the car, you can eliminate various types of leaks, for example, replace the gaskets.
3.8 Replacing camshaft sealing rings
PERFORMANCE ORDER 1. Remove the toothed belt, the toothed belt tensioner and the camshaft pulley. 2. Remove the rear timing belt cover. 3. Using a small screwdriver, remove the distributor O-ring.
3.13 Flywheel/drive plate
Removal PERFORMANCE ORDER 1. Raise the car and remove the gearbox. 2. Using a marker or paint, mark the position of the clutch drive assembly in relation to the flywheel. 3. Gradually, in a diagonal sequence, loosen b.
3.14 Replacing the rear crankshaft seal ring
PERFORMANCE ORDER 1. Remove the gearbox and flywheel. 2. The easiest way to remove the old O-ring is to use a screwdriver to hook the O-ring and remove it from its seat. 3. Also sealing.
Interior
Until 1968, the car was supplied in the front part of the cabin with a sofa-type seat, which had separate backrests. A little later, separate seats began to be installed on the car, both for the driver and for the passenger sitting next to him.
In both variations, the backrests of the seats were able to fold, creating a berth. Inside the Soviet sedan, they decided to trim the interior with leatherette in the color of the body, while its coloring options are different, and the plastic parts used inside the car began to be used less.
Original sofa seat
For example, already at the onset of 1966, the dashboard began to have soft plastic overlays - they decided to do this in order to increase the level of safety for the driver and the passenger sitting next to him.
Already in ’79, plastic linings were placed on the body pillars, and in ’71, the instrument panel was already decorated with a solid plastic lining. The heating system was already able to take in air both inside and outside the cabin.
In addition, it was possible to significantly increase the efficiency of the heating system by significantly increasing the active surface of the heat exchanger.
On top of that, heat inside the sedan was better distributed thanks to a six-bladed fan, which was driven by a powerful electric motor. The luggage compartment of the new car did not have such a large volume - 372 liters. The car also had a low loading height.
This minus significantly reduced the convenience of its use. The design staff also decided to place the spare tire flat on the bottom of the trunk, on the left side, which only took up even more of the already small volume.
Due to the wheel wells protruding towards the passenger compartment, it was quite uncomfortable for three adult passengers to sit on the back seat. But the legs of the driver and the passenger sitting in front were more spacious than, for example, in the Zhiguli, since the wheel wells were moved forward.
Historical excursion
Moskvich 2140 is the result of a deep modernization of the “412” model.
By the mid-eighties, the old model ceased to meet global demands, especially:
- An outdated body shape that did not allow the car to be equipped with passive safety systems;
- The interior was not as functional as its domestic counterparts, not to mention the imported car models with which it competed;
- Uninformative instrument panel. In addition, it was also dangerous, since no one in those years worked on safety issues in case of road accidents;
- Ineffective braking system, etc.
Period from 1976 to 1981
The modernized “one hundred and fortieth” first rolled off the factory assembly line in 1976.
In accordance with the factory classification and applicable industry standards, the restyled model with a sedan body received the name:
- "Moskvich-2140". The model was equipped with a UZAM-412 engine;
- "Moskvich-2138". The model was equipped with an M-408 engine.
For reference: The predecessor of the “412” appeared in the AZLK line thanks to the development of the new UZAM-412 engine. Its service life and technical capabilities turned out to be promising and modern, which made it possible to equip all subsequent models with this power unit.
Period from 1981 to 1988
Starting from 1981, the Moskvich 2140 was no longer equipped with the M-408 engine due to its low power (56 hp), which did not meet modern requirements. And the model itself was restyled.
Among the most radical differences between the “one hundred and fortieth” and its predecessor are:
- Front disc brakes (previously drum brakes were installed on the front and rear axles);
- The windows disappeared from the front doors;
- The car received a new bumper design;
- All chrome moldings were removed from the exterior trim, including the chrome radiator grille;
- Armrests and seats with headrests appeared in the cabin.
For reference: the updated model received the index 2140-01. The promotional video of those years strongly emphasized the changes made to the design of the car. Also, for the first time on cars, the inscription “AZLK” appeared on the radiator grille.
The export version had the factory index M-2140-117, and in everyday life the car received the name “Moskvich-1500 SL”.
Features worth noting:
- “Low” dashboard with new instruments and controls;
- Modern interior trim;
- New rear lights (all produced by Yugoslav companies).
For reference: it should be noted that the Moskvich 2140 car was painted for the first time in domestic practice with modern paintwork - “metallic”. And although the price of cars increased slightly, the car was not able to ensure its previous sales.
Ignition switch connection diagram
To install a new ZZ, your action plan should be as follows:
- disconnect the ground wire from the battery;
- set the key to position “0” of the ignition switch;
- Now you need to disconnect the electrical wiring from the terminals of the lock contact device;
- unscrew the four bolts securing the lock bracket on the steering column and remove its cover, and then the entire bracket with the lock;
- now remove the 3 screws securing the lock from the bracket, then remove the spring washers of the screws and the rubber bushing;
- using a screwdriver, press in the flat spring and unscrew the lock from the bracket;
- Installing a new device is done in the reverse order.
Sequence of valve adjustment on Moskvich-412
Moskvich-412 cars were produced at the Moscow (AZLK) and Izhevsk (IZH) automobile plants and were equipped with a four-cylinder UZAM-412 carburetor engine. The motor was in production until 2001 and is currently still very common.
Signs that adjustment is needed
A characteristic sign of the need to adjust the valves is knocking noises coming from under the valve cover when the engine is warm. Also, valve adjustment is required after grinding them into the seats.
Tools
To perform the work of adjusting the valves on the Moskvich-412, you will need a socket wrench with head sizes of 5 and 10 mm, a wrench with a throat size of 12 and 14 mm, as well as a standard set of feeler gauges. The adjustment is made at an engine temperature of approximately 20-22 degrees.
The camshaft on the UZAM-412 engine is located in the block head. The exhaust valves are located to the left of the camshaft mounted in bearings, the intake valves are located to the right.
Sequence of work
Let's take a step-by-step look at the procedure for adjusting the valves on Moskvich-412. It is necessary to disconnect the engine crankcase gas pumping hose from the valve cover and disconnect the carburetor vacuum corrector tube. On the Moskvich-2141 with the UZAM-412 engine, it is necessary to additionally remove the flexible air duct from the air intake pipe of the air filter. After unscrewing the seven fastening nuts with a socket wrench, you need to remove the valve cover from the head
It is important not to damage the cover gasket.
It is necessary to set the piston in the first cylinder to the top point for the compression stroke (TDC). The first is the cylinder next to the motor pulley. There is a special mark on the engine pulley that must be aligned with the pin on the crankcase. In addition, there is an additional risk on the gear for driving the camshaft. It needs to be combined with the tide on the head. When setting the dead center, you should rotate the crankshaft by the ratchet, and if it is missing, by the engine pulley.
Using a probe with a plate thickness of 0.15 mm, you should check the thermal gaps. The feeler gauge should fit through the gap between the rocker arm and the top of the valve stem with little force. If the gap does not match, it is necessary to adjust the Moskvich-412 valves.
To change the gap, loosen the clamp with a 14 mm wrench and rotate the pressure screw to set the required gap. After this, tighten the clamp and check the gap again. This operation is carried out on both valves of the first cylinder. The adjustment of the Moskvich-412 valves is completed on one cylinder.
Rotate the motor shaft 180 degrees clockwise. Carry out similar work in the third cylinder. By turning the shaft 180 degrees, set the gap in the fourth cylinder, then, turning the shaft again, in the second. Reinstall the removed parts. The valve adjustment in Moskvich-412 is completed. The check is carried out by starting and warming up the engine - the valves should not knock.
Autoclub "Moskvichemaniya"
| Current time: 29 Dec 2022, 17:35 |
Time zone: UTC + 2 hours
Ignition settings
You set it by label. You remove the distributor drive, insert the distributor into it in such a way that you can then turn it right and left, so that nothing interferes. You remove the distributor cover and insert the distributor together with the drive into the engine. Since the threads on the drive gear are oblique, when you insert all this, the slider will turn at a certain angle (in my opinion, the slider will turn clockwise). You need to insert it so that the slider looks approximately at the first cylinder after this turn. After that, you remove the distributor from the drive, screw the drive, insert and screw the distributor. Next, you adjust the ignition only by turning the distributor.
Why is it more convenient? Because you can set the drive so that nothing will interfere with the rotation of the distributor. For example, when installing the BSZ distributor, it was impossible to turn it in one direction - the chip with the wires rested on the radiator.
_________________ IZH-412 IE, 1975, white night, MPSZ MaYa, OZONE 2140-20, central locking and CONVOY alarm, air thermostat and dynamic boost). Status - In a coma. He fell in an unequal battle with a minibus.
Every solution creates new problems
A long 12 or 13 wrench nut loosens or clamps the distributor. If we turn the distributor in the direction of its rotation, the ignition is late, if against it, we advance it. Detonation is an early ignition.
_________________ in electrics there are only two faults - there is no contact where it should be and there is contact where it should not be!
the one who searches knows something
If you collect all the urine, do everything skillfully - You can piss on the Sun - so that it hisses!
The steeper the jeep, the further you have to go behind the tractor.
my horse IZH-412 - BSZ, Solex21083, basin, VolgoGTC and a few little things - already the corpse of IZH 21251 - everything that was good on the 412 was removed and installed here)) AZLK 2140 SL is truly mine
Time zone: UTC + 2 hours
Who's at the conference now?
This forum is currently viewed by: no registered users and guests: 0
Ignition switch connection diagram
To install a new ZZ, your action plan should be as follows:
- disconnect the ground wire from the battery;
- set the key to position “0” of the ignition switch;
- Now you need to disconnect the electrical wiring from the terminals of the lock contact device;
- unscrew the four bolts securing the lock bracket on the steering column and remove its cover, and then the entire bracket with the lock;
- now remove the 3 screws securing the lock from the bracket, then remove the spring washers of the screws and the rubber bushing;
- using a screwdriver, press in the flat spring and unscrew the lock from the bracket;
- Installing a new device is done in the reverse order.
how to set the ignition on a Moskvich 2140 - Video tutorials
How to set the contact ignition on a Moskvich.
How was the ignition earlier...again? Details in the new video from Nail Poroshina! Enjoy watching!…. ˜ Dear subscribers! We recommend that you visit the website - https://minibk.ru.
Here you will find information about a multifunctional device that allows you to measure fuel consumption, including gas, if the car is equipped with an LPG system, measures temperature and on-board voltage, and can answer the question - “What time is it now?”
The developer of the device is our friend Alexey Tretyakov, an excellent specialist in the field of microelectronics and just a good person.
Video about repair and diagnostics of the Moskvich 2141 car. Enjoy watching.
The operating order of the Moskvich cylinders
Moskvich from A to Z Ignition system Hello everyone!
In 14 videos on car repair AZLK MOSKVICH 2140, we will look step by step at how to remove the coil...Moskvich 408 with a 412 engine. Working on 1 cylinder This is the process itself, installing high-voltage wires on a Muscovite. Look and you will find it)). So nothing special) a common thing for a home-made person) The order of operation of the cylinders in an in-line 4-cylinder Moskvich engine, engine operation BB-wires, Butler, on Moskvich 412 - 2140 Good silicone wires. They got mixed up and mixed up! (ANTIrepair of the Unkillable Moskvich) The “ANTIrepair” section is with you again. The unkillable Moskvich car was subject to the ANTI-repair phenomenon. Grandfather... Setting the ignition Moskvich. Part 1. Cam clearance. Setting the ignition gap Moskvich. how to set the ignition on a Moskvich 2140 Moskvich 412 a little preparation after 8 years of hibernation Work done. Setting the ignition Moskvich. Part 2. Moment.Motor assembly Moskvich 2141 (M412)Moskvich M412 assembly Finally!! The long-awaited assembly is here!! We hope that our efforts were not in vain. Please note...the car is NOT wired! (+ Resistance tests) This video was not entirely successful... Nail Poroshin quickly figured out the reason why... Moskvich IZH-412: adjusting thermal valve clearances and all that I haven’t dealt with Muscovites, but now I’ve gradually become familiar with the technical part of the engine. Ignition installation any way!!! cylinder (with plug) Dear subscribers! We recommend that you visit the website - https://minibk.ru. Here you will find information about multifunctional... avtoclubvideo.ru
How to set the ignition on a Moskvich 412
Error-free and quick installation of the ignition on a Moskvich with your own hands
The owner of a traditional model of the Russian automobile industry should know how to set the ignition on a Moskvich-412. This is a fairly simple process, but can still be difficult if you don't know the steps. Specifically, how the ignition is installed on the Moskvich 2140 and other models of the brand will be discussed in this article.
Why turn on the ignition?
If you set the ignition timing correctly, this will directly affect the dynamics of the car. This will also save fuel. If the ignition is too late, the engine overheats, the working mixture does not burn completely and this also reduces power.
If the engine starts too early, this may cause detonation knocks in the engine. This can even cause valves and pistons to burn out.
Installation instructions
To work, you will need tools such as a set of keys and a test lamp.
The procedure for setting the ignition of the Moskvich-412 is as follows:
How to display
contact ignition on Moskvich
.
How to set the ignition on a Moskvich using a light bulb. And some thoughts about the future
Setting the ignition gap Moskvich
In the video below you will learn how to set the cam clearance (author of the video Garage in the USSR).
Checking for correct installation
The most accurate method of checking the ignition setting is to perform a drive test. To do this, you need to accelerate to 55-60 km/h on a flat road, and then give full throttle.
Acceleration is carried out in fourth gear. If knocking occurs after a sudden fuel supply, you need to set the ignition later.
Make sure that only 1-2 light knocks are heard.
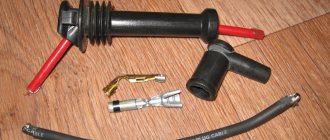
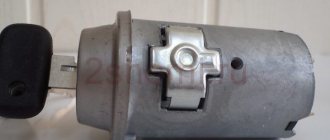
Tumblr installation and repair
The tumbler, also known as the ignition drive, may have various malfunctions: cracks in the cover, dirty or wet contact, or broken contact in the power circuit. You can solve them all or just replace the part.
To connect a new part, you will need to check that the roller is installed correctly in the housing. Then, after removing the tumbler cover, insert the shank into the distributor drive housing on the engine. Turn it until the floating clutch pins align.
Next, tighten the nut securing the distributor shank to the drive housing. Install the cover. Then, insert the high-voltage wires from the spark plugs in cylinder firing order 1-3-4-2, taking into account the rotation of the distributor rotor.
Now connect the vacuum regulator tube. Installation completed.
Video “How to correctly set the ignition on a Moskvich 2140”
This video demonstrates how adjustments are made on one of the most popular Moskvich models (video author Maxim Mitin)
Examples of savings calculations in St. Petersburg
Let's calculate the difference in the cost of refueling gas and gasoline using two examples:
- From Nevsky Prospekt to the Ring Road and back in St. Petersburg 60 km. Let's take this distance as the daily mileage rate and calculate the benefit for the month.
- From St. Petersburg to Moscow - 710 km. Let's calculate how much you can save on a trip to Moscow and back.
Savings after switching to gas
| Engine | From Nevsky to Ring Road and back every day for one month | From St. Petersburg to Moscow and back | ||||
| Petrol | Propane | Saving | Petrol | Propane | Saving | |
| 1.5 MT | RUB 9,153 | RUB 4,910 | RUB 4,243 | RUR 7,221 | RUB 3,874 | RUB 3,347 |
| 1.5 MT | RUB 5,299 | RUB 3,485 | RUB 1,814 | RUB 4,180 | RUB 2,749 | RUB 1,431 |
| Prices in calculations: AI-92 - 45.00 rubles, AI-80 - 36.80 rubles, CIS - 22.00 rubles. | ||||||
If you use Moskvich 412 rarely and travel short distances, then the benefit will be insignificant. But if you spend more than an hour driving every day, HBO will pay for itself in the first year. Calculate how much you will save at the gas station based on your mileage in the savings calculator.
Tell your friends how to save money while driving:
- Go to page:
How to set the ignition on a Moskvich 412
Error-free and quick installation of the ignition on a Moskvich with your own hands
The owner of a traditional model of the Russian automobile industry should know how to set the ignition on a Moskvich-412. This is a fairly simple process, but can still be difficult if you don't know the steps. Specifically, how the ignition is installed on the Moskvich 2140 and other models of the brand will be discussed in this article.
Why turn on the ignition?
If you set the ignition timing correctly, this will directly affect the dynamics of the car. This will also save fuel. If the ignition is too late, the engine overheats, the working mixture does not burn completely and this also reduces power.
If the engine starts too early, this may cause detonation knocks in the engine. This can even cause valves and pistons to burn out.
Installation instructions
To work, you will need tools such as a set of keys and a test lamp.
The procedure for setting the ignition of the Moskvich-412 is as follows:
How to display
contact ignition on Moskvich
.
How to set the ignition on a Moskvich using a light bulb. And some thoughts about the future
Setting the ignition gap Moskvich
In the video below you will learn how to set the cam clearance (author of the video Garage in the USSR).
Checking for correct installation
The most accurate method of checking the ignition setting is to perform a drive test. To do this, you need to accelerate to 55-60 km/h on a flat road, and then give full throttle.
Acceleration is carried out in fourth gear. If knocking occurs after a sudden fuel supply, you need to set the ignition later.
Make sure that only 1-2 light knocks are heard.
Tumblr installation and repair
The tumbler, also known as the ignition drive, may have various malfunctions: cracks in the cover, dirty or wet contact, or broken contact in the power circuit. You can solve them all or just replace the part.
To connect a new part, you will need to check that the roller is installed correctly in the housing. Then, after removing the tumbler cover, insert the shank into the distributor drive housing on the engine. Turn it until the floating clutch pins align.
Next, tighten the nut securing the distributor shank to the drive housing. Install the cover. Then, insert the high-voltage wires from the spark plugs in cylinder firing order 1-3-4-2, taking into account the rotation of the distributor rotor.
Now connect the vacuum regulator tube. Installation completed.
Video “How to correctly set the ignition on a Moskvich 2140”
This video demonstrates how adjustments are made on one of the most popular Moskvich models (video author Maxim Mitin)
Installation instructions
To work, you will need tools such as a set of keys and a test lamp.
The procedure for setting the ignition of Moskvich-412 is as follows:
- First, remove the valve cover. Next, use the starting handle and crank the crankshaft. Continue until the mark on it coincides with the tip of the pin on the block, and the mark on the sprocket also matches the mark on the cylinder head.
- Release the latches and remove the tumbler cover. Using a “10” wrench, unscrew the two nuts and lift the tumbler. The slider must be positioned opposite the wire of the first cylinder.
- Now place the tumbler in place and tighten it. Start the engine. Using a key set to “12”, you need to loosen the hexagon at the bottom of the distributor. With the engine running, you need to turn the distributor until you hear the engine running smoothly. This is a way to set the ignition by ear.
- Adjustment is also carried out through a control lamp. If you align the marks and direct the slider, you need to loosen the distributor. One wire of the control lamp must be connected to the low voltage terminal, the other to ground. Turn on the ignition. While holding the slider, turn the breaker until the light comes on, this will be the ignition moment.
Distributor in a car
The procedure for setting the ignition of the Moskvich-412 is as follows:
- First, remove the valve cover. Next, use the starting handle and crank the crankshaft. Continue until the mark on it matches the point of the pin on the block, and the mark on the sprocket also matches the mark on the cylinder head.
- Release the latches and remove the tumbler cover. Using a “10” wrench, unscrew the two nuts and lift the tumbler. The slider must be placed opposite the wire of the first cylinder.
- Now place the tumbler in place and tighten it. Start the engine. Using a "12" key, you need to loosen the hexagon at the bottom of the distributor. With the engine running, you will need to turn the distributor until you hear the engine running smoothly. This is a method of setting the ignition by ear.
- Adjustment can also be carried out through a control lamp. After you align the marks and direct the slider, you need to loosen the distributor. One wire of the control lamp must be connected to the low voltage terminal, the other to ground. Turn on the ignition. While holding the slider, turn the breaker until the light comes on, this will be the ignition moment.
In the video below you will learn how to set the cam clearance (the author of the video is Garage in the USSR).
How to set the ignition on a Moskvich 2140
How to set the contact ignition on a Moskvich.
How to set the ignition on a Moskvich using a light bulb. And some thoughts about the future.
Setting the ignition gap Moskvich.
In the video below you will learn how to set the cam clearance (author of the video Garage in the USSR).
How to set electronic ignition on a Muscovite 412 video
the engine was without a distributor and coil, I took electronic ones from 2108, now the question is how to connect the new coil to the old wiring. You can answer me in PM.
Vadim (Marcenia) this is shit. I need Volgov's
Stas (Bronka) Got it, what does it look like or in the store just say Volgovsky.
Vadim (Marcenia) Stanislav, you can leave your distributor. switch and coil Volga-31029-3102-3110. But you can also look for a distributor. It comes as a modification of the Volgovsky for the Muscovite. You can look up their catalog numbers on the Internet, write them down and search.
Stas (Bronka) Vadim, thank you, I’ll try.
Sergey (Ameya) I installed sonar-IR instead of contacts. There are places in the distributor that need to be sharpened, but it works flawlessly, the spark is horsepower. Although there are many reviews on the Internet that sonar is crap, I thought so myself until I did everything properly in the distributor.
Vladimir (Jerralyn) I found a Hungarian distributor from 08 or 09 at my grandfather’s market, I made an adapter from the old distributor on a lathe, set everything up, adjusted it - it works perfectly. Switch and cat from 08.
Kirill (Firdaus) The Volga ignition has a magnetoelectric sensor, which does not work at high speeds. What is good for ZMZ 402, Ufa is not ice. If you set it, then from 2108. It works well.
Anechka (Zyon) Good afternoon, tell me, could someone here find such a device useful? I offer a new and used SECU-3T microprocessor control unit for ignition and injection of internal combustion engines that will provide the advantages of an injector to a carburetor, including better dynamics in all engine operating modes, stability of its operation and easier starting in winter. All main parameters of the SECU-3 system are configured on the go using a laptop. The benefit is improved engine performance, insignificant, but there is, fuel economy, increased environmental friendliness of the car.
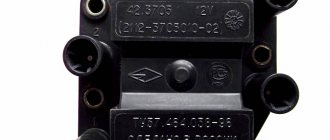
Basic information about the contactless ignition system
The contactless ignition system is considered a continuation of the design of the transistor-contact system. The proximity sensor replaces the standard contact breaker of this system. Thanks to this system, it becomes possible to reduce fuel costs, increase engine power, reduce harmful emissions using a high discharge voltage of thirty thousand volts, as well as increase the quality of combustion of the air-fuel mixture.
The design of the contactless system of the Moskvich car is similar to the wired system, only the signal sensor and transistor switch are excluded and includes a whole list of various elements, which include:
- Coil;
- Switch;
- Contactless distributor;
- High voltage wiring.
Contactless ignition system for Moskvich
The main advantages of installing a BSZ on Moskvich are:
- Improved engine starting, especially noticeable in the cold season;
- Saving engine operation.
- Improving engine stability;
- Increasing high voltage and spark discharge energy.
What is the operating principle?
A special sensor and distributor, when the engine crankshaft rotates, generates voltage signals, and then displays them on a transistor switch. The transistor switch generates signals in the initial winding circuit on the ignition coil. When the current in the secondary winding of the coil is interrupted, a high voltage current is generated and transmitted to the main contact of the distributor. Depending on the order of operation of the vehicle engine cylinders, high voltage current is transmitted to the spark plugs through high pressure wiring.
The spark plugs ignite the air-fuel mixture. As the engine crankshaft speed increases, the ignition timing is adjusted using a centrifugal ignition timing regulator.
When the load on the engine changes, the function of regulating the ignition timing switches to the vacuum ignition timing regulator.
Ignition timing angle of VAZ 2107
Incorrectly set ignition timing can be diagnosed by a prolonged detonation sound, monitored when engaging fourth gear at a speed of 50 km/h and sharply pressing the gas pedal. When the ignition is set correctly, the ringing sound lasts no more than 3 seconds. A prolonged sound of detonation indicates an overestimated ignition angle, and its absence indicates an underestimated ignition angle. To adjust the ignition timing, you need to unscrew the bolt securing the distributor to the cylinder head. In order to reduce the ignition angle, the distributor housing must be turned clockwise, and in order to increase it, counterclockwise. After completing the setup, you need to put the distributor cap back in place.
Note! Checking and setting the ignition timing on Moskvich vehicles is recommended no more than every 10,000 km. Useful advice If you do not have a starting handle or the possibility of using it, engage fourth gear and, pushing the car, set TDC and combine the risks
Useful advice If you do not have a starting handle or the possibility of using it, engage fourth gear and, pushing the car, set TDC and combine the risks.
This is interesting: How to replace thresholds on a VAZ - we outline the essence