Print this article Font size 16
The VAZ 2110 car itself is quite nice. An important advantage of the model is that it interacts well with various tuning methods. This car is literally made to be customized.
Moreover, the improvement should be not only technical and external. Many people do the right thing when they decide to replace their door trim. So the interior looks richer, more interesting, newer, the inside looks no worse than modern foreign cars. The most important thing is that you can do all this yourself. More about this in our article today.
What you can get
Replacement options
Today you can find VAZ 2110 door cards ready for installation, especially in the Lux or Lux 2 versions; they can be either purely plastic or with fabric inserts.
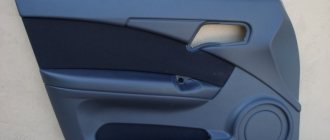
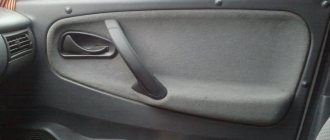
Door trim VAZ 2110 Lux
There are also euro panels, which in online stores are most often called “Door trim for VAZ 2110 Lux 2”. The finished cladding probably has only one drawback - its high price.
But there is another, more budget-friendly option - to do the door trim yourself. With the right approach, you will cope with this task, and we will tell you how to do it correctly.
Tools and materials
Before you start upholstering doors with your own hands, you need to stock up on what you can’t do without:
- Fabric or vinyl (another name is faux leather) is best purchased in stores that sell fabrics. Even before you go there, take measurements of your doors so that there is about 5 centimeters of allowance on each side. This is necessary to ensure that the fabric fits perfectly, and most importantly, that it is enough to fill all the protrusions and cavities;
- Glue like Moment or another that has worked well for you. Possibly – Titan, Master, etc.;
- Cutting scissors;
- Stationery type knife;
- Construction hairdryer. If you are unlikely to need it in everyday life, you can often rent it;
- 2 brushes: narrow and wider with normal bristles;
- Antenna cable;
- Upholstery fastening pistons (clips). It is better to take them with a small reserve, since their removal is often accompanied by breakage. Please note that each door has 8 pistons;
- Self-tapping screws. If you are making fabric or vinyl trim, then standard, short screws, the same as the previous ones on the door, will do. But if you are going to install Euro panels with your own hands, then to attach them to the bottom you will need long self-tapping screws;
- You may need new speakers, these should also be purchased in advance. Please note that usually in ready-made Lux 2 panels there are holes for speakers of 16 - 17 cm.
Options
There are several options for replacing door trim. Each of them has its own characteristics, advantages and, of course, the final appearance.
- Lux 1 and Lux 2. These are ready-to-install cards designed specifically for the domestic top ten. Depending on the design, these door cards are made entirely of plastic or with inserts made of fairly good quality fabric.
- Europanels. For some reason, in online stores such products are called Lux 2 door trim, although this is actually a little different. Regardless of the name, this trim looks great. But it has a serious drawback - high cost.
- With my own hands. The most budget option for replacing door trim. If you approach this issue competently and consistently, you can easily cope with the task without outside help. Today we will talk about them in more detail.
Required Tools
Any work involving repair or modification of a car begins with the search for the necessary materials and tools.
This list is mandatory; without it, it will be impossible to carry out work on replacing the door trim.
- Fabric or artificial leather, that is, vinyl. Buy them at fabric stores. Don’t forget to make replacements and calculations first to determine the exact amount of upholstery material needed. IMPORTANT! There should be an allowance of 5 centimeters on each side of the door. This significantly affects the total amount of fabric.
- Glue. Choose a proven adhesive that is sure to hold your new upholstery. It could be Moment, Master, Titan or something similar.
- Scissors. They will be used to cut upholstery material.
- Stationery knife. Something will definitely have to be cut off. In this case, a sharp stationery knife cannot be replaced.
- Construction hairdryer. It’s not worth buying it for one event to modify the car. Today this device can be rented.
- Brushes with high-quality bristles. One should be narrow, and the second should be a little wider.
- Antenna cable.
- Mounting clips. With their help you will attach fabric or leather. Be sure to buy extra, as these caps may break during installation. Also keep in mind that there are 8 pistons for each door.
- Self-tapping screws. Their size depends on the selected panels. If these are handmade products, you will need short, standard self-tapping screws. If we are talking about Euro panels, then purchase long screws.
- Speakers. New pre-fabricated panels include holes for speakers. So, in Lux 2 their size is about 17 centimeters. This is an excellent reason to install a new audio system in the cabin.
Dismantling
Front doors
Removing door trims is not at all difficult. The only unpleasant thing is that the clips are often damaged.
They can, of course, be repaired, but it’s much easier to stock up on ready-made ones without fooling yourself. There are some peculiarities: if you have euro cards, you need to dismantle the window lift lever (if your VAZ has one).
But we will tell you about the basic algorithm for dismantling door trim with your own hands:
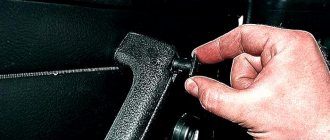
- It is necessary to use a thin screwdriver to press the trim of the manual window lift handle away from the socket, guiding it so that it disengages and remove it. If you have electric windows, then naturally skip this point;
- Remove the socket;
- Using a screwdriver, release the locking mechanism for the inner handle of the armrest and remove it;
- Remove the screws securing this handle;
- Press the inner handle of the lock, turn the armrest handle up and remove it;
- Unscrew the button blocking the door lock;
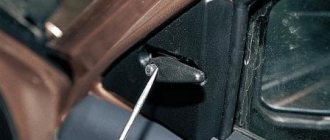
- Unscrew the screw securing the outside mirror control mechanism and remove it from the lever;
- Remove the triangular trim, removing the pistons for its fastening from the two holes in the door.
Rear doors
Removing the rear door trim of a VAZ with your own hands has some differences.
First you need to unscrew the fastening screws (there are 3 of them) and remove the cover. Using a screwdriver, press the upholstery so that the pistons bounce off.
When doing this, keep the screwdriver close to each piston so as not to tear off the holders. It is also necessary to remove the spacer sleeve from the window lifter shaft.
Removal
Dismantling work is the beginning of your journey to replacing the door panel trim. It's nice to know that this task is quite simple. This is especially true for the front doors.
We will tell you separately about the nuances of dismantling the front and rear door trims of your VAZ 2110.
Disassembled cards
Front
Let's say right away that the likelihood of damaging the standard clips is very high. But this is not scary, since new products are cheap, and their installation is much simpler than repairing old caps.
If you are installing Euro panels, you will have to remove the lever from the window regulator.
The process is performed according to a certain algorithm:
- Using a thin screwdriver, pry the window handle trim away from the socket. Direct it in such a way that it disengages. Now remove the lining. This item is not relevant for those whose car is equipped with electric windows;
- Remove the socket now;
- Using a screwdriver, press out the latch on the plug for the inner handle of your armrest, and then remove it;
- Remove the handle mounting screws;
- Press the inner handle of the lock and turn the armrest handle up. This way you can remove the element;
- Next, unscrew the button that blocks the door lock;
- Remove the screw that secures the exterior mirror control mechanism. It must be removed from the lever;
- Remove the triangular trim. To do this, the fastening pins are removed from two holes in the door.
Upholstery in all its glory
Rear
The rear trim is removed slightly differently. But this does not make the procedure significantly more complicated.
- Remove the three mounting screws;
- Remove the trim;
- Using a screwdriver, press out the upholstery. This will allow the pistons to pop out;
- Try to keep the screwdriver as close to the piston as possible to avoid breaking the holders;
- Don't forget to also remove the spacer sleeve from the window lift shaft.
Self-upholstery
Now we can begin to create a new look for your interior by independently reupholstering the dismantled door panels.
Preparations are in full swing
Before starting work, be sure to clean the cards, go over them with a vacuum cleaner, and replace the door seals if necessary. This will allow them to close better, without unnecessary noise.
The job of re-upholstering yourself is not difficult. Especially if you already have experience working with fabric or leatherette in or outside the car.
- Measure and cut the pieces from your chosen fabric or vinyl to size.
- An allowance of 5-7 centimeters must be provided for each side. This is necessary in order to avoid the use of patches when covering.
- Gradually apply adhesive to the cards, letting it dry a little. Just be sure to make sure that the glue does not dry completely.
- When you have coated the doors, use the same glue to treat the surfaces of fabric or leatherette, depending on what you choose. Let these elements sit for about 10 minutes so that the glue dries a little, but does not dry out.
- After the specified time has passed, begin gluing elements of the material onto the door cards. Vinyl is good because it stretches well and fills all the differences and depressions in the card structure.
- To ensure that the vinyl stretches and fills all the gaps, preheat the material using a hair dryer.
- Smooth the material by hand, but it is better to wear gloves for this.
- The edges with the allowance are carefully folded to the wrong side, after which they can be trimmed.
- Do the same with all the doors of your VAZ 2110. As you can see, there is nothing complicated here.
- Experienced car owners and fans of comprehensive tuning of domestic cars note that some other interior elements should be covered with the same material in order to achieve an ideal picture of the car’s interior. This could be the glove compartment lid, a triangle near the mirrors, a steering casing, etc.
- When reassembling cards with new skins, use pistons. To install them, you will need to make appropriate holes in the casing. This is where a sharp utility knife comes in handy.
Tuning
After finishing removal, clean the cards from dust using a vacuum cleaner, and begin tuning yourself.
First of all, measure and cut the necessary “patterns” for all door cards, taking into account an allowance of 5 or even 7 centimeters for each side.
This is so that during the process of gluing the sheathing material you do not have to install patches or redo everything all over again.
The glue must be applied to the cards with brushes one at a time so that it has time to dry a little, but not dry out. Having coated the doors with glue, we proceed to the cut piece of vinyl or fabric, which we also coat with glue on the back side, and set aside for 10-15 minutes.
After this time, we proceed directly to gluing the upholstery to the door cards. Vinyl stretches well, filling door “cavities”, but for this it needs to be heated with a hair dryer and smoothed over each cavity and bulge with your hands, preferably with gloves. The edges need to be carefully folded inside out and trimmed.
We subject the remaining doors to the same procedure. In addition, it is advisable to paste the same material over other parts of the interior so that it is in the same style.
These include door handle inlays, the glove compartment lid (if you want to highlight it), triangles at the mirrors, and the top cover of the steering casing. In places of various fastenings, you need to cut small holes using a stationery knife.
When reinstalling, do not forget to replace damaged pistons.
Installation of a ready-made kit
If you decide to buy a ready-made set - VAZ Euro trim panels Lux 2, you will get a more stylish version of the interior.
In addition, such plastic panels improve sound insulation, which is always important for VAZ.
You can also install them yourself.
Door trim VAZ 2110 Lux
We have already talked about how removal is carried out, and now about some of the subtleties of installing Lux 2 upholstery:
- The kit usually includes only the upholstery panels themselves in the amount of 4 pieces. Everything else for them - caps, meshes for the speakers - needs to be purchased.
- Don’t really believe sellers who claim that the Lux 2 upholstery will exactly fit the doors of the VAZ 2110. Don’t be surprised if some of the clips don’t fit, usually 2 of them in the front door, and 1 in the rear.
- Be sure to secure the bottom of the casing with long self-tapping screws.
- If your front doors are not equipped with power windows, you will have to make holes for the handles.
- With conventional window lift handles, a gap will form in the rear doors, which will need to be masked, for example, using a piece of hose. However, it would be better to immediately install electric windows on all doors - it’s convenient, plus the trim panels will fall into place without problems.
Working with ready-made kits
Do-it-yourself upholstery is good, cheap, and the interior will be a source of pride for you, since you decorated it with your own hands.
But still, not every car owner is well versed in fabrics, knows how to sew, or has mastered all the nuances of a pattern. So the result does not always live up to expectations.
Therefore, we advise you to pay attention to ready-made kits. Factory VAZ Lux 2 panels are in great demand; they create an excellent appearance for the interior.
An important advantage of Lux 2 type kits is the presence of an additional sound insulation effect, which is very important and useful for the VAZ 2110.
It is not necessary to contact specialists, since the installation can be done by yourself.
- The kit often includes only panels - 4 units. But the grids for the speakers, pistons and other elements will have to be purchased separately.
- You should not trust sellers who claim that Lux 2 fits perfectly on the doors of the domestic top ten. Some of the pistons probably won’t want to be installed where they are supposed to be. This is because they slightly do not match the car model.
- Fastening from below must be done using long self-tapping screws.
- If your doors do not have power windows, then you will have to slightly change the configuration of the panels yourself by cutting holes in them for the “oars”.
- The problem of the gap that is formed as a result of installing Euro panels on a model with manual windows can be solved by masking it with some object. Although the best solution is to re-equip the car by installing electric windows.
Example of a finished banner