→ Electrical appliances
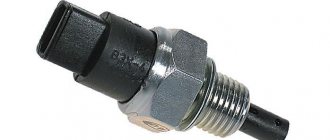
Reverse sensor
(DZH) - is a device that activates the reversing lights (white) when you engage the appropriate gear and start moving in reverse. In this way, you notify motorists (pedestrians) standing behind you of your intentions, that is, that you are going to drive in the opposite direction.
Today we will talk not only about what this sensor is, but also how to check it if it malfunctions and replace it with your own hands, if necessary.
I would like to note right away that non-working reverse lights are not conclusive evidence that the reverse sensor is faulty; perhaps the reason is quite trivial, for example, a wiring has come loose or a light bulb has burned out. Therefore, in order not to make unnecessary movements, make sure that the reason is in this sensor, and not in the light bulb or wiring.
Additional reasons why the lights do not light up when reverse gear is engaged:
- , which is connected by a DZH chain and lanterns;
- Failure to fit the reverse sensor;
- The contacts of the flashlights have oxidized;
- There is no wiring contact between the fuse block and the plug.
Where is the reverse sensor located?
The DZH can be seen if you drive onto an overpass and climb under the car, there will be two sensors on the gearbox, one of them is the , the second is the reverse sensor
.
Symptoms of a faulty reverse sensor
You put the car in reverse, but the lights do not come on, although both the bulb and the wiring are in good condition.
Causes of failure
Before you start replacing the reverse sensor (RDS), we recommend checking the condition of the rear lights and determining whether the signal may not be working for other reasons.
Possible reason
Your actions
A common and fairly banal cause of problems, which, nevertheless, many ignore. Take out the light bulb, arm yourself with a multimeter and check if they have burned out. Replace if necessary
The problem is no less common, but looking for the source of the problems in such a situation is a little more difficult. You will also need a multimeter, which you need to test the wiring and check the resistance readings
Poor regulator contact
It happens that during operation the contact of the sensor with the socket is broken. Lack of contact means that the device will not work normally. So check its condition
Wiring insulation is broken
If the insulation on the wires near the sensor is broken, this can lead to a short circuit. The result is quite obvious, so check the condition of the wiring and replace it if necessary
Depending on the type of fuse box, check the condition of the corresponding element in the mounting block. On old-style blocks this is fuse F16, and on new-style fuse blocks you should look at fuse 5. If they are melted, they will need to be replaced. But it is also important to determine the reason why the fuse blew
A failure of the reverse control itself may be indicated by a situation where the lights do not light up at all or, on the contrary, light up without interruption. In the second case, the option of burnt out light bulbs is excluded by itself.
Replacing a reverse sensor is not a difficult or financially expensive job. Today, the DZH can be purchased at any auto parts store, and its cost is about 100 rubles.
How to check the reverse sensor on a VAZ 2114?
- Disconnect the power wires from the reverse sensor.
- Connect the wires directly to each other.
- Turn on and .
Conclusions:
- If the lights are on in this position, the sensor is faulty and must be replaced.
- If even in this position the lights do not light up, the reason is in the circuit, the sensor most likely has nothing to do with it.
- Using a tester or multimeter, measure the voltage on ground and the orange wire that comes from the DZH; if there is voltage, you need to check the board of white lights, as well as the contacts. There may be no contact between the fuse box and the sensor contacts.
VAZ 2114 (2113) stops do not work
The VAZ 2114 (2113) car is equipped with brake lights in the rear lights (one in each light).
Plus, an additional brake light in the spoiler on the rear door. There are few reasons why the brake lights of a VAZ 2114, 2113 car do not work. Let's list them all and try to figure out this problem ourselves.
Stop lights (brake lights) of VAZ 2114 (2113) do not work, causes of malfunction
Either one brake light or two at once may not work.
— The brake light bulb in the rear light has burned out
Most often, only one lamp burns out, but sometimes two lamps burn out.
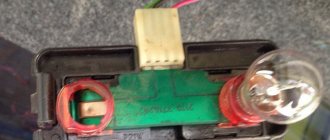
Brake light (stop) lamp in the rear light of a VAZ 2114 (2113) car
In this case, you will have to replace the lamp with a new one or a known good one. The brake light uses a P21W lamp. Similar lamps for the turn signal, reverse light, and fog light are in the same rear light. They can be used to check the brake light by replacing it.
— The contacts in the stop lamp socket have oxidized
In this case, a “break” occurs in the electrical circuit of the lamp. Most often, in this case, one brake light will not work, while the other will be on.
Cartridge and contacts of the brake light lamp in the rear light of VAZ 2114, 2113
To restore contact, you need to turn the light bulb in the socket several times, or remove it and clean the oxidized contacts with fine-grained sandpaper.
— The wiring block for the rear light is faulty (chip)
Either it is not securely fastened, or the contacts have oxidized. In any case, there will be an open circuit in the electrical circuit.
Replacing the reverse sensor on the “fourteenth”
To replace the sensor you will need: a new reverse sensor, an overpass, transmission oil, as well as empty containers and rags. The fact is that when you unscrew the old ESD, oil will flow out of the hole.
- Drive the car into the pit and place it on.
- Remove the engine crankcase protection.
- Remove the contacts from the DZH
. - Carefully clean the work area from dirt and dust.
- Bring the container prepared for the oil to the reverse sensor and unscrew it.
- Try to quickly remove the old ESD and install a new one in its place, then quickly tighten it until it stops.
- Connect the power wires to the new sensor.
- Wipe off all remaining oil using a rag.
- (add oil if necessary) and make sure the new reverse sensor is working.
The fact that the car is moving backwards is signaled by white lamps, which are located at the rear of the car. If the car's reverse lights are not on, it will create an emergency situation - road users will not be able to predict its (that is, your) maneuvers. And parking in the dark will become a very difficult task - you will hardly be able to see anything without lighting.
Causes of the malfunction and ways to eliminate it
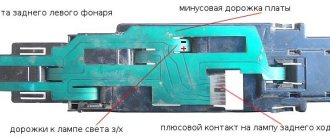
If the reverse lights of a VAZ 2114 do not light up, the reason may be as follows: 1. The light bulb has burned out. We simply replace it with an identical part. 2. Fuses are defective. Replace fuse F 16 and check the others. It is possible that the reason lies in one of them. 3. Contacts have oxidized. Remove the taillight block and clean all the contacts there, as well as at the 3/4 sensor. 4. A situation in which the reverse gear of a VAZ 2114 does not light up may occur due to the fact that there is no ground on the board (located under the lamp). We put it in place or just tighten it. 5. The power supply wire of the Z/X sensor is broken. We find an open circuit and fix it. 6. The travel sensor is faulty. This part must be checked, since it is a common reason why the reverse lights of the VAZ 2109, as well as many other car models, do not light up. Place the car on the overpass, disconnect the wires from the “frog” and connect them “directly”. Turn on the ignition and reverse gear. If the light comes on, this means that the sensor is faulty and needs to be replaced. 7. The contact located on the headlight film has burned out. But this is one of the most common cases when the reverse gear of a VAZ 2115 does not light up, since this malfunction is a “disease” of all Lada SAMARA cars. You can cure it by replacing the standard board with an improved one, or by installing the contact group yourself. We present to your attention some examples of such improvements.
That's all we wanted to tell you about this important and responsible topic. We hope you don’t need to explain how to change the reverse light on a VAZ 2114 or change any of the fuses. However, all other work to “eliminate” this problem is also not particularly difficult.
The reverse sensor is a fairly reliable element in the VAZ device, but at some point it can still fail.
This is easy to determine, since in this case the corresponding lights on the car stop working. However, something else is interesting here: the white lights could well have failed without breaking the sensor. To understand the situation, let's try to outline the range of possible problems.
As we have already found out, this device is responsible for turning on the rear lights on the car. If the white light does not appear when the driver backs up, then a pressing problem arises. It is necessary to determine the cause of the malfunction.
Not only the sensor could break, but something else as well. For example, a fuse or some kind of cable.
And without a rear light, driving in the dark is not very pleasant. It is simply difficult to inform other road users about your intentions to move back. In addition, they illuminate the path for the driver himself.
Even if this malfunction does not seem critical (like, for example, a breakdown of the knock sensor), it still needs to be corrected. And you can do this as follows.
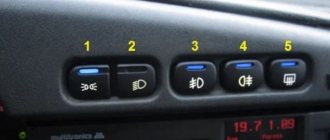
Place of the switch in the light switching circuit
On cars with manual transmission, voltage to the lamps when reversing is supplied through a limit switch (the so-called frog), which is screwed directly into the gearbox housing. When reverse gear is engaged, the switch button is pressed inside the gearbox. The contacts inside the “frog” bridge, and current begins to flow to the lamps.
On the circuit diagram for turning on the reversing lights, we can see that on the VAZ 1118 Kalina, the current from the battery through the ignition switch (No. 2) is supplied to fuse F1. Passing through the fuse that protects the switching circuit, “+” goes to the limit switch (No. 10). The contacts are in a normally open state and close only when reverse gear is engaged. Thus, current begins to flow to the light bulbs. The second contact of the lamps is connected to the “–” battery through the common ground contact of the lamps.
On cars with automatic transmission, the role of the limit switch lies with the selector position sensor. Information about changing the location of the gearshift knob is transmitted to the engine ECU, the light control unit.
How to check the "frog"
- Remove the headlight switch chip.
- Turn on the ignition.
- Using a small piece of wire, connect the contacts of the reverse gear sensor connector to each other.
If the reverse lights are on, then the problem is in the “frog”. Some drivers disassemble the switches, clean the contacts, after which the device continues to work properly. It is up to you to judge the appropriateness of such measures. But keep in mind that on many cars (including VAZ models) the limit switch is located below the oil level in the gearbox. We recommend simply replacing the power sensor. To minimize oil loss, jack up the car on the side where the end switch is installed.
On some cars, the reversing lights do not light up due to incomplete activation of the limit switch. The problem can be solved by installing a thinner washer under the “frog”. To make sure that the switch is working, check with a multimeter in ohmmeter mode whether the contacts close when you press the button.
Checking the circuit
The essence of diagnosing the reason why the reverse lights do not work comes down to identifying the section of the circuit where the voltage is lost. To do this, you can use a regular control light. Continuity testing is done with an ohmmeter, so you need to know how to use a multimeter.
You can start checking directly from the limit switch connector. Turn on the ignition. Connect one contact of the control light to an unpainted metal part in contact with the body, and the second to the “+” connector.
- If power comes in, check the reverse sensor.
- If after installing the “jumper” in the connector the lights do not light up, then the problem is in the section of the wire circuit going from the connector to the lights. Ring the wire to the point where it divides into light bulbs on the left and right sides. Most likely, the reason is the break.
To find the pinout of connectors, light contacts, and wire colors, be sure to study the electrical diagram of your model and vehicle configuration.
Signs of sensor malfunction
To locate the device, just look at the suspension of the 14th VAZ model. There, at the checkpoint there should be two sensors - the one in question and the one indicating the speed of movement. A more labor-intensive way to get the device is to access it through the open hood.
Before diagnosing its performance, possible causes of failure should be taken into account.
These may include the following:
- oxidation of contacts;
- lack of contact with the transmission wiring;
- lack of contact with the fuse console;
- failure of one of the fuses (for example, F16);
- sensor looseness;
- broken wires;
- bulb malfunction.
The last point should not be discounted, since the lamp can also fail. It’s trivial to burn out, in other words. In this case, the reverse sensor 2114 itself will work properly. To find out the truth, you need to take matters into your own hands.
Performance diagnostics
After you have found out where the VAZ 2114 reverse sensor is located, you can begin diagnostics. To do this, you may need light bulbs with wires or a tester. However, there are ways to do without their participation.
The verification procedure itself should proceed as follows:
- The hood must be opened and the cover removed from the fuse console.
- Then check 15A, who is directly responsible for its operation. If the white light does not come on after replacing the fuse, the diagnosis continues.
- The ignition must be turned on to record electrical voltage on the console. If it is not there (and its indicator should be 12 V), then it is likely that the contacts have oxidized. If there is, the check is carried out further.
- And then you need to crawl under the car. The protection is removed from the electric motor, the ignition and the corresponding gear are turned on. Now you can see whether voltage has appeared at the sensor connector or not.
- As mentioned above, if there is no tester with an arrow, you can use a test light. Its glow should make it clear about the existing voltage.
- Then comes the key point: it is necessary to short-circuit the conductors of the sensor in question. When the light appears, all that remains is to state the fact that the VAZ 2114 reverse sensor needs to be replaced.
After completing the diagnostics, you can begin the replacement procedure.
Causes of failure
The main reasons for malfunctioning reverse lights are as follows:
- light bulbs burned out;
- fuses are blown;
- oxidation of contacts in lamp sockets occurred;
- lost contact with the mass;
- the reverse wires have broken;
- the reverse sensor (otherwise called the frog) is broken;
- Damage has occurred on the contact board.
Thus, if the reversing lights of the VAZ 2114 do not light up, then the problem lies in one of the reasons given above. For a more accurate search, you should check all the specified elements one by one, starting with the light bulbs and their sockets and ending with the contact board and the sensor itself. And if the simplest faults can be eliminated almost instantly - by replacing light bulbs or wires, then replacing the reverse sensor requires a more serious approach.
Replacing the sensor
This procedure is carried out quite simply. Since you need to get under the car, it is strongly recommended to drive it into a pit. In this case, the device will be perfectly visible.
Attention! It should be noted here that contacting a car service will cost much more. Replacement there will be carried out at the price of 2-3 sensors.
Therefore, it is worth performing the procedure yourself. The main thing here is not to waste time installing a new device. If you miss the right moment, oil may pour out of the hole directly onto your clothes. It is better to prepare a basin in advance.
The step-by-step replacement plan should look like this:
- The sensor contacts are released from protection and then disconnected.
- The device is unscrewed with a 22mm wrench. If the tool turns out to be powerless (and this is possible due to the proximity of oil), then you need to arm yourself with a hammer and chisel. True, you should be extremely careful here so as not to splash too much.
- Immediately after removing the faulty sensor, you need to screw in a new one. The reason for such efficiency has already been explained above. By the way, the box should be wiped clean of oil if it has leaked.
- Contacts and protection are returned to their place.
- If necessary, add oil.
Attention! Some car enthusiasts offer an alternative behavior with oil. According to their method, you should get rid of it in advance, so that you can put it back in with peace of mind and clean clothes.
After replacement, you should check the device for functionality: turn on the ignition and reverse gear. In this case, there is no need to start the car.
Repair methods
To repair the reverse signal, you can proceed in two ways. They differ in the way the sensor is accessed.
- Drive the car onto a lift or pit.
- Do the work by climbing under the car.
If you have already encountered a similar problem, then you will probably agree that replacing the DZH is best done using a pit or overpass. This makes access to the sensor as comfortable as possible, plus you minimize the risk of being splashed with oil from the gearbox.
Replacing the DZH is not the cleanest job
Of course, there is another cleanest way - sending the car to a car repair shop. But then you will have to pay not only for the sensor, but also for the services of the specialists. And this is another 2-3 times the cost of the sensor. The choice is yours anyway.
Self-replacement
It’s not difficult to get to and replace a failed DZH on your own. Follow the instructions, do not break the sequence of operations, and then the process will not take you much time and effort.
- Place the car on a pit or overpass. Be sure to apply the handbrake and place the transmission in first gear. This will help prevent your car from accidentally rolling away.
- Remove the protection from the contacts of your sensor, disconnect the contacts.
- Prepare a container into which the oil will be drained when unscrewing the DZH.
- When the container is ready, remove the sensor. In some cases, it may not be unscrewed by hand. In such a situation, use a 22 mm socket.
- Very rarely even the key cannot help, since the sensor becomes stuck to its location. Here you will have to arm yourself with a hammer and chisel and try to remove it as carefully as possible.
- Take out the failed device and insert a new one in its place.
- If oil gets on the gearbox housing, remove it with dry rags. There is no need for extra dirt. Plus, it can lead to a decrease in the efficiency of the device.
- Return all contacts to their places, put the protection back on.
- If a decent amount of lubricating fluid has spilled out of the box, be sure to top it up. Just use fresh ones. By the way, this is one of the reasons to completely change the oil in the gearbox if it has been there for more than the first season.
- The decision to change the oil will simplify the task when removing the sensor. If the liquid is drained in advance, it will not flow in different directions when the sensor is unscrewed. The work will be cleaner, plus you will kill two birds with one stone - replace the sensor and gearbox oil.
How to search for this device
It is not difficult to find the place where the reverse sensor is located. Two devices are installed at the checkpoint, one of them will be the DZH. It is installed at the bottom of the gearbox. This can be clearly seen in the figure below.
Location of the household farm
You can get good access to it when the machine is on an overpass, a lift or above an inspection hole.
The purpose of this device is that when reverse gear is engaged, it should light up a white light in the lamps. The lack of lighting does not mean that it is him. There can be many reasons for this. For example, a light bulb or fuse has burned out, or a wire has come off.
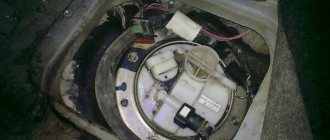
Removing the backplane board
First you need to remove the rear lights on the VAZ 2114, and for this you will need:
- Open rear trunk
- Remove unnecessary things
- Remove decorative trim
- Unscrew the plastic casing
- Take out the back panel
Now you have access to the socket and lamp of the rear license plate lamp, which also needs to be removed. The frog mounting pins are removed and the flashlight is already in your hands. The main thing is not to confuse it with the speed sensor, which is also located on the gearbox.
About the signs of a DZH malfunction and its search
It is safe to say that there can only be one sign when the rear sensor does not work, this is the absence of lighting when driving the car in reverse. But there are quite a few culprits for this. It could be:
- Fuse F16 (15A) has blown;
- Oxidation of contacts in flashlights;
- Poor contact of the connector with the fuse block;
- Broken wires;
- The sensor output terminals have oxidized;
- The light bulb has burned out.
Often the culprit of such problems is the light bulb socket, where oxidation of the contacts occurs due to poor sealing of the lamp.
Troubleshooting
In order for the frog to be replaced, you need to prepare:
- New DZH;
- Adding oil to the gearbox;
- Key to "22";
- Rags for cleaning dirt from the installation site;
- Empty containers for transmission oil, since in the case when the VAZ 2114 reverse frog is changed, a small amount may spill out of the installation hole.
The machine must be installed on an inspection hole, on a lift or overpass. tighten. To make the work easier, you need to remove the engine crankcase protection. After this, you need to proceed as follows:
- Determine where the VAZ 2114 reverse sensor is located and remove the connector with wires from it;
- Clean the installation site of the DZH from dirt with a rag or other means;
- Using the key “22” they begin to unscrew the device. In some cases this can be difficult to do. Over a long period of use, it can “stick” to the body of the box. A socket wrench for “22” helps out. If this does not help, there is still hope for the “old-fashioned method” - using a small chisel and hammer;
- After the DZH has been moved from its place, an empty box is placed under its installation location, the spilled transmission oil is collected, and the device is removed.
Installation is carried out in the reverse order, having previously wiped the plane of the box where the DZH will be installed. Before installing a new product, it will be useful to perform a functional test. It's easy to do. You need to connect the measuring device to its terminals, and use your fingers to press the protruding rod several times. The device should show it turning on and off.
If there were traces of leaks on the old DZH, the new product can be installed on a thin layer of automotive sealant. Tighten the device carefully, being careful not to damage the plastic part of the housing.
Check the oil level in the gearbox and add it if necessary. After checking the functionality of the system, the engine protection is put in place. The work is now complete.