For car enthusiasts who decided to remove the heater motor on their own for the first time on a VAZ-2109, after lifting the hood, the question immediately arises: how can it be removed and pulled out of this place? In fact, everything is much simpler than it seems at first glance, but you will have to tinker for half an hour.
In order to remove the stove motor, you will need a Phillips screwdriver, a 10mm socket and a handle with a ratchet. Below is everything step by step:
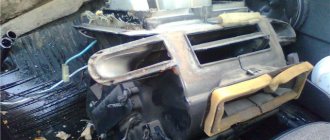
- First of all, you need to open the hood, find the place where the stove is located, and unscrew the 5 bolts of the plastic cover. After unscrewing, remove and place near the car. In order not to look for new bolts during the assembly process, instead of those lost during dismantling, it is advisable to initially prepare a small box for them.
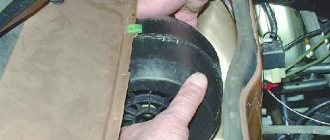
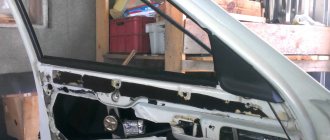
- The next step is to carefully remove the rubber sealing gasket of the hood, as it will interfere with the removal of the protective casing, under which the VAZ-2109 heater motor is located. After completing these steps, access to the motor will be completely open.
- Next you need to unscrew the two bolts that hold the heater motor. They are located on the sides of it. They also need to be put in a safe place.
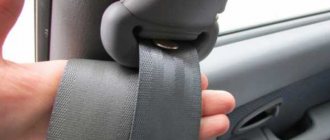
- Now let's move on to something more complex. On the VAZ-2109, the wiring going to the heater is soldered directly, and on the other side it is connected to the general wiring located in the car interior. Therefore, you will have to tinker a little. You need to find the positive wire plug and disconnect it. It is located in the passenger compartment under the panel on the driver's side.
- Let's move on to finding the negative wire. Its location is also under the panel on the driver's side, but there is a certain problem, since it is secured with a nut. Therefore, you need to feel it with your hand and use a 10mm socket and a ratchet to unscrew it. The wires can be immediately pushed out without leaving the cabin, through the rubber seal in the body.
- We return to the stove motor and try to pull it out of its seat, changing the angle. We find the most acceptable position and carefully move it to the right side as the car moves almost all the way.
- When the motor is at the point of maximum expansion of the engine compartment, we finally pull it out of the car body.
- After the stove motor is in good hands, use a screwdriver to pry up the casing seal and separate it into pieces.
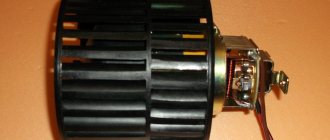
- We release the mounting brackets and remove the cover from the motor and take it out along with the wheel.
In order not to disturb the balancing, it is not advisable to remove the wheel from the motor shaft.
Assembling and replacing the stove motor is carried out in the reverse order. There is no need to try to repair the motor or try to replace it with something else, this can lead to failure of the entire heating system of the “nine”. As a last resort, you can install a part from another, similar car model, but it is better to purchase a new device.
As you can see, the process of removing the heater motor from a VAZ-2109 car is much easier than it seems. It takes a little tinkering, and your car will be warm, even in the most severe frosts.
Replacing the stove fan (motor)
I think that many owners of not only the VAZ 2109-2108, but also other domestic cars encountered a problem when, when the heater was turned on, the motor began to howl like a pig. So, you can, of course, lubricate the whole thing, but practice shows that this is not enough for a long time and a terrible squeal or creaking, call it what you want, appears again. In this case, it is necessary to replace the fan, or more precisely, the motor assembly itself.
To carry out this repair procedure, we will need the following tools:
- crosshead screwdriver
- Head for 10
- Ratchet handle
Heater fan VAZ 2108/2109
Breakdowns of the stove motor, although not so often, still occur. If this unit fails, the quality of heating is significantly reduced. Depending on the nature of the problem, extraneous noise may appear that distracts the driver's attention. In this situation, repair or replacement of the device is required, for which it must be removed from the car.
Reasons for failure
There are several common reasons that lead to fan problems.
Fuse
One of the likely reasons leading to a malfunction of the motor may be a faulty fuse. The element is located in a mounting block installed in the engine compartment in front of the windshield on the left side. It is worth starting troubleshooting by checking this part. The fuse is marked F7 and has a rating of 30 A.
The stove fuse is located in the mounting block marked F7 and has a rating of 30 A
Poor contact
Over time, contacts may oxidize. The check is not difficult; to do this, just move the block with the harnesses. If the fan starts working during the diagnostic process, then the cause has been found. The malfunction can be eliminated by cleaning the problematic contact in the mounting block.
During oxidation, the contact is usually covered with a green or white coating.
Resistor
The operation of the electric motor may be impaired due to problems with the additional resistor. At maximum speeds, the motor is connected to the power circuit directly, and at the first two speeds - through a resistor. If problems arise with this particular element, the electric motor will only operate in maximum mode. To replace the part located on the left side of the stove body, simply unscrew the fasteners and install a new resistor.
If the heater resistor fails, the heater will only operate at maximum speed
Switch
Sometimes problems may arise with the heater mode switch itself. The most likely cause is oxidized contacts (inside or outside) or the back of the part that has come loose from vibrations.
The contacts of the heater switch may oxidize or the back part may come off
In addition to the reasons listed, breakdowns of the electric motor itself are possible, for example, wear of the brushes. The same anchor can cause different problems:
- pollution;
- wear;
- winding short circuit.
If the windings short out, the heater fuse will blow, which will require repair or replacement of the fan.
How to remove the heater motor on a VAZ 2108/09
To dismantle the unit, you will need to prepare the following tools:
- Phillips screwdriver;
- head for 10;
- ratchet handle.
To remove the heater motor you will need a 10 mm socket, a Phillips screwdriver and a ratchet.
Then you can start removing the device:
- Raise the hood, unscrew the screws securing the plastic trim near the windshield and move it to the side.
To remove the plastic cover you will need to unscrew the corresponding fastener.
The hood seal can be removed with a simple hand movement
To get to the heater motor, you will need to remove the protective cover.
The fan is attached to the body with screws
To disconnect the fan circuit, you need to move into the cabin under the dashboard
To remove the electric motor, you need to rotate it in different directions.
Video: how to remove the heater motor
Disassembling and assembling the fan
After dismantling the motor, it is subjected to troubleshooting, for which the unit will need to be disassembled. We carry out the work in the following order:
What is a stove fan
A car heater, which is popularly called a stove, is designed to perform a simple and at the same time important function - heating the interior. In addition, the device helps eliminate fogging of windows in cold and damp weather. During normal operation of the heating system, the temperature in the interior of the “nine” should be maintained at +20 ˚С with the same indicators outside, but only with a minus sign. In the legs, with maximum heating mode, the value should be maintained at +25 ˚С. One of the important components of the stove, in addition to the radiator, is the fan. The purpose of this device, its malfunctions and repairs should be considered in more detail.
Purpose of the device
The purpose of the motor is to increase the efficiency of the heating system and air circulation in the car. Its operation is based on air intake from outside and its subsequent supply into the cabin through the radiator. As a result of the air flow passing through the heat exchanger, the air enters the cabin already warmed up.
Heater operation diagram: a - VAZ 2108; b - VAZ -2108–01: 1- fan impeller; 2 — air duct for heating the windshield; 3 — windshield heating flap; 4 — damper for heating the driver’s feet; 5 — central nozzle flap; 6 - central nozzle; 7- radiator; 8 — heater control damper; 9 — driver’s foot heating window; 10 - internal ventilation duct
Where is the motor located on the VAZ 2108/09
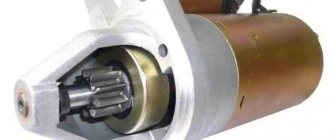
The heater motor on the VAZ 2108/09 is installed in a niche in the engine compartment in front of the windshield, which is radically different from the design of the heater of classic Zhiguli cars, which have a fan installed in the cabin. The unit is an electric motor with an impeller mounted on it, through which air is pumped into the cabin.
The heater motor on the VAZ 2108/09 is installed in a niche in the engine compartment in front of the windshield
Connection diagram
To make it easier to find possible faults with the fan, an installation diagram may sometimes be required, the main components of which are:
- fuse mounting block;
- egnition lock;
- additional resistor;
- fan motor;
- operating mode switch.
The heater motor connection diagram consists of a fuse mounting block, an ignition switch, an additional resistor, a fan motor, and an operating mode switch
Replacement instructions
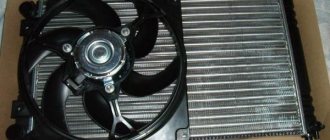
In most cases, the reason lies precisely in the radiator device, so below we will talk about how to replace the VAZ 2109 heater radiator.
How to change the unit on cars with a high or low panel, read on:
- The device itself is located at the passenger’s feet, under the glove compartment. The replacement procedure will be identical for cars with a high and low panel, only in the first case you will have to remove the passenger seat. After removing the chair, you can see the screws on the right that secure the panel; they need to be unscrewed. The panel itself needs to be slightly pulled towards itself; insert some kind of spacer, for example, a wooden beam, into the gap that appears.
- Fully tighten the tap, and place a rag under possible coolant leaks.
- Then open the engine compartment and unscrew the cap on the radiator unit. The last unit is located between the glove box, as well as the lower shelf below it. The steps you need to follow next must be completed as quickly as possible, otherwise the coolant may spill. The lines that come from the radiator device must be closed; this will require plugs. Reach your hand through the detached center console, disconnect the lower line and plug the hole with a plug as quickly as possible.
- Repeat similar steps with the upper hose.
- The radiator is removed after all consumables have been drained. A new device is being installed.
Some car owners believe that if the backlight on the center console in the heater area disappears, this is due to the operation of the stove. Remember that the backlight of the stove has nothing to do with the operation of the unit as a whole, so if the backlight has disappeared, you need to find an open circuit and repair it.
Sorry, there are no surveys available at this time.
- Open the hood and disconnect the negative terminal of the battery.
- Behind the engine shield, unscrew the four screws securing the fan casing and remove it. Phillips head screws.
After removing the casing, remove the two screws that hold the fan housing in place.
Using a slotted screwdriver, open the latches and separate the plastic fan housing into two halves.
Disconnect the heater motor power supply terminal (it is located above the gas pedal).
Unscrew the nut by ten and remove the ground terminal of the heater motor (the terminal is located above the gas pedal).
After removing the wires, remove the fan along with the motor.
How to disassemble a fan motor
If the stove fan does not work and you do not want to buy a new one, but prefer to deal with the problem yourself, you will need to disassemble the motor itself.
- Unscrew the 2 fan mounting screws.
- Unhook the fan itself; to do this, disengage its support.
- Tear off the foam seal on the right side of the casing.
- Remove the fan shroud support.
- Using a screwdriver, release the plastic latches of the casing.
- Using a screwdriver, pry up the 2 spring latches and unhook them.
- Now you can remove the cover from the motor.
- Pull out the motor, and the heater motor impeller will also come out with it; do not remove it so that the balancing is not disturbed.
- Unscrew both screws that hold the brush holder.
- Remove the 2 cage nuts.
- Remove the brush holder.
- Perform a visual inspection of the collector. If there are scratches or burns, it needs to be cleaned with fine-grained sandpaper. If there is more serious damage that cannot be repaired, replace the motor.
- Reassemble everything in reverse order.
If you already have experience in repairing electric motors, then it will not be difficult for you to cope with this, however, sometimes it is easier to replace a broken motor with a new one than to suffer from repairing the old one and extending its life for a very short time.
Cold air is blowing from the stove VAZ 2109, 21099
On a frosty winter day, going on a long trip, planning that this trip will be comfortable thanks to the stove, turn it on and... be horrified, because cold air is coming from the stove! What to do in such a situation?
The simplest way to solve the problem is to tighten the radiator damper cable. It can be found on the radiator housing, located near the gas pedal.
Front-wheel drive VAZ models often experience a breakdown such as incomplete opening of the heating tap. Diagnostics is carried out by comparing the temperature of the radiator pipes. In the case when the temperatures differ, we can say with confidence that the tap is not closed completely, which is why cold air is blown out instead of warm. The solution to the problem lies, again, in tightening the valve control cable and adjusting it.
It also happens that the air pumped by the stove escapes through the cracks in the air vents. Leaks lead to this problem. A simple sealing of the seams will help return everything to normal and again enjoy the warmth of your favorite stove.
Features of the VAZ 2109 heating system
Ventilation in the cabin is supply and exhaust. Special holes located in the windshield trims serve to allow air to flow through them, which is supplied spontaneously or forcefully by the heater fan. Air escapes through the cracks between the panels inside the doors or holes in the ends. Valves built into the holes allow air to pass out and prevent it from getting inside. This improves thermal insulation in the cabin. The engine cooling system includes a stove, a heater radiator, which is located parallel to the main radiator, a faucet, a pump, and an electric fan.
Heating system of a VAZ 2109 car
- two rows of tubes;
- cooling plates;
- two plastic tanks.
The air is heated in the radiator and is directed into the passenger compartment through a system of air ducts fixed from below to the dashboard:
- An electric fan is attached to the top of the heater with two screws; it can be easily removed from the engine compartment. The impeller of the electric fan, mounted on the shaft of the electric motor attached to the fan casings, has three rotation speeds due to two resistor spirals. An additional stove resistor allows the impeller to obtain the desired rotation speed, and it is mounted on the left side in the hole in the stove casing.
- The stove faucet consists of a body and two pairs of pipes. It is connected by rubber hoses to the cooling system. A plate valve is mounted in the valve body, allowing coolant to pass through. Its lever is connected to the handle lever by a rod, due to this it is possible to control the air heating. The hole in the valve opens when the lever is turned, and fluid will begin to flow into the radiator.
- The pump circulates liquid through the radiator. Three handles control the stove. Their levers are mounted on the axles of a bracket made of plastic and attached with four screws to the instrument panel. The lever that actuates the damper, and through the rod on the valve lever, is affected by the heating control handle.
- The damper and tap open completely when you move it all the way to the right. In this case, air is supplied through the radiator by an electric fan and the heated liquid is circulated for cooling.
- When the handle is positioned in the middle, the valve and tap have an intermediate position. In this case, part of the air passes through the radiator, the other bypasses it, which ensures the desired degree of heating of the air in the cabin at the moment.
- The position of the handle in the extreme left position completely closes the heater valve and the control damper, and the air entering the cabin is not heated. Air is supplied to the feet of passengers and the driver by the upper left handle, connected by a rod to the damper lever.
- Moving the handle to the left opens the foot heating flap, and the air from the casings is directed into the windows. Air is supplied to the feet of the driver and passenger in the front seat from both sides; it is supplied to the rear seats through the internal ventilation air duct.
- The air supply to the windshield is carried out by a handle connected by a rod to a lever that drives the heated glass flap drive, which opens or closes the entry of air through the air duct onto the glass.
The device of the stove on the VAZ 2109
Heating of the VAZ 2109 interior is provided by the operation of the heater radiator, connected in parallel to the main radiator, which is part of the engine cooling system.
Appearance of the device
Heater diagram
The heater is mounted in the cabin under the dashboard using nuts on bolts that are welded to the air supply box. The air heated in the heater through channels (air ducts) enters the interior of the cabin.
The air ducts are located at the bottom of the dashboard and have sealing gaskets.
- If you plan to carry out repair and maintenance work, or replace failed components yourself, you definitely need to study the design of the stove and become familiar with the location of the components.
- Based on the diagram below, we will introduce you to the design of the VAZ 2109 stove.
Scheme
| Item number | What is this |
| 1. | Bracket for fixing stove casings |
| 2. | Heater control damper |
| 3. | Left heater casing |
| 4. | Flap rod for heating the foot area |
| 5. | Radiator gasket |
| 6. | Radiator |
| 7. | Gasket sealing stove |
| 8. | Electric stove motor |
| 9. | Heater fan shrouds |
| 10. | Fan impeller |
| 11. | Heating damper |
| 12. | Air duct for heated windshield |
| 13. | Side nozzle duct |
| 14. | Side nozzle |
| 15. | Center nozzle flap |
| 16. | Pusher (blades); |
| 17. | Blade axis |
| 18. | The blade itself |
| 19. | Center nozzle closing lever |
| 20. | Heated windshield damper rod |
| 21. | Lever for changing air flow directions |
| 22. | Air heating control knob |
| 23. | Windshield air handle |
| 24. | Leg air handle |
| 25. | Bracket for control levers |
| 26. | Rod sheath fixation bracket |
| 27. | Stove valve control rod |
| 28. | Stove control damper rod |
| 29. | Heated footwell flap |
| 30. | Air control lever axis |
| 31. | Screw clamp |
| 32. | Stove valve |
| 33. | Heater valve body |
| 34. | Valve lever |
| 35. | Hoses connecting the faucet to the heater radiator |
| 36. | Internal ventilation duct |
| 37. | Heated windows for rear footwells |
| 38. | Stove tap |
| 39. | Window for heating the driver's foot area |
| 40. | B-pillar trim |
| 41. | Inner cavity of the central pillar |
| 42. | Exhaust ventilation duct |
| 43. | B-pillar trim |
| 44. | Hood deflector lining |
| 45. | Rubber valve |
| 46. | Deflector housing |
| 47. | Exhaust ventilation deflector |
| I | Heater |
| II | Stove operation diagrams |
| III | Stove tap |
| IV | Interior exhaust ventilation |