Modification of the rear beam 2108
The rear torsion beam in front-wheel drive VAZs is a self-stabilizing type of suspension, since the BEAM itself is a STABILIZER. and the amplifier is needed only to add torsional rigidity to the stabilizer beam.
The reason for writing such an article was a blog entry in which the author tried to strengthen the beam by adding a homemade “stabilizer” to it.
.
The idea was subjected to severe negative criticism; in general, many did not consider the idea useful, but it interested me - the idea of a stiffer beam... Let's move on to the analysis of existing solutions
Appearance
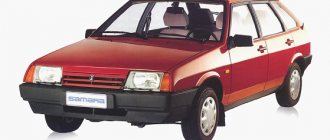
From the outside, the VAZ-2109 is an evolution of the Soviet car. Here you can notice the transition to rectangular body lines, which are clearly distinguished by the bow headlights, which are shaped like a trapezoid, as well as a flat-shaped radiator grille and a slightly inclined hood. It was decided to place the turn signal lights on the long front fenders.
After some time, hydraulic headlight range control began to be installed on all “nines”, and some vehicles had a brush headlight cleaner. In 1989, the debut restyling of the “nine” exterior took place, which consisted of a transition from small front wings to longer ones. The most dubious component in the exterior of the G8 and VAZ-2109 was the so-called nasal mask.
It was a fairly complex type of body part, which was adjacent to the hood and wings installed in front. The combined mask area had a beak that protruded forward of the radiator trim. Block headlights were installed on the sides of this unusual structure. Such a pile of elements reduced the already slight elegance of the Soviet car, and the clear lines connecting the cladding to the wings looked unpleasant.
We decided to use only a solid wing, without any “tricks,” which improved the appearance of the VAZ 2109. After this, they installed a new grille, which had two longitudinal stripes in a large frame. After some time, they began to use a new version, consisting of 3 massive stripes, devoid of any frame.
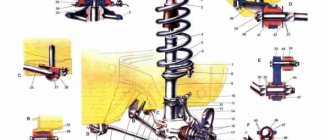
Standard suspension
The rear suspension is semi-independent, with an elastic beam, with helical coil springs and double-acting hydraulic telescopic shock absorbers.
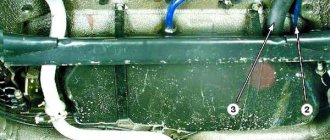
The longitudinal arms are welded to the beam through reinforcements. To increase lateral stability and reduce vehicle roll, a stabilizer bar made of ∅14 mm steel rod runs inside the beam. The ends of the rod are welded to the levers.
Pay attention to the bar
1 - beam; 2 — anti-roll bar;
Advantages and disadvantages
- Inexpensive Soviet-made car;
- Front-wheel drive can certainly be considered an advantage;
- Acceptable ride height;
- Good dynamics, high speed, pleasant handling and sufficient stability on different surfaces;
- Heating and ventilation cope well with their tasks and supply air to several points at once, which improves the uniform distribution of thermal air throughout the cabin;
- Acceptable fuel consumption;
- Ideal for tuning;
- Availability of spare parts and good maintainability.
- Corrosion of metal;
- The appearance is clearly not for everyone;
- A small resource of some details;
- Mediocre sound insulation of the cabin;
- Low equipment;
- There is very little free space, especially for rear passengers;
- Small luggage compartment;
- Poor maneuverability;
- Poor quality interior;
- Low level of security;
- The power unit clearly lacks power.
Replacing the rear beam on a VAZ 2108
There are many reasons why you will have to remove the rear beam. You will hear a strange sound (metal ringing, thuds, rubber squealing, etc.) from the rear of the car: constantly, only on bumps, or when cornering. Only someone with experience can identify the real problem.
Because there are quite a lot of options: the stabilizer may knock, the silent blocks may “tear” to the side (because of this, you will get the feeling that one shock absorber “disappears” when turning - it knocks quite sharply and strongly), or they are simply worn out, they may “ play" in the axle bearings and so on... I recommend calling a specialist for diagnostics, even if you carry out the repairs yourself.
It is rational to install and dismantle the beam on a lift. But in the absence of such an opportunity, we carefully lift the rear part with a jack and place supports under the “sockets” to rest the jack on the car body. Before doing this, do not forget to place the shoes under the front wheels and engage the gear.
So, the progress of the work:
- We loosen the nuts on the wheels while the car is still on the ground(!).
- We raise the car.
- Remove the shock absorbers from the rear suspension on both sides.
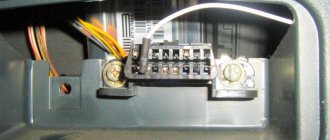
- Disconnect the handbrake cables and remove the cable jackets from the bracket on the body. We bend the brackets that secure the cable to the body and pull both cables out of the brackets. This is all in order to provide convenient access to the mounting bolt of the beam itself.
- The elastic lever of the pressure regulator drive passes through the earring, connecting to the lever bracket. This earring must be disconnected from the bracket on the rear axle beam.
- Now, disconnect the brake hoses, on both sides of the beam, from the tubes. Immediately cover the holes with something to prevent brake fluid from leaking.
- On both sides, unscrew 1 nut from the bolts that secure the beams to the brackets.
- Knock out the bolts (don’t be afraid to knock them, they may “sit” tightly). Now the beam can already be removed by simply rolling it out on wheels; )
Now some recommendations.
- If you plan to disassemble the beam, then in advance you need to loosen the tension on the hub nuts and other connections that are tightened with a large torque.
- It is recommended to replace rubber-metal hinges in a specialized workshop, since this will require a special tool and, preferably, experience in such work.
- The factory documentation talks about dismantling the beam along with the brackets by unscrewing the 3 nuts that hold them in place. However, after using the car for a long time, the studs rust and can easily crack. Therefore, I advise removing the beam by simply unscrewing it from the brackets that continue to “hang” on the body.
Signs of wear or damage to the undercarriage
- Leaks under the car in the area where suspension parts are located. Cars of the VAZ 2109 model, as a rule, already have a long service life (and the design of the hydraulic cylinders is designed for a certain resource, which they may have exhausted a long time ago). There is a high probability that the oil seal or shock absorber rod mirror may wear out, so pay attention to possible leakage of hydraulic fluid (in principle, you need to be careful about any leaks from the car);
- Knocking when driving, yawping along the road is the most common sign of a malfunction. As a rule, this indicates wear or loosening of the components; carefully inspect the suspension, or best of all, contact a workshop;
- When acting on the suspension (try pressing on the hood or, conversely, lifting your car, experienced auto mechanics, when first getting acquainted with passenger cars, not only the VAZ 2109, roughly assess the condition of the chassis), the suspension does not provide sufficient resistance - the first sign of malfunction hydraulic cylinders. There can be many reasons - insufficient amount of fluid, leakage due to wear of the seals, fluoroplastic bushing, wear of the rod, malfunction of the valve mechanism. It is necessary to replace worn parts, replenish the oil in the cylinders, or eliminate the malfunction of the valve mechanism;
- When driving (especially on uneven roads), hard shocks with a characteristic sound occasionally appear, which can even be felt on the steering (the so-called “breakdown” of the suspension). The appearance of this symptom indicates that the springs (most often the rear chassis) have lost their properties due to metal fatigue; hydraulic shock absorbers may also not work properly. In any case, it is necessary to inspect the structure of your suspension and make repairs.
We have not yet mentioned the uneven wear of tires - if your wheels are adjusted to alignment and balanced, and the CV joints (since the VAZ 2109 is assembled according to the front-wheel drive scheme) work correctly, then the reason is the chassis, there is a breakdown somewhere, unnecessary backlash or wear.
In conclusion, it should be noted that although the chassis of the VAZ 2109 is not subject to such overloads as a similar truck unit, its design is still quite complex and requires constant attention; fortunately, the suspension design allows for maintenance and repair without large material costs.
What else is worth reading
Steering mechanism diagram
Brake system diagram
Parking brake diagram
Replacing the front pads of a VAZ 2109
Independent suspension device
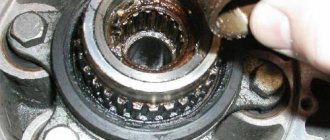
Replacement of silent blocks of the rear beam of VAZ 2108
- To begin, place the car on a jack and remove the wheel from the desired side using a wheel wrench.
- Next, take the 19mm wrenches and unscrew the nuts on the bolts securing the bracket and rear beam.
- Then you need to remove the mounting bracket (it will be on the left) and disconnect the pressure regulator rod in the brake system.
- Now you can pull out the bolt itself and move the rear beam eye downwards. Keep in mind that it must be fixed in this position. The ideal option for this is a small wooden block, which should be placed in the space between the beam and the body.
- Arm yourself with a hammer and a drift, then knock out the old silent block.
- Take a new part and a device for pressing it in, generously coat the seat and the silent block itself with soapy water (it will act as a lubricant) and install it.
- Take another jack, remove the block and raise the beam to the desired level, then insert the bolt and tighten the nut, but do not tighten it. Place the mounting bracket and rod in place.
Place the wheel and remove the car from the jack. Having opened the trunk, sit in the opening and try to rock the car up and down with a large amplitude so that the silent block fits completely into place. Now the nuts of the mounting bolts can be tightened completely.
What causes damage to the body of the “nine”
ATTENTION! A completely simple way to reduce fuel consumption has been found! Don't believe me? An auto mechanic with 15 years of experience also didn’t believe it until he tried it. And now he saves 35,000 rubles a year on gasoline! Read more"
There is an opinion that Soviet cars are equipped with an “indestructible” body. It is impossible to say this one hundred percent, but it is also wrong to refute such a statement. Indeed, the body of the VAZ 2109, the diagram of which is presented in the article, is made to perfection, but over time, any quality will come to an end.
Almost all car bodies older than 5-7 years need repair. And there is nothing surprising about this. The living conditions of recent years, the huge amount of harmful substances, the general deterioration of the environment - all this cannot have a positive effect. Difficult, almost extreme, modern operating conditions also cause a lot of harm.
As a result, the state of the metal surface becomes deplorable, the internal combustion engine and parts are sent for disassembly, and instead of a worn-out but close-to-the-heart car, a new car takes its place. All this can be avoided if you know the features of the body layout, understand the intricacies and carry out preventive maintenance in a timely manner.