Such a Soviet car as the VAZ-2106 has been produced since 1975. In 2005, the conveyor was stopped. The car became a real legend and an attribute of the Soviet automotive world. He was a favorite of many citizens of the USSR, although, like any car of that time, the car could not boast of a good braking system. This VAZ 2106 system leaves much to be desired.
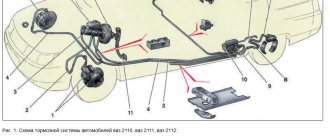
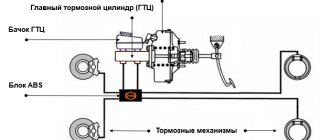
Diagram of the brake system of a VAZ 2106 car. 1 - brake disc; 2 — brake pedal; 3 - vacuum booster; 4 — master cylinder for hydraulic brakes; 5 — pipeline of the front brake drive circuit; 6 — front brake protective cover; 7 — front brake caliper; 8 - vacuum pipeline; 9 — master cylinder reservoir; 10 — parking brake lever button; 11 — parking brake drive lever; 12 — lever latch rod; 13 — lever latch; 14 — bracket for the parking brake drive lever; 15 — return lever; 16 — pipeline of the rear brake drive circuit; 17 — flange of the rear end of the cable sheath; 18 — rear brake wheel cylinder; 19 — rear brake pressure regulator; 20 — pressure regulator drive lever; 21 — brake pads; 22 — lever for manual drive of the pads; 23 — rod of the pressure regulator drive lever; 24 — bracket for fastening the front end of the cable sheath; 25 — rear cable; 26 - lock nut; 27 — adjusting nut; 28 — bushing; 29 — rear cable guide; 30 — guide roller; 31 — front cable; 32 — parking brake warning lamp switch stop; 33 - brake light switch
Summary
The braking system is the basis for vehicle safety. If the slightest problem occurs in its operation, you must immediately look for the problem and fix the problem. In fact, there are not so many reasons. In addition, everything can be much simpler - for example, a knock in the wheel when braking occurs due to a loose caliper mounting bolt.
Yesterday, after driving without music, well, I got fed up, and heard an interesting knock. When I press the brake pedal (I just touched it, one might say), a single metallic (it seems to me) knock occurs. It was not possible to localize it, either on the right front or behind. And sometimes there is a knock, sometimes there isn’t. For example, I’m rolling at 40, I touch the brake (that is, I’m not braking to the floor), the brake light comes on and this knock sounds. I release the pedal, press - silence, stop, press in place - silence, move off, brake - silence, move off, drive 20-50 meters, press - knock. The pedal doesn't respond, but it infuriates me when something goes wrong.
Experts, attention to the question, what is knocking? Stub racks? Caliper? pads?
When I changed the pads, I lubricated the guides, but then I lubricated them and thought why I was doing this, since part of the guide is in the open air. And the thought came to me now that maybe the dirt has stuck and is wedging?
The appearance of a knocking sound when you press the brake pedal is not common, but it still occurs. At the same time, diagnosing the cause of the knock is quite difficult.
Let's figure out where this knocking comes from and how to solve this problem.
The braking system is one of the main ones ensuring traffic safety. This is what slows the car down to a stop.
The most widely used system on cars is a hydraulic drive system, when the driver’s force is transmitted through the working fluid to the brake mechanisms installed on the wheel hubs.
As for the mechanisms themselves, there are two types of them used on cars - now disc mechanisms in which pads, the elements that perform deceleration, interact with a disc mounted on the wheel hub are becoming increasingly widespread.
Previously, drum mechanisms in which the shoes were placed inside the drum were more common in use; the deceleration in such mechanisms was carried out by decompressing the shoes, as a result of which they were pressed against the inner surface of the drum.
But they did not completely abandon the use of drum mechanisms, since they have a well-implemented parking brake system.
Therefore, many cars are equipped with disc mechanisms at the front and drum mechanisms at the rear.
Maintenance of a hydraulically driven system comes down to periodic replacement of the pads, since they are worn out as a result of interaction.
Therefore, checking the condition of discs and drums is necessary.
The condition of the pipelines in the drive is checked, a visual inspection is performed for leaks, and the liquid level is monitored.
Often, after repair work, it is necessary to bleed the brake drive to remove air from the pipelines, because its presence can affect the performance of the system.
Since the brake system does not include a large number of elements, it is considered to be quite reliable and should not cause problems with proper care and maintenance.
But it is not always the case. Even in such a seemingly simple system, problems can arise.
One of the most common problems is the appearance of a knocking sound when pressing the pedal.
Auto repair school – DIY car repair
Jun 14, 2022 VAZ 2101, VAZ 2102, VAZ 2105, VAZ 2106, VAZ 2107, Zhiguli, Classics by admin
Let's return to our immortal and beloved Classics! In this article we will look at the process of replacing the front brake hose on VAZ-2101, VAZ-2102, VAZ-2104, VAZ-2105, VAZ-2106, VAZ-2107, Classic cars. I hope that it will be useful to you and after reading it, you will be able (or will have information) on how to replace the front brake hoses yourself. I, in turn, will try to describe the replacement process in as much detail as possible and warn you about possible problems that may arise during operation.
Pay special attention to the list of necessary tools and the quality of purchased spare parts. In general, please...
Let's start, perhaps, with the tool that you will need to replace the front brake hose on a VAZ-2101, VAZ-2102, VAZ-2104, VAZ-2105, VAZ-2106, VAZ-2107, Classic car: 14mm socket wrench, socket wrench for 10, pliers, an open-end wrench for 17, a rubber cap from the bleeder fitting (after disconnecting the tube and hose, it will be necessary to “plug” the brake pipe to prevent brake fluid leakage), special keys for unscrewing the brake fittings for 10 - split or crimped (photo 1).
The presence of at least one special key is necessary. Without it, in 9 out of 10 cases, you will not unscrew the brake pipe fitting!
What you should pay attention to when purchasing spare parts... First, we buy brake hoses from “Balakovo” or “Dimitrovgrad” production. Hoses from these manufacturers, although not cheap, are of high quality and durable
As they say - time-tested.
Included with the front brake hose you should buy two new copper sealing washers
When purchasing washers, you should pay attention to their thickness. According to the standard, the thickness should be 1.5 mm
But unscrupulous sellers may sell washers of thinner thickness (see photos 2 and 3), using which you will not be able to tightly tighten the brake hose bolt.
We can also advise you to buy a new brake hose mounting bolt. This is not necessary, but believe me, this cheap detail can save quite a lot of nerves. Since the old bolts are generally very stretched (photo 4) and even with new copper sealing washers, such a bolt will have to be pulled long and hard until there is no brake fluid leakage (and don’t forget that the threads in an aluminum brake cylinder are very easy to break).
We're done with the tools and spare parts. Now let's move on to a step-by-step description of replacing the front brake hose on VAZ-2101, VAZ-2102, VAZ-2104, VAZ-2105, VAZ-2106, VAZ-2107, Classic cars:
1. Use pliers to pull out the fixing bracket (photo 5)
2. Using an open-end wrench size 17 and a special clamp wrench 10, unscrew the brake pipe fitting (photo 6). We disconnect the hose and brake pipe, and put a rubber cap on the end of the pipe.
3. Using a 10 mm spanner, unscrew the fastening bolt securing the brake hose bracket (photo 7), if you have one, of course))).
4. Using a 14 mm socket wrench, unscrew the bolt securing the brake hose to the brake cylinder (photo 8). We remove traces of dirt and sand from the brake cylinder.
We carry out assembly in reverse order. We install the brake hose as shown in photo 9, with the bevel down. We install two sealing copper washers. When tightening the brake hose and tube, tighten the tube fitting and do not twist the hose, thereby preventing the brake hose from twisting.
When using an article or photographs, an active direct hyperlink to the website www.avtorem.info is required!
Problems when braking
The parking brake is a mechanical lever-type device with a cable drive. In this case, braking is carried out only by the rear wheels. These brakes include a brake lever, cable, pads. All brake system problems can be divided into several types. Moreover, each malfunction has a list of specific causes and methods for eliminating them. Problems that arise during the operation of the braking system usually have the following manifestations:
- braking is not fast and effective enough;
- incorrect and untimely braking;
- during braking, the car drifts to the side;
- jamming of the cable when turning the handbrake on and off.
The braking process may not be fast or effective enough if brake fluid leaks. This can happen in the area where the VAZ brake cylinders are located. To fix this problem, you need to remove the broken parts and install new ones. It will be necessary to clean and dry all the pads, drums of the VAZ 2106 brake system, and the hydraulic brake drive.
Problems with braking can arise due to the accumulation of air in the depths of the VAZ system itself. If you get rid of it, the car will work perfectly. Malfunction of hoses leads to disastrous consequences, so they need to be changed on time. Rubber seals located in the brake system affect the operation of the machine, so they require timely replacement.
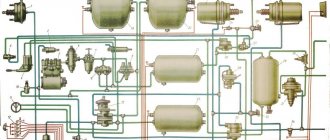
1 – cap; 2 – clamp; 3 – wheel mounting bolt; 4 – brake drum; 5 – hub; 6 – axle; 7 – brake shield; 8 – brake pad; 9 – pressure spring; 10 – emphasis; 11 – the tip of the spacer bar is long; 12 – tension spring (long); 13 – dirt-proof cover; 14 – cylinder; 15 – piston; 16 – cuff; 17 – thrust ring; 18 – air release valve; 19 – valve cap; 20 – flexible hose; 21 – lock washer; 22 – axis; 23 – adjusting nut; 24 – the tip of the spacer bar is short; 25 – expansion lever; 26 – cable end; 27 – cable spring; 28 – cable; 29 – tension spring (short); 30 – split washer; A – threaded holes for removing the drum
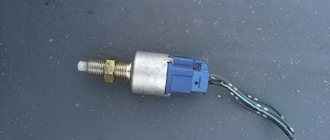
Another common malfunction of the brake system is incorrect and untimely braking. This can happen when the car engine is still running, and the VAZ system begins to slow down. It may occur due to the fact that the vacuum brake booster of the VAZ begins to malfunction. If its cover or seal wears out, the part is poorly secured.
If such a malfunction occurs, you need to completely replace the entire vacuum brake booster of the VAZ 2106. The lubricant may have been used quickly, so you need to add it to the vacuum seal, having first unscrewed the cap. The wheels of the vehicle may not fully release the brakes. This happens because there is no travel in the brake pedal. This in turn is caused by an incorrect position of the brake light.
To remove this malfunction, it is enough to adjust the switch correctly. It is necessary to monitor the protrusion of the bolt in the brake booster. The protrusion itself should be approximately 1.25-0.25 mm. But if the vacuum booster has stuck valves due to swollen seals and diaphragms, then it needs to be completely replaced.
When product replacement is required
Both the front and rear wheels are characterized by the use of 4 brake pads to ensure effective braking. Only in design these products are very different, although the principle of operation is similar.
The rear pads of the VAZ 2107 are presented in the form of an arched steel structure, on the outer part of which a friction layer is applied. It is due to the friction of this layer against the inside of the drum that the car stops. If you do not replace the brake elements in a timely manner, this will be fraught with the development of unpredictable consequences, because the most important thing for any car is the serviceability of the braking system.
It will not be possible to determine this fact without removing the wheel and dismantling the drum. But this is one of the main ways to determine whether the brake system is faulty. There is a second option, which is more convenient and does not require dismantling the rear wheel. To do this, you need to listen for signs of squeaking of the rear wheels, as well as grinding and lack of braking effect, but this can lead to damage to the drum itself. You can squeeze the handbrake while standing on a slope and check that it is working correctly. Of course, the cable on the handbrake may become loose, but if you tighten it and still have no effect, then it’s time to start replacing the pads. If the rear brakes are not functioning, then it is time to change the pads. It is recommended to change them as a set on both rear wheels, since they are often worn out at the same time. What is the process of replacing rear brake pads on a VAZ 2107 will be determined further.
On a note! All four pads on the rear wheels need to be replaced at the same time, even if the friction linings are worn unevenly.
Instructions for replacing rear pads
At the beginning of the work, it should be noted that the handbrake must initially be lowered to its lowest position. This will allow you to dismantle the brake drum and thereby get to the worn parts. To begin replacing the brake pads of a VAZ 2107, it is necessary to remove the rear wheel:
- There is a drum behind the wheel, which also needs to be removed. There are no problems with this, so we move on.
- After removing the drum, it is necessary to inspect the worn pads. If the thickness of the friction lining exceeds 1.5 mm, then there is no need to replace the products. Before carrying out further work, it is necessary to clean the mechanism from dirt and dust. To do this, you can use a brush or cloth.
- If the products need to be replaced, then you need to take a screwdriver and then remove first the upper, then the lower connecting springs. If you can’t dismantle it with a screwdriver, then you should use pliers. The photo below shows the springs that should be removed.
- Next, you need to remove the clamps, which consist of a rod, a washer and a spring. These washers must be rotated 90 degrees to remove them through the slots. This is what the washers that hold the pads look like.
- Similar procedures are carried out with the second block.
- After removing the springs and clamps, the pads are removed independently.
- The parking brake locking pin is straightened. The photo below shows the location of the locking pin. Now you need to unscrew the parking brake lever. This can be done using pliers. After this, the washer is removed, then the lever.
- During the dismantling process, you will have a question, what to do with the parking brake tip? It must be disconnected from the product and then left hanging.
- If necessary, it is recommended to replace all parking brake parts that were removed from the old product with new ones.
The rear brake pads on the VAZ 2107 should be installed in the reverse order of removal. Before installation, remember to bring the brake cylinder pistons as close as possible. Despite their simple design, installing them is much more difficult than the front ones.
But having completed the procedure once, all subsequent repairs will be much easier for you.
The cost of new pads starts from 800 rubles per set, but it is important to purchase high-quality products, and not Chinese “consumer goods”. Not only the service life of the products, but also the braking of the car will depend on this. This completes the replacement procedure, if you have any questions, be sure to ask them
This completes the replacement procedure; if you have any questions, be sure to ask them.
Principles of operation of the braking system
The model in question has service and parking brake systems. The working system includes a hydraulic drive. It, in turn, consists of several circuits. They work independently and, accordingly, use the mechanism of the entire braking system of the wheels (rear, front). The composition of the service brakes is as follows:
- amplifier (vacuum);
- pedal system;
- brake cylinders;
- brake fluid sensor;
- pipelines;
- front and rear disc brakes on a VAZ with all adjacent units.
The clutch pedal and brake pedal are located on the same axis. The brake pedal has a return mechanism. There is also a switch for signals that indicate the braking process. The vacuum booster is designed to reduce the force on the brake pedal when the engine is running. This is possible due to the fact that the intake pipeline is discharged.
The master cylinder of the braking system is attached to the booster. Tubes from two circuits are fixed to it. The engine compartment has a special reservoir containing brake fluid. It goes through special hoses to the cylinder. The level sensor for this mixture is located on the tank lid. The front wheel brake mechanism is disc-type and includes brake discs, calipers, cylinders and pads.
https://youtube.com/watch?v=Av-jj8NNrv8
Replacing rear pads
The brake elements front and rear wear unevenly. Therefore, rear pads are changed much less frequently. However, you should not delay the repair, since both the braking efficiency and the holding of the car when using the handbrake directly depend on the condition of the pads.
To carry out the procedure you need to prepare the following tools:
- screwdriver with flat and Phillips blade;
- pliers;
- long nose pliers;
- "balloon".
How to remove a brake drum
We dismantle the part in the following sequence:
- We hang up the rear of the car and remove the wheel.
- Unscrew the guide pins.
Removing drums on “classics” is a “disease” of these cars. Pulling the part together is very problematic, especially if it is done rarely. However, there is an old-fashioned method that is used not only by me, but also by other motorists. To dismantle, screw the pins into the drum, then start the engine and engage fourth gear, causing the drum to rotate. Then sharply press the brake. You may need to repeat the procedure several times. After that we try to knock the drum down with a hammer again, usually it works.
Removing the pads
We dismantle the pads in this order:
- Remove the spring-loaded bolts holding the brake elements.
Video: replacing rear brake pads on a “six”
Installation of pads and drum
The brake elements are installed in reverse order. Before putting the drum on the axle shaft, you need to clean it from the inside from corrosion and dirt, for example, with a metal brush. It should also be taken into account that with new pads the drum may not sit in its place. Therefore, you will have to slightly release the tension on the handbrake cable. When the drums on both sides are installed, you need to adjust the handbrake.
It is not recommended to brake sharply for some time after replacing the pads, as they need to get used to the drums.
When replacing pads, it is recommended to also check other elements of the brake system and suspension. There should be no visible damage or leaks on the brake hoses. The pads are replaced only as a set. Otherwise, the car will pull to the side after repair.
System failures
The VAZ brake system may show malfunctions. This may be due to the fact that the cylinder holes are clogged, so they need to be cleaned in a timely manner. It won't hurt to pump the entire hydraulic drive. It is necessary to replace the cylinder if the pistons fail. In this case, bleeding the entire system will not hurt. If the rubber seals begin to swell due to liquid (gasoline or oil) getting inside, then the entire circuit of the VAZ brake system requires thorough washing and replacement of the damaged elements.
Sometimes the wheels (or one of them) may slow down if the brake pedal is loosened. This problem occurs for several reasons
In this situation, you need to pay attention to the pad springs in the rear brake, because they could either fail or weaken a little. You just need to change the springs
The piston itself may sometimes not work and jam.
You need to disassemble the entire cylinder and see what is blocking the piston. Then start cleaning. When the part is washed, you need to look if there is damage to other elements. All broken devices need to be replaced. Wheels may fail to brake if the seals in the cylinders have increased in size. If they are swollen, then liquid has entered there. To troubleshoot problems, you need to thoroughly flush the entire brake system, eliminating unnecessary fluids in it.
In addition, you need to install new rings. The same problem with wheel braking can arise due to the fact that over time the vehicle has been used, the space between the drum and the shoe has expanded. To fix this problem, you need to adjust the parking brake.
The wheels can free themselves and brake on their own if the position of the caliper has changed. This situation occurs if the bolts near the brake disc bracket are unscrewed. To get rid of the problem you need to tighten all the bolts in their places.
Instructions for replacing rear pads
Raise the rear of the car with a jack from either side. Install wheel chocks under the front wheels. Remove the wheel by unscrewing the mounting bolts and lockers. Now you need to remove the drum from its seat. As a rule, during the operation of the car, it settles and “sticks,” which complicates the dismantling process. It is recommended to use a hammer to give several gentle blows to the surface of the drum between the studs. After removing the drum, it is necessary to clean the brake mechanism itself and the seat from dust and dirt with a brush. Check the drum for wear
If there are severe chips, cracks or burrs, replace with a new one. Remove the upper tension spring using a screwdriver or pliers. Press the support spring plate with pliers. Turn the plate ¼ turn. Remove the support strut of the second block in the same way. Move the brake pads apart and remove the clearance adjuster. Remove the lower tension spring by hand. Now you need to pay attention to the handbrake mechanism, which is located on the rear block. It needs to be dismantled. To do this, you need to remove the locking ring and remove the pin using pliers. Check the condition of the brake pads
If necessary, replace with new ones. After replacing the pads, it is necessary to adjust the gap between the pads and the drum itself. To do this, you need to remove the rubber plug from the inside of the dirt shield and use a flat-head screwdriver to turn the regulator gear. The wheel rotates only in one direction to spread the pads. It is necessary to achieve light contact between the pads and the drum. Before assembling all parts of the brake drum system, it is necessary to wash all parts in gasoline, disassemble the clearance adjuster and lubricate it with graphite or silicone grease. Assembly is carried out in the reverse order of dismantling. Place the vehicle on the ground and secure the wheel mounting bolts. Repeat the procedure with the second wheel.
To do this, you need to remove the locking ring and remove the pin using pliers. Check the condition of the brake pads. If necessary, replace with new ones. After replacing the pads, it is necessary to adjust the gap between the pads and the drum itself. To do this, you need to remove the rubber plug from the inside of the dirt shield and use a flat-head screwdriver to turn the regulator gear. The wheel rotates only in one direction to spread the pads. It is necessary to achieve light contact between the pads and the drum. Before assembling all parts of the brake drum system, it is necessary to wash all parts in gasoline, disassemble the clearance adjuster and lubricate it with graphite or silicone grease. Assembly is carried out in the reverse order of dismantling. Place the vehicle on the ground and secure the wheel mounting bolts. Repeat the procedure with the second wheel.
After replacing the brake pads on the drums, you need to drive to a quiet place and check the functionality and effectiveness of the pads. It is highly recommended that you replace any damaged or worn brake drum parts. Adjustment of the pads must be done once a year, or 15-20 thousand km. This is necessary for uniform wear of the rear pads and maintaining the braking efficiency of the rear wheels. It is recommended to perform this procedure in a lifting box, but if necessary, a jack with an inspection hole will do.
Why does the engine stall when braking VAZ 2106
17.5 they say))
This cannot happen. At one time I had a ’75 “penny” with such a carb. I usually measured the gap with a drill, but I don’t remember exactly, it was 7 or 7.5 mm, but not 17. You remove the cover from the carb and you will see that with a gap of 17 mm, gasoline will flow out of all the holes.
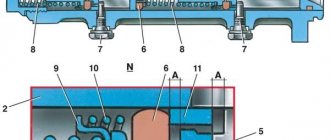
The level required for normal operation of the carburetor is ensured by the correct installation of serviceable elements of the shut-off device (Fig. 76): the float assembly should not have any visible damage, the mass of the float should be 11.13 g; the distance between the float and gasket 10 adjacent to the carburetor cover should be (6.5 ± 0.25) mm. The control is carried out with a gauge, the housing cover is held vertically so that the tongue 8 of the float lightly touches the ball 5 of the needle valve 3, without recessing it: the size adjustment (6.5 ± 0.25) mm is carried out by bending the tongue 8, and it is necessary that the supporting platform the tongue was perpendicular to the axis of the needle valve and had no nicks or dents; the gap corresponding to the maximum stroke of the float should be (8±0.25) mm. It is adjusted by bending stop 4; fork 6 should not interfere with the free movement of the float. After installing the carburetor, you must make sure that the float does not touch the walls of the float chamber. Proper float installation should be checked each time the float or fuel needle valve is replaced; When replacing a needle valve, it is necessary to replace the valve sealing gasket.
Damage and strange sounds
If any units are damaged during the occurrence of the problem, they must be replaced with new ones. If the brake disc produces runout with an increase of 0.15 mm, then it needs to be ground, and if it is already less than 8-9 mm thick, then it’s time to replace it. The next problem with the braking system is situations where the car pulls too far to the side when braking. This occurs in cases where there may be a leak from the cylinder.
To prevent brake fluid from leaking, you need to change the seals. To fully check the circuit requires bleeding. In this situation, the pistons themselves from the cylinder may jam. They need to be checked on time. Make sure the parts are intact. If the brake system units are clogged, it should be cleaned. It is imperative to check all drums, linings, discs, as they can become clogged. All parts of the system require timely cleaning.
If the regulator responsible for the pressure level is not adjusted correctly, then you need to adjust it and set it correctly. If its diagnostics and adjustment show that it is out of order, the unit needs to be replaced. If the cable is damaged, the handbrake may stick, which will affect the efficient operation of the entire vehicle, so the cable must be replaced. You need to completely replace the VAZ handbrake if the entire mechanism is damaged and the handbrake fails.
With increased pressure on the brake pedal, there may be problems with air filters, booster valves, hoses and the seal itself. To eliminate all problems, you need to check these units, clean them, and if they break down completely, parts need to be replaced.
If you hear sounds (creaking) in the brakes, this may be caused by weakening of any parts, springs, wear, breakage, contamination, or too much beating of the brake disc. All these elements need to be checked, tightened, cleaned or replaced. Monitoring the operation of the braking system allows you to study the design and ensure safe operation of the vehicle.
Let's sum it up
Tuning a car's brake system is a very responsible job. Unsuccessful modernization of the appearance of a vehicle or its interior will only affect the unpresentable appearance of the car. A mistake in upgrading your brake system could cost you or other road users your life. Take responsibility for modifications that affect the vehicle's braking system. Buy only certified high-quality spare parts from reputable manufacturers. Proceed to independently improve the brake system of your car only if you are completely confident in your abilities and capabilities.
About flushing the brake system
A person’s life depends on the serviceability of a car’s brakes, and therefore diagnostics must be approached responsibly. The brake system requires periodic inspection. In addition, it needs to be washed from time to time, which many people don’t even realize. Most car enthusiasts will not even remember when their car had a complete brake fluid change. Moreover, there are often those who have not changed the fluid in the system at all since purchasing a new car.
Why flush the system?
Brake fluid tends to wear out over time, that is, with continuous use, over time it begins to lose its basic qualities. Brake fluid serves to transmit pressure through the master cylinder to the working cylinders when the pedal is pressed. In addition, it serves as a lubricant for the components and mechanisms of the hydraulic system.
Brake fluid is hygroscopic, meaning it can absorb water. This means that with constant moisture ingress, after several years of operation, the working fluid begins to boil at lower temperatures. This level can drop to the point where it boils even during moderate driving with infrequent use of the brakes.
The brake fluid that has absorbed moisture ceases to properly lubricate, and the pistons in the cylinders begin to heat up, the sealing collars overheat and leak, and when the brake fluid gets on the friction linings, it renders them unusable. The internal cavities of the cylinders are corroded by corrosion. All this is developing very quickly, and soon a complete repair of the brake system will be required, in particular, replacement of working elements. To avoid such unpleasant consequences, you can change the working fluid in a timely manner. It’s easier and cheaper than having to deal with repairs and replacement of components later.
Washing rules
The procedure for replacing the fluid is specified in the user manual. In addition, replacement is necessary when the fluid in the master cylinder reservoir becomes dark. In this case, flushing is required. To do this, you will need to purchase a special tool, although you can use a simpler method, namely, use a new TZ for these purposes.
There are several ways to wash it. You can use the services of a service station, where washing is carried out using special equipment. But the VAZ 2106 is easy to maintain, and you can wash it yourself in a garage. The work takes more time than turning to specialists, but the results are no less effective, and you will also be able to save money. The only thing you will have to fork out for is to buy a high-quality TZ. You need to take it with a reserve, as some will go away along with the old liquid. You will also need the help of a friend.
The procedure is as follows.
After washing, bleeding will be required, so you need to prepare a transparent silicone hose in advance, which can be pulled tightly onto the bleeding fitting on the cylinder. In terms of technology, flushing is very similar to pumping and is performed according to the same scheme. That is, you need to start with the left rear wheel, then move to the right front, the next will be the right rear and the last one to bleed is the left front. All liquid is pumped out of the tank. You can use a syringe or a medical bulb. If there is sediment or plaque on the walls, the tank should be removed and washed, or, in extreme cases, replaced. Next, fresh fuel fluid is poured into the tank. Then everything is the same as when pumping: one person sits in the driver’s seat and presses the pedal, the second unscrews the fitting and drains the brake fluid into a container
To avoid having to do pumping after washing, it is important to press and not release the pedal until the fitting is screwed in completely. Determining when to switch sides is very simple. This will happen when the color of the leaking fuel fluid changes, it becomes light
In this case, you need to carefully monitor the fuel fluid level in the master cylinder tank and periodically add it to the maximum.
Before starting this procedure, it is strongly recommended that you study the detailed instructions and read the repair and maintenance manual for the VAZ 2106. There are also methods of washing using compressed air and a compressor, with complete disassembly of all parts and washing by hand, but the result will be the same in any case.
https://youtube.com/watch?v=ZlDhd8lZTwI
Preparation
The work is best done on a flat, paved area - most typical garages will be a bit cramped. Find a suitable support in advance - hanging a car on a standard jack is dangerous, especially considering the state of the jacking sockets on cars, the youngest of which is almost ten years old. Also for work you will need:
- narrow nose pliers;
- a thin drift (at worst - a piece of 4 mm electrode or a thick nail);
- metal brush;
- powerful flat screwdriver;
- rubber bulb or large syringe.
First, you need to pump out the old brake fluid from the reservoir - when the working pistons are recessed, it can overflow, and replacing it with fresh one would be quite reasonable. It is worth placing stops under the wheels and, having removed the tightened bolts, hang the car, place a support under the threshold and release it down.
Where to look for the cause in other components of the car
Now let's look at other elements that can cause knocking when braking. One of the reasons may be a banal loosening of the wheel fastening. In this case, it will play during braking and hit the hub.
You should also check the hub itself for play. If the wheel bearing is heavily worn, knocking noises may occur when braking.
The next component of the car that should be checked is the suspension.
Worn silent blocks and bushings may be the cause of this problem. Wear of the silent blocks of the steering mechanism can also lead to knocking noises.
Wheel rim bolt pattern for VAZ, Ford, Opel, Nissan, bolt pattern table
Finally, you should check the engine mounting. Loosening it on one of the cushions can easily cause a knock.
In general, when knocking noises appear, you should start checking from the brake pedal and go to the mechanisms. Moreover, you need to inspect and check carefully. Even a small amount of play can lead to this problem.
Along the way, you should also evaluate the condition of all elements of the car located near the hubs or connected to it.
Another reason is video.
Substitutes
| vendor code | Price, rub.) | vendor code | Price, rub.) |
| Delphi 65140 | 850 | Finwhale 23593 | 800 |
| LS1219/S | 850 | VR311 | 800 |
| Bosch 17888 | 950 | TRW 26401 | 800 |
| 986487217 | 850 | GS8164 | 850 |
| HZTS 79927 | 800 | 2101-3502090 | 800 |
| Start 63275 | 800 | 21010-3502092 | 850 |
| MASTER SPORT 2103-3502093 | 850 | 030137-02332 | 800 |
The lists are presented for informational purposes. Before purchasing, be sure to consult with a specialist from a service center or auto store to determine the compatibility of the catalog article with the make/model of your car.
Knock in the wheel area, disappears when the brake is applied
#1
Regular visitors
Posts: 97
- City: Moscow
- Interests: Opel Omega B MV6 1999, X30XE engine, automatic transmission
- Car: Opel Omega B MV6 1999, X30XE engine, automatic transmission
@Mention
- Top
- Answer
- Quote
#2 Maxim816
Regular visitors
Messages: 520
- City: Moscow Northern Administrative District
- Car: Omega B, sedan, 2000, automatic transmission, Z22XE; TOYOTA PLATZ 2003 1.0 automatic transmission; FIAT DUCATO
@Mention
- Top
- Answer
- Quote
#3
Regular visitors
Posts: 97
- City: Moscow
- Interests: Opel Omega B MV6 1999, X30XE engine, automatic transmission
- Car: Opel Omega B MV6 1999, X30XE engine, automatic transmission
@Mention
- Top
- Answer
- Quote
#4 Maxim816
Regular visitors
Messages: 520
- City: Moscow Northern Administrative District
- Car: Omega B, sedan, 2000, automatic transmission, Z22XE; TOYOTA PLATZ 2003 1.0 automatic transmission; FIAT DUCATO
@Mention
- Top
- Answer
- Quote
#5
Regular visitors
Posts: 97
- City: Moscow
- Interests: Opel Omega B MV6 1999, X30XE engine, automatic transmission
- Car: Opel Omega B MV6 1999, X30XE engine, automatic transmission
@Mention
- Top
- Answer
- Quote
#6 Maxim816
Regular visitors
Messages: 520
- City: Moscow Northern Administrative District
- Car: Omega B, sedan, 2000, automatic transmission, Z22XE; TOYOTA PLATZ 2003 1.0 automatic transmission; FIAT DUCATO
@Mention
- Top
- Answer
- Quote
#7
Regular visitors
Posts: 97
- City: Moscow
- Interests: Opel Omega B MV6 1999, X30XE engine, automatic transmission
- Car: Opel Omega B MV6 1999, X30XE engine, automatic transmission
@Mention
- Top
- Answer
- Quote
#8 magic gray
Experienced Opel Driver
Club users
Messages: 1,124
- City: Estonia.Tallinn
- Car: Omega 2.5TD
@Mention
- Top
- Answer
- Quote
#9 Dim_
Regular visitors
Messages: 1,326
- City: St. Petersburg
- Car: OOB x20xev. CD.Automatic -> Zafira B'07 enjoy x2->Zafira B'13
@Mention
- Top
- Answer
- Quote
#10 Falcon
Experienced Opel Driver
Regular visitors
Messages: 1,665
- City: St. Petersburg
- Car: X20SE 1994 manual transmission
@Mention
- Top
- Answer
- Quote
#11 Felix
Club users
Messages: 1,343
- City: Moscow, Northern Administrative Okrug
- Interests: I like to be lazy %)
- Car: crashed
@Mention
I immediately remembered your number, there is such a bus here (c) Alexey
- Top
- Answer
- Quote
#12 PILOT-T
Experienced Opel Driver
Regular visitors
Messages: 3,103
- City: Ukraine. Nikolaev.
- Car: OOB 1JZ GTE VVTI Restyle, OVA C18NZ 4WD
@Mention
These are the caliper guides. On these 296mm, they wear out and knock, although you can simply straighten the anti-rattle springs and there will be silence
- Top
- Answer
- Quote
#13
Regular visitors
Posts: 97
- City: Moscow
- Interests: Opel Omega B MV6 1999, X30XE engine, automatic transmission
- Car: Opel Omega B MV6 1999, X30XE engine, automatic transmission
@Mention
These are the caliper guides. On these 296mm, they wear out and knock, although you can simply straighten the anti-rattle springs and there will be silence
Well, laugh after laugh, are they expensive? Tomorrow I'm going to a service center to get it repaired, I'd like to be prepared so I don't get scammed.
- Top
- Answer
- Quote
#14 Prince
Moderators
Messages: 5,585
- City: Belgorod region. Alekseevka
- Interests: Opel cars, car diagnostics, photos.
- Car: Opel Omega B Caravan x20se
@Mention
“Never be afraid to do what you don’t know how to do. Remember, the ark was built by an amateur. Professionals built the Titanic."
- Top
- Answer
- Quote
#15
Regular visitors
Posts: 97
- City: Moscow
- Interests: Opel Omega B MV6 1999, X30XE engine, automatic transmission
- Car: Opel Omega B MV6 1999, X30XE engine, automatic transmission
@Mention
One of the most popular causes of knocking noises is worn-out seats for mounting the caliper guides in the brake mechanism. In this case, there is play in the caliper, which causes vibrations during braking. Knocking is also common. Solving this problem is very simple - it will completely disappear after replacing the guides.
During braking, the fluid presses on the piston. However, it gets stuck in the cylinder and remains in this position until an increase in pressure pushes the piston out of it. When this happens, it hits the pads with force and presses them down - this is the reason why you hear a knocking noise from the front when braking.
To correct this situation and get rid of annoying sounds, just remove the caliper and remove the piston. Then its condition is visually checked, and the surface of the cylinder is inspected together with the piston. If traces of corrosion are found during the inspection, the cylinder must be cleaned, and it is recommended to replace the piston.
Downloading a book
After successfully completing the payment (by any method) and returning to the KrutilVertel store from the payment system website, you will be taken to the successful payment page:
The book you purchased will be in your personal account, from where you can always download it.
Please note that after making the payment, you need to return back from the payment system website to the KrutilVertel website. If for some reason you did not return back to the site and closed the payment system tab with a message about the successful completion of the payment, please let us know - we will send you a letter indicating access to download the book
If for some reason you did not return back to the site and closed the payment system tab with a message about the successful completion of the payment, please let us know - we will send you a letter indicating access to download the book.
Why does the car stall when braking: the main reasons for the engine stopping
Many car enthusiasts, when starting the engine, believe that it works without any problems and immediately gains the necessary characteristics for uninterrupted operation. After a short warm-up, the car starts normally, but when braking, it stalls, most often at the moment when the clutch is depressed.
To understand the situation, just look at the tachometer or listen to the sound of the engine. When you press the clutch, the speed drops abruptly to a minimum level at which the engine stalls. Moreover, such a problem may occur only occasionally, which complicates the identification of the malfunction. The engine may stall when braking without pressing the clutch, or simply when braking the engine.
From this we can conclude that the car stalls in transient modes when the gas pedal is released and the throttle valve closes. At this moment, the idle system begins to work, but this does not mean that it alone is responsible for the problem that has arisen.
If the car stalls while braking, the first thing to check is the condition of the braking system. To do this, you need to pump the pedal five to six times and leave it depressed to the bottom point. This is done with the engine off, after which it starts, and the pedal should rise to its normal functional state, and the brakes should engage normally. If this does not happen, the brake system needs to be diagnosed and repaired.
Experts include the following reasons why the engine stalls when braking:
- breakdown of the brake vacuum booster, its depressurization;
- a burst and depressurized vacuum booster hose;
- in engines with fuel injection, the idle speed sensor may fail;
- failure or problems with adjusting the throttle position sensor or its clogging;
- tank clogging or fuel pump failure.
Breakdown of the vacuum brake booster (VUT)
This unit reduces the force exerted by the driver's foot on the brake pedal. It is located in front of the master cylinder and consists of a vacuum hose and an intake manifold. Its design includes a flexible membrane or VUT diaphragm. With fast and sharp braking, even microscopic depressurization of the vacuum booster leads to problems.
During operation, the membrane periodically moves back and forth. As a result of wear, it stretches in the middle part and cracks, allowing air to pass through. It is no longer able to create a vacuum, and air enters the fuel mixture, disturbing its balance. To identify problems with the diaphragm, you will need to do several simple procedures:
- Turn off the engine.
- Press the brake pedal up to 6 times, “pumping” it, with each new press the pedal stroke should become tighter.
- Keep the pedal pressed and start the car engine.
- If the pedal “falls through” when the engine is running, the brake booster works normally; if the pedal does not respond, this is a sign of a ruptured membrane, and the problem must be solved urgently.
The serviceability of the VUT diaphragm can be checked in another simple way:
- the car starts and runs for several minutes, then the brake pedal is pressed;
- the car engine turns off;
- it is held pressed for at least half a minute;
- the pedal must remain pressed and not try to rise, but if it rises or resists your foot, the vacuum booster of the brake system is faulty.
Video: What to do if the engine stalls when you press the brake pedal? (Do it yourself repair)
Depressurization of the vacuum booster hose
This hose serves to connect the amplifier to the intake manifold. Violation of its integrity may cause the engine to stall during sudden braking. As a result of wear or mechanical damage, cracks appear in the hose, into which air enters. The result is a violation of the proportion of the air-fuel mixture for the engine, for which the intake manifold is responsible. When you press the brake, especially sharply, it becomes critically lean, the engine speed drops and it stalls.
Checking the hose is quite simple. It is disconnected directly from the VUT, the car starts, and the hole is tightly closed with a finger. If the hose is intact, the engine speed will increase noticeably; if breaks and cracks appear, it will continue to suck in air and the speed will remain at the same level.
Replacing rear pads
The brake elements front and rear wear unevenly. Therefore, rear pads are changed much less frequently. However, you should not delay the repair, since both the braking efficiency and the holding of the car when using the handbrake directly depend on the condition of the pads.
To carry out the procedure you need to prepare the following tools:
- screwdriver with flat and Phillips blade;
- pliers;
- long nose pliers;
- "balloon".
How to remove a brake drum
We dismantle the part in the following sequence:
- We hang up the rear of the car and remove the wheel.
- Unscrew the guide pins.
Removing drums on “classics” is a “disease” of these cars. Pulling the part together is very problematic, especially if it is done rarely. However, there is an old-fashioned method that is used not only by me, but also by other motorists. To dismantle, screw the pins into the drum, then start the engine and engage fourth gear, causing the drum to rotate. Then sharply press the brake. You may need to repeat the procedure several times. After that we try to knock the drum down with a hammer again, usually it works.
Removing the pads
We dismantle the pads in this order:
- Remove the spring-loaded bolts holding the brake elements.
Video: replacing rear brake pads on a “six”
Installation of pads and drum
The brake elements are installed in reverse order. Before putting the drum on the axle shaft, you need to clean it from the inside from corrosion and dirt, for example, with a metal brush. It should also be taken into account that with new pads the drum may not sit in its place. Therefore, you will have to slightly release the tension on the handbrake cable. When the drums on both sides are installed, you need to adjust the handbrake.
It is not recommended to brake sharply for some time after replacing the pads, as they need to get used to the drums.
When replacing pads, it is recommended to also check other elements of the brake system and suspension. There should be no visible damage or leaks on the brake hoses. The pads are replaced only as a set. Otherwise, the car will pull to the side after repair.