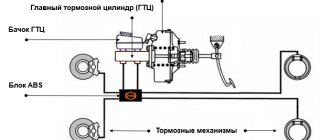
Bleeding the hydraulic brake system
We pump the brakes to remove air from the hydraulic drive after it has depressurized when replacing the master cylinder, wheel brake wheel cylinders, hoses, tubes, as well as in case of replacing the working fluid or when the brake pedal becomes “soft”. We remove air from the system when the engine is not running, first from one circuit and then from the other in the following sequence: – the brake mechanism of the right rear wheel; – brake mechanism of the left front wheel; – brake mechanism of the left rear wheel; – brake mechanism of the right front wheel. If air gets into one of the circuits, it is enough to bleed only this circuit, and not the entire hydraulic drive. Before pumping, check the level of working fluid in the brake system hydraulic reservoir and, if necessary, add fluid (see “Checking the fluid level in the brake hydraulic reservoir,” page 42). We bleed the brakes with an assistant. If the rear wheels are hanging...
...insert a screwdriver between the lever and the plate spring of the pressure regulator in the hydraulic drive of the brake mechanisms of the rear wheels, fixing the regulator piston in the recessed position. We clean the brake bleeder fitting of the right rear wheel from dirt...
...and remove the protective cap from it. Use a spanner wrench or an “8” socket to loosen the tightening of the bleeder fitting. We put a hose on the fitting, and immerse its free end in a container partially filled with working fluid. An assistant should vigorously press the brake pedal all the way 4-5 times and keep it pressed.
Using the “8” wrench, unscrew the bleeder fitting 1/2–3/4 turn. In this case, liquid with air bubbles will flow out of the hose, and the brake pedal should be pressed all the way. As soon as the liquid stops flowing out of the hose, tighten the fitting and only after that can the assistant release the pedal. We repeat pumping until air bubbles no longer appear in the liquid coming out of the hose. We remove the hose, wipe the bleeder fitting dry and put a protective cap on it. We pump as described above...
...brake mechanism of the left front wheel. Similarly, we bleed the brake mechanisms of the other circuit. When pumping, you need to monitor the fluid level in the brake hydraulic reservoir and add fluid if necessary. If, when you press the brake pedal, you feel its “softness” and increased travel, it means there is air left in the system. In this case, we repeat pumping until the pedal becomes “hard”, i.e., when pressed, go no more than half the distance to the floor. If air cannot be removed, check the tightness of connections, pipelines, hoses, master and working cylinders. We tighten leaking connections, replace faulty main and working cylinders (see “Brake system”).
Below are instructions for checking the brake system of the Russian class “B” sedan Lada Priora. It includes all the important points and connecting parts of the braking system.
To imagine a car without brakes is tantamount to an uncontrollable horse. When leaving the garage, this is the first thing to check and never put off repairing the brake system. We'll tell you about the brake system parts, their testing and their prices.
How to modify the design
The d-shape can be used to protect the wiring from the environment. We put wires on it and wrap it with electrical tape. Let's put everything in a corrugation. We seal the cover covering the ABS sensor connector around the perimeter with the same sealant. This will prevent moisture and dirt from getting into the sensor and connector area.
Attention! If the ABS fails, the brakes remain functional, but braking performance decreases, which is especially dangerous as the coverage area increases. Understand why.
Like any modern car, Priora is equipped with many devices that make driving more comfortable and safe. These devices include ABS (anti-lock braking system). Like all modern devices, it has its own electronic control unit and a warning light on the instrument panel. And then this lamp came on. What to do if the ABS fault indicator on a Priora comes on? Where to see? Who should I contact?
Car braking distance
First of all, it is necessary to calculate the braking distance of the Lada Priora car. According to the rule, it should be about 12 m. In order to find out this distance, you must first fill the brake fluid tank full.
Then on a flat road you need to accelerate to 40 km/h and then brake sharply. The distance from the start of braking and the place where the car stops is the braking distance. If it exceeds the norm, then the system is in an unusable state. For more accurate results, it is recommended to do this procedure several times.
ABS fault detection
Servicing the ABS system in Priora, as in any car, is a very important issue. It is very convenient that the slightest error in its operation is immediately reflected on the dashboard. The ABS warning light will either come on or not go out after the set time has elapsed after the ignition is turned on.
There is no need to doubt here. You urgently need to go for computer diagnostics at a decent gas station. Modern Priority ABS control units have an output for a diagnostic connector. They are perfectly diagnosed by both portable handheld scanners and stationary engine testers. Since all ABS electronics are closely related to the mechanical part, a trained diagnostic technician will identify most failures in this area by scanning the computer.
For example, the service valve is stuck in one of the directions. What happens: The coil, figuratively speaking, tries to influence it, but does not move. The computer, noticing a load violation in the circuit, will immediately give a signal. The “ABS Sensor” will turn on. After connecting, the technician will see the display direction and quickly fix the problem.
Features of diagnostics of ABS Priora
Some scanners that read faults registered in the ECU produce only alphanumeric codes, so for particularly picky motorists it makes sense to have at hand the decoding of these codes for the VAZ Priora:
- C0035 - malfunction of the front left sensor;
- C0040 - the same on the right front;
- C0045 - left rear malfunction;
- C0050 - the same right back;
- C0060 - failure of the left front exhaust valve;
- C0065 - failure of the left front intake valve;
- C0070 - malfunction of the right front exhaust valve;
- C0075 - malfunction of the right front intake valve;
- C0080 - rear left exhaust;
- C0085 - rear left inlet;
- C0090 — rear right exhaust;
- C0095 - rear right intake valve;
- C0110 - malfunction of the return pump circuit;
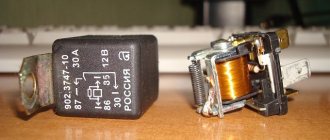
- C0121 - failure in the relay circuit for turning on the valve supply voltage;
- C0161 - malfunction in the brake light circuit;
- C0245 - incorrect reading of rotation speed;
- C0550 - ECU malfunction;
- C0800 - voltage mismatch in the ABS network.
This list allows you to find a fault, even if a simple Priora scanner only produces codes, and find out why the ABS sensor turned on. And yet it is worth remembering that it will be more pleasant for the technician to hear the correct wording - the anti-lock braking system malfunction indicator is on.
The video below shows the operation of ABS Priora:
Brake fluid level
Brake fluid is one of the most important elements of the braking system. Its insufficient level can lead to irreparable consequences. Therefore, it is important to check the fluid level before using the vehicle or when the special brake fluid level light in the tank comes on.
Before starting work, use a rag to wipe off any dirt on the brake cylinder to prevent dirt from getting inside. Open the barrel. The liquid level can be seen by looking inside the barrel; it should not be below the minimum mark. If wear on the brake pads is noticeable and the fluid is at a minimum, you must fill in new fluid before unscrewing the terminal wires.
Then close the tank, attach the tip and check the liquid level using the emergency level sensor. If the light comes on, the system is OK.
Why does the ABS and ESC light come on?
ABS malfunction may be caused by:
- failure of wheel rotation sensors;
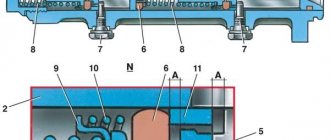
- malfunction of the hydraulic valve block;
- wiring damage.
If the ABS fault indicator lights up, you must contact a service station as soon as possible for diagnosis (reading fault codes) and repair.
The most common cause of ABS failure is damage to the wiring near the ABS sensor connector. It is located under the wheel arch trim, but is still poorly protected from moisture and dirt.
As a result, the wires oxidize and break, and the ABS warning light comes on.
Brake pads
Also, the main elements of the braking system include brake pads for the front and rear mechanisms.
For the first case, put the car on a jack and remove the front wheels. Then you should turn the steering wheel and monitor the brake mechanism. The thickness of the pads should not be less than 1.5 mm. If the value does not correspond to the specified value, all pads should be replaced. You should also check the performance of the piston. If there are any defects, it should also be replaced.
For the second case, you must first unscrew the rear wheel brake plug. Next, inspect the thickness of the pads; if at least one of them does not correspond to the above size, all pads are replaced.
How to repair wiring
We remove the wheel, then the locker (for the front wheel, unscrew the fastening screws) or the protective shield (for the rear, unscrew the two fastening nuts “10”). Press the latch and disconnect the release cable from the ABS sensor. We inspect the connector and make sure there is no corrosion or damage. In case of damage, we restore the integrity of the wires:
We treat it with a special means for cleaning electrical contacts (for example, graphite grease) and clean the contacts from oxides. We clean the wheel speed sensor and the surface around the sensor from dirt.
Attention! Keep ABS sensors away from magnets as they can be damaged.
Free pedal travel
The next point in checking the system is to measure the brake pedal play. Typically it should not exceed 5 mm. Using a ruler, measure the distance of the pedal to the floor. Then start pressing the pedal and the moment you feel resistance, measure the distance again.
Less or more free play can create many problems. In the first case, the brake pads may not work due to pressure, and in the second case, the play can lead to late application of the brakes. If performance is unsatisfactory, parts should be replaced.
What is ABS
The anti-lock braking system was developed when it became clear that when the wheels became heavily jammed, the car became unstable and difficult to control. In addition, the quality of braking did not improve, and the car practically drove off the road. Therefore, a system was developed that, by adjusting the pressure in the brake system pipes, allows the wheels to turn slightly. This significantly improves vehicle dynamics, allowing the driver to drive more safely. But despite its apparent simplicity, this is a rather complex process that requires the coordinated operation of many mechanisms included in the anti-lock brake system. If any component of the instrument panel malfunctions, the warning light comes on.
Test results
The optimal adjustment of the “sorcerer” corresponds to the average factory settings, and a few percent can be gained only with individual correction for specific brake pads, tires, vehicle loading and road conditions. But it’s unlikely that anyone will start every trip with a test run.
It would seem that it is possible to reduce the braking distance by increasing the pressure in the rear brakes, but this threatens a loss of stability due to early blocking of the rear wheels. And today only ABS can provide maximum braking efficiency.
On a fully loaded car, depending on the position of the regulator, the spread of the braking distance is 8.3 m. The best results, as on the Niva, are with increasing pressure in the rear brakes. However, on a slippery road, even in smooth turns, early locking of the rear wheels is possible, leading to a skid. And at partial load, with the regulator position different from the base one, the braking distance only increases.
How to adjust the brake force regulator if you install so-called houses?
It is adjusted by moving the plate. There is no specific scheme to regulate it normally. By trial method, with an assistant. We set the regulator to a certain position. We slammed on the brakes, and people... looks when he takes the front and back. Ideally, the front should be taken first, the back later. Look here for the link text.
Or by placing washers, but again there is no system, accelerate the car and brake in the sand, rarely does anyone adjust it after installing the houses.
Subscribe
to our channel in
Index.Zen
Even more useful tips in a convenient format
Source
Replacing the brake pressure regulator
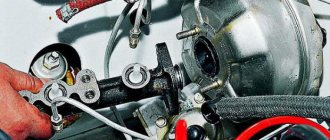
The replacement of the sorcerer on VAZ-2110 cars and other vehicles equipped with an RTD is carried out on an overpass. You need a 13 mm spanner, a powerful screwdriver and a special 10 mm wrench designed for unscrewing brake pipes. Before starting work, the assembly must be cleaned of dirt and rust, doused with WD-40 or another penetrating compound, and then wait half an hour.
Work begins by unscrewing the bolt securing the bracket to the spring. Afterwards, the brake pipes are dismantled, the position of which is recommended to be pre-marked.
You can also unscrew the tube fittings with a regular wrench. However, using a special tool makes the job easier and reduces the likelihood of “licking” the edges. After the fittings, unscrew the two bolts securing the sorcerer to the body and remove the part. » alt=»»> It is necessary to install the new VAZ-2110 sorcerer in strict reverse order. After installing it and before adjusting the RTD, you should bleed the rear brake circuits. Next, the above-described procedure for setting up the sorcerer is performed.
Removing and installing the brake pressure regulator Lada Priora
One of the reasons for the car skidding or pulling to the side when braking may be a malfunction of the pressure regulator.
It is recommended to replace a faulty pressure regulator as an assembly.
You will need: a flat-blade screwdriver, a 8- or 13-size wrench, a 13-size socket wrench (head), a special 10-size wrench for loosening the brake pipe nuts.
Using a screwdriver, remove the lock washer of the elastic arm of the regulator drive and the flat washer installed under it.
Disconnect the elastic arm with the shackle from the rear suspension beam.