1.
Open the heater tap by moving the control lever to the right until it stops.
2.
Place a container under the radiator drain plug of the cooling system and unscrew the plug.
3.
Open the coolant expansion tank cap by turning it counterclockwise.
4.
Unscrew the drain plug on the cylinder block and drain the remaining coolant from the channels of the cylinder block, first placing a container under it. Tighten the plug.
5.
Fill the engine cooling system by pouring coolant into the expansion tank until the level is at the top edge of the expansion tank mounting belt. Close the expansion tank cap. Start the engine and let it warm up to operating temperature (before turning on the fan). After this, stop the engine, check the coolant level and, if necessary, add to the level of the upper edge of the reservoir fastening belt.
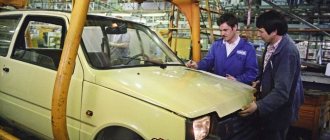
The compact Oka model rolled off the AvtoVAZ assembly line in 1989 and its production lasted until 2008. Those who managed to acquire this miniature passenger car are now trying to modernize it and sometimes they end up with very interesting specimens.
What do they make from Oka?
The most common type of improvement for the Oka is the installation of huge low-pressure tires, which increases the vehicle's cross-country ability.
Also, this changes the chassis, which is taken from other vehicles. To make it easier to mount the huge wheels, craftsmen trim the wings. At the same time, the exterior of the “all-terrain vehicle” changes significantly.
There are examples when car enthusiasts install bottom protection, which reduces the load.
The power characteristics of the Oka are also subject to changes. Initially, low-power engines were installed under the hood of the economical compact, but if it is possible to equip the “all-terrain vehicle” with a more powerful unit, then the craftsmen are not afraid of even the labor-intensive process.
There are craftsmen who transform the body and overall exterior of the Oka so much that they can be shown at exhibitions.
All-terrain vehicle from Oka
To create a tracked all-terrain vehicle from a compact runabout, it is better to purchase ready-made tracks and drive shafts from Buran. A gearbox with Oka brakes goes well with the former.
The splined part of the drive shafts is removed and mounted on the Oka. CV joints are suitable as “native” ones, as well as brake discs, which are convenient to connect to different systems. Similar work is done with the front shafts, after which the brake mechanisms are installed. It is recommended to install brakes in the front.
As an option, there are homemade Oka models with tracks on each wheel, which reduces the total weight of the car.
Disadvantages of Oka all-terrain vehicles
Converted into an all-terrain vehicle, the Oka actively “devours” engine oil and quickly wears out the “shoes”.
All frame welds require constant monitoring, and mechanisms and parts cause less trouble if covered with a special material. The oil pan requires special protection.
If the springs are not replaced with springs, they wear out very quickly, which causes discomfort for passengers while moving.
Some craftsmen attach sheets of foam plastic, which increases the water-keeping properties of the car.
DIY "Oka" all-terrain vehicle
In general terms, the conversion of the Oka into an all-terrain vehicle occurs according to the following scheme.
- A detailed diagram of a frame made of profile pipes is being developed
- Transfer case installed and connected
- Springs with increased all-terrain properties are installed
- Cutting car fenders to install large diameter tires
- It is better to take the chassis from Niva
- Optimal engine from VAZ-1111
- The steering will fit from a VAZ-2109
When all the improvements have been made, all that remains is to test the new Oka off-road.
It has long been known that OKA is far from an ideal car. But there are several problems that are visible, so to speak, to the naked eye. Side mirrors and rear window washer. Parts of the car that provide visibility of everything that is happening from behind. And if they do not perform their direct function properly, this will certainly lead to undesirable consequences.
Oka panel tuning
Tuning the Oka torpedo is associated with a difficulty - the compact dimensions of the car.
In this regard, it is unlikely that it will be possible to install a torpedo from other models. Or you will have to search for suitable sizes for a long time. Here the best helpers will be imagination and available means. You can resort to the standard, proven option - covering the dashboard with leather or carbon film. If you want to create something exclusive, then polyurethane foam, epoxy resin, and a grinding tool will help with this. With their help, you can change the design of the torpedo as you please. This is also a good method for redesigning the dashboard mounting hole.
Do-it-yourself Oka panel tuning also provides 2 options:
- Factory Panel Upgrade
- Installing a new panel from other car models
The first option involves replacing standard backlight lamps with LED ones. Installing a new backing or modifying the standard one will create a custom look. A complete replacement of the instrument panel will require modification of the dashboard.
Helpful advice
Do not forget about high-quality sealing; a new or modified torpedo should not make squeaks. This requirement can be considered an integral part of tuning.
Interior modification - how to do tuning?
When considering the most popular tuning methods, do not forget about the possibility of changing the interior. Let's highlight the following most popular tuning methods:
- Interior insulation. In order to feel comfortable while driving in noisy cities, you should take care of proper insulation.
- Installing more comfortable seats. The seats installed in the car at the factory, to put it mildly, do not provide adequate comfort.
- Modernization of control units and instrument panel. An example is the work of changing the instrument panel in order to increase the readability of information.
- Improving the quality of finishing. You can also install panels from high-quality materials.
Important! You can finish the interior at the lowest cost due to the fact that there are quite a large number of ready-made kits on sale.
Engine tuning
Do-it-yourself tuning of the “Zaporozhets”
Modernization of the Oka engine is conditionally divided into two directions:
- Replacing the motor.
- Improving the characteristics of the standard power unit.
The ideal option for converting the Oka to an injector is to install a 1.3-liter engine from a Rover Mini. Modernization allows you to increase the technical characteristics of the car, but the cost of the work is very high, since most systems need to be redesigned for a new engine.
The second option is to improve the engine. It is cheaper, but does not allow you to achieve such an increase in power as the first one.
Modernization of the Oka engine begins with the carburetor, namely, increasing the diameter of the throttle valve. This facilitates the operation of the motor, increases its service life and technical characteristics. Instead of increasing the throttle, you can immediately install a tuned version of the carburetor.
An increase in the number of revolutions to 7000 units is possible thanks to the installation of a new camshaft. At the same time, the engine power is increased:
- Lightweight valves are installed instead of standard ones.
- Modernization of valve seats;
- Improved valve inlet and outlet ports.
- Sealing.
- Installation of bronze guides.
- Reconstruction of combustion chambers.
The intake and exhaust manifolds are replaced with sports analogues, the air filter is replaced with a K&N model with zero resistance. The work allows you to improve the technical characteristics of the engine and minimize power losses.
Providing car tuning services
You can modernize the Oka yourself or entrust this work to professionals. When considering the services provided by professionals, we note the following points:
- Such companies appeared relatively recently and provide professional services for car modernization.
- The cost of services is quite high, but this is how they can change a car almost beyond recognition.
As a rule, the services of such companies are used by those who have enough money to replenish their garage with a tuning car. This is due to the fact that even with proper and high-quality tuning, many of the Oka’s shortcomings will remain.
Oka base, transmission – Niva
Do-it-yourself field tuning
In this “passenger tractor” it is quite difficult to recognize Oka, which the owner managed to install on truly gigantic low-pressure tires on homemade rims, assembled from tubes that had become completely unusable and protected from mechanical damage by a dense fabric layer from a fire hose.
Moreover, the master went even further, providing all-wheel drive in his super SUV, using the transmission from the old Niva for these purposes. It is noteworthy that the entire chassis was also borrowed from the Niva, which makes it possible to overcome almost any off-road terrain.
In addition, a winch was provided on board this hybrid in case of various force majeure. As for the shortcomings, the durability of such tires and chassis does not inspire much confidence, although it is quite possible that these fears are completely unfounded.
Replacement of pipelines
In addition to replacing consumables, Oka car owners often have to change the rubber tubes connecting the metal lines to the brake mechanisms. These hoses are not particularly reliable and crack over time, which leads to depressurization of the circuit.
To replace the Oka, tubes from the VAZ-2108 are suitable, the only thing is that they differ from the original ones in length, but this, in general, does not prevent them from being used. Replacing brake pipes does not cause any particular difficulties, but after this operation it is necessary to bleed the brakes.
Do-it-yourself Oka tuning – what do you need to know?
Tuning VAZ 21099 with your own hands
Surely everyone is tormented by the question: “How to do Oka tuning with your own hands?” Since the car is considered the cheapest and most economical, the following advantages can be emphasized: per 100 km of travel, the car consumes only 3-4 liters of fuel, but at the same time loses its dynamics.
Let's try to improve the technical part of such a powerful unit, for this we need:
- Any repair begins with the purchase of the necessary materials;
- buy all tools, instruments and devices from an authorized dealer to avoid possible counterfeiting;
- choose only high-quality materials, metallic.
Next, we move on to purchasing equipment: a gas shock absorber, mirrors that match the body color, luxurious upholstery with armrests, a towbar, a cigarette lighter with an ashtray, noise insulation material, an engine crankcase protection device, an anti-corrosion treatment device, lockers (fender liners), inertial seat belts .
Additionally, you can purchase a new dashboard with a clock, tachometer and a special place for the radio. Looking at the car, you can see how the designers bent the car's cables, thereby shortening its longevity.
You can see how one cable presses the filler pipe of the gas tank, which has an unfavorable effect on the propulsion system, so some kind of redevelopment is required. Then we move on to adjusting the carburetor, tension belts and replacing the heating valve.
Let's start changing the appearance by replacing the wheels; the purchased set should consist of light alloy wheels and tires of the required diameter, usually from 14 to 16 inches. The first impression you will get is how much the feeling of movement has changed, the ride has become softer over uneven surfaces.
To replace the dashboard, you can use the console from the Niva; to do this, you need to cut off the lower part of the device, secure it with four screws to the heater and the lower part of the dashboard.
In the dashboard you can also install control buttons for the head light, rear and front fog lights, an emergency light button, a heating button for the rear window and rear wiper, and a fan switch.
Where the cigarette lighter is located, you can also install a door ashtray. Don't forget to install a glove compartment, which can be purchased at any car dealership.
A special Oka tuning photo with your own hands will help you modernize the car yourself, which shows where all the devices should be located. The photo can be used as a guide or as a diagram of the occupancy of the cabin.
To improve the quality of interior lighting, you can embed two lamps of the required color into the rear part of the door trim; another lamp can be installed in the lower part of the dashboard above the glove compartment. It would not be superfluous to install a lamp in the luggage compartment.
Next is a video with a do-it-yourself Oka tuning option:
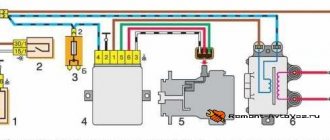
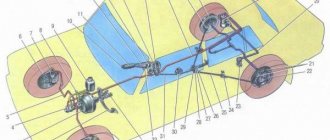
Drive unit
Comprises:
- Pedals;
- Vacuum booster (VUT);
- Brake master cylinder (MBC);
- Brake force regulator;
- Highways and pipelines;
Many drive components are “borrowed” from other VAZ vehicles. Thus, the GTZ used on the Oka was also installed on the VAZ-2121 Niva; the amplifier was taken from the classic VAZ 2101-2107 family.
Related link:
OKA engine design
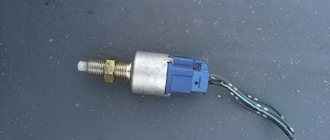
Pedal, amplifier
Using the pedal, the driver applies the brakes as needed to slow down or stop. It fits into the pedal unit installed in the cabin and is located in the middle.
The pedal is connected to the VUT rod. The amplifier itself is of a classic design and consists of a housing with a spring-loaded membrane installed inside, which divides the housing into two chambers. This unit operates due to pressure difference. The vacuum in one of the chambers is created by the power unit, for which the housing is connected to the intake manifold through a tube.
The operation of the amplifier is quite simple - when the brake pedal is released, the pressure in the chambers of the unit is the same. When braking, the driver, pressing the pedal, moves the rod, moving it opens a special valve that connects one of the chambers to the atmosphere. At the same time, since a vacuum is maintained in the second chamber, atmospheric pressure puts pressure on the membrane, causing it to bend. When deflected, it pushes the rod connecting the amplifier to the GTZ, thereby creating additional force to operate the drive. The amplifier functions only when the power unit is running.
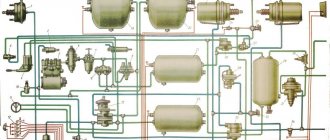
Master cylinder
GTZ is the main drive unit. Its task is to create fluid pressure, which activates the working mechanisms. This cylinder is a two-piston cylinder with a sequential arrangement of pistons. Each of the pistons is responsible for supplying working fluid to two brake mechanisms, thereby providing a dual-circuit braking circuit.
When braking, the rod coming from the amplifier pushes the first piston. By shifting, it pushes the liquid into the line, and at the same time pushes the second piston, which ensures the creation of liquid pressure in the second circuit. The pistons are returned to their original position by springs.
Thanks to the sequential arrangement of the GTZ pistons, the operation of the unit is maintained in the event of depressurization of one of the circuits.
The fluid is supplied to the drive from a special tank, the connection between which is made by rubber hoses. A float-type sensor is installed in the reservoir lid, connected to a brake fluid level indicator lamp installed on the front panel.
Related link:
Ignition of the Eye
Among the design features of the GTZ installed on Oka, one can highlight the presence of only three outputs for connecting highways.
The first working chamber of the GTZ has two outlets and from it the liquid is supplied to the right front and rear left wheels. In this case, the line leading to the rear wheel leads to the mechanism not directly, but through the regulator.
The second GTZ chamber has only one outlet, and it leads to a tee, which divides the fluid flow into two channels leading to the front left and rear right (through the regulator) wheels.
The circuit diagram on the Oka is diagonal, that is, one circuit connects one front and one rear brake mechanisms diagonally (the front left and rear right wheels are the 1st circuit, the other two are the 2nd circuit). Thanks to this scheme, the car retains the ability to brake in case of depressurization of any circuit.
Regulator, lines
The brake force regulator is designed to reduce fluid pressure on the rear operating mechanisms when braking, which prevents their premature blocking, thereby preventing the car from skidding during heavy braking. This unit only works with rear brakes.
The amplifier, turbocharger, reservoir and regulator are installed in the engine compartment near the shield that separates the engine from the passenger compartment, on the right side (if you stand in front of the car).
The lines along which fluid moves to the mechanisms are composite. All drive elements are connected to each other by copper pipelines, which also go to the working mechanisms. But rubber brake pipes are used to connect the mechanisms to the drive, so the operation of the suspension does not affect the functioning of the brakes.
Experts' comments
Yuri. In order to carry out tuning of expensive cars, you must have the necessary skills. To obtain them, I decided to use Oka as a training ground. This is due to the fact that the design of this model is simple, and the compact car itself has a relatively low cost. It is possible to modernize almost all components; the only question is how much time and money can be spent on this.
Michael. I got the Oka for practically nothing. There is another car in the garage, but I still decided to leave it, since I still won’t be able to get a lot of money by selling it. In order for it to be able to be used somehow, it was modified for an SUV. Now there is something to drive in the forest and on the field.
Victor. Considering the VAZ 2121 and its modernization, I note that the car has a simple design. The installed motor requires significant changes, like other power units.
Content
Today, compact cars are quite popular. They are ideal for urban environments, as they are compact and economical. The class under consideration includes the VAZ 1111, which is also called “Oka”. The car began production in 1987, production was closed in 2008. The model is a prominent representative of the budget class, which determines the accessibility of the car. The fact that its production was established more than ten years ago is determined by outdated technical equipment. That is why many people decided to do the tuning of the VAZ 1111 with their own hands.
Design feature
The main purpose of a sports car is to drive on difficult dirt tracks with sharp exits and entrances. Why is it best to choose Oka? Firstly, the original purpose of the car is to drive on sandy terrain. Secondly, the Oka car is ideal for a buggy due to its design characteristics. Although buggies are classified as sports SUVs, this car is nevertheless very safe and comfortable.
Due to the fact that the design of this car mainly consists of frames, it is not afraid of deformation even in conditions of extreme and aggressive driving; the driver will not suffer in case of accidents. In truth, you can use not only Oka as a donor car, but also Zaporozhets or Niva 4x4. In the latter case, the car will be heavier, but with all-wheel drive. However, for light models, a car with an engine capacity of 750 cubic centimeters or more is quite suitable. The buggy can also be made with all-wheel drive.
Working mechanisms
The VAZ Oka uses two types - disk (in the front) and drum (on the rear bogie).
The front mechanisms consist of non-ventilated discs fixed to the hub, calipers with a so-called floating bracket and friction pads installed in special guides mounted on the stationary part of the hub.
Related link:
Adjusting Oka valves
The caliper is single-piston, so the working piston acts only on one pad, but due to the floating caliper, when braking, the caliper itself, with its body, also presses the second pad to the disc.
The rear mechanisms consist of:
- Brake shield;
- Drum;
- 2 pads;
- Working cylinder (two-piston);
- Parking brake mechanism;
The shield is a stationary element and a number of components are fixed to it - a cylinder, pads, and a handbrake mechanism. The brake drum is part of the wheel hub and is movable (rotating).
In general, the working mechanisms are identical in design to the VAZ-2108, but the dimensions differ - the diameter and thickness of the brake disc are smaller, and accordingly the pads and caliper are also more compact. The same applies to the rear mechanisms.
Ideas for external modifications
"Stens" is a fashionable trend in modern tuning. Drivers realize their ambitions when they bring the car to a state of uniqueness. A car causes envy if it is, as it were, spread out on the road.
To do this, Oka's suspension is extremely lowered and large rims are installed. In addition, tuners monitor the position of the wheels relative to the body, and the position of the body in relation to the road. The wheel arches are equipped with stylish linings.
Next install:
| Tuning element | Cost, in rubles |
| Air intakes on the hood from a Subaru Impreza WRX | 1050 |
| Round lens headlights | 1200 |
| New volumetric mirrors with a convex fairing, heating and anti-glare | 700 |
| Nice bumpers instead of plastic ones | 1200-5000 |
Then they decorate the car with airbrushing and vinyl paintings.
In the case of such processing, the Oka driver fully deserves: “Boy, your car is the coolest!” This is what the “stens” direction means, loosely translated.
Changing the working fluid, bleeding the brakes
According to the regulations, brake fluid requires replacement every 2 years of vehicle operation. The technology for performing this maintenance is not complicated, but it is better to do it with an assistant.
The essence of the work is as follows:
- We put the car on the inspection hole;
- Use a syringe to pump out the waste liquid from the tank;
- Fill the tank with new fluid to the level;
- On the brake mechanisms we find the bleeder fittings, clean them, and put transparent silicone tubes on them (corresponding in diameter). We lower the ends of these tubes into prepared containers. Loosen the fittings a little;
- The liquid will begin to flow by gravity through the tubes into the container. We ask an assistant to monitor the level in the tank and replenish it in a timely manner;
- We monitor the tubes, and having discovered that new fluid has flowed through them, we tighten the fittings;
- We bring the level in the tank to normal;
Related link:
Carburetor "Oka"
After replacement, the Oka brakes must be bled to remove air from the system.
Pumping on the Oka is carried out using the technology “from the near working mechanism to the far one”, taking into account the contours. That is, the front left wheel is pumped first (in the direction of travel of the car), then the rear one on the right. Bleeding the secondary circuit is also performed from the front brake mechanism.
The pumping technology is simple - we put a tube on the fitting and lower it into a container with liquid. We ask an assistant to pump the brakes (press the pedal a couple of times and then hold it down). Next, unscrew the fitting a little and wait until the liquid drains (in this case, the pedal will go to the floor all the way). We perform the procedure of pumping up the brakes and draining the fluid 2-3 times, after which we move on to the next brake mechanism. When pumping, it is also important to constantly monitor the level in the tank and replenish it in a timely manner.
"Machine". Sports Oka
“Machine”
I happened to see exactly this sign on the back door of the Oka instead of the standard nameplate. And it perfectly reflects the tender feelings that many owners feel for their cars. Yes, they know about their low passive safety, modest technical characteristics and other shortcomings, but they still love them. And some even try to correct these shortcomings.
The engine and transmission tuning program developed by is designed for them. The owner of the car we took for a short test turned out to be a devoted Oka fan, and we got a car that was modified in almost all respects, except, perhaps, the suspension.
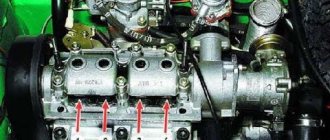
The bulk of the work was on the cylinder head. “The highlight of the program” is the DAAZ-21073 carburetor, installed instead of the standard one. The peculiarity of this carburetor, used on large-volume VAZ engines, is the large diameter of the diffusers (2x24 mm). Cartuning know-how consists of individually adjusting the carburetor to the volume and compression ratio of a particular engine. To do this, in addition to replacing the jets in the carburetor, the internal channels are modified and the profiles of the cams that control the flaps and the accelerator pump are selected.
In order for the capabilities of the new carburetor to be fully revealed, the car is also equipped with a K&N air filter and another camshaft, which is essentially a “half” of the tuning shaft from the 83rd engine. Paired with a carburetor, it allows the Oka engine to spin up to 7000 rpm. To reduce losses at such high speeds, the intake and exhaust channels and valve seats are additionally modified, and the shape of the combustion chamber is changed. This work is very painstaking, almost all manual, which is why it is quite expensive.
Perhaps the tuning luminaries, after reading these lines, will grimace. Like, again this is witchcraft with jets, polishing manifolds and other squeezing horsepower out of the engine drop by drop. Sixteen valves and a sports receiver are much more significant... However, for the Oka, multi-valve engines with injection are not yet produced, and for a small car, the few horsepower that can be “increased” in this way are a significant help.
The original panel with white instrument scales sets you in a sporty mood. I wish I had a different steering wheel...
KarTuning know-how - individual carburetor tuning with testing on a diagnostic stand
This is confirmed by the measurement results. Yes, a miracle did not happen, the car did not become a sports car. Due to the installation of a main pair with a large gear ratio, the maximum speed of the Oka did not increase much. But the overclocking characteristics have improved noticeably. This is confirmed by the driver's sensations. Now the car has a reserve of traction, adding confidence in the bustle of the city and when overtaking. And the sports air filter adds aggressive notes to the engine sound, hearing which, no one will compare the Oka with a sewing machine...
And finally, about another important characteristic of tuning - price. Speaking from the perspective of an ordinary Oka owner, frankly speaking, she bites
For the money that a modified car costs, you can already buy an inexpensive “classic”, even having noticeably better technical characteristics as standard. However, there is a demand for Oka tuning. If in wealthy Great Britain the Rover Mini has remained a cult car for so many years, then in Russia there will also be people who are ready to sacrifice a lot for the sake of their “car”...
| Test results | ||
| VAZ 1113 standard * | VAZ 1113 CarTuning | |
| Maximum speed, km/h | 119,6 | 127,7 |
| Acceleration time, sec | ||
| 0..100km/h | 36,0 | 25,2 |
| on the way 400m | – ** | 22,64 |
| on the way 1000m | 46,8 | 42,94 |
| 60..100km/h (III gear) | – | 16,60 |
| 80..120km/h (IV gear) | – | 51,10 |
| Run-out, m | ||
| from 50km/h | – | 512 |
| 120..80km/h | – | 536 |
| * Measurement data from Autoreview dated 06/05/1997 ** measurements were not made |
| speedometer readings, km/h | 40 | 60 | 80 | 100 |
| true speed, km/h | 36 | 57 | 75 | 90 |
List of improvements
- Refinement of the cylinder head: installation of bronze valve bushings, changes in the geometry of the intake, exhaust channels and combustion chamber, modification of the valve seats, polishing of the intake manifold
- Installation of a modified DAAZ-21073 carburetor
- Sports camshaft (10.25 mm)
- Split camshaft gear
- Air filter "K&N"
- Main pair 4.55
Valery Arutin. Motorsport magazine No. 12, December 2000
Diagnostics
Before carrying out repairs, you should find out in which component - the drive or mechanisms - the malfunction occurred. To do this, first of all, you need to carefully inspect all elements of the system for fluid leakage, since leakage is the most common problem. To do this, it is usually enough to carefully inspect the GTZ and all the wheels from the inside. You should also pay attention to the rubber tubes and their connections to the working cylinders and metal lines.
Some symptoms of a malfunction can make troubleshooting easier. Eg:
- The pedal became very “hard”. Typically, this problem indicates a failure of the amplifier;
- The pedal is very soft, the free play is increased. This may indicate airing of the system, depressurization of one of the circuits, or fluid leakage;
- The beating of the steering wheel during braking indicates a change in the geometry of the brake disc (it is bent or a dent has appeared);
- A squeal when braking indicates critical wear of the friction linings.
If we consider malfunctions of the brake system in general, then any changes in the force on the brake pedal are mainly indicated by a breakdown of the drive, while problems with the working mechanisms affect the car’s handling.
To maintain the brake system in working condition, periodic maintenance is required, which boils down to timely replacement of working fluid, consumables and components subject to increased wear.
Oka engine tuning
The process of improving engine performance can be divided into 2 directions:
- A radical change in characteristics - a complete replacement of the motor
- Improving the standard power unit
In the first case, the ideal option would be a 1.3-liter injection engine from Rover Mini. The advantage of this type of tuning is a significant increase in technical indicators; the disadvantages are the high cost of implementation and the need to rework most of the car’s systems for a new engine. It's expensive and time consuming.
The second option - upgrading the standard power unit - is cheaper and simpler, but will not allow you to obtain such an increase in power as in the first case.
Do-it-yourself Oka engine tuning must begin with the carburetor. The first step is to increase the throttle body diameter to 52–54 mm. This will allow the engine to receive more air, which will make its operation easier, improve performance and increase engine life. You can immediately install a tuning modification of the carburetor.
Installing a new camshaft allows you to increase the speed to 7000 units. In this case, it is necessary to increase the engine power, which is done using the following operations:
- Replacing standard valves with lightweight ones
- Valve seat upgrades
- Modification of inlet and outlet valve channels
- Sealing valves
- Installation of bronze guides
- Changing the shape of combustion chambers
Additionally, it is necessary to replace the intake and exhaust manifolds with sports modifications, as well as the air filter with a K&N model with zero resistance. This set of measures will significantly improve the technical characteristics of the engine and optimize its operation, that is, the loss of power will be minimal.
The muffler attachment can be used to give the engine a sporty growl. Illuminated models will create the effect of a flame escaping from a jet nozzle.
Common methods of body tuning
The exterior design of the car in question does not look modern and is very simple. That is why many are considering the possibility of upgrading the body. Just a few years ago, body tuning involved creating a body kit yourself - painstaking work that required certain skills and technical equipment. However, today you can carry out tuning by purchasing a special kit. This tuning method can be characterized as follows:
- All elements are easy to use and do not require major modifications. When creating the kits in question, they are ideally adjusted for installation on a car.
- The entire body kit is made in the same style, which allows you to complete the style of the car.
- Installation work does not take much time. The fact that there is no need to change the design determines a significant acceleration of work. It is represented only by dismantling old elements and installing new ones. You need to be prepared for the fact that some fasteners will be covered with corrosion and dismantling will be difficult, and after removing the body kit, body defects will be discovered that require restoration.
- The cost of the sets sold is relatively low. Of course, homemade options will be much cheaper, but only if they are done on the first try.
In this way, you can significantly modify the car in question. However, this method only changes the Oka in appearance; significant modernization requires more serious intervention.
Tuning headlights for Oka
Tuning Oka optics is one of the important elements affecting the appearance of the car. An effective method of transforming headlights is to install overlays. You can buy them or make them yourself. Before that, you need to install LED lamps and polish the headlights. It is possible to completely replace optical devices. To install an advanced model, modifications to the body will be required.
What other techniques can be used to change the appearance of headlights:
- Changing the design of the headlight rim - applying a shiny coating, stylized as chrome
- Refinement of the headlight substrate
- Decoration with LED strips, most often they resemble eyelashes, but you can place them at the bottom and give the car an aggressive look
Tuning Oka taillights is carried out mainly by installing overlays. It is worth remembering that they should not harm safety - the lights in any case remain clearly visible.
throttle 52 cm? to make from a sewer hatch? what was the author thinking when he wrote this?
Principle of operation
The general principle of operation of the brake system is as follows:
- Drive unit. To slow down or stop, the driver presses the brake pedal, and the force on it affects the intensity of the deceleration. The force applied to the pedal is transmitted to the VUT through the rod. The force increased by the amplifier acts through the rod on the 1st piston of the GTZ. As it moves, it pushes the liquid into the lines, and also pushes the 2nd piston, which ensures the creation of pressure in the second chamber of the cylinder. From the first chamber, the liquid flows through the lines to the right front working mechanism (right), as well as to the regulator, and from it to the rear wheel. The liquid from the second chamber is discharged into only one line, but thanks to the tee it is divided and supplied to the left front wheel, as well as the regulator, and from it to the rear mechanism;
- Front brakes. Liquid under pressure enters the caliper cylinder and squeezes out the piston, which begins to press the pad against the disc. In this case, a counteracting force arises, which, thanks to the bracket, displaces the caliper. When moving, the caliper begins to press the second pad.
- Rear brakes. Fluid pressure forces the pistons out of the cylinder. And since the pads rest against them, the release of the pistons is accompanied by the pads being pressed against the inner surface of the drum, and due to the friction force, the speed of its rotation slows down;
- Handbrake. To activate the handbrake, the driver pulls the lever located in the passenger compartment upward. The lever is connected by means of a rod to the equalizer, to which the cables are connected. The impact on the lever is accompanied by tension on the cables, due to which the parking brake mechanisms are activated, which unclench the shoes and press them against the drum. The lever is held in the raised position by a ratchet mechanism.
Related link:
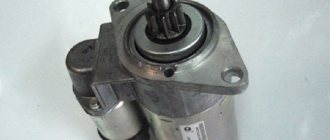
Installation and repair of Oka car starter
In general, the functioning of the entire braking system of the VAZ Oka is no different from other VAZ models.
DIY Oka tuning
There are many options for transformation and restyling of the VAZ 1111:
- SUV
- rally car
- Retro car - design concepts of the late 60s and early 70s of the XX century are determined by the angularity of body shapes and the use of bright colors in design
- Cabriolet
- Roadster
The simplest and most accessible is tuning the Oka for off-road use, since the car’s appearance is similar to this class of car. To enhance this effect, it is enough to lift the suspension, install larger diameter wheels and tires with a powerful tread. But tuning the Oka for a jeep is not limited to the above changes; they can be considered only the first stage in creating an exclusive little all-terrain vehicle.
External tuning of the Oka can be styled after the popular Grand Cherokee SUV model. This is facilitated by the similarity of the headlights and radiator grille. In both cars they are oblong, rectangular in shape. It is enough to install a body kit, wheels with a large diameter and tractor tire tread, as well as give the hood the appropriate configuration and the nondescript OKA will turn into a miniature clone of an SUV popular in the 90s.
Tuning Oka cars with your own hands is quite easy. This is due to the simplicity of the technical structure of the car and its unpretentious appearance, which, on the one hand, makes modernization simple and cheap, and on the other, allows you to carry out all kinds of experiments on the car. From all of the above, we can conclude that tuning a VAZ 1111 is the best school for a beginner and a kind of creative studio for an experienced master.
Stylish wheels and other chassis modifications
Many car enthusiasts like to drive on splayed wheels, so the VAZ 11113 Oka tuning widens the car's track by 150 mm and enlarges the arches to accommodate larger diameter wheels. You can install plastic covers on top of the arches, which will decorate the appearance of the car and create individuality.
Tuning the Eye can be done ad infinitum; it all depends, as a rule, on the owner’s imagination. External tuning of the Eye is considered one of the most important and noticeable elements of car modernization. It has become fashionable to do tuning of aerodynamic body kits, which can also change the appearance of the car and improve its technical characteristics.
If you lift the car body a little, you will immediately feel the gaze of passing envious people. Install good bumpers in place of the plastic ones, extend them and decorate them with linings, so you will noticeably expand the body of the car, and the Oka itself will look even more powerful.
It will also be interesting: TSI motors: what does TSI mean, engine features
Install a figure-eight steering shaft with a modified driver's position, so you will get the long-awaited comfort. And here are the long-awaited Oka tuning photos, with the listed upgrades.
Third-party service for earning OKs
There is one online resource that has been operating for a long time and has not yet been closed - this is coinsup.com.
How it works
After registration, you begin to complete various tasks, such as registering on the site, joining a group on a social network, writing comments. After completing the work and checking by moderators, you will be awarded credits. When you collect 200 of these points, they can be exchanged for Odnoklassniki currency or play money. For 10 credits, 1 OK is purchased.
The CoinsUP service can be used online on a computer or installed an application on your phone.
How much can you earn
Spending from 1 to 3 hours a day, in a month you can get from 100 to 300 rubles, which at the moment equals approximately the same number of OKs. Not too thick, it seems to me. The main advantage of this method is that you do not spend money from your main income, but earn extra money in order to get additional privileges on the ok.ru website. But I see much more disadvantages:
- it takes quite a lot of time, and the earnings are very small;
- the service needs credentials to exchange one currency for another, and this is always a risk of hacking;
- users note that at first there are a lot of tasks, and then less and less, some customers take a long time to confirm the completion of the work, and the support service does not work in the best way.
I will honestly express my opinion. At first glance, it seems that you are not spending money, but paying with your time, and it is precisely the greatest value. If you have the desire and opportunity to earn extra money, then it is better to master one of the popular Internet professions and earn several times more than what such services offer.
This path is accessible even to students and schoolchildren. And everyone is free to spend the money they earn at their own discretion: on games, social networks or something else.
"Oka" for an SUV
It did not receive restyled developments, but it provided fans with the opportunity to create an exclusive mini-all-terrain vehicle with their own hands. This is facilitated by the spartan angular appearance, simple technical design and rectangular oblong headlights.
Tuners lift the suspension - they raise the entire body by changing it. They install large wheels and tires with powerful tractor treads. The hood is given the appropriate configuration, cuts are made, and cilia are welded on. These manipulations stylize Oka as a Grand Cherokee SUV, as in the photo.
Preparation
In the process of constructing something, it is important to clearly understand before starting work what will happen and how. A reasonable approach to organizing a business will allow you to achieve an adequate result the first time, otherwise you risk facing the need for rework, additional costs of time, effort, and even money
All this is completely unnecessary, so let’s look in detail at how to prepare for creating an ATV from the Oka.
Drawings and dimensions
The craftsman will have to weld the frame of the ATV himself, but you need to correctly understand its dimensions so that the vehicle turns out to be spacious and at the same time quite durable. The total length of the frame should be chosen as 2300 mm, the distance between the axles will be 1430 mm, the total width of the body including the wheels will be 1240 mm.
At the same time, the “folk craftsman” is not forbidden to make his own design changes, one way or another improving the future all-terrain vehicle, customizing it to his needs, adapting to the transport the materials that he has at his disposal
However, in the latter case, you should pay special attention to drawing up your own drawing indicating dimensions. The more dimensions you write down for each individual part, the greater the chance that success will be achieved the first time.
Before you begin design and assembly, you need to make sure that the drawing is correct on all sides, and that you have all the tools and materials required to implement your plan. It is better not to rush into starting work immediately - if you are not completely sure about something, such a delay will help to avoid unnecessary mistakes.
Tools and materials
We will assemble a 4x4 ATV for outdoor activities, which was developed by analogy with the best factory-produced models. Judging by numerous reviews, the scheme not only works, but is also of quite high quality - often a good homemade product for your own use is significantly superior to what advertised brands offer for a lot of money.
You won't need a lot of materials, but you need to be sure that you have everything you need. If you do not make sure of this in advance, you may not be able to find the last part, and because of this the ATV will not be assembled.
Pipes. This material will act as the basis for the frame. Ordinary water pipes are suitable, but, naturally, we are talking about metal products. You will need two different diameters - 27 and 32 mm. There is no need to indicate the exact length - it all depends on your skills in working with metal, and a beginner will probably need much more than the minimum.
The toolkit for making a homemade quad looks much broader, since it is designed to provide comprehensive processing of the materials described above. From what you will definitely need, we highlight the following:
- welding;
- grinder for cutting pipes;
- drill;
- hammer;
- roulette;
- wrenches of different sizes;
- calipers;
- knife.
Armed with everything you need, you can proceed directly to constructing a homemade vehicle.
ATV from OKI and a regular “quad”
A do-it-yourself ATV made of oka has a number of advantages over its industrial counterparts. Its main advantage is its cost-effectiveness. During the assembly process, you will remove most of the spare parts from your old car. If you need to buy new ones, the purchase will require a minimum of financial investments.
Another indisputable advantage that a do-it-yourself ATV made from Oka can boast of is its relatively low weight compared to industrial analogues.
But at the same time, the power of a homemade ATV will be much greater. So in many ways, creating an ATV from Oka is beneficial not only economically, but also in terms of performance.
Spare parts and materials used:
- Engine and gearbox from Oka.
- Bridges from UAZ.
- Transfer case from Niva.
- Wheels from Kraz.
- Steering and springs from Volga.
- Square pipe 50*50*2.5 mm - 20 meters.
- Sheet metal.
The photo shows drawings of the all-terrain vehicle frame. The frame is welded from a square pipe 50*50*2.5 mm; 20 meters of profile were used for the frame. It turned out to be durable and light, the weight of the frame is about 50 kg.
I installed the springs from Volga, initially the springs contained five leaves, but two leaves were removed and, as it turned out later, it was in vain, it was necessary to leave all five. Shock absorbers from Niva.
The photo shows a homemade adapter for connecting the UAZ cardan with the Niva razdatka. It’s done this way, we take 2 flanges from a UAZ and a Niva, cut off the working part of the oil seal from the Nivovsk, connect the flanges with the reverse sides and weld them together, you get an adapter.
I painted the frame and bridges and installed the engine. The differential in the box is welded, the Okovskaya “grenade” is cut off and a flange for the Nivovsky cardan is welded to it.
I installed a Volga steering wheel, it’s a little hard to steer, and over time I’ll need to install a hydraulic booster.
Since the fit of the wheels on the UAZ bridges is a bit narrow, I decided to make the wheel rims with an offset to space the wheels further away from the body. This is necessary so that the turning radius of the front wheels is sufficient.
The tires were taken from Kraz; the peeling process was carried out using a chainsaw, which was used to cut strips. I peeled it off with an electric hoist and trimmed it with a utility knife.
One day on the road, both CV joints on the wheel side fell off. The reason for this is not known, but now I always carry spare ones. There may be additional load due to wheel offset, or there may simply not be enough strength for severe conditions. And so the all-terrain vehicle has been in service for several years and so far there have been no more serious breakdowns.
Replacing pads at the front
The next brake maintenance operation that will have to be performed periodically is replacing consumables, in particular brake pads.
Since a small car uses two types of working mechanisms, you should know how to correctly change the brake pads on an Oka.
On the front wheels this operation is performed as follows:
- We immobilize the car;
- We jack up the wheel on which the pads are being changed;
- Remove the wheel;
- We remove the brake hose from the bracket on the shock absorber strut;
- We bend the antennae of the locking rings, which prevent unauthorized unwinding of the caliper mounting bolts;
- Unscrew the caliper fasteners;
- We remove the caliper and hang it on the stand using a wire (so that the rubber hose is not stretched);
- We remove the worn pads;
- Before installing new pads, we “recess” the piston in the working cylinder so that the caliper can “sit” on the new pads;
- Putting the unit back together.
Similarly, you will have to disassemble the mechanism if you need to replace the Oka brake disc. That is, to remove it, you must first dismantle the caliper, and then:
- Unscrew the fastening of the pad guide and remove it;
- Unscrew the bolt securing the disc to the hub;
- We remove the disk together with the spacer ring (if necessary, they can be knocked down using a hammer and a wooden adapter);
Related link:
Clutch OKA
Then all that remains is to put everything back together by installing a new disk.
Stages of creation
To acquire the design of an SUV, you will need to carry out the following manipulations:
- Finding the basis for the vehicle. Using a motorcycle frame is quite suitable for this. The brand doesn’t matter, it all depends on the financial choice, as well as off-road preferences. This indicator is most developed in IZH motor vehicles.
- Creation of the rear axle and suspension. To do this, you need to use a strut that connects the side members. All this is complemented by a strut and steering bushing, which as a whole form an independent rear suspension. It is recommended to use just such a suspension, because it will provide the product with the necessary maneuverability in difficult places.
- Installation of wheels. In practice, such an all-terrain vehicle based on the Oka is equipped not with the wheels themselves, but with their cameras. They are taken from trucks and attached to the suspension using a hub. Stability is complemented by special tapes that wrap around the wheel. As a rule, cameras from KAMAZ, Ural and cargo trailers are used. This solution increases the reliability of the trip.
- Providing torque and mounting the engine. Such procedures begin to be done after installing the frame and suspension. In addition to the motor, you will also need to install a brake, clutch and exhaust system.
When the entire list of work has been completed, it is necessary to test the device for functionality. If errors are identified, they must be corrected. As practice shows, an illiterately made all-terrain vehicle or swamp vehicle from the Oka can create a danger to others.
Possible nuances
Despite its advantages, this technique has its drawbacks. Frequent troubles are caused by the fragility of low-pressure chambers. Of course, due to the absence of a differential, the vehicle does not require frequent maintenance, but the presence of high pressure in the overall wheels reduces their maneuverability. Also, due to the size of the wheel system, there is a problem with flying dirt, because it is quite difficult to cover them with wings.
Practice shows that pneumatics have poorer maneuverability than the Oka all-terrain vehicle on tracks. The choice of materials used for the design and type of future vehicle directly depends on the purpose of use. More and more people from suburban and rural areas prefer to create such structures, since converting the Oka into an all-terrain vehicle is, first of all, financially beneficial.
A homemade all-terrain vehicle from Oka is profitable and convenient, because the device can be repeatedly modernized and improved. In different weather seasons, its design and characteristics can be changed to adapt them to the weather conditions of the area.
Creating a homemade all-terrain vehicle is a common practice in suburban areas where it is not possible to purchase an expensive car
But it is important to take into account the design features and approach the creation of such a machine with all responsibility. Negligent performance of work can create a risk to the life of the driver and others
Interior modernization
There are practically no prohibitions or restrictions in this matter, since everything depends on the financial capabilities and imagination of the owner.
Interior improvements include:
- They change the covering. Buy material or a ready-made set.
- Decorate - install original figured elements into the cladding.
- The factory seats are upgraded with new covers (4,500 rubles) and headrests. Seat covers and interior trim should be in the same color scheme.
- They change the seats to sports ones.
- Install automatic drive windows and rear view mirrors.
- They cut out a sunroof or make it panoramic. Such manipulations are impossible at home.
How to earn points and participate in auctions
You can activate certain functions by exchanging points for items in auctions. But first you need to earn them. To do this, go to the website ok.ru, enter your username and password, and in the menu on the left, find the “OK Moderator” section.
Then click on the “Select game” button.
At the moment there are 3 options for tasks:
- check photographs and videos for the presence of pornography, obscene language and scenes of violence;
- recognize images on stickers;
- note whether there is a phone number in the pictures.
You perform verification and help the administration of the social network monitor various content. Your marks are compared with the opinions of the majority of participants, points are awarded for correct decisions, and points are deducted for mistakes. Select the appropriate option for tasks, read the rules and start completing them.
If you choose the first type of check, keep children away from the screen; some images actually contain pornography.
After you earn at least 200 – 300 points, go to the “Auctions” section.
In the window that opens, we see what features can be purchased for points, the bid for each lot and the auction deadline. It is better to bet on positions that will close soon, then there is a greater chance of becoming a winner.
You can view current lots at any time, the points are saved and will not go anywhere until you spend them. It’s convenient to access “Auctions” through the list of sections on the main page. First, tap “More” and then find the item you want.
Replacing pads at the rear
Now let's talk about how to remove the brake drum to change the pads. The technology of work is as follows:
- We immobilize the car, jack up the rear and remove the desired wheel;
- Using a hammer and screwdriver, knock off the protective cap of the hub;
- Using pliers, remove the hub nut stopper;
- We twist the nut, remove the washer and tapered bearing installed under it;
- We carefully sell the drum.
- If it does not come off, remove the rubber plug on the drum, and install the hole that the plug closes opposite the adjusting nut of the spacer bar of the parking brake mechanism. By rotating this nut, we bring the pads together, which will allow you to remove the drum.
- To remove the pads, dismantle their clamps and tension springs;
- We install new pads in place of the worn ones and put the mechanism back together;
- We adjust the parking brake mechanism.
Identical work will have to be performed if the working cylinders are replaced. But after removing the pads, you will additionally have to unscrew the fluid supply line to the cylinder, and then unscrew the bolt securing it.
Thoughtful solution
Since in rural areas you often have to navigate difficult terrain, many people want to buy an SUV. Alas, such cars are quite expensive, so you need to know how to make an all-terrain vehicle from the Oka. To create it, they use improvised means, which include spare parts from broken cars and motorcycles.
Among the most popular options for “folk” crafts are “station wagons” based on low-pressure pneumatics or air-cushioned ones. The use of crawler tracks is also common, but they are more suitable for snowy areas. Creating an SUV based on the Oka is a cost-effective solution, since it does not require the purchase of expensive components.
All-terrain vehicle on low-pressure tires
This design is based on an invention that uses a body that is located on a breakable frame. This solution significantly strengthens the design of the product. All wheels are installed with your own hands as drive wheels, so they can even overcome swampy terrain.
Based on Oka engines, the production of so-called karakat engines is also very popular. They stand out for their increased cross-country ability thanks to wide-format tires. This complements the advantages of pneumatics, because it does not destroy the grass cover.
Using Tracks
These “station wagon” options are most popular among fishermen and hunters. Homemade tracked all-terrain vehicles from Oka have increased maneuverability in water bodies and wooded areas. Their body is usually made of a box structure, which reaches a length of 3 meters. It is light in weight, so in places where deep traces of a person remain, vehicles penetrate into the quagmire only 10 cm.
Correct execution of such a device is possible only with reliable calculations. This is especially true for the chassis, which should be in contact with the ground by 1.4 square meters. m. The speed of the product is 45 km/h. You can also find hovercraft all-terrain vehicles. They have greater maneuverability than the Oka tracked all-terrain vehicle, and also do not require a chassis.
Malfunctions and their symptoms
Although the simple design of the system ensures reliability, malfunctions do occur with it. Drive faults include:
- “Airing” of the system;
- Amplifier malfunction;
- Severe wear or jamming of the GTZ pistons;
- Damage to highways;
- Liquid leaks at joints and seals;
- Malfunction of the regulator;
Such breakdowns are accompanied by a decrease in the efficiency of the brakes or their complete failure. For the most part, troubleshooting requires replacing faulty components or some of their components (applies to seals).
The working mechanisms have other problems:
- Piston jamming;
- Critical wear of discs, drums, pads;
- Violation of the geometry of the disk or drum;
- Damage to the seals on the cylinders;
- Wedging of the caliper on the guides;
- Destruction of tension springs of drum mechanisms;
Such breakdowns are accompanied by failure of the brake system and improper operation.
The main signs of brake problems are:
- Traces of liquid leakage near the system components;
- The need to frequently add working fluid to the level;
- “soft” or “hard” pedal;
- Significant increase in braking distance;
- The car pulls to one side when driving or braking;
- Steering wheel vibration when braking;
- Sharp third-party sounds during braking;
Any brake malfunctions are immediately apparent, and thanks to the simple design of the system, diagnostics and identification of the breakdown is carried out quite quickly. Also, almost all of its components are located in places with relatively easy access. For example, to get to the GTZ or the regulator, it is enough to remove the spare tire, which in the Oka is located in the engine compartment. And to visually assess the condition of the working mechanisms, you just need to remove the wheels.
Some types of malfunctions of brake system components can be eliminated by overhauling and replacing worn elements. Parts for the repair of some components are sold in the form of repair kits. So, you can buy a repair kit for the Oka brake caliper or drum brake, a set of consumables and parts for the GTZ. But such kits are not sold for all system components, and if the amplifier fails, it is completely replaced, since this component cannot be repaired.
Related link:
Oka engine repair
Remodeling Oka's salon according to Feng Shui
The first impression of the interior may seem sparse and insufficient for such a powerful car. Tuning the Oka's interior includes interior firmware, modern upholstery with high-quality material, installation of electric glass lifts and high-quality vibration and noise insulation. Head units, midbass, amplifiers and subwoofer are being updated.
The dashboard is also equipped with sound insulation, and electric lifts can move the windows at the touch of a button. The pedals have aluminum pads, which are often found in sports cars. A loud rectangular muffler will highlight the spirit of sport.
The car has a low degree of passive safety, so this feature needs to be urgently corrected. For the safety of passengers and the driver, install a safety panel and additional airbags. Plus, you can install disc brakes and a dynamic stabilization system.
Sometimes, as an Oka tuning, car enthusiasts purchase starting chargers. Such devices are necessary on the road when the battery runs out randomly. Additionally, you can decorate your car with interesting multi-color airbrushing and vinyl decoration.
Here, give free rein to a professional artist, and he will create a “car” that will surprise and stun everyone on the road. The most popular paintings on the body are in the fantasy style, dark castles, uncharted planets, stars, or the sky.
Adding traction to an Oka car
Many people think that if the car is small, there is no point in tuning the Oka for a jeep. It really consumes little gasoline, but all the factory parameters of the propulsion system were not ideally provided for, so some characteristics need to be modified.
To increase the power of the car, you need to tune the engine. Modernization begins with the replacement of all main components, namely the air filter, camshaft, carburetor and cylinder head.
The fuel exhaust and intake system will also have to be replaced; the cylinder engine will be changed to a Rover engine, which has a volume of 1.3 liters. With such an engine, the car accelerates evenly.
If a gas unit is installed in the car, it may also involve the installation of a camshaft with a lift level of 10.3 mm, and with a significantly increased compression ratio. When the engine of a gas unit is boosted, power increases accordingly and traction at the bottom improves.
Nowadays it is very popular to carry out engine chip tuning in cars, which significantly affects the increase in engine efficiency. This method of modernization differs from others in that the software in the motor control unit is changed.
The program can be adjusted taking into account the concealment of reserves and other characteristics. This method is considered the simplest and most powerful. If the car stops working, you can return the engine to factory specifications.
Chip tuning can reduce fuel consumption and reduce the emission of fuel into the atmosphere with harmful toxic substances. Chip tuning is now applicable to most Russian cars, including the famous VAZ 2106.
When tuning the Oka, it is necessary to replace the camshaft, pusher and grind the manifold. The grinding procedure means fitting the manifold channels to the head channels. Pushers of a special profile, with a lightweight valve and a new camshaft can significantly increase the power of the Oka engine.
For the new engine, it will be important to install a high-quality air filter, thereby allowing wheel speeds to reach 7000 rpm, and the aggressive notes of the engine will be noticeable on the road.
To reduce fuel loss at high speeds, the exhaust and intake channels are modified, the valve seats and the shape of the combustion chamber are changed. This type of tuning is considered one of the most expensive, since the master does all the work manually.
Problems with the brakes of the VAZ-11113 Oka
18 July 2015, 17:21 #1
Is it possible to remove the brake regulator? When braking at a speed of 50 - 60 km/h, the wheels are beating, the brake discs are machined, the wheels are balanced
18 July 2015, 18:09 #2
And the point of cleaning the brakes. regulator What does “wheels beat” mean? Vibration when braking. Then here it is: “Brake deformation. disk. Increased axial play of the wheel (wear of the front wheel bearings or loosening of the hub nut). Ovality of the brake. drum. Brake lining The pads have peeled off from the base. The tension spring of the rear brake pads has weakened or broken.” “Sorcerer” (braking control) has nothing to do with these cases.
February 8, 2022, 10:49 #3
The front seal of the GTZ drips and the brake fluid gets into the VUT, once every 2-3 weeks you have to add a thimble of fluid. Is it possible to eliminate this with “little blood”
VUT works, brakes are fine..
February 8, 2022, 12:22 #4
Glebz, February 8, 2022, 10:49, #3
The front seal of the GTZ drips and the brake fluid gets into the VUT, once every 2-3 weeks you have to add a thimble of fluid. Is it possible to eliminate this with “little blood”
VUT works, brakes are fine..
“Little blood”, usually this is a repair kit from the classics.
8 February 2022, 13:42 #5
Those. replacing the GTZ oil seal, as I understand it? Will it be necessary to bleed the system (hemorrhagic)?
March 15, 2022, 10:14 #6
Is it possible to replace the GTZ without subsequent bleeding of the brakes? They claim that you can fill the GTZ with brake fluid before installation (filling the reservoir with liquid), close the channels with complete plugs and tubes after disconnecting, and after installing the GTZ, remove the plugs and connect the tubes. Will it be possible to prevent air from entering the system in this case? Who has experience and what do they think?
March 15, 2022, 10:25 #7
Glebz, March 15, 2022, 10:14, #6
Is it possible to replace the GTZ without subsequent bleeding of the brakes? They claim that you can fill the GTZ with brake fluid before installation (filling the reservoir with liquid), close the channels with complete plugs and tubes after disconnecting, and after installing the GTZ, remove the plugs and connect the tubes. Will it be possible to prevent air from entering the system in this case? Who has experience and what do they think?
It is important that there is no liquid in the tank, but that it does not leak out of the unscrewed tubes. After installing the cylinder, do not tighten the tubes completely and allow the liquid to “flow” through the connections. But there will still be air in the system.
March 15, 2022, 10:44 #8
It’s a pity, I would like to do without pumping (important!).
Thanks for the advice!
17 March 2022, 17:53 #9
But what prevents you from adding brake fluid from a syringe into the ends of the tubes if it has leaked out a little? Servicemen often don’t perform pumping. I personally am for pumping. but decl air won't hurt. IMHO.
17 March 2022, 18:10 #10
slawko, 17 March 2022, 17:53, #9
But what prevents you from adding brake fluid from a syringe into the ends of the tubes if it has leaked out a little? Servicemen often don’t perform pumping. I personally am for pumping. but decl air won't hurt. IMHO.
Why a syringe? Let it leak from the GTZ, and let the air come out of the loose fittings.
Mineralnye Vody, formerly Pechory
Toyota Yaris Oka 1113
March 17, 2022, 10:17 pm #11
It’s been a while since I’ve been pumping the brakes myself (by the way, in the Urals too).
You just need to imagine the brake fluid in the tubes, like a flexible wire.
A transparent tube, a container half full of old TJ, a suitable stick. He opened the caliper fitting, pressed the pedal with a stick, rested it on the seat and ran to close the fitting. And so on several times per wheel until the bubbles in the tube run out. All! And you don’t have to press the brake pedal a dozen times.
Well, where to go when you’re alone?
6 August 2022, 14:09 #12
When you press the brake pedal with the engine not running, the pedal reaches the start of braking (the pads rest against the braking surfaces), then with further pressing, as if with a soft click (like a step), it falls another 5-10 mm. and then the pedal is hard as it should be (and this happens every time you press it).
I’m wrong that either some cylinder (caliper) is jammed or some kind of block (most likely the rear one) is catching on something, or maybe the “sorcerer” is to blame. For one thing I can’t figure out the reason. I don’t want to shake up the entire brake system (but apparently You'll have to.) Maybe someone has had this happen or has thoughts about it.
Source of the article: https://kraniauto.ru/tyuning/kak-pravilno-prokachat-tormoza-na-oke.html
| Copyright © 2007-2021 All rights reserved. All trademarks are property of their respective owners. Source of the article: https://www.autoprospect.ru/vaz/1111-oka/3-27-prokachka-tormoznojj-sistemy.html |
see also
Which brake fluid is better
Replacing brake fluid
How much brake fluid do you need to change?
Master brake cylinder repair kit
Brake fluid DOT 4
Knowing how to bleed brakes will be useful to any driver, since the procedure is not very complicated, and it must be performed after many manipulations related to the brake system. So why waste extra money once again by sending your car for service when you can pump the brakes alone?
By following the instructions and avoiding the mistakes described below, it is quite possible to remove the air from the brakes yourself, with or without ABS. Bleeding brakes with ABS is by no means more difficult, but still it is a separate topic worthy of its own article.
It is only worth noting that if there is an anti-lock braking system with ESP and SBC modules, then the path lies with a service that has the necessary equipment.
"Oka" on unwelding
Unwelding is tuning wheels. There is no practical benefit to this, but the car stands out among other vehicles. You can just buy wide wheels. Finding the right discs is quite problematic. Therefore, stamped discs are cut (cast ones are not suitable) and inserts are installed between the two halves.
Before starting work, weigh the pros and cons of the procedure.
- Original type of wheels.
- Easy to make.
- Low costs.
- Cross-country ability is increased due to greater tire grip on the road.
- Fuel consumption increases.
- Dynamic performance is decreasing.
- The car is difficult to control at high speeds.
- The load on the axles increases and the bearings wear out.
- It's hard to find wider width tires.
Discs with tuned changes in design lose their strength. Unwelding is a rather unsafe method of modifying wheels.