When is it obvious that the fuel filter needs to be replaced?
The filtration system provides two levels of purification: coarse, removing all large particles, and fine. Fine filters are installed between the engine and the fuel tank. Experts advise replacing filters every 60 thousand kilometers. After all, their clogging leads to very serious consequences, for example, there is an additional load on the gas pump, and it can fail much faster. Clogging also causes the engine to not operate properly because fuel is not supplied to the system as it should.
Thus, the car starts to stall, stalls, and sometimes may not start at all; incorrect gear shifting also occurs (in the case of an automatic transmission, i.e., the automatic stops correctly interpreting engine commands to shift and carries them out at the wrong time or does not respond at all). But, in order not to bring the situation to such a critical moment, you can check whether the fuel filter needs to be replaced. At low speed, sharply press the gas pedal; if the car does not accelerate or there are jerks, it means that the filter needs to be replaced.
Other spare parts for VAZ (Lada) 2113/2114/2115
Having found out which fuel filters VAZ (Lada) 2113/2114/2115 owners prefer to install, you can look at other popular spare parts for this car. In October 2022, the leaders on PartReview were:
- #1 KYB shock absorbers - 19% of votes.
- #1 ATE Brake Discs - 10% of votes.
- #1 ATE Brake Pads - 6% of votes.
- #1 Shell Motor Oil - 10% of votes.
- #1 BRIDGESTONE tires - 8% of votes.
You can also find out what the owners of VAZ (Lada) 2113/2114/2115 chose among manufacturers of such spare parts as: Engine mounting, Timing belt, Cooling radiator, Pump, Thermostat, and others.
Replacing air, oil and fuel filters on VAZ 2101-2107
Filters in VAZ cars must be replaced periodically, depending on the mileage. The air filter should be changed every 10-15 thousand km, depending on the conditions in which the car is operated, the oil filter, along with an oil change, which needs to be done every 10 thousand km, the fuel filter should be changed every 30 thousand km or as it becomes dirty has a transparent body and the level of contamination of the filter element is clearly visible.
Replacing the air filter VAZ 2101-2107.
To replace the VAZ air filter, the first step is to unscrew the three bolts that hold the upper part of the air filter housing. Then we remove it and take out the old air filter. We close the air intake hole with a regular rag or rag, and then thoroughly clean the casing of dust and dirt. We install the new filter in place, removing the protective film or paper from it, close the casing and fasten it with bolts.
Replacing the oil filter VAZ 2101-2107.
The VAZ oil filter must be replaced at the same time as the oil change, at a time when the old oil has already been drained from the engine and new oil has not yet been added. Unscrewing it with bare hands is not always easy; this may require a special key or puller. After the filter is removed, wipe the landing pipe with a dry, clean cloth. Before installing a new filter, you need to moisten the rubber o-ring with oil and pour a little inside (enough so that it does not leak out during installation). Then screw the filter onto the seat and tighten it by hand. After replacing the filter, you need to start the car and let it run for 2-3 minutes to flush out the oil.
Replacing the fuel filter VAZ 2101-2107.
Before replacing the VAZ fuel filter, for safety reasons, it is necessary to remove the negative terminal from the battery. The filter is directional and is attached using clamps to the fuel line hoses. Before removing the old filter, it is best to clamp the hoses with any available means so that any remaining gasoline does not leak out. After the hoses are clamped, you need to unscrew the clamps and remove the old fuel filter. If the clamps are new, there is no point in changing them, but if they are already worn out, then replacement is required. We put the hoses on the new fuel filter and secure them with clamps.
It should be noted that when buying a car second-hand, it is necessary to change not only the oil, but also all the filters. In addition, any clogged filter has a bad effect on engine operation, reducing its service life and reducing key performance.
Video of replacing the air and fuel filter of a VAZ 2107
An air filter, as the name suggests, is used to clean the air. The filter purifies the air that is needed to prepare the fuel-air mixture, which is supplied to the combustion chamber. In addition to its benefits, the filter also creates additional resistance. Due to this, excessive fuel consumption and a decrease in power will occur. But if the filter is not of good quality, then it will allow combustion products, sand grains and dust particles to enter the chamber. They, like a fine abrasive, will act on the surface of the combustion chamber and increase wear on rubbing parts.
Therefore, it is important that the filter is reliable; it must have a density that is necessary for good air filtration and will not affect the dynamic performance of the engine.
It is advisable to replace the air filter for the VAZ 2107 after 30 thousand kilometers. But it is advisable to check its condition from time to time, in case you need to replace the air filter ahead of time. The process of replacing the air filter for the VAZ 2107 is not a complicated procedure, and even a novice in the automotive business can cope with it. To replace the air filter you need to have: a new air filter, a vacuum cleaner and a Phillips screwdriver. The whole process will take about 20 minutes.
Zero resistance filter care
As already mentioned, the zero-resistance filter requires maintenance. The filter needs to be removed and washed; this procedure should be performed approximately once every 5,000 km, and if you drive in a particularly dusty area, then this should be done even more often. So, the procedure for caring for a zero resistance filter:
- remove the zero from the car and remove all the dust from it with a soft brush;
- Now we proceed to impregnate the filter with a special agent, usually it is purchased separately from the filter;
- then carefully wash the filter in a container of water and then rinse it under a weak stream of water;
- shake off the water from the filter and leave it to dry (you cannot dry the nulevik with a hairdryer or any other heating devices);
- After the filter has dried, inspect it; if there are light spots, the filter must be soaked with a special agent again;
- install a zero resistance filter on the car.
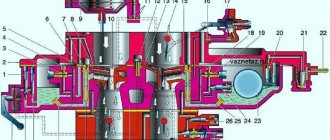
Operation and repair of the device
The carburetor serves to form a combustible mixture by combining injected fuel and air, in order to ensure the operation of the internal combustion engine. In this case, the correct proportions must be observed to ensure normal combustion. If the proportions are not observed, an over-enriched mixture is formed due to an excess amount of fuel or lack of air, which leads to breakdowns.
In addition, you need to adjust the gaps on the gas distribution mechanisms and open the air damper
Special attention should be paid to the correct setting of the ignition timing. When adjusting carburetor 2105, first of all, set the crankshaft rotation frequency to 700-800.
When installing a carburetor on a classic VAZ 21053, you should remember that, unlike the VAZ 2105, 21053 20 has a somewhat poor second chamber. This is explained by the fact that the first has a fairly rich adjustment. It can be made poorer by installing 102-150 jets, but then there will be a need to enrich the second chamber by installing 115-135 jets.
The effectiveness of this method lies in the fact that when a compressor is installed, the charge of the fuel-air mixture increases. The mixture enters the cylinder due to increased air supply to the fuel system. The compressor has not only advantages, but also disadvantages, one of which is increased fuel consumption.
The compressor consists of a pulley, a drive gear, a rotor driven gear and an internal oil gear. All installation work should be carried out with the engine cool. After installation, the compressor should have minimal resistance to air movement. Typically, an installation kit is used for this, which includes all the necessary parts. A mechanical supercharger (compressor) plays an important role in the process of improving the quality of a car.
Diagnostics
The primary conclusion whether the fuel pump is working or not can be assessed by ear when the ignition is turned on. If you don’t hear a quiet buzzing noise from behind, then you need to check the voltage supply to the gas tank block and then draw a conclusion about its malfunction.
You can check the serviceability of the fuel pump using the MTL-2 pressure gauge; this is the most correct way. You can somewhat roughly estimate the pressure using air pressure gauges to check tire pressure. To do this, screw a rubber hose to the sensor and connect it to the fuel system.
Recommendations for selection
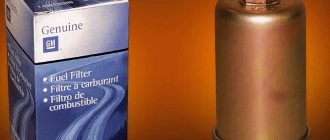
Service station foremen and managers of official representative offices advise purchasing consumables with original catalog numbers.
The high price of a product is not affordable for everyone, so car owners are forced to look for cheap analogues, but not always of high quality.
Check the packaging for integrity and the presence of holograms. Ask distributors to provide quality certificates for their products. Otherwise, avoid questionable purchases.
Conclusion
The design of the fuel system is quite complex, not every master can handle it, let alone an inexperienced driver. However, elements such as a filter or mesh can be replaced independently, without resorting to outside help. If you follow the recommendations, dismantling will take 10 - 15 minutes. If you doubt your abilities, or don’t have enough free time, contact the service station masters.
Replacing the air filter:
As the name suggests, the VAZ 2107 air filter (injector) is designed to clean the air supplied to the combustion chamber from dust. A clogged filter creates additional resistance to passing air. As a result, the composition of the air-fuel mixture changes, fuel consumption increases and engine power decreases. If the filter is damaged, it will allow dust particles and grains of sand to pass through, which, when entering the engine, will begin to act as an abrasive, increasing wear on the rings and cylinder surface. Therefore, the filter must have the proper density, which will not allow dust to enter the engine, but will not create unnecessary resistance to air flow.
According to the instructions, the VAZ 2107 air filter needs to be changed after 30 thousand kilometers. But its service life may be shorter due to operation in very dusty conditions or due to poor filter quality. It is advisable to periodically check its condition and change it if necessary. The replacement procedure is very simple and does not require special knowledge and experience. You only need a minimum of tools and 20 minutes of time.
Signs of a clogged filter device
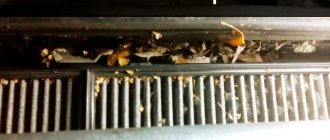
The filter has special filter paper, the cells of which become clogged over the course of vehicle operation. Because of this, fuel flows worse, which causes problems with the engine itself. You can detect that the filter is clogged by several obvious signs.
- Fuel consumption has increased sharply;
- Your car begins to stall frequently at idle;
- At higher speeds, failures in engine operation are observed;
- Starting the engine is carried out with certain difficulties;
- The engine falters and the power drops noticeably;
- When driving, the car brakes spontaneously, although you did not press the brake pedal;
- The car rarely jerks when going uphill.
As you can see, there are many signs, and they differ from each other in many ways. These signs do not indicate 100% that the problem lies with the filter. Similar phenomena occur when there is a malfunction of the electronic control unit, sensors, throttle valve, spark plugs, detonation, and so on.
How to check that the problem is in the filter? Easily.
- Connect a nanometer to the nipple on the fuel frame of the injectors;
- Start the engine;
- Measure the pressure;
- If the indicators are lower than those indicated in the technical documentation of the VAZ 2114, it means that the cleaner is really clogged.
Measuring pressure in the fuel rail of a VAZ 2114
Instructions for replacing the fuel filter on a VAZ 2107 with video and photos
https://youtube.com/watch?v=pZqCQjmnpKw
1. Relieve pressure;
2. Open the hood;
3. Disconnect the battery;
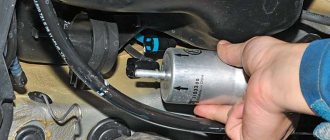
4. Unscrew the fuel pipe fitting, while holding the old filter itself with a wrench. In order to protect against the leakage of a small amount of gasoline, you can lay down an old rag or rags;
5. Disconnect the running pipes from the filter;
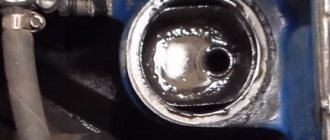
6. Unscrew the fuel filter mount using wrench 10 - the filter is secured with a coupling bolt;
6. Remove the old filter;
7. Install a new fuel filter, making sure that the arrow drawn on the body points to the fuel rail;
8. Replace the sealing rings between the tubes and the fuel filter with new ones;
9. Carry out assembly work in reverse order;
Start the engine and make sure there are no gasoline leaks. All work is not difficult even for a person who does not have special knowledge in auto mechanics.
Also watch the video on replacing the fuel filter on a VAZ 2107:
I didn’t think that there might be problems with replacing the fuel filter on a VAZ 2101-2107... It’s a matter of a couple of minutes.
First of all, you should purchase a gasoline (fuel) filter for the VAZ 2101-2107 (with a carburetor engine). You can find two types of them on sale - horizontal (2) and vertical with a sump (1). Look at the photos below.
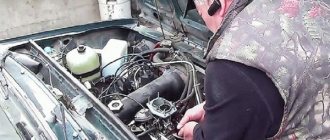
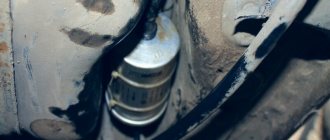
After purchasing the filter, you can proceed to replacement. The fuel filter on Zhiguli is located in the engine compartment. Installed on the fuel hose, usually in front of the fuel pump.
Take a Phillips screwdriver and loosen the clamps. We take out the gasoline filter and install a new one in its place.
Please note that each filter has an arrow, which, when installing the filter, should point to the fuel pump (the direction of fuel movement in the system). Tighten the clamps.
All that remains is to start the car engine and check the filter itself and the fuel hoses for gasoline leaks. Insurance in case of a defective gasoline filter or loose hose clamps.
The replacement of the gasoline (fuel) filter on the Classic (as the Zhiguli is also called) is complete. As you can see, there are no problems and this activity takes 2-3 minutes))).
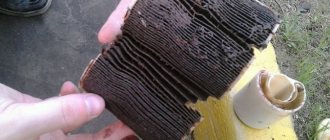
The fuel filter was completely clogged, as you can see it simply had no chance to “live” longer.
Safety precautions during replacement
- Smoking is strictly prohibited when working on the fuel system.
- There should be a fire extinguisher nearby.
- Be careful not to get fuel in your eyes.
- The room in which work takes place must be ventilated.
- Do not replace if it is too hot outside.
- Proceed with replacement only when the engine has completely cooled down.
As you can see, replacing a fuel filter is a fairly simple process that does not require special skills, and even an inexperienced driver can handle it after carefully studying the instructions.
Dismantling and disassembling the fuel pump module Lada Vesta
The work is unpleasant because of what will happen inside the cabin, since the pump assembly can only be obtained in this way. A similar solution can be observed on other new AvtoVAZ models, for example, on the Lada Priora; dismantling the fuel module is similar there. Of course, the solution is somewhat strange, and many will find it impractical, but this arrangement of the fuel pump can be seen in most modern foreign cars.
- The first step is to provide access to the location of the fuel module. To do this, we dismantle the rear sofa cushion. This is done as follows: the front part is pulled out from the latches, and the rear part is removed from the hooks.
- Next, you need to remove the cover (just turn it) and clean the workplace from dust and sand. We take a vacuum cleaner and vacuum up dust and sand so that nothing gets into the fuel tank during dismantling.
The next step is mandatory! You need to relieve the pressure in the fuel system so that when you disconnect the fuel lines from the pump, you do not flood the entire cabin with gasoline.
This is very important, so I do not advise you to neglect this point. There are two ways to relieve pressure in the fuel line
- First: remove the fuel pump fuse, then start the engine and wait until it stalls.
- Second: Turn off the power to the fuel pump, then start the engine, etc.
Decide for yourself which option suits you best...
- Now that the pressure has been released and everything is ready to begin dismantling, it is necessary to take care of fire safety. Make sure there are no open sources of fire near you, remove anything that could lead to a fire. Remember that gasoline vapors ignite very quickly even from a small spark. I also recommend removing the negative terminal from the battery, “just in case,” as they say.
- Disconnect the fuel hoses. We press the latches and move them aside.
- Using a wooden adapter and a hammer, remove the retaining ring by striking counterclockwise. Sometimes you can remove it without any problems, but in most cases everyone complains that it is difficult to remove.
Next you can get the fuel pump module assembly
We remove it carefully, do not forget about the float, which complicates the entire extraction process
Disassembling the fuel pump module (cleaning, replacing, etc.)
- We do disassembly. To do this, disconnect the lower part of the module along with the coarse fuel filter. Depending on the degree of contamination, the mesh should either be washed (solvent or Carb) or replaced.
- We also disconnect the fuel pressure regulator wire
- Following this, we take out the spring filter along with the fuel pressure regulator.
- We disconnect the intake hose, hold the clamps and take out the fine filter along with the fuel pump. Almost everyone has problems with the hose, since when trying to remove it, it is often damaged. Putting this hose on is also a problem; to do this you will have to heat it with a hairdryer, but under no circumstances with an open fire!!! I recommend buying a spare hose just in case.
- Now you can remove the pump from the filter housing, do not forget to turn off the power to the pump.
Further work depends on the reason for disassembly. If you need to replace the Vesta fine filter, we do it without any problems. As it turns out, it is possible! Replacing the Lada Vesta fuel pump is also possible, both with and without filters. But I would strongly recommend that when replacing the pump, you also immediately change the fine filter. As for the mesh, in most cases it is enough to simply wash it.
That's all I have, thanks for your attention. Write in the comments whether you succeeded and what difficulties you encountered during work
Bye everyone, take care of yourselves!
Photo sources: , , 3
Where are the purifiers located?
The location of fuel filters on VAZ models depends on the engine. On injection and carburetor systems they are located in different places.
Filter location on carburetor internal combustion engines
On carburetor VAZs, the fuel purifier is located under the hood. It is installed under the brake reservoir (main), secured with 2 clamps.
The filter for carburetor VAZs is located under the brake cylinder
Location of the cleaner on the injector
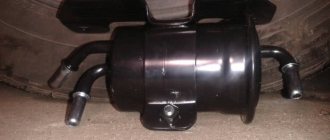
On a VAZ with an injection system, the FTO is installed under the car, at the rear near the muffler. It is mounted in the form of a cartridge in the fuel line. To inspect or dismantle it, you have to lift the car onto an overpass or pit.
Carburetor calibration data
The main dosing systems include the diameter of the mixing chamber: the size of the first chamber is 28 mm, and the second is 32 mm, the diameter of the narrow part of the large diffuser with the size of the first chamber is 21 mm and the second is 25. This also includes the marking of the small diffuser with the corresponding chamber size 3 .5 and 4.5 mm, the diameter of the main fuel jet of the GDS with chamber sizes of 1.07 and 1.62 mm.
The acceleration pump has a diametral nozzle opening of 0.4 mm and a capacity with 10 presses equal to 7 ± 1.75 cm3. Econostats have fuel jets with a diameter of 1.5 mm, air jets with a diameter of 1.2 mm, and emulsion jets with a diameter of 1.5 mm. Characteristics of the pneumatic drive of the second chamber.
Carburetor 2105-1107010 has a remote pneumatic valve, but 2105-1107010-20 does not. In addition, carburetors 2105-1107010 and 2105-1107010-20 have a vacuum tap to the vacuum ignition timing regulator. Carburetor 21053 has slightly different parameters.