The starter is one of the main components of the engine. Stable engine starting depends on its proper operation. If in cars with a manual transmission, an emergency start of the engine in the event of a starter failure can be carried out “from the pusher,” then in a car with an automatic transmission, such an operation cannot be performed when the starter is not working. Therefore, it is important to monitor the serviceability of the starter components, including the solenoid relay.
Purpose and principle of operation of the starter relay
The first starter device without a relay was produced by Charles Cuttering at the beginning of the last century. Initially, it represented a conventional electric motor, which, after starting the engine, switched to generator mode. A little later, the US automaker and inventor Vincent Hugo Bendix proposed a starter device with a built-in start relay, the circuit of which has survived to this day without significant changes.
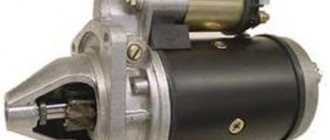
The starter design includes the following main components:
- starting electric motor;
- starter relay;
- fork;
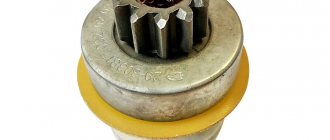
- leading gear (Bendix).
When the engine starts, the starter interlock relay receives a voltage of 12 Volts (for trucks 24 V) from the vehicle’s ignition switch or through an additional starter relay of the electronic engine control system. After the relay is activated, due to the forces of electromagnetic induction, the contact zones (nickels) are closed, due to which the starter motor receives power from the vehicle battery. At the same time, the armature of the starter traction relay drives the fork (relay lever), which pushes the idle clutch with a gear, which is called Bendix in honor of its inventor. The gear meshes with the engine flywheel. The rotating starter motor starts the engine.
Thus, the starter relay simultaneously performs two main functions: electrically connecting the contact areas to supply voltage to the starting motor and driving the bendix into engagement of the gear with the flywheel.
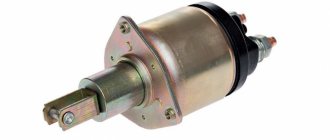
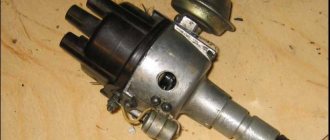
The starter traction relay includes the following components:
- frame;
- retracting and holding windings (sometimes combined);
- relay armature;
- relay core;
- armature return spring;
- relay lever (plug);
- stock;
- damper spring;
- contact plate;
- contact bolts;
- contact coins;
- contact plate return spring.
In general, the result is a rather complex device, in which there is something to break.
Starter relay assembly diagram
Electric motor with mixed excitation
A motor with parallel excitation will cope much worse with the start of rotation, but on the other hand, it is not afraid of runaway. A compromise solution is that a mixed excitation circuit is used for the starter motor - the main winding is series and the auxiliary winding is parallel. The parallel winding also helps to turn the electric motor; it also prevents the starter from spinning out.
In this circuit, the current from the battery is branched, part of the current goes through the left field winding and sequentially goes through the brushes to the armature. The other part of the current goes through the right, parallel excitation winding, immediately to minus.
Most of the later starter circuits with electromagnetic excitation are made exactly according to this scheme.
Source
Main malfunctions of the starter relay, their symptoms
During vehicle operation, the starter is subjected to high overloads. As a rule, it is installed in the lower third of the engine, so it is constantly in the reach of dust, dirt, and foreign liquids (oils, antifreeze, water) in the car. Structurally, the relay is combined with the main structure of the starter. Considering where the starter relay is located, it bears no less load. In addition, the starting currents of the starter reach 500 Amperes or more, and this leads to the destruction of the contact areas of the coins, plate and bolts.
Main malfunctions of the starter retractor relay:
- breakage, destruction or burnout of relay windings;
- destruction of the contact zones of the nickels and the contact plate;
- burning of bolt clamps;
- plug malfunction (usually a bummer);
- sticking of the relay rod or armature;
- destruction of springs.
Each of these malfunctions has its own symptoms. So, a malfunction of the relay winding leads to a general malfunction of the starter: it stops working. Destruction of the contact zones of the nickels can cause a problem with the starter working “every other time”. A broken fork will cause the solenoid relay to click, but the starter drive may not start. Sticking of the rod and armature, breakage of the springs leads to unstable operation of the starter, and possible jamming of the bendix at the moment of starting. This is dangerous in terms of possible damage to engine systems.
Therefore, it is important to know how to check the starter solenoid relay during its operation.
Button recommendations
It is desirable that the button does not have various latches inside. In other words, the button should instantly engage the starter and disable it as soon as the button is released. The locking button works a little differently. You have to press it twice to turn off the starter, and this is not so much inconvenient as it is harmful to the starter.
In a word, the principle of operation of the button comes down to the following: the driver holds the button pressed until the engine starts, then releases it, the starter turns off. It turns out to be a convenient option when you operate the button like a key.
The button material also needs to be selected wisely. You should take into account the fact that the button itself can burn out due to the passage of large currents through it. For example, a button made of anti-vandal chrome material fails after just 6 months of use, despite the fact that it is designed for high loads.
Forget about fines from cameras! An absolutely legal new product - Traffic Police Camera Jammer, hides your license plates from the cameras that are installed in all cities. More details at the link.
- Absolutely legal (Article 12.2);
- Hides from photo and video recording;
- Suitable for all cars;
- Works through the cigarette lighter connector;
- Does not cause interference to radios and cell phones.
How to check the starter relay yourself
The starter activation relay is located directly on the starter, usually in the upper or side structural area. There is good access to it, if, of course, you can find access to the starter at all. In many cars, the starter is located in the “dead” zone under the exhaust manifold in the space between the engine and the passenger compartment.
Checking the starter solenoid relay begins with measuring the winding resistance. In some older vehicles, the starter relay coil is supplied with voltage directly from the ignition switch. You should use a multimeter to “ring” (measure the resistance) the relay coil. In new cars, the starter relay is energized through the engine control system relay. It is usually installed in the engine compartment fuse and relay box. It is better to use the car's electrical diagram.
This operation can also be done directly at the starter. There are two wires going to it: one thick one from the battery, the other thin one to the starter relay. The resistance between the starter relay output and the vehicle ground should be in the range from 0.5 to 5 ohms. But there is a “BUT” here. In most generator circuits, the starter drive motor is included in the starter relay circuit. Therefore, if the brushes are worn out and the contact of the electric motor is lost, the relay will not ring through this method, and the starter will not work. Experienced auto electricians advise knocking on the starter (you need to knock hard), perhaps the brushes will come off and the starter will start working.
All other faults can be determined either by ear, but better by dismantling the starter.
What kind of problems are there?
Now it’s worth talking about the malfunctions that occur when using car starters. Although we are talking about car starters, you should understand that even chainsaws have them. Not long ago I found out about this myself when I was watching a video about repairing this instrument.
Malfunctions are really different. But, depending on the reasons, they can be divided into electrical and mechanical.
If there is an electrical problem, you should check:
- Traction relay. It sometimes fails. Repair is unlikely to help. It is possible that there was a gradual break in the existing winding, or a short circuit between different turns. The element or the entire starter needs to be replaced. Decide for yourself here;
- Brushes. We are interested in the entire brush assembly. Quite often it happens that the brushes simply no longer adhere properly to the commutator. Hence the starter failure;
- Anchor collector. Usually it wears out, which creates the need for repairs or a complete replacement.
The starter can turn the engine, but it does so slowly or does not function at all. Try checking the electrical circuit. It's not that difficult to do if you work carefully.
To check the electrical circuit you need:
- make sure the car battery is well charged;
- check the fastening of the ground contacts;
- look at the integrity and quality of contact of the wiring from our retractor;
- make sure there is no damage or poor contact on the wire running from the battery to the starter;
- make sure that the contact group of the lock itself works well.
There is nothing particularly complicated here. Therefore, you should easily be able to do it yourself. But if you are not sure, it is better to contact a car service.
As for mechanical problems, they are indicated by a working starter, in which the engine does not start or the crankshaft does not rotate.
Here's what you should check:
- Coupling. It slips and therefore cannot fulfill its function;
- Buffer spring;
- Starter flywheel crown. More precisely, its teeth. This problem is indicated by a grinding noise that occurs during startup;
- Clutch rings. These elements sometimes wear out ahead of time, and therefore the operation of the entire system is disrupted;
- overrunning clutch lever.
The presence of uncharacteristic noise should be a reason to look into the starter through the engine compartment or using a hole.
Noise usually occurs due to:
- wear of starter bearings;
- wear of the journals on the armature shaft;
- damage to teeth;
- your starter's mounting bolts are loose;
- loose pole attachment.
There is another situation when the starter has done its job, but does not stop, but continues to turn even after the car engine has started. Here the levers are probably stuck, the soured contacts on the starter relay are stuck together, the traction is stuck, or the spring of the switch is seriously worn out.
The starter is a rather serious thing, the problems of which should be approached very carefully. Any symptoms of malfunctions tell you that you need to promptly check the device and take appropriate measures.
Thanks to all! Subscribe, leave comments and tell your friends about us!
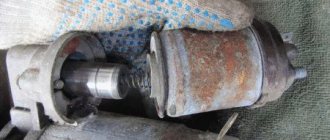
Removing and replacing the starter relay
Before disassembling the starter relay, it must be removed along with the starter itself. In some cars this can be done from the hood side. Sequence for removing the starter relay:
- put the car on the parking brake;
- disconnect the negative terminal of the car battery;
- provide access to the starter;
- remove the conductors connected to the starter located on the relay;
- unscrew the three (usually) starter mounting bolts;
- remove the starter;
- unscrew the screws holding the starter relay to the housing (usually also 3, located at the end of the relay);
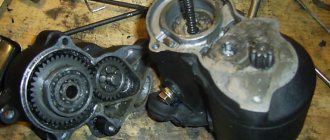
- Carefully disassemble the starter relay while holding the plug.
After disassembling the starter relay, you can visually identify all faults. Problems usually arise with the starter fork: in many cars it is made of impact-resistant plastic. Do-it-yourself repair of the starter solenoid relay is possible if the windings are not damaged.
The starter relay is installed and connected in the reverse order. Before connecting the starter to the car, it is necessary to check the serviceability on a stand, or simply on a table, by connecting a battery to it and briefly applying positive voltage from the battery to the solenoid relay. After this, the starter is installed in its regular place and connected to the on-board equipment.
General Tips
To make the solenoid relay last longer, you should:
- carefully tighten the bolts securing the current-carrying conductors to the starter relay;
- periodically clean the starter housing from dust and dirt;
- start the engine for no more than 15 seconds;
- If extraneous noise appears during startup or when the starter does not turn, dismantle the starter and perform routine maintenance.
If you have any questions, leave them in the comments below the article. We or our visitors will be happy to answer them
Selecting a part for a VAZ-2110
Often the entire starter assembly is replaced, but we recommend not doing this. The pull-out relay is much cheaper than the entire kit.
The choice of a new relay should be approached with the utmost seriousness, since the quality of the part will determine how long it will serve the owner.
Most VAZ-2110 are equipped with a solenoid relay manufactured by Bosch, with catalog number 2339303293 . The cost of the part is about 2000 rubles.
Analogs
In addition to the proposed version of the original part, there are quite a lot of analogues that can be installed on a car. So, many car enthusiasts do just that. Let's look at what the automotive spare parts market offers the owner of a 2110:
- Cargo 131143 – the cost is 1200 rubles. High quality for little money.