Author:
Maxim Markov
Are you familiar with the situation, dear friends, when the car engine is idling unstable? Many will say, “Something with the carburetor.” I agree, but what exactly? I won’t bother you, in most cases it is necessary to adjust the idle speed. Of course, if a modern car is available, then its owner usually doesn’t look beyond the interior; a different matter is the good old “classic”. Each of its owners tries to master the entire structure of the unit as much as possible, because when cutting through the expanses of Mother Russia, anything can happen and you need to be prepared both theoretically and practically.
Setting up a carburetor is not an easy task and it is best to entrust it to professionals, but it’s not for me to tell you about the Russian mentality. We don’t want to pay some guy when we can do everything ourselves, they’ll suffer, but we’ll do it! Self-adjusting the idle speed of the VAZ 2107 will save time and money that you spend at a car service center. Moreover, this skill will be especially useful in unusual situations far from home. With this publication I will prove to all pessimists that anyone can adjust the idle speed directly with their own hands.
Foreshadowing adjustment
Before proceeding with the operation, you need to make sure that the unstable operation of the engine is caused by an incorrectly set idle speed. You need to check the following points:
- Jets for clogging;
- Correctly set ignition angle;
- Gasoline quality;
- Fuel level in the float chamber;
- The tightness of the start sensor;
- Performance of glow plugs.
If all of the above points are normal, and nothing has changed with the car, then you were right, the reason is idling. However, it is necessary to begin its adjustment only in the operating condition of the described mechanisms. Having warmed up the engine to operating temperatures (pay attention to the air damper, it must be in the open position), you can begin the procedure.
Air leak
It is one of the most difficult problems and can be caused by several reasons:
- Crooked seat
- Gasket failure
- Throttle valve not closed
To make sure that this problem exists, you need to check the color of the spark plugs and the number of idle speeds. If the speed is too high and the spark plugs have a white coating, then the mixture is lean, which means more air is coming in than it should be.
In this case, the check begins by treating the carburetor-manifold joints with a throttle valve cleaner. Start processing from the intake manifold, then move to the junction of the carburetor and manifold and complete the EPH. A change in the speed will indicate the presence of air leaks. It should be located at the joints of the gaskets.
However, the gasket may not always be the cause. If carburetors are installed and dismantled incorrectly, irregularities may form on the surface of their connections, through which air is sucked in.
Another reason is an open throttle. More precisely, not completely closed. This would be more correct, because at the bottom of the top carburetor cover there is a bolt for adjusting the throttle clearance. If it is unscrewed, the damper opens slightly and a very large amount of air passes into the diffuser, reducing the gasoline content. This is why the consumption becomes less, but the speed is too high, so it needs to be adjusted.
To fix, you need to remove the top cover and adjust the throttle position. The problem will disappear immediately.
Setup with additional devices
Having obtained a multimeter and a gas analyzer, the adjustment results will be similar to those achieved by car service specialists.
- Adjust the correct ignition angle using a multimeter (connected to the distributor coil) and fix the distributor.
- We insert the gas analyzer into the exhaust pipe and start the car.
- Set the mixture quantity screw (indicated in the figure as number 1) in such a position that the crankshaft rotates within the range of 840-960 rpm.
- We look at the gas analyzer, if the CO value is exceeded, we adjust the quality of the mixture (number 2 in the figure).
- After this, the crankshaft rotation will decrease slightly, repeat step 3. The last steps are repeated until the values are at least a little similar to the factory values. To check, you need to sharply press the gas pedal several times and release it. When configured correctly, the speed increases smoothly and quickly, and is released automatically and without interruption.
Carrying out diagnostics
The simplest method is to measure the voltage at the block to which the regulator is connected. These are terminals D and A. When the ignition is turned on, a voltage of 12 V should be present on them. If the voltage is less than this value, it is worth looking at the battery and generator. It is quite possible that the battery is undercharged. In the same case, if there is no voltage at all, it is necessary to check the entire power circuit of the device and diagnose the ECU.
Set the multimeter to resistance measurement mode. Between pairs of terminals A and B, C and D, there should be a resistance of approximately 53 ohms. Remove the IAC and connect (with the ignition off) to the block. Then turn on the ignition and look at the behavior of the needle - it should extend completely when voltage is applied. If this does not happen, we can judge that the IAC is broken.
To check and replace the regulator itself, you will need to dismantle the throttle assembly and disconnect the device from it. The following tools and resources will be needed:
- screwdriver with Phillips bit;
- slotted screwdriver;
- round nose pliers;
- socket wrench or socket 13;
- multimeter with the ability to measure resistance;
- calipers (you can use a ruler);
- clean dry cloth;
- coolant for topping up (maximum 500 ml).
To remove the throttle assembly, you must:
- Raise the hood and disconnect the negative cable from the battery.
- Using a slotted screwdriver, hook the end of the throttle cable and remove it from the gas pedal pin.
- On the throttle block, use round pliers to disconnect the clamp on the throttle valve drive sector. The fastener is detached using pliers or a screwdriver
- Turn the sector counterclockwise and disconnect the cable end from it. To disconnect the tip, you need to turn the drive sector counterclockwise
- Remove the plastic cap from the cable end.
- Using two 13mm wrenches, loosen the cable fastening on the bracket. To loosen the cable, you need to loosen both nuts
- Pull the cable out of the bracket slot. To remove the cable, it must be removed from the bracket slot
- Disconnect the wire connectors from the IAC connectors and the throttle position sensor.
- Using a screwdriver with a cross-shaped bit or pliers (depending on the type of clamps), loosen the clamps on the coolant inlet and outlet fittings. Remove the clamps. In this case, a small amount of liquid may leak out. Wipe off any spills with a dry, clean cloth. The clamps can be loosened with a screwdriver or pliers (round pliers)
- In the same way, loosen the clamp and remove the hose from the crankcase ventilation fitting. The crankcase ventilation fitting is located between the coolant inlet and outlet fittings
- Using a Phillips-head screwdriver, loosen the clamp on the air supply pipe. Remove the pipe from the throttle body. The air pipe is fixed with a worm clamp
- Similarly, loosen the clamp and remove the hose for removing fuel vapors from the fitting on the throttle assembly. To remove the fuel vapor exhaust hose, you need to loosen the clamp
- Using a socket wrench or a 13mm socket, unscrew the nuts (2 pcs) securing the throttle assembly to the intake manifold. The throttle assembly is attached to the manifold using two studs with nuts
- Remove the throttle body along with the sealing gasket from the manifold studs. A sealing gasket is installed between the throttle assembly and the manifold
- Remove the plastic bushing that defines the air flow configuration from the manifold. The plastic sleeve sets the air flow configuration inside the manifold
- Using a Phillips-head screwdriver, remove the two screws securing the regulator to the throttle body.
The regulator is attached to the throttle body with two screws - Carefully remove the regulator, being careful not to damage the rubber O-ring. A rubber sealing ring is installed at the junction of the IAC with the throttle assembly
Adjustment without additional devices
If you couldn’t find special devices, you can make adjustments without a gas analyzer, but only if you have a tachometer. The procedure is basically the same, only you need to turn the screws a little differently.
- We set the mixture quantity screw to the position of the nominal crankshaft speed (820/900 rpm).
- Using the quality screw we catch the maximum speed.
- We increase the crankshaft speed to 950-1035 rpm (15%), using the quantity screw.
- We check the quality screw; it should be in the position of the maximum possible revolutions for the current location of the quantity screw.
- We repeat steps 3 and 4 until, after completing the third step, adjusting the quality screw will only lead to a decrease in speed.
- We tighten the quality screw to the nominal speed.
Symptoms of a problem
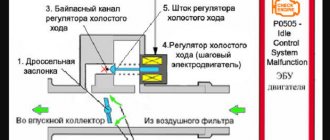
The VAZ-2110 idle speed control is a structurally simple mechanism consisting of a stepper electric motor and a spring-loaded needle, the displacement of which leads to a change in the cross-section of the channel. But despite the simplicity of the design, this part often breaks. Symptoms of a broken XX regulator:
- Unstable “floating” crankshaft speed during idle operation;
- Inconsistency of speed with the normal indicator (800-850 rpm);
- Spontaneous stopping of the power plant when releasing the gas pedal;
- No increased speed when starting a “cold” engine (“warm-up” mode);
- Drawdown in speed after creating a load on the on-board network;
Conclusion
As you yourself have seen, a carburetor is a complicated thing, but you don’t need any special intelligence to adjust the idle speed. Do not try to repeat the procedure if your “Seven” is on gas, the process will be pointless because the carburetor does not work with this type of fuel. You can try to set up the injector, but there is a high probability of only harming the device, since the actions described there are ineffective, so it is better to turn to professionals. All the procedures described and more are clearly demonstrated in the video, where the cheerful specialist easily and simply finds a common language with the carburetor. I wish the same for you, all the best!
Adjusting the idle speed of the carburetor on a VAZ-2107
As part of eliminating illiteracy on the basics of adjusting, tuning and repairing carburetors on the VAZ-2107, we are conducting a series of publications focusing on the main nuances and “secrets”, based on the experience of our colleagues from the forum. So, today we will tell you how to correctly adjust the idle speed on a VAZ-2107 carburetor without having a gas analyzer at hand, but guided only by the tachometer readings. The need for adjustment arises among owners of VAZ classics quite often. Signs - the engine idles unstably, stalls, troits, etc. So, let's go, this procedure is described in simple 6 steps for adjustment.
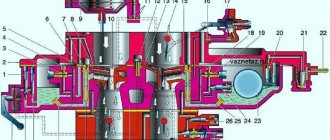
We draw your attention to the location of the quality and quantity screws on the OZONE carburetor for the VAZ-2107
2. quality screw , we find its position at which the speed will be maximum .
4. We check that the position of the quality screw provides the maximum possible speed for a given position of the quantity screw. If this is not the case, then use the quality screw to achieve the maximum possible speed and use the quantity screw to restore the speed above the nominal speed by 15%. We again check that the position of the quality screw provides the maximum possible speed, and return the speed with the quantity screw to +15% of the nominal value. Etc. until the moment when, at a rotation speed 15% higher than the nominal one, any rotation of the quality screw will only lead to a decrease in speed.
This is interesting: DIY repair of VAZ 2112 16 valves
5. By tightening the quality screw, we reduce the speed to nominal.
6. We check and make sure that the car’s engine runs smoothly, without “tripping” at idle and does not stall when the throttle is closed abruptly
Briefly, all this can be stated as follows:
1. Find the position of the quality screw at which the speed will be maximum. 2. If necessary, use the quantity screw to set the speed 15% (130.150 rpm) higher than the required XX speed. 3. see point 1 4. see point 2 5. When it is no longer necessary to adjust the speed with the quantity screw, by turning the quality screw we reduce the speed by 15%, i.e. to the required idle speed.
What to pay attention to:
If the adjustment is made correctly, then when you remove the terminal from the solenoid valve or the vacuum hose from the fitting of the “quantity” adjusting screw housing, the engine should immediately stall.
If, when you tighten the “quality” screw all the way, the engine does not stall, then most likely one of the throttle valves is too open - adjust the locking screws.
Pay attention to the return spring and the “gas” drive. The throttle valve should clearly return to its original position when the gas pedal is released.
How to remove a carburetor: step-by-step instructions
To remove the carburetor from the engine yourself, you will need a simple set of tools and preparation of the workplace. To carry out the procedure for removing the carburetor with your own hands, you must prepare in advance:
3 mm slotted screwdriver;
4 mm cross-head screwdriver;
wrench 7;
wrench 8;
socket wrench 13.
You will need to clear a place near the hood so that nothing interferes with work. To make the procedure easier, it is recommended to unscrew the screws securing the air filter box with a screwdriver and remove it. The following steps are aimed entirely at removing the carburetor:
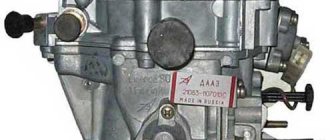
First you need to disconnect the wire tip from the DAAZ solenoid valve.
Using a Phillips screwdriver or a 7mm wrench, you need to loosen the clamp located on the fuel hose. The hose comes out of the carburetor fitting and must be removed and set aside.
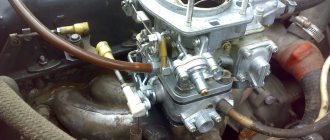
Adjusting the idle speed of a car engine with carburetors 2105, 2107 Ozone
If the idle speed is adjusted incorrectly, the engine may start and immediately stall, it may stall, during acceleration there may be a “failure”, and during operation there will be increased fuel consumption.
Tools required for adjusting XX speed
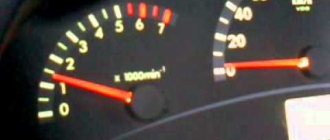
— tachometer (you can use the one built into the instrument panel) — slotted screwdriver (3 mm) If you don’t have a tachometer, you can adjust the idle speed by ear. But for this you must have at least some experience in car repair, since it is necessary to distinguish when the speed is normal and when it is increased or decreased.
Preparatory work
Before making adjustments, you must first make sure that the ignition timing is set correctly. The distributor cover, breaker contacts, armored wire and spark plugs are in good condition.
If the carburetor is after disassembly and reassembly or you simply need to set the initial value of the adjustment screws, then first tighten them completely, and then turn out the “quality” screw by 2-3 turns, and the “quantity” screw by 3-4.
— Warm up the engine to operating temperature (85-95 ). — With the engine stopped, connect the tachometer and start it again.
procedure for connecting an autotester (tachometer)
Adjusting the idle speed of an engine with a carburetor 2105, 2107 Ozone We carry out the adjustment in four stages.
1. Turn the “quality” screw and set the maximum idle speed.
Rotate the screw counterclockwise.
turn the “quality” screw of the fuel mixture of the carburetor 2105, 2107 Ozone counterclockwise, thereby increasing the supply of gasoline to the fuel-air mixture
2. Use the “quantity” screw to set an even higher rotation speed. For example, 80 rpm more. Rotate the screw counterclockwise.
rotate the “amount” screw of the fuel mixture counterclockwise, increasing the total amount of fuel mixture entering the engine cylinders
3. We check with the “quality” screw whether these revolutions are the maximum for the given position of the “quantity” screw.
Simply rotating it back and forth.
We check by rotating the “quality” screw in different directions whether the set idle speed is maximum
If not, then we carry out the above adjustments again.
Adjustment in this way is very simple, but at the same time convenient, since it does not require special equipment.
If, after such an adjustment, the content of CO and CH emissions does not correspond to the norm or the idle speed cannot be adjusted, then it is necessary to check:
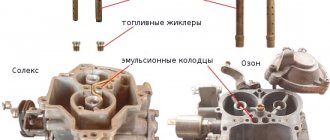
— whether the fuel and air jets of the main dosing system are dirty; — whether the main fuel jets of the first and second chambers are reversed; — whether the fuel level in the float chamber is increased; — Is the needle valve working? - Is the fuel jet of the idle system clogged; — whether the holder of the fuel jet of the idle system or the solenoid valve has turned away; — whether the tubes have come off the electro-pneumatic valve; — whether the rubber o-ring on the fuel mixture “quality” screw is damaged.
— In some cases, it makes sense to modify the carburetor idle system. See “Modification of the idle system of Solex and Ozone carburetors.”
Five more articles on the site on adjusting and tuning carburetors 2105, 2107 Ozone
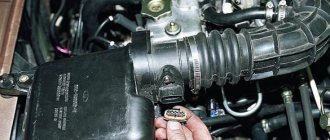
EPH sensor is faulty
The idle speed economizer or idle speed sensor is located under the hood of the VAZ 2107 and is screwed to the side of the carburetor. It is a small cylindrical electromagnet screwed into the unit. On the back side of the valve there is a contact, the wire from which goes to the power circuit of the ignition switch.
EPHH control unit: 1 — block outputs; 2 - body; 3 - printed circuit board with microelectronic elements.
If the carburetor cannot be adjusted in any way or the VAZ 2107 does not idle, and the idle speed disappears very quickly or the engine is unstable, then it makes sense to start the engine and try to unscrew the valve a little. If the operation of the carburetor engine is restored, tighten the valve with a little force and try changing the amount of mixture. In 90% of cases, the carburetor starts working correctly again.
Another case is complete valve failure. To do this, you need to check it. You need to connect it directly to the battery. If clicks are heard, then the valve is working. Try screwing it into the carburetor and starting the engine. If successful, you need to look for a break in the electrical wiring and then you won’t need to adjust xx.
Adjusting the idle speed of the VAZ 2107
Today we will talk in detail about how to independently adjust the idle speed on a VAZ 2107. It is worth noting that the adjustment on the car is made after carburetor repair, as well as when the engine is idling unstable. Theory
The crankshaft rotation speed at idle should be in the range of 820–900 rpm, and the carbon monoxide (CO) content in the exhaust gases should be in the range of 0.5–1.2% (at 20 °C 760 mm Hg) . Adjusting the idle speed on a VAZ 2107 car is carried out using the adjusting screws for the composition (quality) and quantity of the carburetor mixture. On the new carburetor, plastic bushings are pressed onto the screws, which limit the rotation of the quality screw to 50°, and the quantity to 90°. This is done in order to maintain factory settings during the warranty period.
Adjusting the idle speed should be done on a warm car engine, with the carburetor air damper fully open. To adjust the idle speed, you will need a multimeter and a gas analyzer.
How to adjust the idle speed of a VAZ 2107
1. Prepare the car for adjustment.
2. Before adjusting the idle speed, we check the ignition timing and, if necessary, on the VAZ 2107 we adjust the ignition timing.
3. Connect one probe of the multimeter in the mode for determining the crankshaft rotation speed to the terminal of the primary winding of the ignition coil, and the other to ground.
4. Insert the gas analyzer sensor into the exhaust pipe and turn on the gas analyzer.
5. Start the car engine.
Note:
In the absence of a multimeter, we control the crankshaft rotation speed using the tachometer on the car’s instrument panel.
7. By rotating the mixture composition (quality) screw with a slotted screwdriver, we achieve the required concentration of CO in the exhaust gases. At the same time, the engine speed of the VAZ 2107 will change.
8. By repeating the operations specified in paragraphs 6 and 7, we achieve the required values of the crankshaft speed and CO concentration in the exhaust gases.
9. If it is not possible to adjust the idle speed on the VAZ 2107 within the limits allowed by the restrictive bushings, remove them and make the adjustments again.
10. To check the correct idle speed adjustment, sharply press and release the gas pedal on the car. The engine should increase the crankshaft speed without interruption, and the engine should not stall when the pedal is released.
Let us remind you that the previous article was about cleaning the fuel filter of a VAZ 2107 carburetor with your own hands.
Reassembling the carburetor in reverse order
After the carburetor has been removed, disassembled and cleaned, it must be reassembled. As owners of carburetor cars note, it is not always possible to do this correctly the first time. The fact is that the order in which certain tubes and hoses are connected is of great importance:
A new gasket is installed at the mounting location. You can install the old one, but only if it is not damaged or deformed.
The carburetor is threaded onto studs and pressed tightly against the gasket.
Using a 13mm wrench, attach four nuts to the studs one by one. After the carburetor takes a stable position at the intake manifold, the nuts are well tightened.
The end of the throttle linkage is screwed to the desired connector with a slotted screwdriver.
Next you will need to connect the ventilation hose, air flow vacuum tube and economizer.
After this, the throttle valve spring is inserted into the cavity of the first combustion chamber and fixed there using clamps.
The air damper drive rod must be screwed with a special screw.
Next, attach the fuel supply hose: it is important to secure the clamp well to the product.
Finally, the tip of the wire is connected, which comes from the solenoid valve.
Thus, if you follow the instructions, it is quite possible to assemble the carburetor with your own hands the first time. For new and inexperienced drivers, it is recommended to mark the hoses and tubes with different colors to make the assembly process easier.
Today, DAAZ carburetors are used less and less, as they are being replaced by more modern and efficient power units. However, the simplicity of the device and the clear operating principle of this mechanism are still popular among experienced drivers.
Idling is a mode of engine operation in which there is no load on the crankshaft. It is necessary to maintain the combustion of a minimum amount of fuel so that the engine does not stall and the battery does not have to be used to restart. Unstable idle speed leads to the engine stalling or running intermittently, so periodically adjusting the idle speed on the VAZ 2107 (carburetor) is required. Today you will find out why there is no idle speed on a VAZ 2107 car with a carburetor and how to adjust it.
Checking engine systems
The car engine runs on gasoline; the composition and quality of the fuel does not always meet the standard requirements. A clogged carburetor can lead to unstable engine operation. Depending on how clogged the carburetor is, this can manifest itself in different ways, even to the point that the engine may stall.
Reasons for unstable idling of the VAZ 2107 car:
- the air filter is clogged;
- the strainer, jets and their channels are clogged;
- incorrect fuel level in the float chamber;
- difficulties or limitation of valve travel in the EPH;
- air suction through tubes, membranes or damaged gaskets;
- incorrect gap between contacts or their burning;
- bad candles;
- incorrectly adjusted ignition.
Before you start adjusting the idle speed, you need to eliminate the problems listed above, if any, otherwise you will not be able to achieve the result.
Carrying out diagnostics
The simplest method is to measure the voltage at the block to which the regulator is connected. These are terminals D and A. When the ignition is turned on, a voltage of 12 V should be present on them. If the voltage is less than this value, it is worth looking at the battery and generator. It is quite possible that the battery is undercharged. In the same case, if there is no voltage at all, it is necessary to check the entire power circuit of the device and diagnose the ECU.
Set the multimeter to resistance measurement mode. Between pairs of terminals A and B, C and D, there should be a resistance of approximately 53 ohms. Remove the IAC and connect (with the ignition off) to the block. Then turn on the ignition and look at the behavior of the needle - it should extend completely when voltage is applied. If this does not happen, we can judge that the IAC is broken.
To check and replace the regulator itself, you will need to dismantle the throttle assembly and disconnect the device from it. The following tools and resources will be needed:
- screwdriver with Phillips bit;
- slotted screwdriver;
- round nose pliers;
- socket wrench or socket 13;
- multimeter with the ability to measure resistance;
- calipers (you can use a ruler);
- clean dry cloth;
- coolant for topping up (maximum 500 ml).
To remove the throttle assembly, you must:
- Raise the hood and disconnect the negative cable from the battery.
- Using a slotted screwdriver, hook the end of the throttle cable and remove it from the gas pedal pin.
- On the throttle block, use round pliers to disconnect the clamp on the throttle valve drive sector.
The fastener is detached using pliers or a screwdriver - Turn the sector counterclockwise and disconnect the cable end from it.
To disconnect the tip, you need to turn the drive sector counterclockwise - Remove the plastic cap from the cable end.
- Using two 13mm wrenches, loosen the cable fastening on the bracket.
To loosen the cable, you need to loosen both nuts - Pull the cable out of the bracket slot.
To remove the cable, it must be removed from the bracket slot - Disconnect the wire connectors from the IAC connectors and the throttle position sensor.
- Using a screwdriver with a cross-shaped bit or pliers (depending on the type of clamps), loosen the clamps on the coolant inlet and outlet fittings.
Remove the clamps. In this case, a small amount of liquid may leak out. Wipe off any spills with a dry, clean cloth. The clamps can be loosened with a screwdriver or pliers (round pliers) - In the same way, loosen the clamp and remove the hose from the crankcase ventilation fitting.
The crankcase ventilation fitting is located between the coolant inlet and outlet fittings - Using a Phillips-head screwdriver, loosen the clamp on the air supply pipe.
Remove the pipe from the throttle body. The air pipe is fixed with a worm clamp - Similarly, loosen the clamp and remove the hose for removing fuel vapors from the fitting on the throttle assembly.
To remove the fuel vapor exhaust hose, you need to loosen the clamp - Using a socket wrench or a 13mm socket, unscrew the nuts (2 pcs) securing the throttle assembly to the intake manifold.
The throttle assembly is attached to the manifold using two studs with nuts - Remove the throttle body along with the sealing gasket from the manifold studs.
A sealing gasket is installed between the throttle assembly and the manifold - Remove the plastic bushing that defines the air flow configuration from the manifold.
The plastic sleeve sets the air flow configuration inside the manifold - Using a Phillips-head screwdriver, remove the two screws securing the regulator to the throttle body.
The regulator is attached to the throttle body with two screws - Carefully remove the regulator, being careful not to damage the rubber O-ring.
A rubber sealing ring is installed at the junction of the IAC with the throttle assembly
Adjusting the idle speed yourself
The idle speed setting is performed as follows:
- The minimum speed is set with the carburetor mixture quality screw, at which the engine begins to operate unstably, but so as not to stall (indicated by number 2 in the figure).
- Increase the rotation speed by adding a mixture (indicated by number 1 in the figure).
Repeat this procedure, with the mixture quality screw, until the engine runs stably and when you press the gas pedal sharply, the car should not stall and there are no failures in its operation.
This adjustment method is used very often and with normal driver experience, a positive result is guaranteed.
Choosing a replacement regulator
On the VAZ-2110 with both 8-valve and 16-valve injection engines, a sensor with catalog number 2112-1148300 is used. Additionally, at the end of the marking there is a prefix consisting of two numbers, for example, 01, 02, 03, 04. This index indicates the manufacturer of the regulator (01 and 03 - “Pegasus”, 02 and 04 - KZTA). When choosing a replacement regulator, pay attention to two nuances - the seal and the height of the needle protrusion above the body. Factory spare parts use a red seal, while counterfeits use a black rubber element. The height of the needle protrusion above the body is 23 mm.
Before installing a new regulator, it is recommended to coat the sealing ring with a thin layer of engine oil to ensure a tight fit of the part in the seat and eliminate the possibility of air leaks.