The fuel filter is one of the most important parts in any car, including the Lada Priora. It is this that prevents all kinds of debris that accumulates in the fuel tank from entering the engine, thus preventing damage to the sensitive elements of the car. However, over time it can become clogged, in which case you may need to replace the fuel filter.
This problem affects absolutely all cars, regardless of the engine (8 or 16 valves), the type of car (sedan, sports hatchback, etc.), with or without air conditioning and other additional elements. Today we’ll talk about how to correctly replace this element on a Lada Priora, and what nuances need to be taken into account before or during the procedure.
Operating principle of the fuel filter
The fuel equipment of new Lada 2170 cars is very sensitive to such impurities, reacting with coked injectors and deposits on engine parts. To reduce their harmful effects, filters are installed on cars that finely purify the fuel.
In this case, the cleaning element itself becomes clogged quite quickly and cannot perform its functions fully, so periodic replacement of the fuel filter on Priora is necessary.
Experts recommend changing the Priora fuel filter no earlier than after 25 thousand kilometers. However, in our realities, such a replacement sometimes has to be made much earlier, guided by some factors indicating the failure of this part of the fuel system:
- The operation of the power unit at idle speed is not only difficult, but in some cases it is simply impossible.
- Weak dynamics during acceleration, “dips” appearing when trying to quickly gain speed.
- Starting the engine is difficult.
- Increased gasoline consumption.
- Decrease in power of the power unit.
If it happens that your car is at the service station, and you need to go on business urgently, use the rental service without a driver https://rentavtoclub.ru/arenda-bez-voditelya/. This way you can maintain comfort and speed of movement.
All these factors together, individually or in any combination, may indicate the need to replace the fuel filter on the Lada Priora. The fuel filter must protect the engine injection system injectors from corrosion by trapping even the smallest drops of moisture. In addition, it must filter fuel from microscopic mechanical inclusions that the primary filter element could not retain.
There are many fine filters available, and they differ not only in appearance, but also in design:
- Systems with automatic injection are characterized by increased fuel pressure, so the housings of these filters are made only of metal, and the joints in their structure are welded or rolled. Recently, filters have appeared with a body made of high-strength plastic, non-separable, like metal ones.
- Inside the filter there is an “accordion” made of special filter paper that can trap particles up to 10-15 microns in size. This type of curtain is laid inside the body in a spiral or star pattern.
- The service life of the fine fuel filter depends on how the paper “accordion” is laid. Spiral laying allows the element to be replaced no earlier than 40 thousand kilometers, while star laying reduces the life of this part to 25 thousand km. This factor can be easily explained by disassembling the filter. When laid in a spiral manner, it will contain almost twice as much filter material, while its quality is much higher.
Lada Priora cars are equipped with filters from the BIG FILTER company, which can operate normally on good fuel up to 60 thousand kilometers. The filter model depends on the material of manufacture and its design features:
- GB-320 – metal body;
- GB-332PL – high-strength plastic casing;
- GB-3198 – iron body with galvanized coating.
The price of a Priora fuel filter depends on the design, model and manufacturer and ranges from 200 rubles.
Oil filter for Lada Priora 8 and 16 valves: original, analogues - which is better?
LADA Priora has been produced since 2007 to the present day. The car is equipped only with gasoline engines. There is an 8- and 16-valve version of the power plant. The oil filter model does not depend on the vehicle modification.
Oil filter for Priora 8 and 16 valves
Regardless of whether the Lada Priora has an 8 or 16 valve engine, the car is equipped with the same oil filters. In the original configuration, filters from 2 manufacturers can be installed off the assembly line:
LADA 2108-1012005-08 – . Cost – from 160 rubles. Has a lot of negative reviews. The main disadvantages are oil leakage along the rolling contour and low quality filter paper.
JSC Avtoagregat is a large Russian manufacturer of filter elements for the automotive industry. It is a supplier of original filters for many manufacturers, including AvtoVAZ.
Salute 2108-1012005-010 – . Average price - from 160 rubles. It has an original bypass valve design, which ensures constant oil flow through the filter, even when the filter components are clogged. Reviews about this filter model are different. The main disadvantage is the poor quality of filter paper. It often breaks during operation. Also uneven placement of the filter element.
CJSC SALYUT-FILTER is a Russian enterprise that specializes in the production of automobile filters. Has been supplying oil filters to the assembly line for VAZ cars since 1997.
Oil filter LADA 2108-1012005-08
Oil filter Salyut 2108-1012005-010
| 93 mm | 62 mm | 1.2 bar | 3/4″-16UNF |
When choosing an oil filter for LADA Priora, you should pay attention to the following substitutes:
- BIG Filter GB-102M. Price – from 120 rub. Manufacturer: Russian company BIG Filter. A popular substitute among Lada Priora owners. According to customer reviews, the quality is above average. Among the shortcomings is a weak rubber sealing ring.
- FRAM PH5822 Price – from 170 rub. Reviews about this filter model are both positive and negative. The main disadvantages are that the filter element has a small total area and is not dense enough.
- Mann W914/2 Part price – from 170 rubles. High-quality foreign analogue for Priora. Customer reviews are only positive. It has good quality synthetic filter paper, as well as an opening pressure of the bypass valve of 1.2 bar.
Oil filter BIG Filter GB-102M
Oil filter FRAM PH5822
Oil filter Mann W914/2
According to the Lada Priora maintenance regulations, the oil filter must be replaced every 10 - 15 thousand kilometers, or after 12 months of operation (whichever comes first). As a rule, it changes along with the oil. A clear sign of a poorly functioning oil filter is when starting the engine for at least 5 seconds. The oil pressure warning light does not go out.
Even more useful tips in a convenient format
Subscribe
Did not find an answer to your question?
Popular instructions
for repair of VAZ (Lada) Priora
WHEN YOU NEED TO REPLACE THE FUEL FILTER
The car's operating instructions require replacement after 30 thousand kilometers. But I would like to warn Prior owners that this is not always true. For various reasons, this sometimes has to be done much earlier.
Their service life depends largely on the way in which the paper filter element is installed. If it is laid with a curtain, the filter will work properly for approximately 40 thousand km. If the paper element is laid in an asterisk pattern, the service life will be approximately 25 thousand km. This is the case when the gasoline used by the vehicle is close to ideal.
Fuel filter from inside
Unfortunately, the fuel at our gas stations is still far from ideal, and often replacing the fine fuel filter on a Priora occurs much earlier. There are a number of signs that should alert the owner and prompt the idea that it is time to think about replacing the filter element. These are the following disturbances in engine operation:
- No stable idle speed;
- Acceleration is impossible due to failures in engine operation;
- Difficulties when starting the engine;
- Fuel consumption increased significantly, without significant reasons;
- The motor does not produce the declared power.
We recommend: Self-replacement of the coolant temperature sensor: 2 types and 7 signs of their malfunction
All this taken together, or each sign separately, should prompt the driver about the need to replace the fuel purification element.
Operating principle of a lambda probe
The main task of the lambda probe is to determine the chemical composition of exhaust gases and the level of oxygen molecules in them. This figure should range from 0.1 to 0.3 percent. Uncontrolled excess of this standard value can lead to unpleasant consequences.
During a standard car assembly, the lambda probe is mounted in the exhaust manifold in the area where the pipes connect, however, sometimes there are other variations in its installation. In principle, a different arrangement does not affect the operating performance of this device.
Today you can find several variations of the lambda probe: with a two-channel layout and a broadband type. The first type is most often found on older cars produced in the 80s, as well as on new economy class models. A broadband sensor is typical for modern mid- and high-class cars. Such a sensor is capable of not only accurately determining the deviation from the norm of a certain element, but also promptly balancing the correct ratio.
Thanks to the hard work of such sensors, the vehicle's operating life is significantly increased, fuel consumption is reduced and the stability of idle speed is increased.
From an electrical engineering point of view, it is worth noting that the oxygen sensor is not capable of creating a uniform signal, since this is prevented by its location in the collector zone, because a certain number of operating cycles may pass in the process of reaching the device with exhaust gases. Thus, we can say that the lambda probe reacts rather to destabilization of the engine, which it subsequently notifies the central unit about and takes appropriate measures.
Step by step replacement
Instrumentation and preparation
To replace you need:
- key to “10”;
- container for draining, in case there is gasoline in the fuel line.
Before changing, you need to reduce the pressure in the system, otherwise you may be flooded with gasoline. The pressure can be easily relieved by simply disconnecting the fuel pump power connector and turning the starter for 3-6 seconds. Or wait about half an hour after turning off the engine, the pressure will drop on its own.
detailed instructions
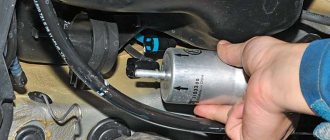
- We find the fine fuel filter on your Priora and press the retaining fuel hose onto the clamp.
- Holding the clamps and pulling the hose to the side from the filter, remove it.
- We do the same on the second side, pressing on the two clamps at the base of the fuel hose.
- We disconnect the fuel hose.
- Using a “10” wrench, unscrew a couple of bolts of the filter mounting bracket. Let's take it out.
- We install the new filter in place and screw everything in the opposite order of removal. We check that the arrow on the filter housing is in the direction in which the fuel flow is spreading.
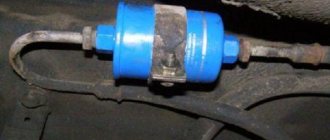
Newly installed fine fuel filter
You can easily replace all the parts yourself; the process does not take much time and saves your budget.
Important information
After assembly, you need to start the engine and make sure that there is no fuel leakage. If it is detected, it is necessary to double-check the quality of the hose connections. If this does not help, you need to change the rubber O-rings that are located on the tips of the fuel pipes. Since the tips on the tubes are fragile, they can break and this leads to the need to replace all the hoses.
Why are they needed at all?
Forced fuel cleaning is a necessity to ensure the performance of any engine running on liquid fuel. Filling the filter cavity, gasoline passes through a layer ( there may be several
) filter material, leaving on its surface particles of dust, dirt and other solid inclusions that have a detrimental effect on engine parts.
If the “food” ration of a car engine is diesel fuel, then an additional separator is required, which will help clean the fuel, in addition to mechanical inclusions, from water content.
Its operating principle is based on the fact that water is heavier than diesel fuel, and centrifugal force helps separate them from each other. Due to the specific operation of separators, most of them are heated.
What is needed for replacement
Before starting work, you need to buy the necessary things. Required:
- Standard set of keys;
- It is advisable to have a jack;
- Special stand for the vehicle
This concerns the main tool, without which it is impossible to imagine the process of replacing the fuel filter. As an additional tool, it is advisable to have:
- Work clothes;
- A small piece of plywood;
- WD – 40 or similar product;
- A container into which the liquid will be drained;
- And the fuel filter itself
Procedure for replacing the fuel pump mesh
The procedure for replacing fuel filters looks like this:
- Purchase of spare parts.
- Choosing a workplace.
- Preparing the tool and vehicle for disassembling part of the fuel system.
- Removing the electric fuel pump and installing a new filter.
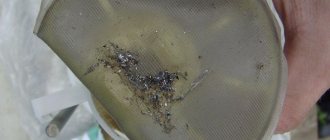
If the gasoline pump mesh is not changed in time, the suction pipe may become clogged with dirt.
Since the FTO is located on the bottom of the car, replacing it will require a lift, inspection hole or overpass. Replacing the fuel pump mesh can be done by simply placing the car on a flat surface. In this case, the gas tank must be at least half empty. Otherwise, when manipulating the FGO, you can spill fuel on the casing, and a persistent smell of gasoline will appear in the cabin.
Preparing for work
You can dismantle the electric fuel pump in any convenient place, observing fire safety measures.
The following tools will be required:
- two screwdrivers - flat and figured;
- pointed pliers or round nose pliers;
- socket or socket wrenches for 10, 12 and 13;
- car vacuum cleaner and rags.
To dismantle the electric fuel pump you will need a minimum set of tools
Preparing the car involves providing access to the top hatch of the gas tank. To do this, the rear seats are removed and the surface under them is cleaned with a vacuum cleaner. This will prevent debris from entering the tank.
The hatch under the seats is covered with a layer of dust that needs to be removed
Then the fuel supply system releases the pressure that remains after the engine stops. If this is not done, then when you remove any tube, gasoline will splash out. Pressure can be relieved in three ways:
- The electrical connector is disconnected from the fuel pump. The engine starts and runs until it stops completely.
- The fuel pump can be turned off by removing the corresponding fuse. The car starts and runs until the remaining fuel in the lines is completely exhausted.
- A universal option is to relieve pressure through the diagnostic fitting on the ramp. The hood opens and the cap is removed from the valve at the end of the ramp. The pressure will decrease when pressing on the spool with a screwdriver - in this case you need to place a small container. The cap is then screwed into place.
The valve is a regular spool closed with a plastic cap
Procedure for removing the mesh
To get to the metal hatch located under the rear seats, you need to fold back the floor flap at the right (in the direction of travel) door. Further operations are performed in the following order.
- Use a Phillips screwdriver to unscrew two self-tapping screws that press the cover to the bottom of the car. The hatch is removed and moved to the side.
The hatch covering the fuel pump is screwed on with two self-tapping screws.
- The bolt on the negative terminal of the battery is loosened, and the battery is disconnected from the on-board power supply. The plastic tab on the fuel pump power connector is bent and the block is disconnected.
The block is easily removed from the socket
- The fuel hoses are disconnected. On the supply hose, the plastic stopper is first unlocked, then the wire lock. The return hose is secured with a metal clamp, which must be carefully squeezed with pliers to remove the pipe.
To remove the tubes, you need to bend the wire retainer
- The eight nuts holding the mounting flange are unscrewed, and the washers are removed from the studs (they may get lost). The flange is dismantled.
The flange holds the pump housing and is secured with eight nuts
- Having remembered the correct position of the plastic cover, the electric fuel pump is removed from the tank. When the body is halfway out of the opening, tilt the tank and pull out the float. To prevent debris from entering the tank, cover the hole with a clean rag.
When demolishing, the electric fuel pump housing rises up and then tilts to the side
- To remove the suction pipe with filter from the glass, the internal connector is disconnected. Then you should simultaneously press on the ends of the four plastic latches and pull out the pipe.
The glass is attached to four plastic latches that must be pressed simultaneously
- The contaminated mesh is removed from the tube and replaced with a new one. Fitting the filter is accompanied by a characteristic click.
The mesh is put on the suction pipe by hand and fixed
- The inner surface of the glass is cleaned of dirt. Assembly of the unit is carried out in the reverse order.
Having removed the hatch cover at the very beginning of disassembly, pause and clean all the dust from the opened opening. Otherwise, some of it will inevitably end up in the tank.
Assembly should be performed carefully, preventing foreign objects from entering the gas tank. After installing the pump flange, attach a ground wire to any stud. After removing traces of fuel, you need to check the tightness of the connections. When the ignition is turned on, the operating pump will begin to increase pressure, and gasoline may leak out through loose joints.
After replacing the mesh, the engine is started and its operation is checked in different modes.
The technology for replacing FGOs on engines with 8 and 16 valves is absolutely the same. There is only a minor difference in the location of the fuel rail diagnostic fitting, which does not affect the procedure.
And now in more detail
Lada Priora Sedan constructor, assemble it yourself Logbook Mileage and clutch replacement
How can I check the functionality of this device? The fundamental element in the absorber is the valve. To understand the function, let’s look at how the adsorber works. When a car is parked, a huge amount of gasoline vapor can accumulate in its tank. Some of the vapor is caught by the recuperator, and the rest settles back into the tank. The part that was caught goes into the adsorber. When the engine is running, the absorber valve closes and interrupts the access of vapors, now they are sent to the combustion chamber. What is it for? When you start the car, our device prevents vapors from entering the exhaust manifold, thereby reducing the amount of harmful substances in the gas.
In a car, the adsorber absorbs fuel vapor from the gas tank ventilation system and supplies it to the intake, because according to environmental standards, the gas tank must be isolated from the atmosphere.
From Wikipedia;
Adsorber (from Latin ad - on, with and sorbeo - absorb) is a device for absorbing (thickening) a surface layer of a solid, called an adsorbent (absorber), of dissolved or gaseous substances, not accompanied by a chemical reaction. The adsorber is used in chemical, oil refining and other industries. The process occurring inside this apparatus is called adsorption.
Gasoline vapor filtration system. The diagram is quite conventional, but it reflects the essence. Gasoline vapor from the tank passes through a carbon filter, is cleaned and supplied to the inlet through a solenoid valve controlled by the ECU.
Now the first question is - why filter gasoline vapors if they still go into the intake? The answer is simple - adjusting the internal combustion engine control program by adding the nth number of clean air at the inlet is much easier than making adjustments based on the fuel-air mixture (gasoline vapor from the tank) of an unknown proportion.
And now the answer to the main question - why delete it? So, although some manufacturers claim that this device will have enough resources for the entire life of the car, we know that they are lying)
In general, over time, the adsorber becomes clogged and stops passing air. As a result, we get excess pressure in the tank, which interferes with the normal operation of the fuel pump. In the cabin (sometimes under the hood) we get a periodic smell of gasoline, the vapors of which are squeezed out of the ventilation tube. And the engine starts running on a rich mixture due to lack of air.
Now guess how our country solves this problem? That's right, most people simply throw out the adsorber and turn off the system as shown in the diagram:
A fuel filter from a carburetor classic is usually placed on the tube from the gas tank, and the solenoid valve, through which clean air should flow into the engine, is simply shut off with a bolt.
In the picture I already wrote that this is wrong and here’s why. This method of removing the adsorber only partially solves the problem. Yes, the smell of gasoline disappears, the tank is ventilated, but no air is supplied to the intake and the engine continues to run on a rich mixture.
And now the following diagram:
And now it already shows how it SHOULD be done. The same filter from the classics is put on the hose from the valve to the adsorber, which now serves as an air filter and prevents dirt from getting into the receiver. This is how the fuel-air mixture is brought to normal parameters.
Well, now a couple of visual photos of what it all really looks like:
Everything is clear here, one tube goes to the gas tank, the second through the valve to the engine.
Bottom part of the adsorber. There is a fitting for supplying air from the atmosphere so that a vacuum is not created in the adsorber.
So this is all done on my machine. I didn’t take a photo of the tube from the tank, it’s hard to get to it even without a phone
How to determine the need for replacement
Each malfunction in a car has its own characteristic features, from which we can conclude that it is necessary to replace certain components. Fuel filters are no exception, the clogging of which manifests itself as follows:
- the car moves jerkily at high speeds with subsequent problems when driving at low speeds;
- increased noise level of the fuel pump.
In accordance with the maintenance regulations, the fuel filter on the Lada Priora is replaced every 30,000 km. However, in fact, the need for this procedure occurs much earlier; regular use of the car, combined with the low quality of fuel that our gas stations “sin” with, leads to rapid clogging of this element.
The cost of a fuel filter for a Lada Priora is about 250 rubles - not the most serious reason for saving. And you can replace it yourself. Next, we’ll talk about how to do it yourself.
Instructions for replacing the fine fuel filter
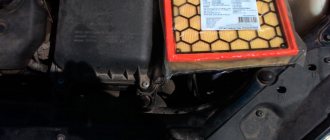
First of all, you need to know where the fuel filter of the Lada Priora car is located. To gain access to this element, it would be best to install the car in a garage pit. The filter for fine purification of gasoline in the Lada Priora car is located under the bottom, above the rear beam.
Before you begin replacing the part, you must relieve the pressure in the vehicle's fuel system. To do this, either leave the car idle for 4 hours, or you will have to perform the following manipulations:
- Pull out the fuel pump fuse (it is installed in the additional mounting block).
- Turn on the ignition and start the car engine.
- Let the power unit run at low speeds until it stops completely.
- Check if the engine can start by cranking the starter for a few seconds.
- It is best to replace the Priora fuel filter by watching the video. However, even without this, you can do this work efficiently and quickly by taking a 10mm socket wrench and using these instructions.
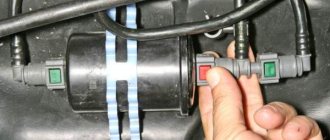
- The hose ends must be removed. To do this, press the latches installed at their ends.
- Using a “10” wrench, you need to unscrew the bolt of the clamp securing the filter.
- Remove the fine filter.
To install a new filter element, you must repeat all the steps in reverse order. It is necessary to pay attention to the direction of fuel flow. As a rule, an arrow indicating the direction is marked on the fuel filter. On Priora, the time to replace this part will be no more than 30 minutes; see for yourself by watching the video of this process.
Now you know how to change the Priora fuel filter. Agree that the low price of the filter allows it to be replaced more often than prescribed by the manufacturers of the cleaning elements. This will save the fuel system from premature failure.
Camshaft and crankshaft sensors on Lada Kalina (8 valves): description and replacement nuances
Phase sensor (camshaft position)
Camshaft Sensor You will find this part on the left side of the cylinder head. The operating principle is quite simple. There is a special pin on the camshaft itself. When it passes by the sensor, but sends a signal to it. This moment corresponds to compression of the piston of the first cylinder.
The controller determines the camshaft angle. This is important information for machine systems and sensor failure has certain consequences. The information is sent to the vehicle's ECU, which uses it to control the ignition and fuel supply to each cylinder.
In what situations is replacement required?
If this part fails, you will see a “Check” indicator on the vehicle’s instrument panel. This is how the ECU signals the driver that the engine needs to be checked. At the same time, the fuel supply pattern changes - it goes to all cylinders simultaneously and, as a result, consumption increases.
The cause of the breakdown may be mechanical damage, as well as other things. There is no point in trying to repair the old unit itself - it costs little and you will waste more nerves and time.
In the video below you will find instructions for replacing this part (the author of the video is Alexandr V).
Replacement instructions
To replace the camshaft sensor, you only need a "10" key. It is better to use a socket with a collar or a ratchet. It will be inconvenient to work with a regular key, although it is still quite possible.
The dismantling and installation procedure is as follows:
- First, disconnect the block with wires by pressing the latch and slightly pulling it up;
- now, using the key, unscrew the part itself;
- it can be pulled out by slightly pulling towards the windshield;
- installation is carried out in the reverse order of steps.
There are no difficulties in this process, but be careful not to damage both the block with wires and the connector for the controller itself on the cylinder block.
Crankshaft position sensor
Crankshaft position corrector separately Although this controller fails quite rarely, its failure can lead to the most unpleasant consequences. You may simply end up in the middle of the road with no way to continue driving.
This element is installed on the oil pump cover. The DPKV transmits information to the ECU so that it can synchronize the fuel supply. Inductive type sensor. As mentioned above, it rarely fails, but this becomes a big problem.
In what situations is replacement required?
If this DPKV is completely out of order, you will not be able to start the engine at all.
But even if it just works intermittently, this can be recognized by a number of signs:
- poor engine starting;
- unstable work;
- power reduction;
- detonation with increasing load.
If you notice such signs and there are no other reasons for them, change the sensor. You can check it by testing the resistance of the windings. If the ohmmeter readings differ from 550-570, then the part is faulty. Fortunately, it costs little and replacement can be done very quickly.
Replacement instructions
To replace this part, you will again need a "10" key and nothing else.
- Turn off the ignition. Then disconnect the wire block by pressing the latch.
- Now, using a wrench, unscrew the fastening bolt.
- All that remains is to remove the old DPKV and install the new one in the reverse order.
In the video below you will learn how to check the performance of the DPKV (the author of the video is IZO)))LENTA).
Loading …
avtozam.com
TYPES OF FUEL FILTERS
An important component in the power system, such as a fuel purification filter, is produced by many domestic and foreign manufacturers. On store shelves you can find products from such companies as:
- Russian BIG INTER GB-302. The filter element is made in the form of a multi-beam star;
- BOSCH 0986 450 is produced in Germany. The filtration element is also represented by a multi-beam star;
- Also produced in Germany is the CHAMP FN Multi-beam star filter that copes well with the task;
- FILMAR FF is produced in the European Union. The filtration element is made in the form of a multi-beam star;
- Polish manufacturers offer a gasoline filter for the Priora FILTRON PP. It has insignificant hydraulic resistance to fuel flow;
- “Nevsky Filter” NF 06m is produced in Russia. It is an inexpensive product and has also proven to perform well in operation;
- Also produced in Russia by Federal State Unitary Enterprise UFP "Gidravlika" 2112-1117010-03. The multi-beam star of the filter element cleans the supplied fuel well.
At the Volzhsky Automobile Plant in Togliatti, during assembly, filter elements from the BIG FILTER company are installed.
They can be of three types:
- GB-320 is made of metal;
- GB-332 PL has a plastic housing that can withstand high pressure in the fuel line;
- GB-3198. The body of this product is galvanized iron.
They are also installed on foreign cars, for example, AUDI, Ford and others. If you fill the tank with high-quality gasoline, the service life of these products can be about 60 thousand km.
You can list quite a lot more brands, but then you’ll have to write a separate article about them. You can purchase a fine fuel filter for a Priora at a price from 390 to 550 rubles per piece. The price depends on the fuel filter manufacturer. Priora owners need to learn this detail. Fine gasoline filters for carburetor and injection engines differ in design, appearance and internals.
Specialists servicing the engine and its systems recommend installing the same filter as the one currently installed on the car. To see the markings, you need to climb under the bottom of the car. It is located on the bottom, next to the gas tank. In addition to the markings, you should pay attention to the fuel pipe fittings.
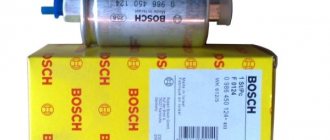
Prior owners speak well of a product such as MANN WK 512, which is able to clean gasoline from moisture, debris, rust and other particles.
Questions about choosing a new filter
Depending on the year of manufacture, gasoline filters of different designs were installed on the Lada Priora. To avoid making a mistake, look under the car. The differences will be in the way the fuel hoses are connected. A fine filter is installed near the fuel tank, closer to the rear suspension. It is secured to the tank with a metal clamp. Buy a filter of the same design that is installed on the car .
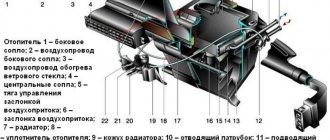
Number 8 in the figure indicates the location of the fuel filter
Filters from KNECHT and MANN have proven themselves well. Catalog number KNECHT KL 83, MANN - WK 512.
In most cases, the Lada Priora has a filter with connections through plastic fittings. Less commonly used is a threaded connection.
Frequency of replacement of fuel filters
The operating instructions for all front-wheel drive VAZ models indicate the service life of the fuel filter corresponding to 30 thousand kilometers. However, the manufacturer does not take into account the poor quality of gasoline, dusty, broken roads and difficult operating conditions of the car. For these reasons, the frequency of filter replacement is noticeably reduced.
According to the recommendations of professionals:
- The electric fuel pump grid should be changed at least every 70 thousand kilometers;
- the maximum mileage for a fine filter is 20 thousand km;
- When operating a car in the north or when constantly driving on dirt roads, the service life of the FTO compared to factory recommendations is halved and amounts to no more than 15 thousand kilometers.
Severely clogged mesh impairs the supply of gasoline to the injectors
Filters are also replaced when signs of premature clogging are detected in the form of lack of fuel during acceleration, driving under load or on an incline. The car begins to “stupid”, and when you press the accelerator pedal, popping noises may be heard from the muffler.
With such symptoms, you need to listen to the operation of the fuel pump before starting the engine. The pump takes more time to create pressure in the fuel lines, so its hum can be heard for quite a long time after the ignition is turned on. This means it's time to change the fuel filters.
Thus, the technology for replacing fuel filters is quite simple. The work can be done by almost any car owner with a couple of hours of free time and a standard set of tools. .
Every 60,000 km of vehicle mileage:
- perform maintenance operations after 20,000 km.
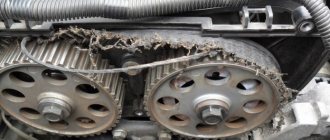
- Replace the timing belt and belt tension roller. The instructions for most Japanese diesel SUVs indicate the frequency of replacing the timing belt at 100 thousand km. However, such a recommendation is only valid if there is a successful combination of many determining factors: operating the car in a temperate climate zone, regular maintenance, using the original belt and roller, and the absence of antifreeze and oil leaks. In all other cases, it is better not to take risks and reduce the mileage between belt replacements to 60 thousand km, which is guaranteed to ensure engine serviceability. If the belt breaks, the engine always suffers severe damage due to the meeting of the valves with the pistons. After replacing the timing belt, fine adjustment of the timing of the start of the feed and the tension of the timing belt should be made. Adjustment of the moment when diesel fuel begins to flow on VE type pumps, used on 90% of SUVs, is done using a dial indicator of the plunger position. Screwing the central bolt of the front crankshaft pulley requires special care and strict adherence to the tightening torque, as well as the use of a special adhesive-sealant such as Loctite 262.
- Replace the coolant and flush the cooling system. Before draining it, you should check the tightness of the system by creating an excess pressure of 0.5 bar. Fix any detected leaks. After filling the cooling system and removing air pockets, check the operation of the thermostat. Blow out the engine radiator from the outside with compressed air.
- Check the operation of the turbocharger. When checking, the absence of oil ejection from the side of the compressor rotor is visually determined and the boost pressure is measured, which for various engines is 0.6 - 0.9 bar at more than 2500 rpm.
- Check engine smoke levels. If the maximum permissible smoke level is exceeded, remove and check the injectors. Smokiness is measured using special optical smoke meters that determine (in%) the opacity coefficient of the exhaust gases. The operation of diesel vehicles that exceed the smoke limit is unacceptable, especially since many stationary traffic police posts are currently equipped with portable smoke meters.
- Remove the injectors and check them (the operation is performed only if the smoke standard is exceeded). Injectors removed from the vehicle are checked on a special testing device, consisting of a single-section injection pump with a manual drive and a pressure gauge and a test chamber in which a visual assessment of the quality of the injector is made. The opening pressure of the injector is checked and its compliance with technical requirements, the absence of fuel leakage at a pressure lower than the opening pressure (so-called pressure testing), the nature and uniformity of spraying when the operating pressure is reached, the fuel supply is cut off when the pressure drops below the opening pressure of the injector. In all cases of non-compliance of its operation with technical requirements, the nozzle must be adjusted or repaired, most often with the replacement of the faulty nozzle. Before installing the injectors on the engine, you should install new heat sink washers under them, durite return drain hoses for European cars, or sealing washers under the metal return drain line for Japanese cars. Installation of old heat sink washers is unacceptable, because leads to rapid overheating and failure of the injector nozzle.