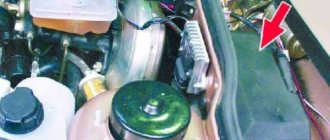
On all cars of the Tenth Family, the power lines for the lights contain many elements. There are lamp health relays, switches and fuses. Therefore, if the brake lights on a VAZ-2112 do not light up, you need to check the entire chain.
But the reason may look simple: sometimes the lamps do not turn on because the socket does not contact ground. Circuits are easy to analyze, but finding the cause of a breakdown is difficult. Let's look into the details.
If the lamps do not light, it is simply replaced.
Standard version of the brake light operating diagram
Power is supplied to fuse F17 from the battery, then the current goes to limit switch contact 11, and then, if the limit switch is closed, a circuit is formed with the filament of lamps 7. But note: part of the circuit is relay K1, more precisely, its contacts 5 and 4.
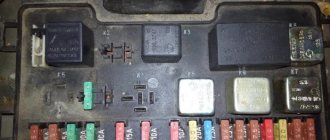
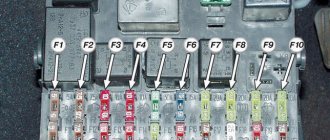
If the brake lights do not light up, on the VAZ-2112, as on all Tens, check one fuse. It is called F17 and is located in the mounting block to the left of the driver.
It is important to know: voltage is always present at one of the fuse terminals. Check it out!
VAZ 2110 2111 2112 - fuses and relays
VAZ 2110 2111 2112 (Lada 110 111 112) - a family of cars produced in 1995, 1996, 1997, 1998, 1999, 2000, 2001, 2002, 2003, 2004, 2005, 2006, 2007, 2008 and 2009 with sedan and hatchback bodies and a station wagon mainly with 8 and 16 valve gasoline engines (injector, carburetor). In this article you will find a description of the fuse and relay blocks of the VAZ 2110 2111 2112 with diagrams , photographs and their locations. Electrical connection diagram. Let's highlight the fuse responsible for the cigarette lighter.
p, blockquote 1,0,0,0,0 —>
p, blockquote 2,0,0,0,0 —>
The purpose of fuses and relays in your VAZ 2110 (2111 / 2112) relay may differ from those presented and depend on the year of manufacture. The current purpose can be printed on the block itself.
Main unit
The main block with fuses and relays is located in the cabin, on the left side, under the control panel. To access, press the latch switch.
A few words about the “serviceability relay”
The lamp health relay is called K1, and it is the largest in the mounting block. If you remove this relay, then when you press the pedal you can dial the voltage at terminal 5 (but not 4). Look at the diagram again, and it will become clear what we are talking about.
The largest relay in the block. All relay contacts are numbered. Check the voltage at the block terminals:
- – “mass” potential;
- – voltage “+12”, but only after turning on the ignition;
- – “+12” by pressing the pedal;
- – the terminal rings like a ground tap.
If the potential “0” is not generated at terminal “4,” it means that the lamp filaments are burnt out or there is a break in the wiring. Now consider something else: the ground potential has been detected, but the lamps do not light. This is where suspicions of a short circuit arise.
Electric sema VAZ 21102
| 1 — block headlight | 35 — instrument lighting switch |
| 2 - front brake pad wear sensors | 36 - ignition switch |
| 3 - reverse light switch | 37 - mounting block |
| 4 — electric motor of the engine cooling system fan | 38 - recirculation valve switch |
| 5 - sound signal | 39 — heater controller |
| 6 — gear motor for locking the right front door lock | 40 - hazard warning switch |
| 7 - power window relay | 41 — lamp illuminating the heater control levers |
| 8 - 8 A fuse | 42 — glove box lighting lamp |
| 9 - starter | 43 - glove compartment light switch |
| 10 - accumulator battery | 44 - cigarette lighter |
| 11 - generator | 45 — display unit of the on-board control system |
| 12 - windshield washer motor | 46 - ashtray lighting lamp |
| 13 — washer fluid level sensor | 47 — brake light switch |
| 14 — gear motor for locking the left front door lock | 48 — gear motor for locking the left rear door lock |
| 15 - left front door power window switch | 49 - left rear door power window switch |
| 16 — coolant level sensor | 50 — electric window motor of the left rear door |
| 17 - windshield wiper motor | 51 — socket for a portable lamp |
| 18 - recirculation valve | 52 - watch |
| 19 — micromotor gearbox for heater damper drive | 53 — electric window motor gearbox of the right rear door |
| 20 — electric heater motor | 54 — right rear door power window switch |
| 21 — trunk lock switch | 55 — gear motor for locking the right rear door lock |
| 22 - right front door power window switch | 56 - side turn signal |
| 23 — electric window motor reducer of the right front door | 57 - parking brake warning lamp switch |
| 24 — control unit for the door lock system | 58 — driver's seat belt sensor |
| 25 — additional resistor for the heater motor | 59 - directional lamp |
| 26 — brake fluid level sensor | 60 - interior lamp |
| 27 — electric window motor reducer of the left front door | 61 — cabin air temperature sensor |
| 28 - outdoor lighting switch | 62 — switch in the front door pillar |
| 29 — instrument cluster | 63 — switch in the rear door pillar |
| 30 - rear fog light switch | 64 — external rear light |
| 31 — fog light indicator lamp | 65 - internal rear light |
| 32 — indicator lamp for heated rear window | 66 — license plate lights |
| 33 — rear window heating switch | 67 - trunk light |
| 34 - Understeering's shifter |
How to and how not to check potential
Let’s agree right away that we only work with a voltmeter. Voltage “+12” is caused by connecting one probe to ground. The presence of potential “zero” is checked differently: any of the probes is connected to a terminal with positive voltage, and then the second probe is connected to the wire being tested.
Consider the error: one probe is connected to ground, the second to the terminal being tested, and vol. Here they conclude that there is a “mass” potential, but this is wrong! If the contact with ground is broken, the device will also show “0”. That is, the number “0” does not contain information.
LED indicators
Each of the indicators has its own meaning and a symbolic, intuitive picture.
When the indicator lights up, there is a malfunction in the following vehicle functions:
- Oil level.
- Washer fluid.
- Coolant.
- Doors.
- Headlights.
- Seat belts.
Data-lazy-type=”image” data-src=”https://vazremont.com/wp-content/uploads/2017/08/foto-3-3.jpg” alt=”LED indication bsk” width=” 533″ height=”330″ class=”lazy lazy-hidden aligncenter size-full wp-image-3746″ srcset=”” data-srcset=”https://vazremont.com/wp-content/uploads/2017/08 /foto-3-3..jpg 300w" sizes="(max-width: 533px) 100vw, 533px">
Wiring test on non-working brake lights
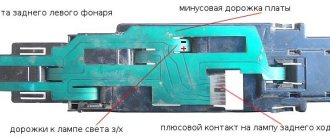
Let's look at the basic diagram: the brake lights and the reversing lamps have a common ground pin. If contact with this pin is broken, the reverse lamps will not turn on. Well, brake lights too.
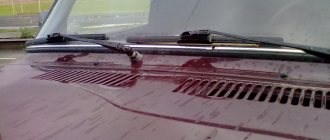
On the left side there is a connector through which the wiring goes to the fifth door. The connector has black and red wires. Check the voltages on them. Most often the ground on the black wire does not ring. But maybe the connector itself needs to be cleaned.
Usually, if the ground breaks, another pin is used - the one that is connected to the glass heating coil. If the “plus” does not come to the red wire, we check the “frog”. It's simple here:
- Disconnect the connector with two wires from the limit switch;
- Using 17mm wrenches, loosen the two nuts: holding the lower nut, rotate the upper one;
- The end switch is removed as an assembly and checked with an ohmmeter.
By the way, one of the connector terminals receives a voltage of “12 Volts”. Check it!
If all the steps do not lead to results, there is only one thing left: contact a qualified electrician. We wish you success.
What else can you do?
Another option for modifying the rear of the car is to install additional rear fog lights on the VAZ-2110. But such lighting elements will have to be purchased.
And then the PTFs are installed on the bumper and connected to the vehicle’s on-board network. Attaching additional lights to a standard bumper will not be easy, since you will have to cut holes for them. But you can also buy a tuning bumper, which has niches for PTF.
There are two ways to power the fog lights. The first one involves connecting them to the side lights. In this case, the fog lights will light up when the headlights are turned on.
In the second method, the PTF is also connected to the dimensions, but a power key is additionally embedded in the circuit, which is then installed on the dashboard.
Didn't find the information you are looking for? on our forum.
Replacing a headlight bulb - how it is done
Light bulb for rear light of VAZ 2110
To change the headlight bulb in the headlight, you need to perform the following steps:
- remove the battery;
- holding the lamp from behind, separate the wires in the block directly from the lamp;
- remove the rubber cover;
- remove the end of the spring retainer with the hook from engagement, move the retainer to the side;
- remove the light bulb from the headlight housing;
- install a new lamp, performing the reverse sequence of actions.
Note. If the side light bulb in the headlight turns out to be faulty, it must be replaced on site. Otherwise, you need to drive to where the repairs will be carried out with the headlight lamp turned off.
Methods for troubleshooting
Troubleshooting is not a complicated process and even novice car enthusiasts can do it (the author of the video is Avtoelektika VC).
Using a multimeter, you need to test the wiring. Damaged or torn sections should be replaced intact or soldered. If there are traces of oxidation processes on the contacts, they need to be cleaned.
If the LEDs burn out, they need to be replaced in pairs. If the breaker fails, it must be replaced with a new one, as it cannot be repaired. Before replacing, turn off the vehicle's power by removing the negative terminal from the battery. Then disconnect the power wires from the breaker. Next, you need to loosen the lock nut and unscrew the main nut securing the switch to the bracket.
Replacing the brake light switch
Before installation, the new frog should be checked for functionality. This can be done using an ohmmeter. We connect the device to the device and measure the resistance. When the contact is closed, the resistance should be zero. If you press the rod, the contacts should open; the resistance in this case tends to infinity.
Main reasons
Almost all problems related to automotive electrical systems can be solved in approximately the same way. You need to look for a potential or probable cause of malfunctions in the problematic object itself, or understand the system responsible for supplying power.
The situation is exactly the same with devices called brake lights. If they stop working, then you should look for the reason in one of the following points:
- There were problems with the fuse. It has oxidized or completely failed;
- There are faults in the lamps themselves or in one lamp, depending on how many stops are not working;
- The reason lies in the mechanism responsible for turning on the warning signal when the brake is applied;
- In the socket where the stop light is installed, the contacts have oxidized;
- More serious problems appeared related to damage to the wiring.
Based on the stated reasons why the feet may stop working, we can draw a completely objective conclusion. A truly serious malfunction concerns only wear or damage to the electrical wiring. Solving such a problem with your own hands is not always correct.
When the rear brake lights (left and right) or the additional central brake light repeater fail, do not rush to look for an auto electrician and offer him money to fix the problem.
There is a high probability that you will be able to do everything on your own. You will only need a standard set of tools for a motorist, as well as an understanding of how the lighting equipment in general works in your vehicle. Start with the most likely and fairly simple to solve possible malfunctions. Only if it turns out that the problem is bad or damaged electrical wiring, then it makes sense to visit a good car service center. It is better to entrust such tasks to experienced craftsmen. The main components for restoring the operation of brake lights on your own, you will need a spare working lamp, a control unit or a multimeter, as well as suitable tools.
It would be a good idea to study the owner's manual and understand how to get to the stops on your car.
Fuse
The first place to start is by searching for the mounting block in which the fuse responsible for the brake light is located.
Moreover, each machine has its own electrical circuit and specific location of fuses.
These can vary significantly depending on the vehicle, such as:
- VAZ 2110;
- VAZ 2107;
- Toyota Rav 4;
- Ford Fusion;
- VAZ 2114;
- VAZ 2115;
- Ford Focus;
- Chevrolet Lacetti;
- Lada Granta;
- Hyundai Accent;
- Renault Logan;
- Hyundai Solaris, etc.
A blown fuse quite often causes the failure of a number of equipment, including lighting devices. Check fuses visually and using a multimeter.
But there is a simple and effective way to check that takes a minimum of time. To do this, start the engine and hold down the horn button. This is not suitable for all car models, but on many vehicles the same fuse is often responsible for the sound signal and brake lights.
If this is not the case, we continue our search further.
Brake lamps and their sockets
Next, you should switch to the brake lights themselves. In most cars, to gain access to the feet, the luggage compartment is opened, the rear light bulb is removed, after which you can get to the feet themselves.
But the dismantling process may differ on different brands and models. Here, start from your car specifically; if necessary, look for hints in the operating manual. There are examples of cars where you can get to the brake light without removing the rear optics at all. You still have one main task ahead of you. It consists of gaining physical access to the faulty device, the lamp and the socket in which it is located. Not everyone can try to determine the problem by eye. Here it is better to take a different route.
The optimal solution would be to use new, similar lamps instead of potentially faulty ones. Therefore, you will have to buy a light bulb in advance and screw it in. If you can't find a lamp of a similar size, use a marker or turn signal repeater. Make sure these conditional controls work first.
When everything worked after installing the new lamps, you found the reason. You can confidently buy new matching stop lamps, replace old ones and reassemble the unit in reverse order.
It is extremely important to take into account one feature. Some modern cars have such a principle of operation of brake lights, in which when one car brake light fails for one reason or another, the second one automatically stops functioning. That is, sometimes checking one lamp does not give a result, since in fact the chances are 50/50 of replacing the burnt lamp, and not the one that simply turned off in tandem.
If replacing the light bulbs did not give anything, check the sockets themselves. It happens that they oxidize, this breaks contact, and the device does not turn on, although power is supplied to it. Also make sure that the socket is connected to the vehicle wiring. If necessary, the contacts are disconnected, cleaned with fine-grained sandpaper, and then returned to their place. Even during this procedure, it is recommended to apply a special lubricant to the contacts after cleaning.
One more thing. When checking the sockets, it is also worth taking new light bulbs. It happens that due to oxidation of the cartridge, the lighting device itself fails. That is, in fact, 2 malfunctions occur simultaneously.
Problems with the switch
The brake light on a car lights up the moment the driver presses the brake pedal with his foot while sitting behind the wheel. When pressed in this way, the force is transferred to a special mechanism. It is popularly called a frog. It is also a limit switch and it is also a classic brake light switch.
There are 3 main reasons why a frog or limit switch may not work:
- contacts have oxidized;
- carbon deposits appeared;
- corrosion has formed.
Despite the slightly different processes, the essence of the problem is the same. It can be eliminated by stripping the frog, or by replacing the stop switch.
How to remove the mounting block - all steps in one video
Checking brake lights
Left: If the turn signals work properly but the hazard warning lights do not turn on, the cause is usually a faulty hazard warning light switch. If you press the switch firmly several times, most often it will start working normally. If this does not happen, then remove the switch (2), squeezing its locking tabs and removing it from the groove, check the contacts of the pin connection (1). Right: When installing the brake light switch (2), it must be pressed against the pedal support (3) so that the switch pin also presses the switch when the pedal (4) is released. For perfect operation, the pin block (1) must be correctly connected.
Brake lights should be checked as often as possible in the interests of safety.
- The garage wall behind your car should give off a red glow when you press the brake pedal.
- When driving, check using your rear view to see if the light from your brake lights is reflected in the headlight reflectors or on the paintwork of the car behind you.
Brake light switch
When you press the brake pedal with your foot, the spring in the brake light switch (it is mounted in the brake pedal suspension holder) presses on the control pin. At the same time, the contacts in the switch and the electrical circuit to the brake lights are closed. If the brake pedal is released, the pedal pin presses the control pin to its original position and the brake signal goes off.
Checking the brake light switch
If both brake lights do not light, check as follows to see if the brake light switch is the cause.
Replacing the brake light switch
Trouble-shooting
Brake lights
Fault localization
Understanding the operating principle allows you to determine exactly why the brake lights may not light up:
- The fuse has blown. In the diagram, the fuses are marked with the letter F (from English - Fuse) and the serial number of the seat in the fuse block, for example, F3;
- poor contact at connectors;
- the light bulbs have burned out, but since the lights are connected in parallel, the likelihood that 2 lamps will burn out at once is extremely low;
- poor contact on the negative terminal of the lights. In this case, problems may begin not only with the feet, but also with the lighting of the remaining lamps in the lanterns;
- Damage to the negative track in the lamp board. From the total mass directly to the brake light lamp, the minus goes along a special path on the board. The path may collapse from water or mechanical impact;
- malfunction of the brake light switch, the so-called frog;
- broken wiring, oxidation of contacts.
Troubleshooting algorithm
To detect a fault in the electrical network, you will need a multimeter or a tester, which you can make yourself
Previously, we told you how to use a multimeter, so we won’t focus on that.
The sequence of searching for the cause of the breakdown:
- Check the fuse for the brake light circuit. The location diagram of the fuse links can be found in the repair and operating manual for your car; often the symbol of the protected circuits is located on the back of the cover covering the fuse mounting block. If the installed fuse of the required rating immediately blows, there is a short circuit (short circuit) in the circuit. Please note that the fuse can protect not only the feet, but also other circuits. Installing a fuse with an increased rating is fraught with the risk of a car fire;
- If oxidation is detected on the terminals, clean the contacts mechanically or use an aerosol contact cleaner.
- Having turned on the ignition first and holding the brake pedal depressed, check whether there is power on the positive wire that goes from the limit switch to the rear light connector. If there is power, there is a malfunction in the lights themselves;
- check whether the positive signal is coming from the mounting block to the limit switch. If + comes, but when you press the brake pedal it does not appear on the second terminal of the limit switch, then the problem is in the “frog”;
- If there is no + at the limit switch terminal, examine the circuit up to the mounting block. If the wire is intact and securely fastened in the connectors, then the problem is in the mounting block.
Messages 5
1 Topic by pasha123d92 2016-08-07 14:16:32
- pasha123d92
- New member
- Inactive
- Registration: 2016-04-13
- Messages: 14 Thanks : 1
- Car: VAZ 2112
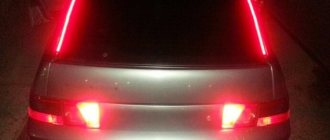
Topic: Brake lights on VAZ 2112 do not light up, but the spoiler lights up
The brake lights on the VAZ 2112 do not light up, the spoiler lights up, the fuses are intact and the turn signals are on, what could be wrong?
2 Reply from Ursadon 2016-08-07 17:19:56
- Ursadon
- Participant
- Inactive
- From: Novosibirsk
- Registration: 2014-02-15
- Messages: 83 Thanks : 25
- Auto: 21120
Re: Brake lights on VAZ 2112 do not light up, but the spoiler lights up
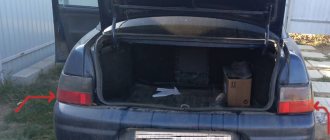
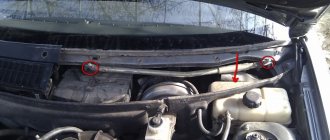
Open the trunk lid, you will see a rubber corrugation between the hinges - all the wiring is there. Most likely there is a frayed wire there.
3 Reply from pasha123d92 2016-08-07 18:31:16
- pasha123d92
- New member
- Inactive
- Registration: 2016-04-13
- Messages: 14 Thanks : 1
- Car: VAZ 2112
Re: Brake lights on VAZ 2112 do not light up, but the spoiler lights up
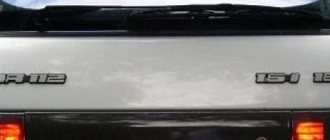
But how are the trunk lid and stopacs connected, they are not located on the trunk lid? on the trunk lid there is only a spoiler with a stopak that lights up, and reverse lights!
4 Reply from pasha123d92 2016-08-07 19:04:24
- pasha123d92
- New member
- Inactive
- Registration: 2016-04-13
- Messages: 14 Thanks : 1
- Car: VAZ 2112
Re: Brake lights on VAZ 2112 do not light up, but the spoiler lights up
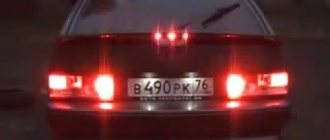
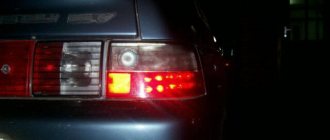
I figured everything out, I thought that the stacks were where the turn signals were, but they are really on the trunk lid, I cleaned the contacts, everything worked) Now another question on the board where the turn signal is, 3 bulbs, 2 large and one small, one large turn signal is small in size, and the second large one is for what, I thought it was stop?
5 Reply from Denis Artyukhov 2016-08-13 23:18:28
- Denis Artyukhov
- Local
- Inactive
- From: Penza
- Registration: 2015-10-21
- Messages: 1,391 Thanks : 279
- Car: VAZ 21124
Re: Brake lights on VAZ 2112 do not light up, but the spoiler lights up
pasha123d92 , rear PTF. That is, when you turn them on, the indicator lights up brighter.
What technical solutions exist
There are a lot of technical solutions for tuning VAZ cars. Starting from tuning the VAZ engine and gearbox to major changes in the design of the car.
After tuning a VAZ car with your own hands, the driver gets new driving sensations
The transformed car clearly stands out from the crowd of cars of the same type and attracts attention, but if the tuning of the vases with your own hands is done correctly, then operating the car will become much more convenient
And although such changes in cars are among the most expensive, many owners of VAZ cars, at the first opportunity and having the necessary funds, try to add something new and unique to their car.
There are as many VAZ car models as there are technical solutions for tuning them. And those decisions, in turn, are divided into several more.
We can safely say that there are several models, and as many VAZ cars exist with their owners, there are as many technical solutions for their tuning.
Since every car owner, when tuning a VAZ with his own hands, brings in something new, unique and distinctive from other cars of the same type.
It is impossible to consider every case of tuning vases with your own hands.
Therefore, we will look at the example of one solution, which, in turn, turned out to be successful.