16.08.2012
parking lights
Side lights are lamps that let another car know about your dimensions. For example, stopping at the side of the road on the highway and turning off the ignition, the low beam goes out, but the dimensions remain. And according to traffic rules, for your information, parking on the side of the road is allowed only with the lights turned on.
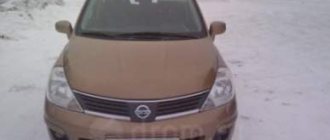
In this article we will look at the main reasons why the lights on the VAZ 2114 do not light up. This article is suitable for all samar owners, both the first generation and the latest.
Possible malfunctions: signs and causes
Now let's look at the main signs and causes of malfunctions in the operation of the shield:
- The backlight failed. If the instrument cluster does not light up, but all the sensors on the device, as well as the equipment lights, work, then most likely the reason is a broken brightness control. If you constantly use this device, then as a result of prolonged use the contact from the regulator to the plug may have become disconnected. The backlight may not work due to a burnout or breakdown of the safety device, which is located in the mounting block under the hood. If only some of the backlight bulbs do not work, then the reason may lie in the burnout of the lighting sources themselves.
- The device is not working. The backlight does not turn on, when the equipment (headlights, rear window defroster, etc.) is activated, the corresponding indicators on the device do not light up, and the sensors also do not work. This malfunction is one of the most unpleasant, since it indicates a breakdown of the device. Detailed diagnostics of the device will be required.
- The speedometer is broken. The regulator needle either does not move along the scale at all, or moves, but too slowly and intermittently, with a delay. If such a malfunction occurs, then first of all you need to check the speed sensor, since due to its malfunction the speedometer will not be able to work. Depending on the vehicle, the sensor is either mechanical or electronic. If the first, then you need to diagnose the condition of the end of the cable connected to the control panel. In practice, it wears out quite often, especially due to the removal and installation of the tidy, so to solve the problem you can try wrapping a piece of food foil on it. With an electronic device, contacts and the device are subject to diagnostics. Sometimes you can solve the problem by disconnecting, cleaning the contacts and reconnecting the device.
- The gauges work, but the lights don't turn on. We are not talking about backlighting, but about working indicators - headlights or turn signals. Maybe the indicator has simply failed and the bulb in it needs to be replaced. If we are talking specifically about turn indicators and optics, then you need to check whether the headlights turn on or not. If not, then you need to test the operation of the steering column switches.
- The fuel sensor in the tank does not work on the instrument cluster. When the ignition is turned on, the gauge needle does not rise or it has moved to the very top of the scale all the way. If the needle does not move, then the fuel sensor itself, which is located in the tank, may have broken down. You need to find the controller and check if it works. If the arrow jumps up and does not go down, then it looks like a short circuit in the wiring. In case of such a problem, the electrical circuit should be checked with a multimeter.
- The arrow of the engine temperature regulator does not function. You need to check the controller itself installed in the engine. The wire contact could have come loose from it, or the wiring could have been damaged, which is less likely.
- The tachometer may also fail. If this problem occurs, you need to check the position of the crankshaft. As in previous cases, the sensor could break, the connector and wiring could also be damaged. It would be a good idea to check the electrical circuit for possible short circuits (video published by RAVIL Shayakhmetov).
What is especially important to control at the rear dimensions
If the control light on the key does not light up, but the dimensions work, then first look at the panel wiring. Remove the key block from the socket, then wipe the contacts with alcohol. If the dimensions on the right side do not work simultaneously with the warning lamp, then check the fuse. It is worth noting that they rarely fail, since the VAZ-2114 began to install wide options that have a reliable contact pad.
If F10 or F11 still breaks down frequently, then it is necessary to check the mounting block; it may be faulty. If this unit is in working order, then check the entire electrical circuit. Sometimes constant failure of fuses indicates a short circuit in the wiring, which can lead to a car fire for no apparent reason.
Removing and replacing rear lights
- It is best to make the replacement before wiring problems begin.
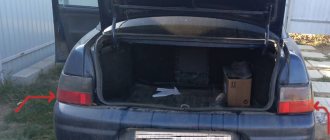
- To work you need to remove the lights. On the VAZ 21099 it is hidden by a plastic decorative trim in the trunk.
- Now unscrew the fixing screws on the trim and remove them.
- Disconnect the block with wires and carefully remove it, being careful not to damage the board, because it sits tightly in place.
- Now, using a 10mm wrench, unscrew the 4 nuts securing the headlight housing. Remove the part from the machine. Now you can install the new part and calmly begin the replacement.
- The collection is done in reverse order (the author of the video is Automaniac1994).
Features of the operation of dimensions on the VAZ 2114
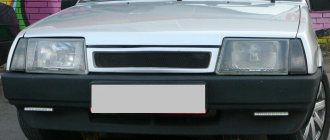
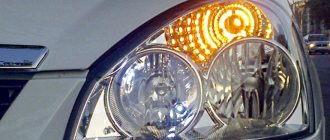
Being the ideological heir of the first generation, the “fourteenth” inherited from it many technological solutions, including external lighting devices. Thus, the dimensions on the VAZ 2114 are located in the corner areas of the body at the front and rear, which, according to technical regulations, are included in the general blocks of lamps and headlights.
At the same time, there are several features that should be noted when describing the side lights on the VAZ 2114:
- on/off is carried out by a button in the exterior light control module;
- when the lights are on, the switch is illuminated by a green indicator diode;
- The rear lights of the VAZ 2114, unlike the front ones, light up in red, in accordance with Russian road safety standards.
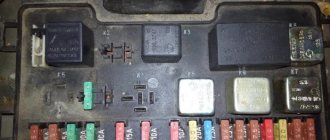
Fuse box
A dedicated fuse block is responsible for the correct operation of the side lamps on this Lada, which can be found in the engine compartment next to the engine. Accordingly, most often motorists who notice non-functioning dimensions on the left or right side of the car are faced with a failed fuse.
Parts prices
There is also a separate section for prices for all the parts that may be needed when repairing this part of the car, because if the side lights on a VAZ 2114 or the fuses have blown, they will still have to be replaced with new ones. In any case, all the components are quite cheap, all we might need:
- Marker lamp;
- Fuse;
- Power button;
- A whole fuse block.
Today, an ordinary white light bulb costs up to 30 rubles; of course, the price depends on the individual pricing policy of a particular seller. Individual fuses can be selected for up to 50 rubles, unless, of course, you want to install a higher quality option. Button, if you look for exactly the same one as the original one, you will have to pay up to 300 rubles. In some situations, more serious problems may arise and you will have to change the entire unit, this is quite an expensive proposition, together with all the wires it will cost up to 1000 rubles.
Sources
- autovaz-2114.ru/optics-in-the-car/ustranyaem-polomki-perednix-i-zadnix-gabaritnyx-ognej-na-vaz-2114/
- ladaautos.ru/vaz-2114/pochemu-ne-goryat-zadnie-gabarity-vaz-2114-i-chto-delat.html
- drive2.ru/l/4498777/
- lampaexpert.ru/avtomobilnye-lampy/neispravnosti/ne-gorat-zadnie-gabarity-vaz-2114
- remontvazov.com/ne-goryat-zadnie-gabarity-vaz-2114
Tips for motorists
There can be at least three options for instrument panels installed on a VAZ 2109 car. The first combination of the instrument panel is placed on those “nines” where there is a low front panel. The second instrument panel combination is installed on “nines” with a high front panel. And the last third instrument panel combination, which is already electronic, is installed on “nines” with a “European panel”.
On instrument panels that are placed on a low panel in VAZ-2109 cars, there will most likely not be an option with a complete failure of the entire instrument panel. Since on these panels, the speedometer and econometer are mechanically driven, and the likelihood that they will fail together with electrical devices and warning lamps is very small. There is no econometer on the high-panel instrument panel, but the speedometer also has a mechanical cable drive.
If all electrical devices and warning lamps on all three versions of the dashboards stop working, then first of all you need to open the hood, then unfasten the cover of the mounting block and see if the fuse through which power is supplied to the instrument panel is intact. The fuse markings are located on the inside of the mounting block cover. Depending on the year of manufacture of the car and what combination of instruments is on it, you need to check the fuse designated as F5 or F16.
If the fuse is intact and its contacts are not oxidized, then next you need to see if power is supplied to the instrument panel. This can be done using a control lamp with the ignition on. Disconnect connector X4 on the mounting block and check whether there is voltage at pin No. 3. The fact is that the mounting block on the nines will always be wet during rain, it’s not for nothing that drivers call this place a swamp, and because of this, oxidation of the contacts in the pads often occurs, which leads to electrical failures. Sometimes not only the contacts, but also the circuit board of the mounting block oxidize.
If the driver was unable to find a fault in the above mentioned places, he will have to remove the instrument panel and check the condition of the contacts in the two blocks, as well as the reliability of the connection of the ground wire, but this is already more painstaking work.
Additional Tips
Sometimes VAZ 2114 owners are faced with the opposite situation, when the rear lights themselves work, but the indicator on the power button does not: this is almost always a sign of a faulty wiring in the interior panel. You can deal with the problem by removing the entire key block and thoroughly wiping its contacts.
In general, the side lights on this VAZ model should not often fail, since the contact pads for their fuses were specially increased in width in order to ensure a tight connection.
In addition, experts advise that in frequent breakdowns of dimensions there is a malfunction in the mounting block itself or its electrical circuit. Such a problem must be eliminated as soon as possible to eliminate the risk of a wiring fire.
Finally, you should pay attention to the tightness of the entire rear light unit and prevent moisture from getting inside, which can easily cause the lamp contacts to sour.
general information
VAZ 2109 electrical faults
Let's start with general information. You should know that the VAZ 2109 has two power sources - the battery and the generator. The battery is designed to supply current when starting the power unit of a car, as well as to power the starter and other 12 V consumers when the engine is not running. When the engine starts, all the “initiative” goes to the generator. Now this element provides current to all consumers, even the ignition system and battery.
Work order
First of all, you need to check whether the alternator belt is in place. It happens that it breaks off. If the belt is in place, intact and undamaged, then it is recommended to check its tension. To do this, press with your thumb from above and notice how much the belt is bent. 10-15 mm is the norm. We arm ourselves with the appropriate wrench and unscrew the nut securing the generator to the body. Then we insert the pry bar between the generator and the engine cylinder block. Using the lever method, we move the generator and tighten the fastening nut.
Working with a generator
You need to check whether the corresponding fuse has blown. If yes, then replace it with a new one (more about fuses below).
- We start the power unit and check whether the battery charging lamp goes out. If it goes out, it means everything was done correctly.
- If it does not go out, then you need to check the cable that runs from the generator to the battery (positive). This could be where the problems lie.
- We check the integrity of this wire. Maybe it's broken or something.
- You also need to carefully check contacts that may have become oxidized over time.
- All these faults, if found, are corrected. We start the engine and see if charging appears.
- If yes, then have a nice trip!
If there is no charging again, then you need to check the generator itself (see VAZ 2109: malfunctions on the generator and how to eliminate them). To do this, it is better to contact specialists or follow the advice that can be found on our portal.
Regulator check
If the motorist is experienced, then he can be advised to check the generator voltage regulator. This component is required to maintain the generator voltage within specified limits, even if the speed and load changes. It is possible that it has “worked out” and the generator is not functioning correctly. By car:
- We arm ourselves with a voltmeter equipped with a scale of up to 15-30 V.
- We always measure the voltage after some operation of the engine at medium speed.
- We measure the voltage with the headlights on, in the place between the corresponding terminal and the generator ground. The norm is thirteen/fourteen V.
- Otherwise, if the value is lower or higher, the regulator will need to be replaced.
Look for the information
Our channel TWOKARBURATORS in Yandex Zen - questions and answers on self-repairing a car. Read and subscribe to new articles.
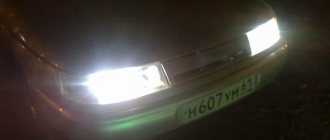
When driving at night or in fog, side lights are indispensable, especially if they are located at the rear. When moving or while parked, they show other motorists where your vehicle is. If the rear lights on a VAZ-2114 car do not light up, then it will not be difficult to do the repair yourself. To do this, just find out the reason and follow the instructions below, or watch the video.
Dimensions of VAZ 2114
The side light signals on second-generation Samaras, which include the VAZ 2114, are located in accordance with the regulations in front and behind the car, two lights on each side of the car, closer to the edge, next to the turn signals.
- The front side lights are white, the rear lights are red. The front ones are located in the headlight block, the rear ones are located in the taillight block.
- The side lights are turned on and off by pressing the “side light switch” key, which is installed in the exterior lighting switch block. The keys are located in the central part of the instrument panel above the on-board computer display. When the side lights are turned on and the side light bulbs come on, a green indicator lamp lights up on the button.
- There is a side light fuse installed in the side light circuit. It is located in the mounting block located in the engine compartment under the hood. There are two fuses, one for each side of the side lights. Fuse F10 is located in the circuit of the left side dimensions, it also controls the operation of the warning lamp on the instrument panel, fuse F11 is the right side dimensions.
Causes of malfunctioning rear lights
Troubleshooting a situation with non-working side lights is the primary task of the car owner, as this not only creates a dangerous situation on the road, but also, in the end, is fraught with a fine from the traffic police.
To find out why the dimensions of the VAZ 2114 do not light up, you need to focus on three main factors:
- Burnt out lamp.
- Loose contact of the power wire.
- Broken wiring leading to the gauge.
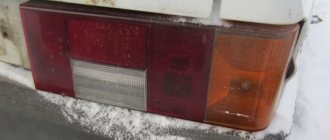
Working rear dimensions
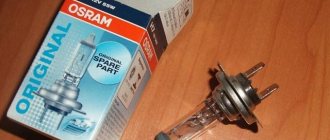
The first case is the most common, and the problem is solved by simply replacing the light bulb, fortunately, they are sold everywhere and cost little money.
You can confirm the second reason without disassembling the device by simply tapping on the size: the moment you press it to the contact, the lamp will light up, and vice versa, it will go out in the free position. If disassembling the device did not reveal any oxidation with carbon deposits, a burnt-out lamp or a loose terminal, but the rear marker of the VAZ 2114 still does not light up, we can talk about faulty wiring.
Tail lights of VAZ 2109 do not light up - repair and modification
The functioning of the rear lights of any car is necessary for road safety reasons. These devices at the rear of the car perform a lighting and information function (warn road users about the movement of the car).
- reversing lighting;
- side lighting;
- brake lights;
- turn signals;
- emergency alarm.
Rear view lights for VAZ 21099
The structure of the lighting devices is as follows:
- body made primarily of plastic (in some cases glass);
- lamp holder;
- latch for holding wires;
- diffuser of light rays for uniform illumination of the road surface. It is glued to the back of the product body, so if it breaks, it needs to be replaced along with the body.
The device of the rear light on VAZ 2109-2108 and 21099
The following types of rear lights can be installed at the rear of a VAZ 2108 or 2109:
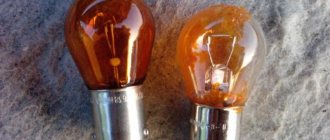
- incandescent lamps. Inexpensive, but they break down relatively quickly and are not bright enough. Such lamps burn with a yellow light, which is not very visible in unfavorable weather conditions;
- halogen bulbs. They are considered more modern and durable, since air is pumped out of their flask and inert gas is pumped in. There are models with H1 and H3 sockets on sale;
- LEDs. They burn with a cool white light and last several times longer than incandescent lamps. They are sold in strips and today often replace obsolete incandescent lamps.
LED tail lights for VAZ 2108
New model power supply
Here the mounting block diagram is arranged a little differently, but it is more relevant for owners of the VAZ 2109, since most of the nines that have survived to this day are modernized versions.
The scheme is relevant for both carburetor and injection types of engines.
Fuse number
Rated current
The electrical circuit for which it is responsible
Radiator fan relay winding, electrical circuit of switch and heater motor
Hazard warning switch in turn signal mode, turn signal switch, turn signal switch, turn signal warning light, turn signal warning light, reverse optics switch, reverse lights, tachometer, voltmeter, gasoline level indicator, gasoline level sensor, gasoline level warning light, pointer coolant temperature, temperature sensor, warning lamp and emergency oil pressure sensor, brake emergency lamp, brake system hydraulic switch, hand brake switch
Brake light switch and bulbs, interior lighting
Room lighting lamps, indicator lamp for switching on the dimensions, lamp for illuminating the heater and cigarette lighter handles, glove compartment lamp, switch and lamp for instrument panel illumination
Horn, horn switch, radiator fan motor
Left side lamp, left rear side lamp
Right side lamp, right rear side lamp, fog light switch, fog light indicator light
Turn signal switch and breaker, turn signal lamps, warning lamp in emergency mode
Cigarette lighter, socket for carrying lamp
High beam right headlight
Main beam of the left headlight, high-range optics warning lamp
Low beam right headlight
Low beam left headlight
New power supply
As for the relay in the mounting block of the new model for the VAZ 2109, the pinout is as follows.
Relay number
Its functions
Without it, the rear window washer motor will not work.
Responsible for the operation of turn signal lamps and light signaling
Provides operation of the windshield wiper
Protects brake lights and vehicle dimensions
Provides operation of high beam lights
Guarantees operation of the optics washer device
Protects the power window motor if your vehicle has one.
Sound signal or just a horn
Protects against high voltage going to the engine cooling fan
Responsible for the operation of the rear window heating device
Provides operation of low beam lights
It is necessary not only to understand the location of a particular fuse or relay, but also to know how to replace a failed element.
Auto-assistance
On a VAZ-2115 car, the side light lamps in the rear lights often stop working. This is due to the occurrence of leaks in the lamps, as a result of which moisture gets inside, which leads to oxidation of the plug of the block or the track on the flexible circuit board, through which voltage is supplied to the lamp contacts.
There are cases when, after moving the exterior lighting switch to the first position, not a single side light lamp lights up. The search for such a malfunction will have to begin by checking the presence of voltage at terminal 1 of this switch. It should be +12 volts, even with the ignition off.
What kind of lighting do you prefer?
Built-in Chandelier
If this terminal is de-energized, then you will need to sequentially check the voltage at terminal 6 of connector X8, and then at terminal 6 of connector X1 of the mounting block. If there is voltage at these terminals, the culprit for the lack of power at terminal 1 of the outdoor lighting switch will be the pink wire connecting it to terminal 6 of connector X1 of the mounting block.
Expert opinion
It-Technology, Electrical power and electronics specialist
Ask questions to the “Specialist for modernization of energy generation systems”
The left side of the VAZ 2114 dimensions does not work; the left rear lamp does not light up; we check the yellow-black wire from the right rear light block to terminal 17, block X9 of the mounting block;. Ask, I'm in touch!
Tips for motorists
Currently, before driving, regardless of visibility conditions, VAZ-2109 passenger cars, like other vehicles, must have their headlights turned on. This means that the load on the elements of the electrical circuit of the head lighting increases sharply. The shortest service life in this scheme is halogen lamps, in which one of the tungsten filaments burns out first, either the low beam, which happens more often, or the high beam. This will be the first malfunction that almost every driver encounters with headlights.
Types of panels
Instrument panels on the VAZ 2109 are of at least three types:
- Low panel;
- High panel;
- Electronic panel on nines with Europanel.
On versions with a low panel, failure of the entire panel is extremely rare. This is due to the fact that here the speedometer and econometer are equipped with mechanical drives. Therefore, it is unlikely that they will fail along with the electrical component.
Removing and replacing rear lights
- It is best to make the replacement before wiring problems begin.
- To work you need to remove the lights. On the VAZ 21099 it is hidden by a plastic decorative trim in the trunk.
- Now unscrew the fixing screws on the trim and remove them.
- Disconnect the block with wires and carefully remove it, being careful not to damage the board, because it sits tightly in place.
- Now, using a 10mm wrench, unscrew the 4 nuts securing the headlight housing. Remove the part from the machine. Now you can install the new part and calmly begin the replacement.
- The collection is done in reverse order (the author of the video is Automaniac1994).
Unlike the vast majority of imported cars (thanks to our designers), you can replace the light bulbs in the rear light in a minute and literally with your bare hands. No removal of wheels, bumpers or engine.
Open the trunk, find the cover covering the back of the lamp, and remove it
Disconnect the power supply from the flexible board (extremely carefully!). We discussed in detail how to do this above.
Now you need to remove the back panel of the lamp. To do this, on the side located closer to the central axle of the car, press the plastic lock.
Retainer holding the rear panel in place
Carefully remove the panel, starting from the side of the latch.
Removing the panel
Place it face up. Before us are five different-sized light bulbs. We need the smallest one - the one marked with an arrow.
Rear light panel of VAZ 2109 from the lamp side
We recess it a little, turn it counterclockwise and take it out. We install a new one in place of the burnt one, fixing it by pressing and turning clockwise. We connect the power supply and turn on the dimensions. Everything is working. Place the panel in place and close the lid.
Replacing a broken light bulb
To repair the rear lights of a VAZ 2114, you need to follow a number of simple recommendations:
- turn off the vehicle's power supply;
- open the trunk, remove the decorative trim;
- Squeeze the latches and remove the contact panel of the entire flashlight;
- press down the faulty lamp and turn it counterclockwise to remove it.
Replacing a light bulb in dimensions
Next, it is advisable to “ring” the lamp with a tester to make sure that it was its malfunction that was the cause of the problem, after which it should be replaced with a new analogue, and you can begin assembling the lamp in the reverse order.
Some Lada owners, faced with the fact that the dimensions on their VAZ 2114 do not work, do not bother and change the entire headlamp assembly - especially since they are not so expensive. This can be considered a convenient solution, since such a replacement eliminates for some time the possibility of failure of other lamps in the flashlight, in addition to the marker lamp.
In some situations, the breakdown of the dimensions does not represent a complete non-functionality of the lights, but simply a weaker glow, which indicates a problem with the supply of current to the contacts. To fix the problem, it is enough to clean the entire contact group in the control unit under the hood, and if that doesn’t help, you will have to check each group leading to the rear light separately.
Popular faults
If we talk about the dashboard of VAZ 2109 cars, then they are characterized by certain problems. We will tell you about them, and also tell you how to act correctly in a given situation.
| Fault type | Your actions |
| Gasoline level and temperature indicator does not work | In most percent of cases, this situation occurs due to breakdown of devices, sensors of these devices, or an open circuit of the power supply. Therefore, first check the circuit for continuity, make sure that the fuses have not blown. If this is not the case, check whether the gas level and temperature sensors are working. Only if none of the actions allowed you to get rid of the breakdown, you can begin to replace the devices themselves. No options, the problem lies in them |
| When the fuel tank is full, the arrow points to zero | If you have worked on the fuel level sensor, the fault most likely lies with you. When manipulating this device, the float limiter is often knocked down. Either the limiter is installed incorrectly or adjusted, causing the resistor winding to end. To resolve the problem, remove the sensor and then adjust the limiter again |
| The fuel gauge needle regularly jumps and ends up at zero | Here, most likely, the resistor has weak contact with the current collector. Another possible option is that there is a break in the resistor. To resolve this situation, we recommend replacing the hot level sensor with a new measuring device |
| The fuel level lamp is constantly on | If this lamp is constantly on, there is probably a short circuit in the fuel level sensor supply wiring to ground. Another option is that the sensor’s flexible bus is shorted to the fuel intake pipe. You will have to disassemble the device to align the bus and get rid of the resulting short circuit |
| Indicator lamps do not work on the dashboard | There is a high probability that the light bulbs have simply burned out, or they are poorly held in their seats due to loose contact. Replace the bulbs, but first try tightening the contacts. Traces of oxidation may be detected. When cleaned, the light bulbs can work normally again. Also, do not exclude the possibility of wiring breakage or oxidation of the tips of the supply wiring. Try going over the wires with a tester, cleaning the contacts if necessary. |
| The speedometer does not work, the flexible shaft is noisy | In such a situation, you will have to change the speedometer drive cable or replace the entire speedometer assembly. But before you bother so much, check that the fastening nuts of the tips are tightened correctly and properly. The flexible shaft may make noise during operation due to deformation or violation of the permissible bending of the shell of less than 10 centimeters during installation |
The instrument panel of the VAZ 2109 is not so complicated that you cannot figure it out on your own. But in the absence of experience, it is better to entrust the repair to specialists, or to enlist the support of a partner who understands this matter.
Didn't find the information you are looking for? on our forum.
We recommend reading:
The tachometer does not work on the VAZ 2110 injector reasons
VAZ 2114 replacement of the hood lock spring, hood arrangement, adjustment
How to connect the stove to a VAZ 2106, do-it-yourself replacement, step-by-step description
Why does the heated seats on the VAZ 2114 not work?
Generator diagram VAZ 21214 Niva injector
How to remove a spoiler on a VAZ 2114
Antifreeze or antifreeze in a VAZ 2110, what is the difference, coolant classes, how to change
Why does the car battery die overnight on a VAZ 2114?
Why doesn't it light up?
- First, remove the cover of the mounting block and make sure that the fuse is intact. The fuse markings are located on the inner surface of the cover. You should look for fuse F16 or F5, depending on the year of manufacture of your VAZ 2109.
- If the fuse is intact, be sure to check whether the contacts of the fuse you are looking for have not oxidized. It is not uncommon for shields to fail due to broken contact.
- Check if there is power to the dashboard. To do this, you will need a warning light and the ignition on. Disconnect connector X4 in the mounting block and check for voltage at pin 3. The disadvantage of the VAZ 2109 design is that when it rains, the mounting block immediately becomes wet. This causes oxidation of the contacts in the pads, which causes the electrics to stop working. Sometimes not only the contact is oxidized, but also the board of the Nine mounting block.
If none of the above actions yielded results, you will have to be disappointed. After all, now you need to remove the dashboard and check the condition of the wiring, contacts, and negative connections. Here it is better to trust a professional electrician or set aside a whole day to troubleshoot problems yourself. There is no need to rush here.
Doesn't turn on
When a problem occurs and the low beam on a VAZ 2109 does not work, a lot can happen, but we will consider only the main options that most often lead to such consequences. We will immediately give recommendations on how to eliminate them:
The light bulb fuse has blown. Check the appropriate fuses, correct or replace them. The lamp filaments have burned out. The low beam lamp on the VAZ 2109 is being replaced, which corresponds to the manufacturer's instructions. The relay or switch contacts have oxidized. Use sandpaper or a knife to clean the contacts. The wires are damaged, their tips are loose, connections have become unusable. Carefully check the machine wiring for breaks, replace damaged areas with new wires and clean the contacts. Contact jumpers have oxidized at the site where the relay is installed that controls the operation of the lamps. Remove new electricity consumers from the system.
Lamp with two filaments
Lamp with two filaments
Repair
- One of the basic rules associated with eliminating defects in a car is that you should not rush to buy new spare parts, since the old ones may still serve well. In this case, there is no need to rush to buy or install a new lamp, the price of which is quite high today. We recommend that you first check the serviceability of the old one; perhaps there is another reason for its inoperability. Therefore, before changing, check why the low beam on the VAZ 21099 is not on:
- set your vehicle to the handbrake, first (reverse) gear, or place a shoe under the wheel;
- open the hood;
- remove the lamp from the headlamp, which in your opinion is burnt out, and check its serviceability visually (by inspecting the spiral) and applying voltage from the battery – “-” to the side part, “+” – to the base (if it is working, it will light up). The faulty lamp should be replaced.
There is no low beam in the VAZ 2109 - check the mounting block
There is no low beam in the VAZ 2109 - check the mounting block
- The light is dim or does not turn on - the fuse has poor contact in the socket in the block. Very often the first one simply melts due to the high temperature when the second one is heated. The issue can be resolved by using sandpaper to clean the contact areas and replacing the fuse.
- You don’t hear a click when you turn on the light that the low beam relay on the VAZ 2109 produces, and the lamp does not light up - most likely, you should check it and make sure the device is working (clean the contacts and put it back in place), or simply replace with a new one.
- A broken wire in a VAZ is an infrequent defect, but it also happens. Therefore, before spending money on a relay or lamp, first use a device to check its operation in all areas from the switch to the lamp.
Replacement
If you have come to the conclusion that the wires, the relay, and the fuse are in order, there is no short circuit anywhere, and the sockets in the mounting block are working, then there is only one option left - replacing the burnt out lamp.
For this there are the following instructions:
Disconnect the negative terminal from the battery to save yourself from problems when working with wiring.
The low beam on the VAZ 2109 does not light - replace the lamps
The low beam on the VAZ 2109 does not light - replace the lamps
Turn the protective cap that covers the headlight bulb socket from dust, water and dirt to the left and remove the part.
The low beam on the VAZ 21099 has disappeared - a possible cause is a burnt-out filament of the light bulb
The low beam on the VAZ 21099 has disappeared - a possible cause is a burnt-out filament of the light bulb
Disconnect the lamp from the socket in which it is installed.
In the photo - remove the lamp from the plastic block
In the photo - remove the lamp from the plastic block
Remove the wire lock holding the lamp. Remove it from the hole.
Adjustment after repair
- It is necessary to ensure good illumination of the road in front of the car.
- Avoid dazzling drivers of oncoming vehicles.
- Make adjustments using two screws vertically and horizontally.
- Use a special screen or a lined wall to position the headlight beams correctly.
Scheme for self-adjustment
Scheme for self-adjustment
Place the car on a level surface, place a load of up to 75 kg on the driver’s seat, and the tire pressure should be normal.
The “dimensions” do not light up on the VAZ 2108, 2109, 21099
Let's look at how to quickly find the reason for the failure of the "dimensions" on VAZ 2108, 2109, 21099 cars. The side lights are part of the vehicle's external lighting system and its operation with non-functioning "dimensions" is difficult, especially at night. We are looking for the reason for the non-functioning dimensions, as is customary in such situations, from simple to complex.
Causes of malfunction
The side light bulb in the socket has burned out
One light bulb, or several at once, can suddenly burn out. In some cases, it may be impossible to visually identify a burnt-out light bulb. Therefore, we replace the burnt out one with a known good one. You can use a similar one from a nearby headlight.
The contacts in the side light bulb socket have oxidized.
We rotate the light bulb in the socket several times to remove the oxidized layer and restore contact. In the future, you can clean everything with sandpaper.
The contacts in the connecting blocks of the headlight or tail light unit have oxidized
We remove and put on the connecting blocks several times to remove the oxidized layer and restore contact. More radically, we remove the pads and clean the contacts.
No "mass"
The “negative” wires of the front headlights and rear lights with side lights on VAZ 2108, 2109, 21099 cars are attached to the car body. It is necessary to clean the mounting location to ensure good contact with ground. Usually the negative wire is the black wire from the headlight connection block, attached to the body next to the headlight or taillight.
Weight of the front headlight, place of attachment to the body of the VAZ 2108, 2109, 21099
Fuse blown
If fuse 10 (F11) is blown, the side lights of the right headlight and right rear light will not work. If fuse 9 (F10) is blown, the left headlight and left rear light of the vehicle will not work. We replace them with new ones, and then look for the cause of the burnout (possibly a short circuit somewhere).
Relay K4 is faulty (monitoring the health of the lamps)
A faulty K4 lamp control relay can be replaced with jumpers. We connect the holes for relay terminals 1-7-8, 9-10-11, 4-5. On some VAZ 2108, 2109, 21099 vehicles, jumpers are already installed instead of lamp health monitoring relays.
The tracks in the rear light circuit boards have crumbled
Visually inspect the tracks in the rear light circuit boards for shedding, rust, or burnout. If necessary, we check their integrity using a test lamp or tester. A faulty track can be repaired by soldering wire onto its frayed edges.
The pads in the mounting block have come off or the wire tips have oxidized.
It is necessary to check the secure fit of the connecting blocks in the fuse mounting block. For an electrical circuit of “dimensions” these are plugs Ш4 (Х4), Ш6 (Х6), Ш9 (Х9), Ш11 (х11). If necessary, the wire tips present in them should be cleaned from oxidation.
The external lighting switch on the instrument panel is faulty
You should remove the exterior lighting switch and connect the black and yellow-red wires together. The black current flows into the switch, and the yellow-red current flows out. If the lights light up, replace the switch with a new one. If not, we look for a fault in the electrical circuit further.
"Open" or short circuit in the wiring
It is necessary to check the presence of electric current on the external lighting switch (circuit from the ignition switch to the switch), fuses (circuit switch - mounting block) and on the lamp control relay (functionality of the mounting block).
Notes and additions
- The side light lamps are located in the front headlights and rear lights of the car. The front lights use an A12-4-1 bulb, and the rear lights use an A12-5 bulb.
- The electrical circuit for turning on the external lighting (“dimensions”) is the same for all these cars. The only difference is in the fuse mounting blocks used: on old Samaras, before 1999. this is 17.3722 with finger fuses, on cars after 1999. modifications of the mounting block 2114 with flag fuses. Accordingly, fuses 9 and 10 are used in the external lighting circuit with the old mounting block, with the new F10, F11.
- “Dimensions” of the right side of VAZ 2108, 2109, 21099 cars on the 10th (F11) fuse. “Dimensions” of the left side on the 9th (F10) fuse.