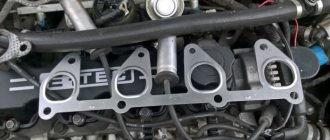
The exhaust manifold is the first section of a vehicle's exhaust system that is directly connected to the cylinder block. This element bears a serious load, both mechanical and thermal. The manifold is designed to combine exhaust gases from the combustion chambers of the cylinders into a common flow and discharge them into the exhaust pipe. Its design is quite complex, and is calculated by engineers taking into account the parameters of the engine and the geometry of the exhaust system. When gases move through the manifold, wave vibrations occur, which can make it easier for the engine to “breathe”, or, on the contrary, worsen the purging of the cylinders. Therefore, designers calculate the length of the pipes in such a way that there is no back pressure.
Collector repair
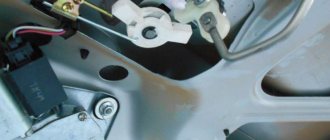
First you need to remove the protection located near the power unit. It is secured with three nuts, which are removed during operation. Before removing the protection, you should make sure that there are no various contaminants on it, and if found, clean it. When unscrewing the fasteners that hold the protection, they need to be lubricated with oil, which will greatly facilitate the procedure. After this, you can begin restoring the part.
Cases where replacement of the exhaust manifold gasket is required are extremely rare. But, if this happens, you should make sure that there is no dirt or other foreign objects at the gasket location. When access to the corrector is open, it is worth cleaning all the bolts and surfaces in order to facilitate the removal process. Before unscrewing the nuts, it would not hurt to lubricate them with oil. This is much easier to do from the inspection hole. Replacing the exhaust manifold is a painstaking job that requires accuracy and extreme care. If a lambda probe is attached to such a spare part, it should be disconnected from the connector.
After this, you can remove the intake pipes, which are best unscrewed from above, as this will be more convenient and, accordingly, practical. Carrying out work from below will require removing the protection. After the exhaust pipe is removed, it must be plugged with something. This can be either a regular rag or other elastic materials. An important point is that when unscrewing the nuts on the manifold, it is necessary to remove the antifreeze pressure and also drain it.
Types of pipe layout
There are two types of exhaust manifold pipe layout:
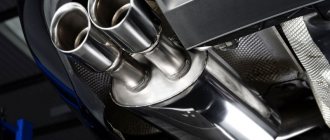
- 4-1. This type consists of 4 pipes connected into one. As a rule, the number of pipes corresponds to the number of cylinders.
- 4-2-1. In this case, first, the pipes of the cylinders operating on the same stroke are connected in pairs (there are 2 of them), and then they are connected into one. Such collectors are most often connected to resonators, which have special “scales” inside the housing, which helps reduce the backflow of exhaust gases.
- 4-2-2. This type of welding of exhaust manifold pipes is used mainly for sports cars, for which a 3-4% increase in power is invaluable.
For all types of exhaust manifolds, it is possible to replace flange connections with reinforced or 3-4 layer corrugations. Flexible connections help reduce resonant frequencies.
Part removal procedure
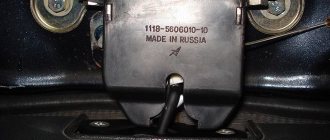
How to remove the exhaust manifold? After the fasteners are removed, with some effort, the outlet part can be removed. The gasket is changed in any case. If there are studs that simply jumped out or broke due to temperature changes, then they definitely need to be changed. How to do this? It is worth drilling them out with a side drill. First you need to make a notch with a thin drill, then with a larger one. After drilling the hole, the remaining studs simply need to be unscrewed. After this, the hole must be cleaned, thoroughly dried, so that when installing a new stud no unpleasant situations arise. The new fastener is installed with a new thread retainer in order to strengthen it and securely fix it. After this process, you can easily install a new or old cleaned manifold. The part is installed on the same studs and nuts. After the procedure is completed, all spare parts that were involved are installed, and the work can be considered complete.
Causes and types of malfunctions
- Cracks in the body. They occur when moisture or snow gets on a hot collector. Damage may also occur upon contact with hard ground.
- Deformation of connecting flanges. It occurs from overheating of the unit and frequent alternation of heating and cooling.
- Broken studs or mounting lugs. Occurs from natural “fatigue” of the metal, excessive vibrations or excess pressure in the exhaust system.
- Destruction of the gasket. The main reason is a violation of the passage of gases in a clogged catalyst or muffler.
Bottom line
Removing the exhaust manifold of the power unit requires care and precise actions; the procedure can take 30 minutes or more. When replacing a part, accuracy in carrying out all processes that require special care is important. The fact is that the most crucial moment is removing the fasteners. When removing these parts, they are first cleaned, taking into account the fact that there are studs inside the nuts, which must be installed correctly when the procedure is completed. There are situations when studs and even nuts fly out while driving a car. When the engine is running, the temperature of the collector rises, which leads to such consequences. The lower mount must be removed with extreme care, given that there are parts nearby that can be damaged. If you do everything correctly, you can get the result of a complete replacement of the manifold, as well as the gasket.
Let me know if this article was useful to you.
What affects the condition of the collector
The temperature of the gases leaving the cylinder head exceeds 600 degrees. If the engine is operating at maximum power, the ignition timing is incorrectly set, or the fuel system is preparing a mixture that is too rich or lean, then the temperature of the exhaust gases exceeds 1500 degrees. Because of this, the exhaust manifold heats up to a temperature of 200–300 degrees. In maximum power mode, if the ignition or fuel preparation systems are not operating properly, its temperature can reach 600 degrees, which is why the collector acquires a dull crimson color.
If all engine systems operate normally, the service life of the exhaust manifold exceeds 40 years. The exception is racing cars and cars whose engines are constantly running at maximum power. The passage of hot gases leads to gradual burnout of the metal. The burnout rate is affected by:
- temperature;
- open flame (when the air-fuel mixture burns out in the manifold);
- oxygen content in the exhaust.
The exhaust manifold is made of cast iron, the base of which is iron and carbon. The higher the temperature of the reservoir, the more strongly the iron reacts with oxygen and atmospheric moisture. Over time, this leads to the metal of the collector burning out and exhaust gases, instead of the exhaust pipe or catalyst, entering the engine compartment. As a result, the air in it heats up, which leads to an increase in engine temperature, overheating and other problems. Some of the smoke from the engine compartment enters the cabin, negatively affecting the well-being of the driver and passengers. If, during strong heating of the collector, you drove through a puddle and water got on the cast iron, then the product will most likely become covered with cracks and require replacement.
How to remove the exhaust manifold on a VAZ-2114 8-valve injector
I decided to solve the problem with the sound that was in the previous post. I stopped by the station, the man listened and said that the manifold gasket needs to be changed, there is a sound, and it’s because of the “clatter”, I asked how much it would cost to replace the gasket? They told me that the price would be 3800-4500, here I’m a bit of an ass, previously 2800-3500 for a pant liner, but now 4000 for a manifold. Okay, I understand, I went to the store, took the gasket, the price turned out to be 170 rubles, the original one, I thought it would be more expensive, but oh well. I chose a day and went to the garage, watched some videos on how to change this gasket, but everywhere they wrote that you don’t need to change it yourself, it’s very dangerous, etc. My arms grow straight, so I’ll do it myself. But unfortunately, I didn’t find a detailed example for beginners with photographs, so I decided to make one, because you never know, it will be useful for someone. Let’s start:
Attention, I will immediately warn you that when you unscrew the manifold, do not under any circumstances allow your nuts or washer, no matter what, to fall into the intake and exhaust holes!
1. Unscrew the ground on the battery. 2.
Unscrew the cap on the antifreeze barrel. 3. Remove the air supply system.
4. Remove the antifreeze pipes from the throttle. 5.
We remove the “gazulka” and also remove its fastening. 6. Remove the chips from the sensors on the throttle.
7. Remove the throttle with a 13 head, two nuts. 8.
Remove the remaining pipes from the receiver. 9. Remove the receiver with a 13 mm head and a short wrench.
10. Unscrew the fuel supply and return with two keys 17.11.
We unscrew the fuel rail fastening, 2 bolts with a 5-point hexagon and the levers in the video with a socket wrench. 12. Remove the ramp.
13. Remove the chip from the sensor. 14.
We unscrew the nuts securing the intake manifold with a 13 socket and a short wrench. (they can unscrew together with the studs, it’s not scary)15. We unscrew the side fastenings of the intake receiver from above, and simply loosen the bolts from below.
16. Unscrew the exhaust manifold fastening. 17.
We move the collector to the side so that it does not interfere. 18. We thoroughly clean the surfaces of the intake and exhaust manifolds, as well as the plane on the engine.
19. Next, install everything in reverse order. I advise you to put all the bolts and nuts from different elements separately so as not to get confused later.
After everything was assembled, I believe from the coolant channels, a little of it went into the exhaust manifold, because the car smoked like a steam locomotive, and it started up not as usual in 1 try, but in 3, which I was very surprised, but after the car I worked for 15 minutes, everything fell into place. As a result, after driving, the sound disappeared, which means the person at the service station was right. And joy knows no bounds, the engine also began to run even more smoothly.
It took 4.5 hours to do everything, despite the fact that I did it without stopping.
I think it will be useful for someone, thank you for your attention.
Full sizeUnscrew the ground
Full sizeNus, let's start one by one
Full size We follow everything in the picture
Full size Super key for unscrewing the ramp
None
Full size There are 2 nuts that secure the intake and exhaust manifold, they are very easy to feel, just take a 13 socket and the knob is not long
Full size She's a beauty: D
None
None
Full sizeClean well
None
None
Full sizeVoila, done:D Price: 170 ₽ Mileage: 164,000 km
Photo and video instructions for those who plan to independently replace the gasket of the intake pipeline and exhaust manifold on a VAZ 2114, 2113, 2115. To carry out work on replacing the gasket of the intake pipeline, you will need an inspection hole or overpass.
- First of all, disconnect the battery.
- We remove the exhaust pipe.
- Using a 17 mm wrench, unscrew the nut of the lower fastening of the left rod (the nut is located above the right drive of the front wheel).
- Using a 13 mm wrench, unscrew the bolt of the lower fastening of the right rod to the cylinder block.
- Removing the receiver
- Remove the fuel rail.
- On the 2111 (1.5i) engine, use a 13 mm wrench to unscrew the three fastening nuts and remove the bracket.
- Using a 13 mm wrench, unscrew the two nuts securing the mounting lug and remove it.
- Using a 13 mm wrench, loosen the nut of the lower bracket fastening, and unscrew the nut of the upper fastening of the bracket.
- We move the bracket to the side.
- Using a 13 mm wrench, unscrew the nut of the upper fastening of the right rod.
- Remove the right rod and spacer bushing from the intake manifold stud.
- Using a 17 mm wrench, unscrew the nut of the upper fastening of the left rod and remove the rod.
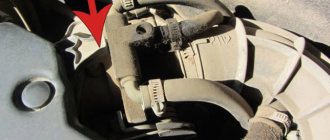
- Using a 13 mm wrench with an extension, unscrew the four nuts of the upper fastening and two nuts of the lower fastening of the intake manifold and exhaust manifold (for clarity, shown on the removed cylinder head).
- Remove the intake pipe.
- Remove the exhaust manifold.
- Remove the gasket from the studs.
- We install the exhaust manifold and intake pipe in the reverse order, replacing the gasket with a new one.
Recently I decided to open the hood to check how things were going. Everything is ok, but the engine noise seemed suspicious, like a boxer car. The search did not yield anything for a long time, but meanwhile the cabin began to smell of exhaust gases. I somehow found the reason in the morning, after starting, looking under the hood and seeing smoke from the catalyst. In Euro-3, -4 similar ones, the neutralizer itself is also closed with metal casings, which makes it difficult to detect gas breakthrough. In general, I bought a spider 4-1 in advance for 1350 rubles.
Full size For one oxygen sensor, I had it upgraded to Euro-2 a long time ago. By the way, I also found a simple 4-1 manifold made of metal or cast iron later on sale. It seemed so brutal and cost less - 950 rubles. I couldn’t find anything similar on Google. I thought for a long time about whether to do it myself without having a pit. Well, in general, I decided on my own, but starting with the most difficult thing - unscrewing the nuts under the car. If unsuccessful, you could always go to the station. Before this day, I had previously spilled all the nuts with Vedashka. In general, everything under the car was not so simple - everything was so sour that I gave up on everything and called a familiar mechanic. However, he kicked the ball a few days in advance, citing the line. It's decided. You did it yourself. I tore off two manifold studs and unscrewed one. The bones were already crunching, performing acrobatic stunts under the car while lying on last year's grass. Then I moved to the top, drained the fluid, removed the throttle and the intake manifold.
After removing the throttle and pipe, I noticed a terrible picture - dust on the surfaces
There is also full size dust here. Apparently, I got a bad filter, the last time there was Nevsky
Full size On the left is the old one, on the right is the packaging of the new spare one
Full size Doesn't seem very dirty Dust doesn't look like sand, more like pollen. Well, that’s understandable, the large one most likely flew into the cylinders. In general, the old filter easily fell out of its place, the Big one sat tightly. I always used a big filter before and there were no problems. I had to ride a bicycle to get carburetor cleaner, and wash the pipe and manifolds in the bathroom.
By the way, I couldn’t remove the injectors - they fit tightly. Well, I didn’t bother tearing them out, they don’t allow air to pass through and that’s okay. I washed it with them, then just dried the ramp
Full size dried. Cleaned with Grass engine cleaner
Even when I unscrewed the fuel line from the ramp, I still did not find a rubber ring on the fitting. Either it wasn’t there, or I lost it. None of them fit in the store, but they did from the stock, silicone rings ordered in China for the Luzar heater valve stem. The exhaust manifold was removed without problems, not a single broken pin. I just couldn’t unscrew the second oxygen sensor. The overall removal and cleaning procedure took me about 8 hours, including time for food, riding a bike to the store and garage, searching for all sorts of rubbish, tools and fallen nuts under the car. The next day started assembling.
Lightly ran a file over the new manifold
The overall size has a slight error. The fasteners are clean and lubricated (I had to lubricate them with a CV joint because I couldn’t find a graphite one), all adjacent surfaces and parts are clean. Beauty! As the designer proceeded to assemble it, without a hitch. Not really - the aluminum intake manifold did not fall into place due to its screen resting on the “spider”. I had to dismantle it. I hope the gasoline in the ramp will not boil in the summer. I tightened everything with a torque wrench to the required torque, there definitely won’t be any jambs, that somewhere I didn’t tighten enough and leaked, or I overtightened it and tore it off. I recommend this key to everyone... The moment X has arrived - we start the first time and everything is ok, there are no errors, nothing leaks or cuts, the engine whispers. Hooray!
Next is the aptitude test.
As usual, we start sawing.
Cutting off the converter casings
Full size We see a crack - the source of troubles. A little more and the catalyst would have divided the exhaust into two separate parts
Full size Condition at 250 thousand km. Metal catalyst, excellent condition
None Then I also noticed cracks in the fastening of the catalyst to the engine
None But the new spider cannot be secured in any way, it is not clear with what or how. We need to come up with something, because the ancient carburetor engines also had “pants” fastenings
this is 2108.
And in the afterword I’ll just say that I didn’t notice any difference, the noise was the same as before, the car didn’t become more powerful. I measured the maximum speed, about 170 km h it remained. So you can safely drive with your original neutralizer.
At least it didn’t stink like carburetor Zhigulis. I decided to leave the catalyst. Who knows what will come into the heads of our bureaucrats in a year or two?
It is recommended to replace the gaskets on the VAZ intake manifold after each removal. But I had to do this prematurely, as I discovered a significant air leak, which mainly manifested itself on a cold engine. Every cold start was accompanied by a terrible tripping.
In addition to the tripping when cold, there was a slight drop in speed when sharply pressing the gas pedal. This applies to both a cold and a hot engine.
A homemade smoke generator made from a cigarette helped me detect the air leak. A very simple and primitive contraption that has helped me out more than once.
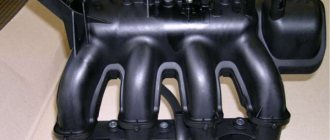
My car (Kalina 1. 6 8 valves) has a plastic intake manifold (receiver). The same will be installed on all VAZ family cars with an 8-valve engine 1.
6 liters (2114, 2110, etc.). 4 rubber rings act as gaskets. According to reviews, black rings last much longer than white ones.
And I was convinced of this personally - these gaskets lasted for about six months and began to let air through. They felt like plastic to the touch. Unfortunately, I didn’t find black ones, so I’ll install white ones again.
To remove the intake manifold (receiver), you must first unscrew the corrugation from the air filter, the throttle cable, and the small crankcase ventilation hoses. I will not remove the throttle and its heating.
The intake manifold is attached to 5 studs - one in the center, two on the sides. To unscrew them you will need a 13mm socket. After unscrewing the nuts, you need to remove the receiver itself from the studs and move it to the side.
Remove the old gaskets and wipe the seats from oil and dirt. You also need to wipe the seat on the engine.
The manifold has special grooves for guides on the gaskets. The gaskets must be installed with the higher side in the plastic manifold. It is the guide that will prevent you from making mistakes.
I additionally coated the areas near the guides with sealant on the outside of the gasket. Because it felt like that was where the ring entered the groove the deepest. In addition, there was a place for air leaks on the old gaskets.
After all procedures, the intake manifold can be installed back. I couldn't find any information on how tightly to tighten the mounting nuts. I delayed it at my own peril and risk.
This is how I replaced the old intake manifold gaskets on my Kalina with new ones. There is no more air leakage, the engine stopped stalling when cold and began to behave much better when warm.
Sources:
- www.drive2.ru
- remont2114.club
- www.drive2.ru
- car-hobby.ru