Regardless of the design of the internal combustion engine, this important element of the car needs careful cooling to avoid overheating and, as a result, breakdown of moving structures. Modern internal combustion engines are equipped with coolant (coolant) circulating through a water pump. To prevent it from boiling, a special radiator is used, consisting of several thin tubes and lamellas.
During the movement, air hits the metal surface and passes between the lamellas, which helps cool the metal. As a result, the temperature of the liquid gradually decreases. In order to prevent a critical situation from occurring, it is important to quickly determine the location of the breakdown and find out why the cooling fan does not work.
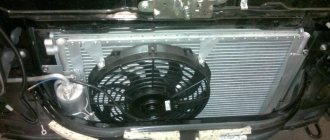
General understanding of the cooling fan
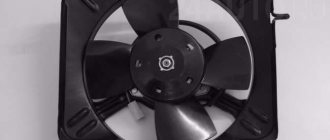
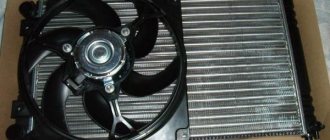
The design is presented in the form of an ordinary electric motor, which is powered by 12V from the on-board network. The shaft has a special impeller, through which an air flow is formed, directed to the surface of the radiator. The fan is attached to the front of the frame, and is covered with a radiator grille on the reverse side.
Using the VAZ as an example, it is worth noting that most often there is only one fan in the system, but there are exceptions among the domestic auto industry, as well as foreign cars. For example, NIVA is equipped with an impeller with two independent electric motors. This design helps to increase the cooling rate of the liquid, which is an additional guarantee of engine safety.
Checking the Coolant Switch or Coolant Sensor
If both fans run when you short them, the problem is somewhere between the current flow at the fuse and the fan motors. On older systems where the fan is driven by the coolant temperature relay, disconnect the relay connector. Make sure this is the connector you need, as some vehicles have up to three connectors: one for the instrument panel warning light, one for the windshield control panel, and one for the engine management computer.
With the engine running and the coolant relay disconnected, the fan should work because the engine management computer on most systems will register a fault code from the inoperative switch and turn on the fans. If the fan does not work, and the switch is normal, it remains open until the temperature rises, then it closes to turn on the fan. To double check, simply ground one wire terminal of the disconnected connector using a jumper wire. The fan should start spinning. Many older Japanese cars have electrical circuits with relays closed in the normal state. They open at high coolant temperatures to turn on the fan, so when simply disconnected (with the ignition on), the fans should always operate in this configuration.
Many newer models have coolant temperature sensors. It is not a switch (relay), but a temperature sensitive resistor (thermistor) that sends a signal to the engine computer. The computer, which also exercises some control over the operation of the air conditioning system, decides when to turn on the fan and at what speed. You may not get a response by simply disconnecting the sensor connector or grounding it. Instead, check its calibration by connecting an ohmmeter.
Connecting an ohmmeter is a reliable way to test the thermistor.
The thermistor creates lower resistance when the temperature rises and increases pressure when it falls. If the sensor reads a thousand ohms or more (indicating low temperature) when the engine coolant is warm, it is out of calibration. Replace it. It's even easier to use a scanning device that will give readings in degrees (C or F).
How the device is activated
The cooling fan can be activated in several ways. It all depends on the make and configuration of the vehicle. If the car has a carburetor engine, then the fluid temperature should reach the range of 105-107 degrees. Then the sensor is automatically turned on, sending a signal to the relay. This, in turn, supplies power to the electric motor and closes the circuit.
Machines equipped with an injector have a slightly different cooling system and fan operation. All processes are started by an electronic control unit. Initially, information from the sensor is processed by the controller and then transmitted to the relay.
Operating principle of radiator fan
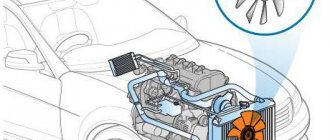
Before considering this issue, let us discuss in general what the water cooling system of an internal combustion engine is, shown in the figure below. It will allow us to remember the principle of its operation.
In cases where cold liquid passes through the motor jacket, it picks up excess heat, while the engine cools and the water heats up. Then it passes through the radiator, where it releases the resulting heat into the atmosphere, and again enters the engine.
The radiator design is a set of thin tubes that create a large cooling surface. The incoming air flow, passing through it, carries away excess heat that is stored in the liquid. In cases where there is no incoming air flow (engine idling, traffic jams and other similar situations), or it is not enough to cool the water to the desired temperature, the cooling radiator fan is provided for.
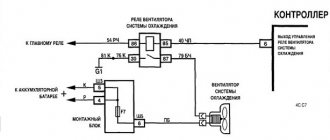
For this purpose, there is a special control circuit, the basis of which is the thermal switch of the radiator fan. It controls the temperature of the liquid. When it exceeds the established limits, the sensor is triggered and, based on its signal, the radiator fan is turned on, which creates the necessary air flow. This flow cools the heated water, and when its temperature reaches the required value, the sensor is triggered again and turns off the blowing.
This is how you can describe the basic principle by which the radiator fan works - it turns on when the water temperature exceeds the set temperature, and turns off after it drops to the desired value.
Causes of malfunction
When the fluid temperature rises to a critical level, this means that the cooling fan does not work. The main goal is to locate the fault as quickly as possible and eliminate it. There are a number of the most common reasons why the cooling fan does not turn on:
the electric fan motor has stopped working;
violation of the integrity of the wiring, which provides continuous power to the electric motor and connection to the power sensor;
the contact between the sensor and the electric motor is no longer reliable;
the fuse is blown;
the fan relay turned out to be faulty;
the sensor is broken;
The expansion tank valve fuse operates intermittently.
It is possible to determine the malfunction in each case independently. Let's look at each point in more detail.
If the fan motor is broken
If the cooling fan does not work, then first of all it is important to check the condition of the electric drive. To do this, you will need to take 2 wires, make a connection to the fan and organize power from the battery directly. If the startup was successful, it means that the element is working and you need to carry out further diagnostics.
It is also worth paying attention to the connectors and contacts in the electric motor. Sometimes a malfunction occurs due to the accumulation of dirt and dust, as well as oxidation of metal elements.
If nothing happens after connecting to the battery, then the problem is in the electric drive. Failure occurs for several reasons:
the brushes are worn out;
the collector collapsed;
The rotor winding is closed.
In the first option, it is enough to install new brushes. In the second and third cases, the situation cannot be corrected. Need a new fan.
Wiring check
An equally common reason why the cooling fan stops working. A wire break or short circuit may occur. To check, it is enough to use an ordinary tester and first activate the detector mode. Check the wiring that connects the controller to the fuse, relay and electric motor.
Checking the fan fuse and relay
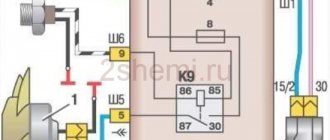
First you need to check the fan fuse. As a rule, it is located in the mounting block under the hood. Most often marked with the designation F7. Check it using a tester. If everything is in order, you need to find the power relay. To find the required relay, it is recommended to use the vehicle manual. There should be 3 relays under the hood.
In handicraft conditions, it is almost impossible to determine operability, so the easiest way is to plug the relay into an adjacent socket.
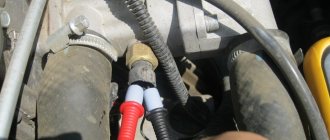
Power sensor test
Another popular reason why the fan does not work is a sensor malfunction. It is possible to accurately determine that the sensor is broken only in cars with injectors. If you turn off the power, the electronic system will perceive this as a malfunction and start the fan in emergency mode.
When the fan switch sensor fails, you should be careful. The check should be carried out as follows: warm up the car until the fluid temperature reaches 100 degrees. Next, turn off the engine, open the hood and disconnect the sensor by disconnecting the connector. Next, start the engine. If the fan starts working, then the problem is a sensor malfunction.
It is important to note that in cars with carburetor engines, it is impossible to check in this way. In this case, you can only replace a new sensor and warm up the engine to operating temperature.
The fan does not turn on - reasons
- Motor. Problems with the electric motor that drives the fan is one possible problem. Such a breakdown will completely immobilize the blades and the cooling of the motor will be disrupted. You can check the operation of the electric motor by connecting it directly to the battery power, bypassing the on-board network. If, after applying power directly, the fan is immobilized, the electric motor is most likely faulty and requires replacement.
- Sensor. If everything is humming with the electric motor, but the fan does not spin, you need to check the coolant temperature sensor (DTOZH). The reason may be that the sensor is faulty and does not report the coolant temperature to the ECU or provides incorrect information. You should check the DTOZH and replace it if necessary.
- No power, open circuit, fuse. If the cooling fan does not rotate, the problem may be a simple open circuit or poor contact. Check the wiring and contacts, this may be the problem. Also check the fuses that are related to this unit.
Changing the safety valve
Another equally common problem that can lead to fan interruptions. If the above checks have been previously performed and all elements are in order, then you need to check the safety valve of the expansion tank.
The main function of the valve is to maintain the operating pressure above atmospheric pressure. Thus, the water present in the liquid does not boil when the temperature reaches 100 degrees. If the valve stops working, the pressure becomes the same as atmospheric pressure, and the liquid will begin to boil when it reaches a certain temperature.
The sensor will only work at 105-107 degrees. The liquid will begin to boil and the fan will not work. It is impossible to check the operation of this element in artisanal conditions. But it’s realistic to buy a new part and make a replacement.
If you need to replace the sensor, it is important to buy the same model with identical characteristics. Otherwise, the cooling system will start working too sooner or later. You can do the replacement yourself using the following procedure:
disconnect the battery terminal;
empty the radiator of liquid;
disconnect the two wires that are connected to the sensor. Use a 30 mm wrench;
Apply sealant to the new sensor and install it in the appropriate place;
do not tighten the sensor too much;
Fill with coolant, start the engine and wait until the temperature rises.
If all steps are done correctly, the procedure does not take much time. On average, replacing a new sensor takes no more than 30 minutes. You can contact a specialized center, but a simple procedure can be expensive.
Checking the fan motor
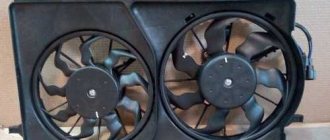
Is the fuse ok? The most practical approach is to go to the end of the chain, that is, directly to the fans. Most cars have two fans. Disconnect one of the fan wiring connectors and (referring to the electrical color code diagram) short the wires to the fan motor connector. Route one jumper cable from the terminal to supply current to the positive terminal of the battery. Connect the second connecting wire to the other terminal of the connector, and connect it to ground. The fan should work. If this does not happen, the fan motor is obviously faulty.
Try connecting the battery with a jumper wire directly to the fan to see if it will work.
Some cars have one fan that runs at two speeds. In such cases, the connector may have: • two terminals (one from the dual voltage supply - through a drop-off resistor circuit for low speed and a bypass resistor circuit for high speed - plus a second for ground). The circuit has a splice or connector for dual voltage supply. If you test by shorting the wires on the fan motor itself, it will start running at high speed; • three terminals (one for low speed current supply, the second for high speed current and ground). Test each of the power supply terminals separately, using a common ground line in each case; • four pins (high speed, low speed and two ground). Connect each pair individually using jumper wires.
Floor fan connection diagram
A simplified diagram of a wind blower looks like this.
Typical circuits for most inexpensive 3-speed floor fans are something like this:
Pressing each button is accompanied by the closure of its contact group.
In this case, the other contact group opens at this moment.
Sometimes these contacts burn out or do not reach their plate. Then you lose any of the speeds.
All this is checked simply with a Chinese multimeter, in circuit continuity mode.
If your very first wire breaks or there is no contact on it, the fan motor simply will not start. Therefore, if the fan is completely inoperative, check it first.
Unless, of course, before you make sure that the plug itself and the power cord from it are working properly. This is also caused by the tester.
Place one end of the probes on the pin of the plug, and touch the other end to the contact pad on the “0” button. If working properly, there should be zero resistance.
Then you can check the wires in the same way at all speeds. Contact probe for the plug - another probe for the outgoing wire from the corresponding speed button to the engine.
If there are zeros everywhere, then the switch and wires are working.
Next, check the second contact on the plug and the wiring that goes directly past the switch to the engine. Make sure your cord is intact here too.
Only after this can you proceed to checking the windings of the motor itself.
How to check the thermostat
The function of the thermostat in an internal combustion engine is to regulate the flow of coolant, directing it in either a small or large circle. While the engine is cold, its valve blocks the flow of coolant into the cooling radiator. This allows the engine to warm up faster.
When the coolant warms up, the thermostat valve opens, directing it to the radiator for cooling. If the valve jams, the coolant constantly moves in a small circle, not reaching either the fan switch sensor or the temperature sensor. In this case, the liquid may even boil, but the sensors, being uninvolved in such a circuit, will not work.
Check the thermostat by determining the temperature of its pipes by touch. When the engine is warm, they should all be hot. If the pipe leading from the thermostat to the cooling radiator is cold, the locking device is faulty.
How to check wiring
Finding a broken conductor in a car's electrical circuit yourself is not at all difficult. It is necessary to check (ring) all wires in the indicated areas with a tester.
For carburetor engines:
- from the switch on sensor to the fan;
- from the fan to the mounting block (fuse);
- from the mounting block to the relay.
For injection engines:
- from the main relay to the fan switch relay;
- from the switching relay to the fan and controller;
- from temperature sensor to controller;
- from the fan to the mounting block (fuse).
If a wiring break is detected, it must be restored, as well as the possible cause of the circuit break must be identified and eliminated.
Disassembling a laptop to access the cooling system
To be able to dismantle the cooling system, you need to disassemble the laptop. In most cases, approximately the same algorithm of actions works, however, the dismantling of some elements may differ in different models. So, in modern laptops, the keyboard is usually attached to a special panel with plastic latches. But on some devices it can be screwed onto both the top and back covers.
In most cases, the disassembly order is as follows:
- The laptop's power turns off, after which you need to disconnect the laptop from the adapter and remove the battery.
- Unscrew all the bolts on the back cover. At this stage you need to be careful not to miss any fasteners, as screws may be hidden in the battery compartment.
- Remove the optical drive, hard drive, and back cover.
- Disconnect the accessible cables and cables, after which you can remove the fan for cleaning.
When the cooler is very dirty, you also need to clean the entire cooling system, which will require removing the radiator. Please note that in this case, when assembling the laptop, you will need new thermal paste and, possibly, fresh thermal pads. Otherwise, when you turn on the laptop, even with a clean cooling system, you will notice that it does not stop overheating.
What can be made from a floor fan?
Modern “homemade” products can find a use for any broken device. When a floor fan for your home has served its purpose, do not rush to throw it away. By showing your imagination, you can make many useful things from its parts:
- The grille of the axial fan will make an original lampshade.
- By painting the blades in bright colors, you can get a bright accessory for a child's room.
- By placing several fan grilles on one base, covering the bottom with special material and planting flowers, you will get an excellent multi-tiered flower bed.
- From half the grille from a large fan you can make a coffee table for the terrace, installing it on a leg or base.
Fan troubleshooting and troubleshooting
To reduce costs and achieve low noise levels during operation, plain bearings are installed in fan motors. As a result, after a couple of years of operation, the lubricant is exhausted, and this is the most common cause of fan failures.
| Table of fan malfunctions and recommendations for their repair | |||
| External manifestation of the malfunction | Possible cause of malfunction | Troubleshooting | Repair method |
| The fan turns off after some time after normal operation and turns on again after a while | A self-resetting thermal fuse against overheating of the windings is triggered | Check the freedom of rotation of the impeller, disassemble the fan and inspect the stator windings for blackening | Lubricate the bearings, rewind the winding |
| The fan turns on, but the blades rotate slowly | The grease in the electric motor bearings has thickened or run out | If the bearings are insufficiently lubricated during operation, the fan produces increased acoustic noise and a burning smell may appear due to overheating of the motor windings | It is necessary to disassemble the fan and lubricate the sliding bearings with machine oil. |
| Mechanical wear of electric motor bearings due to lack of lubrication. In this case, vibration of the impeller relative to the center of rotation is often observed | Rock the impeller to the sides relative to the center. If the play is more than 0.5 mm, then the bearing is worn out | Replace the bearing with a new one | |
| The fan does not start, the blades do not rotate | The cord is not plugged into the outlet | Check | Insert the cord plug into the socket |
| No voltage at the socket | Check the presence of voltage in the outlet using a working electrical appliance | Connect the fan to a working outlet | |
| The power cord is faulty | Visually check the plug and cord for mechanical damage, check the integrity of the cord wires with a multimeter | If faulty, replace the power plug or cord | |
| The switch or speed switch is faulty. The battery in the remote control is low | It is necessary to open the Fan and test the switch with a multimeter. When in the on position, the resistance between the switch contacts should be zero | If the switch is faulty, replace it. If you don’t have it at hand, you can short-circuit the contacts of the switch and turn off the fan by removing the plug from the socket | |
| The fan hums and gets hot when turned on. | The rotor shaft is jammed due to depletion or thickening of the lubricant | Disassemble the fan, wash with solvent and lubricate the bearings | |
| The fan hums and gets hot when turned on. | Break in the starting winding or capacitor. | Turn the impeller by hand, if it rotates, then replace the capacitor or try to find the break point of the starting winding | |
| Broken rotor windings | Visually check the windings for mechanical damage and local darkening, check the integrity of the windings with a multimeter | If a break in the winding cannot be found by external inspection, then it will have to be rewinded, which is not economically feasible. | |
| The thermal fuse against overheating of the electric motor has tripped due to its malfunction | Check the integrity of the thermal fuse with a multimeter. Its resistance should be zero. To check in the absence of the device, you can temporarily short-circuit its terminals | If a broken thermal fuse is detected, replace it with a serviceable one. If the new thermal fuse blows again when the fan is running for a short time, then the electric motor is faulty |
For reliable operation of the fan, it is recommended to disassemble it and lubricate the bearings with machine oil before each season of operation. But no one does this, including me. Usually, lubrication is done when the blades stop rotating or the fan begins to make a lot of noise.
Electrical circuit of the fan
The electrical circuit of the fan consists of two parts - an electric motor with a starting capacitor and a unit for switching on and adjusting the speed of rotation of the blades.
The electric motor is a metal casing (stator) in which windings made of copper wire are fixed and connected according to the diagram shown above. A rotor is also fixed in the housing in sliding bearings, which, in response to the appearance of an electromagnetic field as it passes through the stator windings, rotates.
By applying supply voltage to the windings L1, L2 or L3 using interconnected switches S1, S2 and S3, you can regulate the air flow speed. The motor winding L4 and the capacitor C1 attached to the motor housing are used to start the motor.
If winding L4 or capacitor C1 is broken, the engine will not start when turned on in automatic mode. But if you turn the impeller clockwise by hand, the blades will begin to rotate. In this way, you can determine the malfunction of this chain.
In some fan models, to protect the windings from overheating in the event of a malfunction, a thermal fuse (indicated St° in the diagram) is installed at an operating temperature of about 125°C.
When heated above the design temperature, the thermal fuse breaks the circuit and the supply voltage is not supplied to the motor windings. This prevents them from burning out if the rotor jams when the lubricant is produced. The thermal fuse is usually installed at the end of the stator windings.
There are two types of thermal fuses - disposable and self-resetting. The latter, when heated above the temperature indicated on their body, break the circuit, and when they cool down, they close again. This avoids the need to replace them in the event of a jammed rotor.
Cooler blades do not rotate well
If the fan does not pull and does not move air well, you will need to disassemble the housing in which the motor is located. Sometimes the fact that the propeller does not spin may indicate insufficient lubrication in the plain bearing installed in the electric motor.
The fan is disassembled as follows.
- First you need to unscrew the protective mesh (its front part) and remove it.
- After the grid, disconnect the propeller. It can be screwed to the motor shaft with a nut with a left-hand thread. That is, to unscrew the nut, rotate it clockwise, and to tighten it, counterclockwise.
- Remove the rear protective mesh by unscrewing another nut.
- Unscrew all fasteners holding the unit casing. Sometimes there is another bolt in the handle to adjust the rotation of the body. If you do not unscrew it, you will not be able to remove the motor casing.
- Now, when the engine is open, you should drop a few drops of machine oil (it is better to use spindle oil) onto the bushing (indicated by the red arrow) and rotate the shaft several times in different directions so that the lubricant is absorbed inside.
- After this procedure, slight rotation of the shaft is resumed. Reassemble the motor housing in reverse order.
- Turn on the unit and check the air flow.
The cooler makes a humming noise and does not spin
Cases when the fan does not spin and the motor hums are quite common. There may be several reasons causing this failure:
- lack of lubrication on the bearings (what to do was discussed above);
- capacitor failure;
- electric motor malfunction.
Capacitor failure
Repairing a floor fan in this case comes down to checking the capacitance of the capacitor using a tester. To get to the radio component, you will need to disassemble the motor housing. A detailed description of how to disassemble the case was given above. After removing the casing, you will see the capacitor attached to the motor.
The presented device has a capacitor capacity of 0.85 microfarads. For this reason, the device must be set to a value ranging from 2 microfarads to 200 nanofarads, as shown in the figure below.
In this case, after connecting the capacitor to the device, it is clear that its capacity is 0.841 microfarads. If we take into account the error of ± 5%, then the capacity of the radio component is within normal limits, and it is not the reason why the cooler stopped working.
Engine malfunction
When repairing a fan with your own hands, you also need to “ring” the electric motor in search of a breakdown. If it is faulty, the device will not turn on and will make a humming noise. It is necessary to measure the resistance on the two stator windings, having first disconnected the wires going to them, as shown in the following figure.
As you can see, the resistance is also within normal limits, since its value is 1215 Ohms (1.2 kOhms). Otherwise, the device will buzz but will not turn on. In such a situation, the motor will need to be rewinded in a special workshop.